2011 TOYOTA VERSO S tires
[x] Cancel search: tiresPage 447 of 664
447
5
5-6. Driving tips
Driving
Vehicles with 225/60R18 tires
Use the correct tire chain size when
mounting the tire chains. Chain size
is regulated for each tire size.
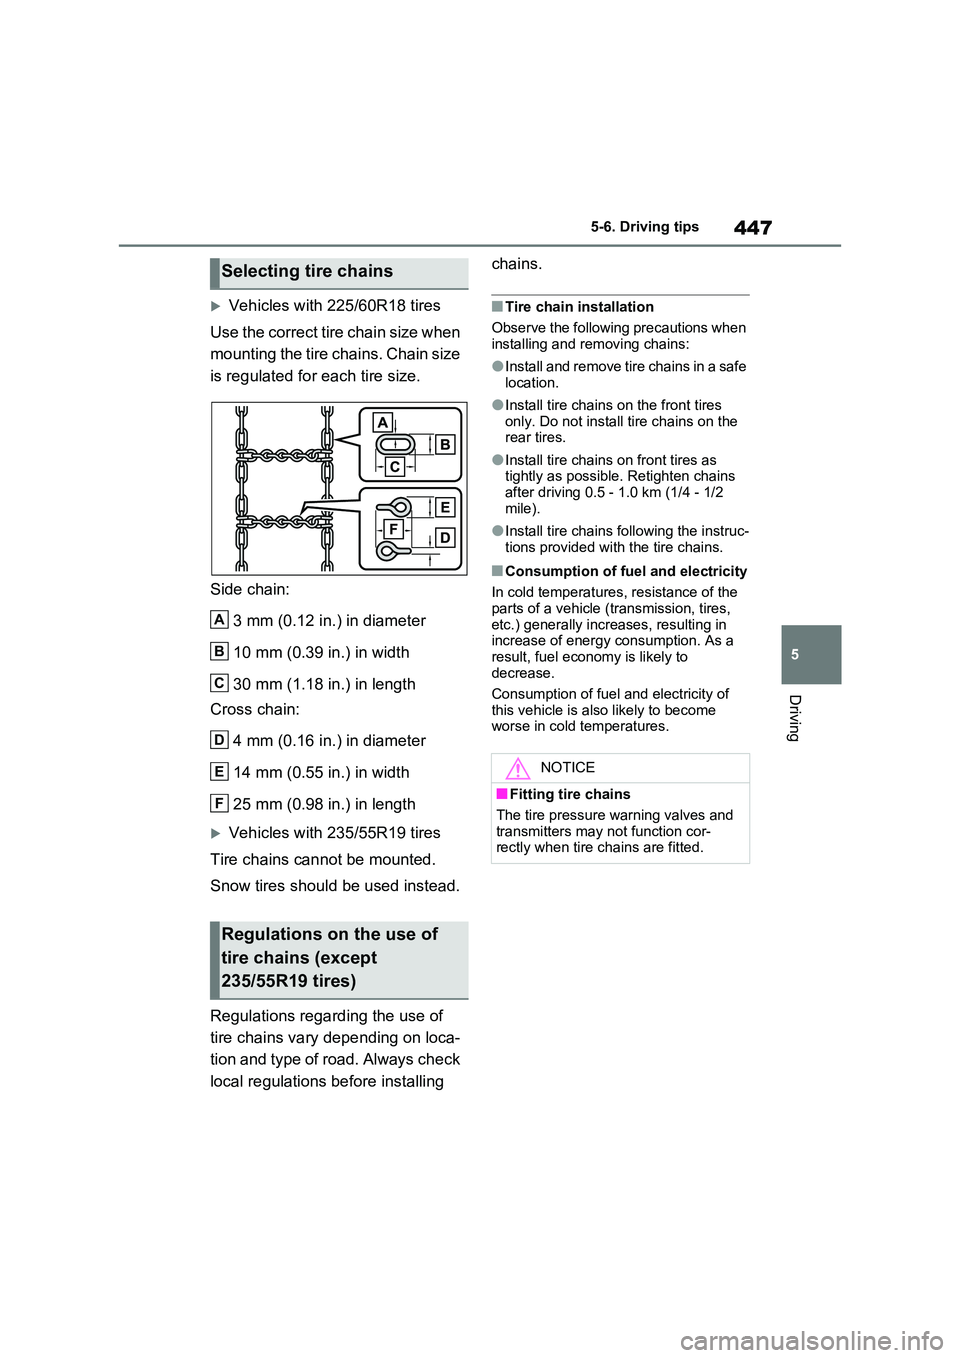
Side chain:
3 mm (0.12 in.) in diameter
10 mm (0.39 in.) in width
30 mm (1.18 in.) in length
Cross chain:
4 mm (0.16 in.) in diameter
14 mm (0.55 in.) in width
25 mm (0.98 in.) in length
Vehicles with 235/55R19 tires
Tire chains cannot be mounted.
Snow tires should be used instead.
Regulations regarding the use of
tire chains vary depending on loca-
tion and type of road. Always check
local regulations before installing
chains.
■Tire chain installation
Observe the following precautions when installing and removing chains:
●Install and remove tire chains in a safe location.
●Install tire chains on the front tires only. Do not install tire chains on the rear tires.
●Install tire chains on front tires as tightly as possible. Retighten chains
after driving 0.5 - 1.0 km (1/4 - 1/2 mile).
●Install tire chains following the instruc-tions provided with the tire chains.
■Consumption of fuel and electricity
In cold temperatures, resistance of the
parts of a vehicle (transmission, tires, etc.) generally increases, resulting in increase of energy consumption. As a
result, fuel economy is likely to decrease.
Consumption of fuel and electricity of
this vehicle is also likely to become worse in cold temperatures.
Selecting tire chains
Regulations on the use of
tire chains (except
235/55R19 tires)
A
B
C
D
E
F
NOTICE
■Fitting tire chains
The tire pressure warning valves and transmitters may not function cor-rectly when tire chains are fitted.
Page 487 of 664
7
487
7
Maintenance and care
Maintenance and care
7-1. Maintenance and care
Cleaning and protecting the
vehicle exterior ............... 488
Cleaning and protecting the
vehicle interior ................ 491
7-2. Maintenance
Maintenance requirements 494
7-3. Do-it-yourself maintenance
Do-it-yourself service precau-
tions ................................ 496
Hood ................................. 498
Positioning a floor jack...... 499
Engine compartment ........ 501
12-volt battery ................... 506
Tires.................................. 509
Tire inflation pressure ....... 529
Wheels.............................. 530
Air conditioning filter ......... 532
Cleaning the DC/DC Con-
verter air intake vent and filter
....................................... 536
Wiper insert replacement .. 539
Electronic key battery ....... 543
Checking and replacing fuses
....................................... 545
Light bulbs ........................ 548
Page 495 of 664
495
7 7-2. Maintenance
Maintenance and care
request that a record of maintenance
be kept.
■Does your vehicle need repairs?
Be on the alert for changes in perfor-
mance and sounds, and visual tip-offs
that indicate service is needed. Some
important clues are:
●Engine missing, stumbling or pinging
●Appreciable loss of power
●Strange engine noises
●A fluid leak under the vehicle (How-
ever, water dripping from the air con-
ditioning system after use is normal.)
●Change in exhaust sound (This may
indicate a dangerous carbon monox-
ide leak. Drive with the windows open
and have the exhaust system checked
immediately.)
●Flat-looking tires, excessive tire
squeal when cornering, uneven tire
wear
●Vehicle pulls to one side when driven
straight on a level road
●Strange noises related to suspension
movement
●Loss of brake effectiveness, spongy
feeling brake pedal, pedal almost
touches the floor, vehicle pulls to one
side when braking
●Engine coolant temperature continu-
ally higher than normal (P.174)
If you notice any of these clues, take
your vehicle to any authorized Toyota
retailer or Toyota authorized repairer, or
any reliable repairer as soon as possi-
ble.
Your vehicle may need adjustment or
repair.
Page 509 of 664
509
7 7-3. Do-it-yourself maintenance
Maintenance and care
repairer.
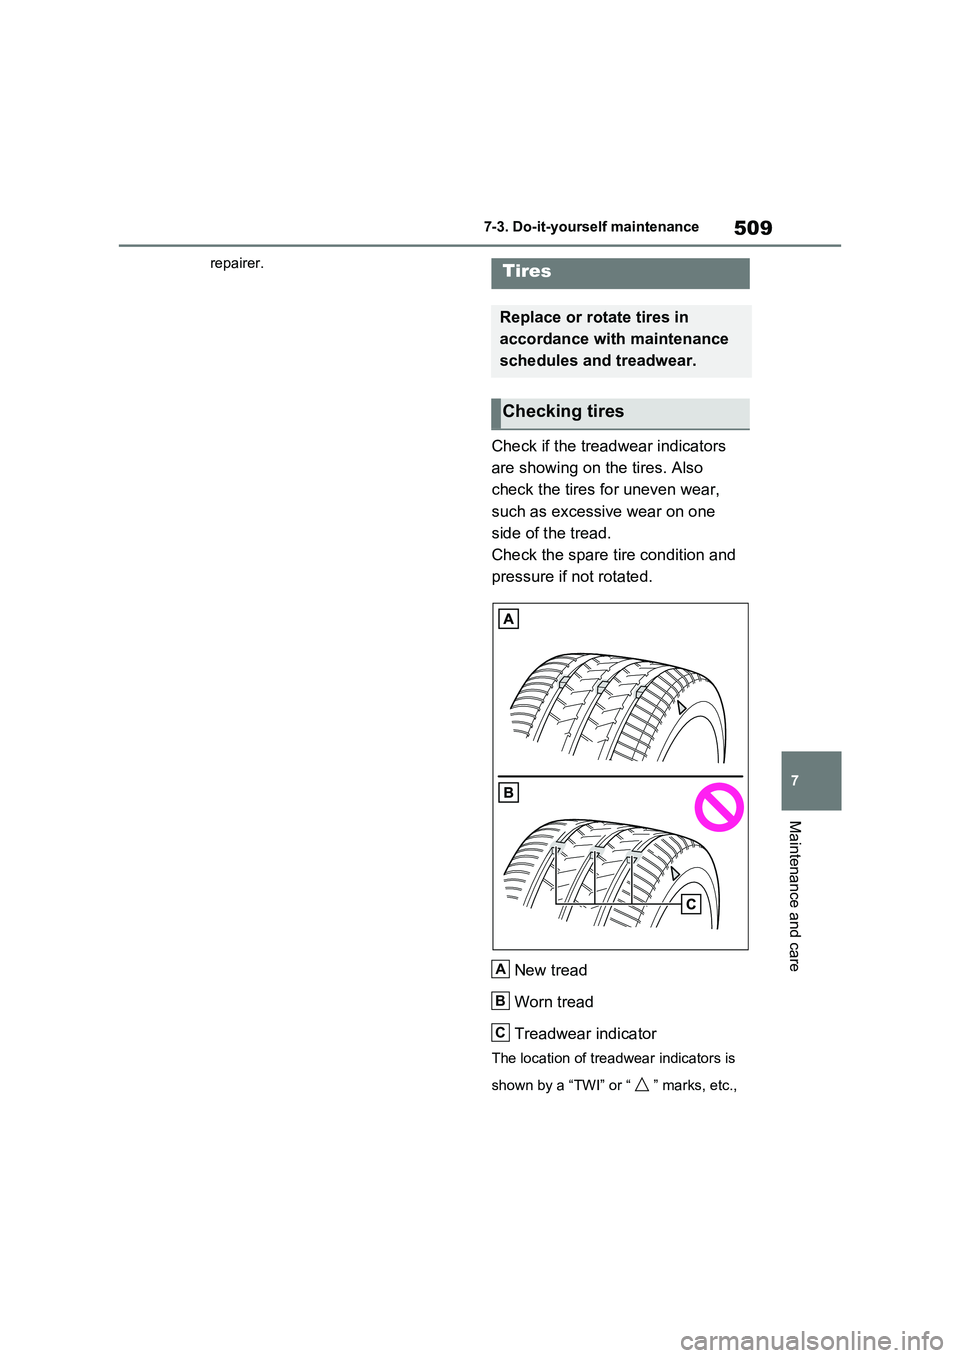
Check if the treadwear indicators
are showing on the tires. Also
check the tires for uneven wear,
such as excessive wear on one
side of the tread.
Check the spare tire condition and
pressure if not rotated.
New tread
Worn tread
Treadwear indicator
The location of treadwear indicators is
shown by a “TWI” or “ ” marks, etc.,
Tires
Replace or rotate tires in
accordance with maintenance
schedules and treadwear.
Checking tires
A
B
C
Page 510 of 664
5107-3. Do-it-yourself maintenance
molded into the sidewall of each tire.
Replace the tires if the treadwear indi-
cators are showing on a tire.
■When to replace your vehicle’s tires
Tires should be replaced if:
●The treadwear indicators are showing on a tire.
●You have tire damage such as cuts, splits, cracks deep enough to expose
the fabric, and bulges indicating inter- nal damage.
●A tire goes flat repeatedly or cannot be properly repaired due to the size or location of a cut or other damage.
If you are not sure, consult with any authorized Toyota retailer or Toyota authorized repairer, or any reliable
repairer.
■Tire life
Any tire over 6 years old must be checked by a qualified technician even if
it has seldom or never been used or damage is not obvious.
■If the tread on snow tires wears down below 4 mm (0.16 in.)
The effectiveness of the tires as snow tires is lost.
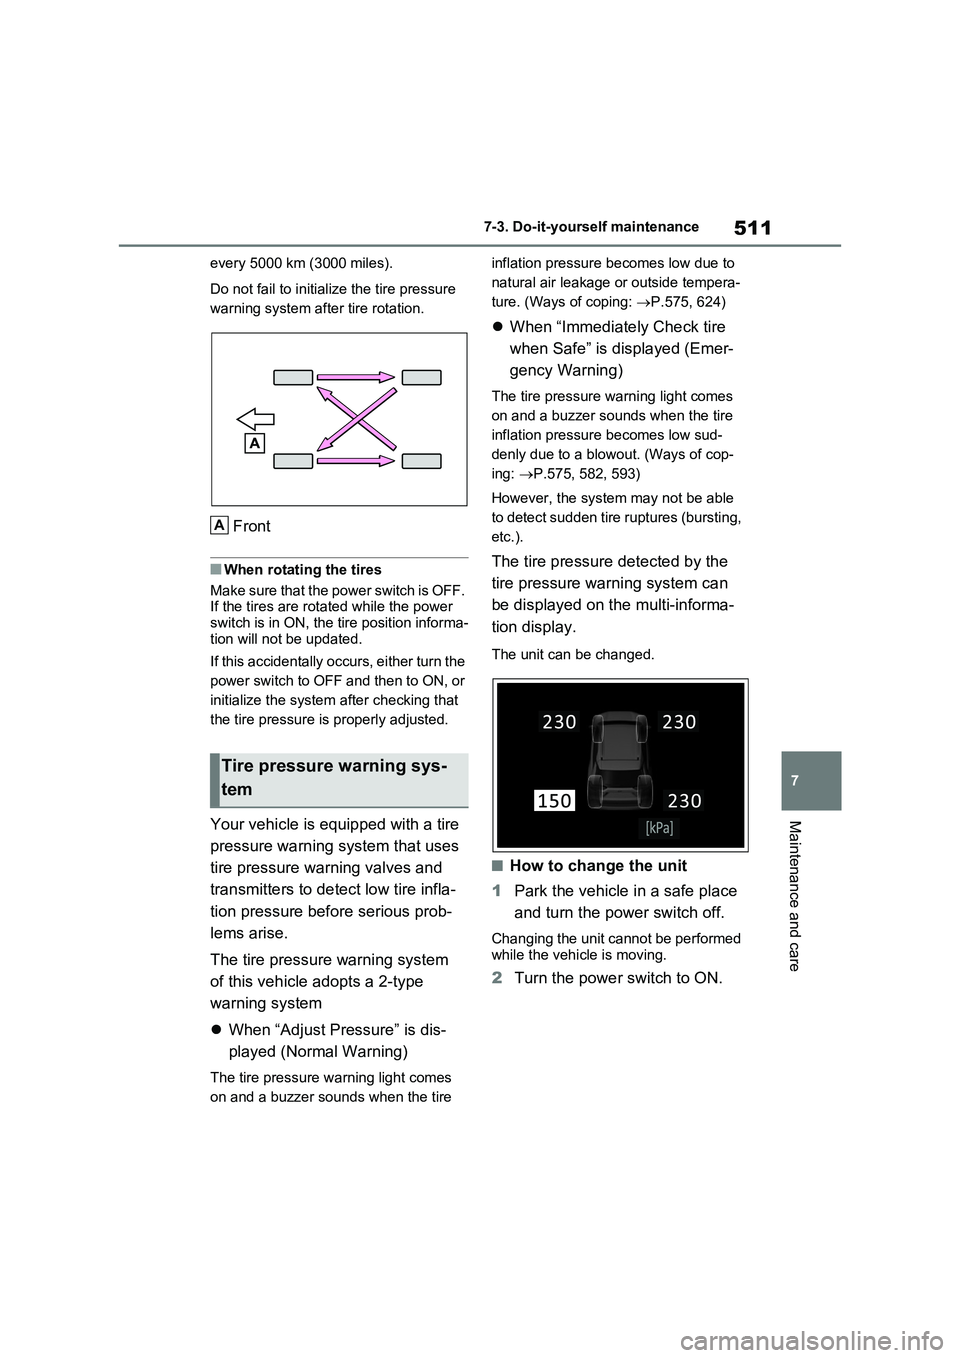
Rotate the tires in the order shown.
To equalize tire wear and help extend
tire life, Toyota recommends that tire
rotation is carried out approximately
WARNING
■When inspecting or replacing tires
Observe the following precautions to
prevent accidents. Failure to do so may cause damage to parts of the drive train as well as
dangerous handling characteristics, which may lead to an accident result-ing in death or serious injury.
●Do not mix tires of different makes, models or tread patterns.Also, do not mix tires of remarkably
different treadwear.
●Do not use tire sizes other than those recommended by Toyota.
●Do not mix differently constructed tires (radial, bias-belted or bias-ply tires).
●Do not mix summer, all season and snow tires.
●Do not use tires that have been used on another vehicle.
Do not use tires if you do not know how they were used previously.
●Vehicles with compact spare tire: Do not tow if your vehicle has a compact spare tire installed.
●Vehicles with emergency tire punc-ture repair kit: Do not tow anything
if a tire that has been repaired using the emergency tire puncture repair kit is installed. The load on the tire
may cause unexpected damage to the tire.
NOTICE
■Driving on rough roads
Take particular care when driving on roads with loose surfaces or potholes.These conditions may cause losses in
tire inflation pressure, reducing the cushioning ability of the tires. In addi-tion, driving on rough roads may
cause damage to the tires them- selves, as well as the vehicle’s wheels and body.
■If tire inflation pressure of each tire becomes low while driving
Do not continue driving, or your tires and/or wheels may be ruined.
Tire rotation
Page 511 of 664
511
7 7-3. Do-it-yourself maintenance
Maintenance and care
every 5000 km (3000 miles).
Do not fail to initialize the tire pressure
warning system after tire rotation.
Front
■When rotating the tires
Make sure that the power switch is OFF.
If the tires are rotated while the power
switch is in ON, the tire position informa-
tion will not be updated.
If this accidentally occurs, either turn the
power switch to OFF and then to ON, or
initialize the system after checking that
the tire pressure is properly adjusted.
Your vehicle is equipped with a tire
pressure warning system that uses
tire pressure warning valves and
transmitters to detect low tire infla-
tion pressure before serious prob-
lems arise.
The tire pressure warning system
of this vehicle adopts a 2-type
warning system
When “Adjust Pressure” is dis-
played (Normal Warning)
The tire pressure warning light comes
on and a buzzer sounds when the tire inflation pressure becomes low due to
natural air leakage or outside tempera-
ture. (Ways of coping: P.575, 624)
When “Immediately Check tire
when Safe” is displayed (Emer-
gency Warning)
The tire pressure warning light comes
on and a buzzer sounds when the tire
inflation pressure becomes low sud-
denly due to a blowout. (Ways of cop-
ing: P.575, 582, 593)
However, the system may not be able
to detect sudden tire ruptures (bursting,
etc.).
The tire pressure detected by the
tire pressure warning system can
be displayed on the multi-informa-
tion display.
The unit can be changed.
■How to change the unit
1Park the vehicle in a safe place
and turn the power switch off.
Changing the unit cannot be performed
while the vehicle is moving.
2Turn the power switch to ON.
Tire pressure warning sys-
tem
A
Page 522 of 664
5227-3. Do-it-yourself maintenance
For vehicles sold in Ukraine
For vehicles sold in Serbia
When replacing tires or wheels, tire
pressure warning valves and trans-
mitters must also be installed.When new tire pressure warning
valves and transmitters are
installed, new ID codes must be
registered in the tire pressure warn-
ing computer and the tire pressure
warning system must be initialized.
Installing tire pressure warn-
ing valves and transmitters
Page 523 of 664
523
7
7-3. Do-it-yourself maintenance
Maintenance and care
( P.525)
■When replacing the tires and
wheels
If the ID code of the tire pressure warn- ing valve and transmitter is not regis-
tered, the tire pressure warning system will not work properly. After driving for about 10 minutes, the tire pressure
warning light blinks for 1 minute and stays on to indicate a system malfunc-tion.
■The tire pressure warning sys-
tem must be initialized in the
following circumstances:
When rotating the tires.
When changing the tire.
After registering the ID codes.
( P.525)
When changing between two
registered wheel sets.
When the tire pressure warning
system is initialized, the current tire
inflation pressure is set as the
benchmark pressure.
■How to initialize the tire pres-
sure warning system
1 Park the vehicle in a safe place
and stop the hybrid system for
20 minutes or more.
Initialization cannot be performed while the vehicle is moving.
NOTICE
■Repairing or replacing tires, wheels, tire pressure warning valves, transmitters and tire
valve caps
●When removing or fitting the wheels, tires or the tire pressure
warning valves and transmitters, contact any authorized Toyota retailer or Toyota authorized
repairer, or any reliable repairer as the tire pressure warning valves and transmitters may be damaged
if not handled correctly.
●Make sure to install the tire valve
caps. If the tire valve caps are not installed, water could enter the tire pressure warning valves and the
tire pressure warning valves could be bound.
●When replacing tire valve caps, do not use tire valve caps other than those specified.
The cap may become stuck.
■To avoid damage to the tire pres- sure warning valves and trans-mitters (vehicles without spare
tire)
When a tire is repaired with liquid sealants, the tire pressure warning
valve and transmitter may not operate properly. If a liquid sealant is used, contact any authorized Toyota retailer
or Toyota authorized repairer, or any reliable repairer or other qualified ser-vice shop as soon as possible. Make
sure to replace the tire pressure warn- ing valve and transmitter when repair-ing or replacing the tire. ( P.511,
531)
Initializing the tire pressure
warning system