Page 22 of 360

22
The items shown on the “Setup” screen can be set. To display the “Setup” screen, push
the “SETUP” button.
1“General”
Settings are available for language selec-
tion, operation sounds, automatic screen
change, etc. 268 . . . . . . . . . . . . . . . . . . . .
2“Clock”
Used for changing settings for time zones,
daylight saving time, etc. 273 . . . . . . . . .
3“Voice”
Voice guidance can be set. 275 . . . . . . .
4“Navi.”
Settings are available for average cruising
speed, displayed screen contents, POI
icon categories, etc. 278 . . . . . . . . . . . . .
5“Vehicle”
Settings are available for vehicle informa-
tion such as maintenance information. 333
. . . . . . . . . . . . . . . . . . . . . . . . . . . . . . . .
6“Audio”
Settings are available for portable audio
devices, Bluetooth � audio devices etc.
326
. . . . . . . . . . . . . . . . . . . . . . . . . . . . . . . .
7“Phone”
Bluetooth � phones and phone numbers
can be registered, and the receiver volume
can be adjusted. 287 . . . . . . . . . . . . . . . .
Quick reference (“Setup” screen)
Page 27 of 360
 on the
screen.
When")
NAVIGATION SYSTEM: BASIC FUNCTIONS
27
�
Maintenance information
This system informs about when to replace
certain parts or components and shows
dealer information (if registered) on the
screen.
When the vehicle reaches a previously set
driving distance or date specified for a
scheduled maintenance check, the “Infor-
mation” screen will be displayed when the
navigation system is in operation.
To disable this screen, touch “Do Not
Display This Message Again”. This
screen goes off if the screen is not op-
erated for several seconds.
To prevent this information screen from be-
ing displayed again, touch “Do Not
Display This Message Again” .
To register “Maintenance information”, see
“— Maintenance” on page 333. This system is operated mainly by the
touch screen buttons on the screen.
To prevent damage to the screen, light-
ly touch buttons on the screen with the
finger. When a button on the screen is
touched, a beep sounds. (To set a beep
sound, see page 268.)
Do not use objects other than the finger
to touch the screen.
INFORMATION
�
If the system does not respond to
a touch on a touch screen button,
move the finger away from the
screen and then touch it again.
� Dimmed touch screen buttons
cannot be operated.
� Wipe off fingerprints using a glass
cleaning cloth. Do not use chemi-
cal cleaners to clean the touch
screen.
� The displayed image may become
darker and moving images may be
slightly distorted when the display
is cold.
� Under extremely cold conditions,
the map may not be displayed and
the data input by a user may be de-
leted. Also, the touch screen but-
tons may be harder than usual to
depress.
� When you look at the screen
through polarized material such as
polarized sunglasses, the screen
may be dark and hard to see. If so,
look at the screen from different
angles, adjust the screen settings
on the “Display” screen, or take off
your sunglasses.
Touch screen operation
Page 32 of 360

NAVIGATION SYSTEM: BASIC FUNCTIONS
32
Color and tone adjustment
1. Touch the desired button to adjust
color and tone.
You can adjust the color and the tone while
the DVD video, DVD audio and video CD
are being played.
“Color” “R”: Strengthens the red color of
the screen.
“Color” “G”: Strengthens the green color
of the screen.
“Tone” “
+”: Strengthens the tone of the
screen.
“Tone” “
–”: Weakens the tone of the
screen.
2. After adjusting the screen touch
“OK”.
If your vehicle is equipped with the rear
seat entertainment system, the rear
screen turns on or off when “Rear” is
touched.
The screen goes off when “Screen Off” is
touched. To turn the display screen back
on, push the “DISP” button again, or push
the “DEST” or another screen mode but-
ton.
INFORMATION
When you do not touch any button on
the “Display” screen for 20 seconds,
the previous screen will be displayed.
�Changing between day mode and
night mode
Depending on the position of the headlight
switch, the screen changes to day mode or
night mode.
To display the screen in day mode even
with the headlight switch on, touch
“Day Mode” on the adjustment screen
for brightness and contrast control.
If the screen is set in day mode with the
headlight switch turned on, this condition is
memorized in the system even with the en-
gine turned off.
In the following conditions, the displays
condition is not changed to night mode
even if headlight switch is turned on.
�The instrument panel light control
switch is turned fully to the right.
�The vehicle is in a bright area such as
daytime.
Page 95 of 360
NAVIGATION SYSTEM: ROUTE GUIDANCE
95
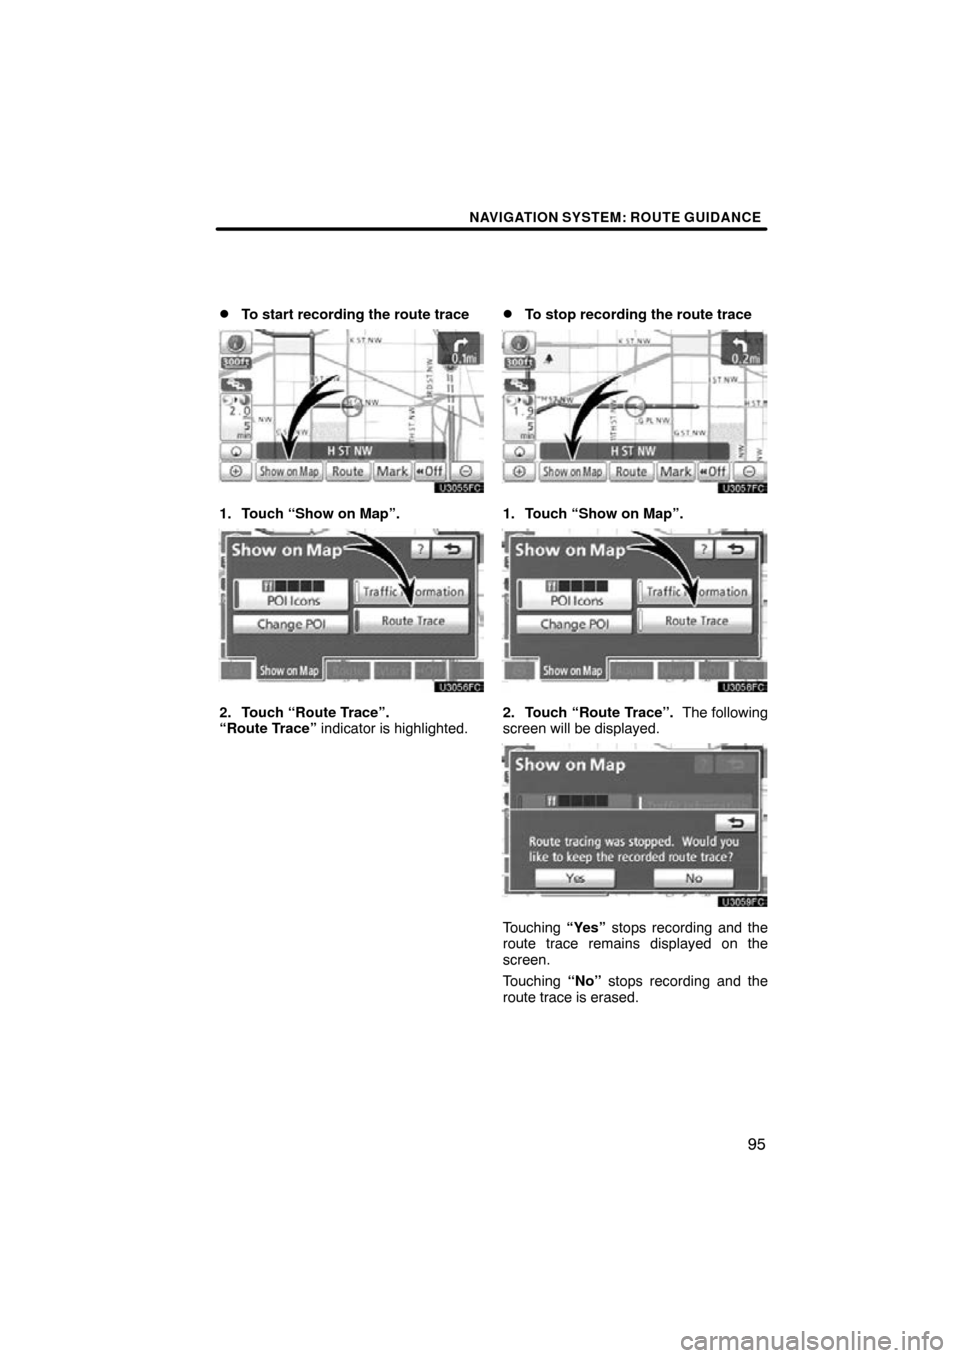
�
To start recording the route trace
1. Touch “Show on Map”.
2. Touch “Route Trace”.
“Route Trace” indicator is highlighted.
�To stop recording the route trace
1. Touch “Show on Map”.
2. Touch “Route Trace”. The following
screen will be displayed.
Touching
“Yes” stops recording and the
route trace remains displayed on the
screen.
Touching “No” stops recording and the
route trace is erased.
Page 97 of 360
NAVIGATION SYSTEM: ROUTE GUIDANCE
97
�
Show XM
� NavTraffic information
1. Touch “Show on Map”.
2. Touch “Traffic Information”.
“Traffic Information” indicator is high-
lighted. XM
� NavTraffic information is displayed
on the map.
� On Map screen
�On Freeway information screen
Page 147 of 360
AUDIO/VIDEO SYSTEM
147
The touch�screen buttons for radio,
DVD changer, Bluetooth� audio player,
AUX and USB memory/iPod operation
are displayed on the screen when the
audio control mode is selected. Touch
them lightly and directly on the screen.
Touch the tab to select the desired mode
when the audio control mode is selected.
The selected switch is highlighted.
INFORMATION
�If the system does not respond to a
touch of a touch�screen button,
move your finger away from the
screen and then touch it again.
�You cannot operate dimmed
touch�screen buttons.
�Wipe off fingerprints using a glass
cleaning cloth. Do not use chemi-
cal cleaners to clean the touch
screen.
Page 153 of 360
 Selecting a station
Tune in the desired station using one of the
following methods.
Preset tuning: Touch the touch−screen
button (1 — 6) or push the “
” or “”")
AUDIO/VIDEO SYSTEM
153
(c) Selecting a station
Tune in the desired station using one of the
following methods.
Preset tuning: Touch the touch−screen
button (1 — 6) or push the “
” or “”
button of “CH·DISC” for the station you
want. The touch−screen button is high-
lighted and the station frequency appears
on the screen.
Seek tuning: Push the “
” or “” but-
ton of “SEEK·TRACK” . The radio will be-
gin seeking up or down for a station of the
nearest frequency and will stop on recep-
tion. Each time you push the button, the
stations will be searched automatically
one after another.
To scan all the frequencies: Touch
“SCAN” briefly. “SCAN” appears on the
screen. The radio will find the next station
and stay there for a few seconds, and then
scan again. To select a station, touch
“SCAN” again.
To scan the preset stations: Touch
“SCAN” for longer than a second. “P.
SCAN” appears on the screen. The radio
will tune in the next preset station, stay
there for a few seconds, and then move to
the next preset station. To select a station,
touch “SCAN” again. (d) Radio Data System (if equipped)
Your audio system is equipped with Radio
Data Systems (RDS). RDS mode pro-
vides you to receive text messages from
radio stations that utilize RDS transmit-
ters.
When RDS is on, the radio can
— only select stations of a particular pro-
gram type,
— display messages from radio stations,
— search for a stronger signal station.
RDS features are available for use only on
FM stations which broadcast RDS infor-
mation.
Page 158 of 360
 Presetting a channel
1. Tune in the desired channel.
2. Touch one of the channel selector
buttons (1 — 6) and hold it until a beep
is heard.
This sets the channels to the")
AUDIO/VIDEO SYSTEM
158
(e) Presetting a channel
1. Tune in the desired channel.
2. Touch one of the channel selector
buttons (1 — 6) and hold it until a beep
is heard.
This sets the channels to the touch −
screen button and the name and number
of the channel appears on the touch −
screen button.
Each touch− screen button can store three
SAT channels. To change the preset chan-
nel to a different one, follow the same pro-
cedure.
The preset channel memory is cancelled
when the power source is interrupted by
battery disconnection or a blown fuse. (f) Selecting a channel
Tune in the desired channel using one of
the following methods.
Preset tuning:
Touch the channel selec-
tor button (1 — 6) or push the “
” or “”
button of “CH·DISC” for the channel you
want. The button (1 — 6) is hig hlighted and
channel number appears on the display.
To select channel within the current
category: Push the “
” or “” button of
“SEEK·TRACK” . The radio will step up or
down the channel within the current chan-
nel category. Touch “TypeSeek”. The ra-
dio will step up the channel within the cur-
rent channel category.
To scan the currently selected channel
category: Touch “SCAN” briefly. “SCAN”
appears on the display. The radio will find
the next channel in the same channel cate-
gory, stay there for a few seconds, and
then scan again. To select a channel,
touch “SCAN” a second time.
To scan the preset channels: Touch
“SCAN” and hold it until you hear a beep.
“P.SCAN” appears on the display. The ra-
dio will find the next preset channel, stay
there for a few seconds, and then move to
the next preset channel. To select a chan-
nel, touch “SCAN” a second time.