Page 345 of 422

11-14Maintenance and service
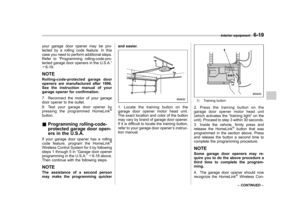
6. To install the air cleaner case cover,
insert the three projections on the air
cleaner case cover into the slits on the
air cleaner case.
7. Install in the reverse order of removal. Spark plugs
It may be difficult to replace the spark
plugs. It is recommended that you have
the spark plugs replaced by your
SUBARU dealer.
The spark plugs should be replaced
according to the maintenance schedule
in the
“Warranty and Maintenance Book-
let ”.
& Recommended spark plugs
Refer to “Electrical system ”F 12-7. Drive belts
The alternator, power steering pump, and
air conditioner compressor depend on
drive belts. Satisfactory performance re-
quires that belt tension be correct.
It is unnecessary to check belt tension
periodically because your engine is
equipped with an automatic belt tension
adjuster. However, replacement of the belt
should be done according to the main-
tenance schedule in the
“Warranty and
Maintenance Booklet ”. Consult your
SUBARU dealer for replacement.
If a belt is loose, cracked, or worn, contact
your SUBARU dealer.
Page 346 of 422

Automatic transmission fluid &Checking the fluid level
The automatic transmission fluid expands
largely as its temperature rises; the fluid
level differs according to fluid temperature.
Therefore, there are two different scales
for checking the level of hot fluid and cold
fluid on the level gauge.
Though the fluid level can be checked
without warming up the fluid on the“ COLD ”range, we recommend checking
the fluid level when the fluid is at operatingtemperature. ! Checking the fluid level when the
fluid is hot
Check the fluid level monthly.
1. Drive the vehicle several miles to raise
the temperature of the transmission fluid
up to normal operating temperature; 158
to 176 8F (70 to 80 8C) is normal.
2. Park the vehicle on a level surface and
set the parking brake.
3. First shift the select lever in each
position. Then shift it in the “P ” position,
and run the engine at idling speed.
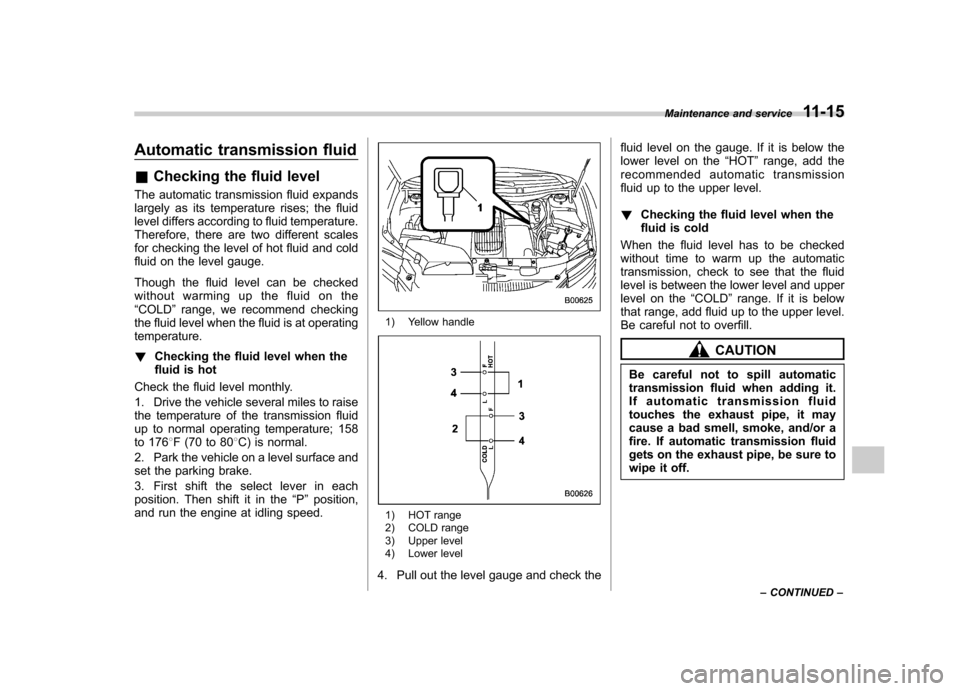
1) Yellow handle
1) HOT range
2) COLD range
3) Upper level
4) Lower level
4. Pull out the level gauge and check the fluid level on the gauge. If it is below the
lower level on the
“HOT ”range, add the
recommended automatic transmission
fluid up to the upper level. ! Checking the fluid level when the
fluid is cold
When the fluid level has to be checked
without time to warm up the automatic
transmission, check to see that the fluid
level is between the lower level and upper
level on the “COLD ”range. If it is below
that range, add fluid up to the upper level.
Be careful not to overfill.
CAUTION
Be careful not to spill automatic
transmission fluid when adding it.
If automatic transmission fluid
touches the exhaust pipe, it may
cause a bad smell, smoke, and/or a
fire. If automatic transmission fluid
gets on the exhaust pipe, be sure to
wipe it off. Maintenance and service
11-15
– CONTINUED –
Page 347 of 422
11-16Maintenance and service
&Recommended fluid
Refer to “Fluids ”F 12-7.
NOTE
Using any non-specified type of auto-
matic transmission fluid could result in
damage inside the transmission. When
replacing the automatic transmission
fluid, be sure to use the specified type. Front differential gear oil &
Checking the oil level
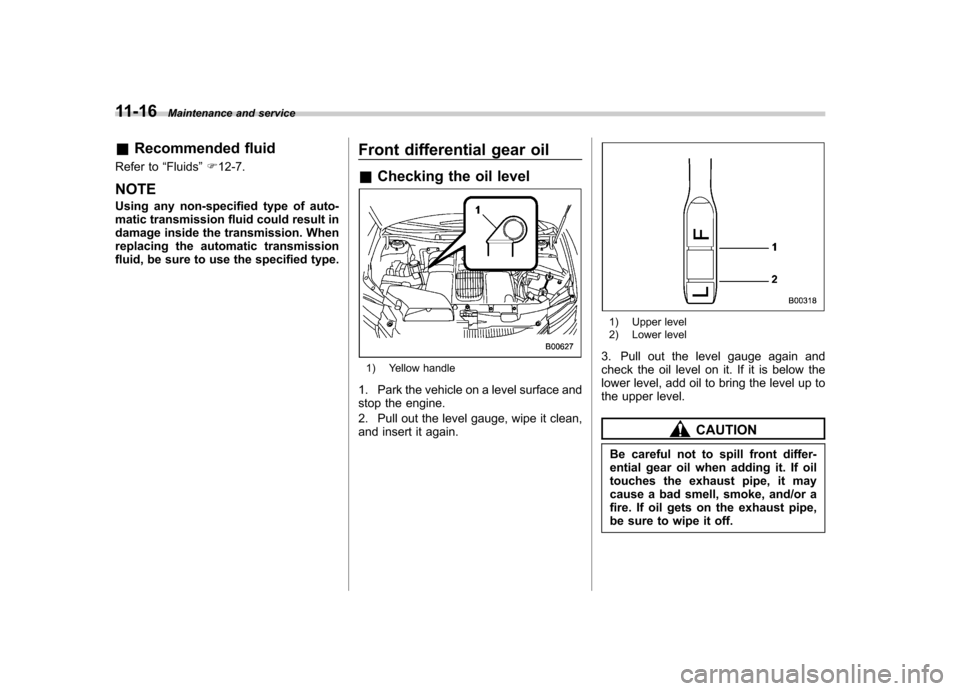
1) Yellow handle
1. Park the vehicle on a level surface and
stop the engine.
2. Pull out the level gauge, wipe it clean,
and insert it again.
1) Upper level
2) Lower level
3. Pull out the level gauge again and
check the oil level on it. If it is below the
lower level, add oil to bring the level up to
the upper level.
CAUTION
Be careful not to spill front differ-
ential gear oil when adding it. If oil
touches the exhaust pipe, it may
cause a bad smell, smoke, and/or a
fire. If oil gets on the exhaust pipe,
be sure to wipe it off.
Page 348 of 422
&Recommended grade and viscosity
Each oil manufacturer has its own base
oils and additives. Never use different
brands together. For details, refer to “Front
differential and rear differential gear oil ”
F 12-6. Rear differential gear oil
There is no oil level gauge. To check the
rear differential gear oil level, consult your
SUBARU dealer for inspection. &
Recommended grade and viscosity
Each oil manufacturer has its own base
oils and additives. Never use different
brands together. For details, refer to “Front
differential and rear differential gear oil ”
F 12-6. Power steering fluid &
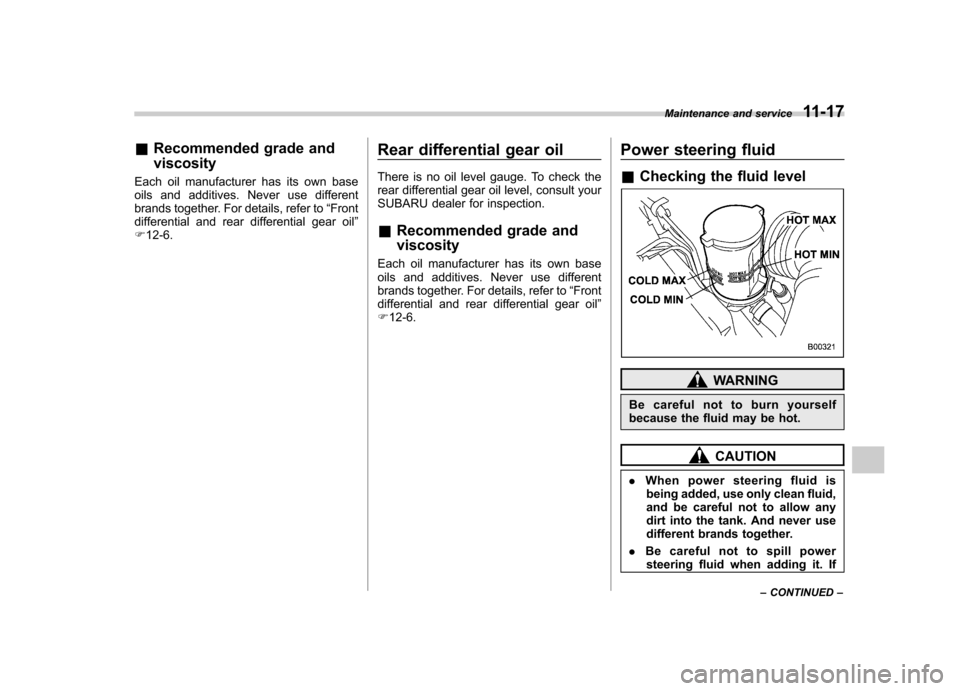
Checking the fluid level
WARNING
Be careful not to burn yourself
because the fluid may be hot.
CAUTION
. When power steering fluid is
being added, use only clean fluid,
and be careful not to allow any
dirt into the tank. And never use
different brands together.
. Be careful not to spill power
steering fluid when adding it. If Maintenance and service
11-17
– CONTINUED –
Page 349 of 422

11-18Maintenance and service
power steering fluid touches the
exhaust pipe, it may cause a bad
smell, smoke, and/or a fire. If
power steering fluid gets on the
exhaust pipe, be sure to wipe itoff.
The power steering fluid expands greatly
as its temperature rises; the fluid level
differs according to fluid temperature.
Therefore, the reservoir tank has two
different checking ranges for hot and coldfluids.
Check the power steering fluid level
monthly.
1. Park the vehicle on a level surface,
and stop the engine.
2. Check the fluid level of the reservoir tank.
When the fluid is hot after the vehicle has
been run: Check that the oil level isbetween “HOT MIN ”and “HOT MAX ”on
the surface of the reservoir tank.
When the fluid is cool before the vehicle is
run: Check that the oil level is between“ COLD MIN ”and “COLD MAX ”on the
surface of the reservoir tank.
3. If the fluid level is lower than the
applicable “MIN ”line, add the recom-
mended fluid as necessary to bring the
level between the “MIN ”and “MAX ”line. If the fluid level is extreme low, it may
indicate possible leakage. Consult your
SUBARU dealer for inspection.
& Recommended fluid
Refer to “Fluids ”F 12-7. Brake fluid &
Checking the fluid level
WARNING
. Never let brake fluid contact your
eyes because brake fluid can be
harmful to your eyes. If brake
fluid gets in your eyes, immedi-
ately flush them thoroughly with
clean water. For safety, when
performing this work, wearing
eye protection is advisable.
. Brake fluid absorbs moisture
from the air. Any absorbed moist-
ure can cause a dangerous loss
of braking performance.
. If the vehicle requires frequent
refilling, there may be a leak. If
you suspect a problem, have the
vehicle checked at your SUBARU
dealer.
CAUTION
. When adding brake fluid, be care-
ful not to allow any dirt into the
reservoir.
. Never splash the brake fluid over
painted surfaces or rubber parts.
Page 350 of 422

Alcohol contained in the brake
fluid may damage them.
. Be careful not to spill brake fluid
when adding it. If brake fluid
touches the exhaust pipe, it may
cause a bad smell, smoke, and/or
a fire. If brake fluid gets on the
exhaust pipe, be sure to wipe itoff.
Check the fluid level monthly.
Check the fluid level on the outside of the
reservoir. If the level is below “MIN ”, add
the recommended brake fluid to “MAX ”.
Use only brake fluid from a sealed
container. &
Recommended brake fluid
Refer to “Fluids ”F 12-7.
CAUTION
Never use different brands of brake
fluid together. Also, avoid mixing
DOT 3 and DOT 4 brake fluids even if
they are the same brand. Brake booster
If the brake booster does not operate as
described in the following, have it checked
by your SUBARU dealer.
1. With the engine off, depress the brake
pedal several times, applying the same
pedal force each time. The distance the
pedal travels should not vary.
2. With the brake pedal depressed, start
the engine. The pedal should move
slightly down to the floor.
3. With the brake pedal depressed, stop
the engine and keep the pedal depressed
for 30 seconds. The pedal height should
not change.
4. Start the engine again and run for
approximately 1 minute then turn it off.
Depress the brake pedal several times to
check the brake booster. The brake
booster operates properly if the pedal
stroke decreases with each depression.Maintenance and service
11-19
Page 351 of 422

11-20Maintenance and service
Brake pedal
Check the brake pedal free play and
reserve distance according to the main-
tenance schedule in the “Warranty and
Maintenance Booklet ”.
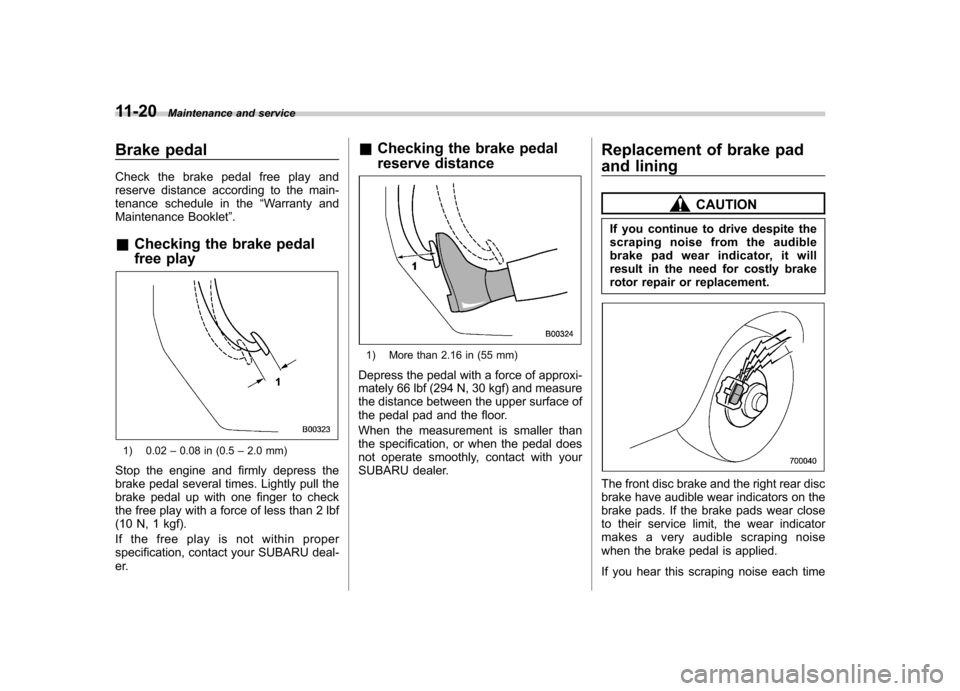
& Checking the brake pedal
free play
1) 0.02 –0.08 in (0.5 –2.0 mm)
Stop the engine and firmly depress the
brake pedal several times. Lightly pull the
brake pedal up with one finger to check
the free play with a force of less than 2 lbf
(10 N, 1 kgf).
If the free play is not within proper
specification, contact your SUBARU deal-
er. &
Checking the brake pedal
reserve distance
1) More than 2.16 in (55 mm)
Depress the pedal with a force of approxi-
mately 66 lbf (294 N, 30 kgf) and measure
the distance between the upper surface of
the pedal pad and the floor.
When the measurement is smaller than
the specification, or when the pedal does
not operate smoothly, contact with your
SUBARU dealer. Replacement of brake pad
and lining
CAUTION
If you continue to drive despite the
scraping noise from the audible
brake pad wear indicator, it will
result in the need for costly brake
rotor repair or replacement.
The front disc brake and the right rear disc
brake have audible wear indicators on the
brake pads. If the brake pads wear close
to their service limit, the wear indicator
makes a very audible scraping noise
when the brake pedal is applied.
If you hear this scraping noise each time
Page 352 of 422

you apply the brake pedal, have the brake
pads serviced by your SUBARU dealer as
soon as possible. &Breaking-in of new brake
pads and linings
When replacing the brake pad or lining,
use only genuine SUBARU parts. After
replacement, the new parts must be
broken in as follows. ! Brake pad and lining
While maintaining a speed of 30 to 40
mph (50 to 65 km/h), step on the brake
pedal lightly. Repeat this five or moretimes. ! Parking brake lining
WARNING
A safe location and situation should
be selected for break-in driving.
CAUTION
Pressing the parking brake pedal
too forcefully may cause the rear
wheels to lock. To avoid this, be
certain to press the pedal slowly
and gently. 1. Drive the vehicle at a speed of
approximately 22 mph (35 km/h).
2. Depress the parking brake pedal
SLOWLY and GENTLY. (Pressing with a
force of approximately 34 lbf [150 N, 15kgf].)
3. Drive the vehicle for approximately
220 yards (200 meters) in this condition.
4. Wait 5 to 10 minutes for the parking
brake to cool down. Repeat this proce-dure.
5. Check the parking brake stroke. If the
parking brake stroke is out of the specified
range, adjust it by turning the adjusting nut
located on the parking brake pedal.
Parking brake stroke: 5–6 notches / 67 lbf (300 N, 30 kgf) Parking brake stroke
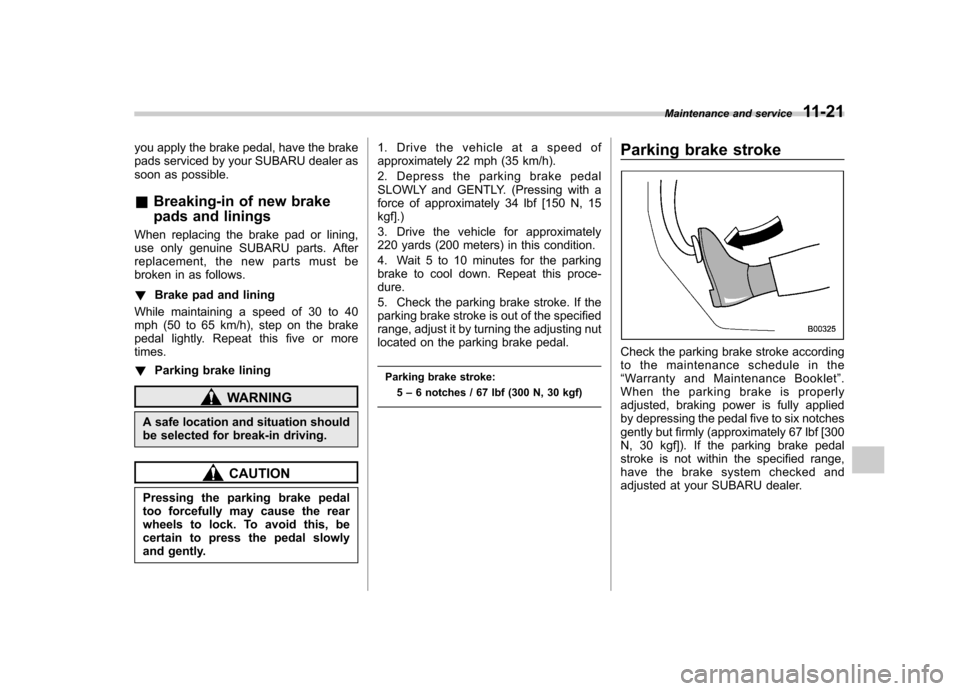
Check the parking brake stroke according
to the maintenance schedule in the“
Warranty and Maintenance Booklet ”.
When the parking brake is properly
adjusted, braking power is fully applied
by depressing the pedal five to six notches
gently but firmly (approximately 67 lbf [300
N, 30 kgf]). If the parking brake pedal
stroke is not within the specified range,
have the brake system checked and
adjusted at your SUBARU dealer. Maintenance and service
11-21