2011 SUBARU IMPREZA WRX STI check
[x] Cancel search: checkPage 60 of 459
Black plate (58,1)
北米Model "A1110BE-C" EDITED: 2010/ 12/ 17
1-28
Seat, seatbelt and SRS airbags
injuries or death to the child.
CAUTION
When you install a child restraint
system, follow the manufacturer ’s
instructions supplied with it. After
installing the child restraint system,
check to ensure that it is held
securely in position. If it is not held
tight and secure, the danger of your
child suffering personal injury in the
event of an accident may be in-
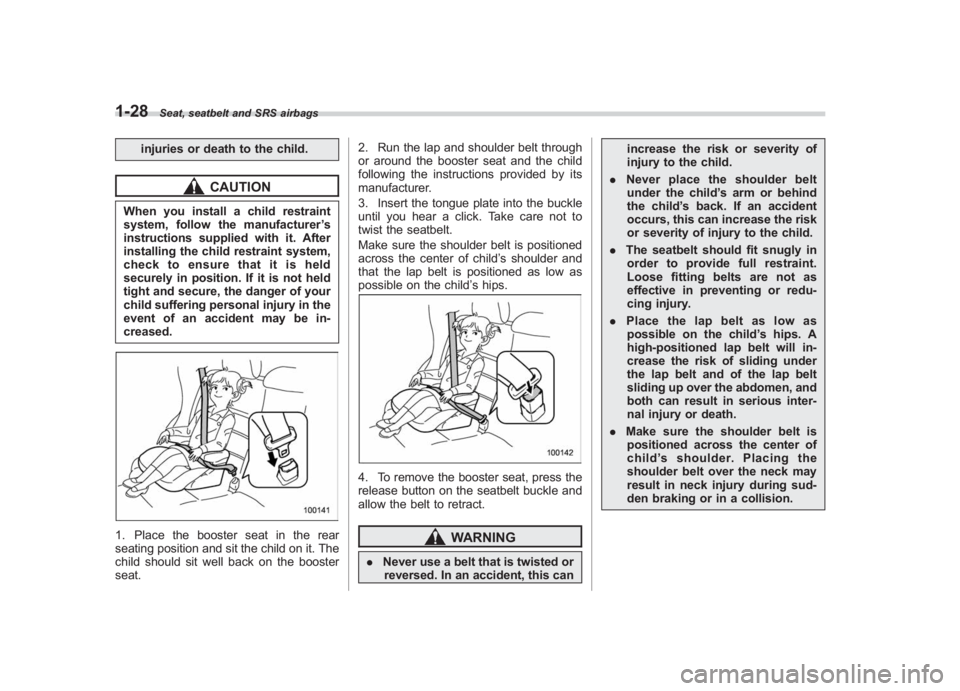
creased.1. Place the booster seat in the rear
seating position and sit the child on it. The
child should sit well back on the booster
seat. 2. Run the lap and shoulder belt through
or around the booster seat and the child
following the instructions provided by its
manufacturer.
3. Insert the tongue plate into the buckle
until you hear a click. Take care not to
twist the seatbelt.
Make sure the shoulder belt is positioned
across the center of child
’s shoulder and
that the lap belt is positioned as low as
possible on the child ’s hips.
4. To remove the booster seat, press the
release button on the seatbelt buckle and
allow the belt to retract.
WARNING
. Never use a belt that is twisted or
reversed. In an accident, this can increase the risk or severity of
injury to the child.
. Never place the shoulder belt
under the child ’s arm or behind
the child ’s back. If an accident
occurs, this can increase the risk
or severity of injury to the child.
. The seatbelt should fit snugly in
order to provide full restraint.
Loose fitting belts are not as
effective in preventing or redu-
cing injury.
. Place the lap belt as low as
possible on the child ’s hips. A
high-positioned lap belt will in-
crease the risk of sliding under
the lap belt and of the lap belt
sliding up over the abdomen, and
both can result in serious inter-
nal injury or death.
. Make sure the shoulder belt is
positioned across the center of
child ’s shoulder. Placing the
shoulder belt over the neck may
result in neck injury during sud-
den braking or in a collision.
Page 61 of 459
Black plate (59,1)
北米Model "A1110BE-C" EDITED: 2010/ 12/ 17
& Installation of child restraint
systems by use of lower and
tether anchorages (LATCH)
WARNING
. Child restraint systems and seat-
belts can become hot in a vehicle
that has been closed up in sunny
weather; they could burn a small
child. Check the child restraint
system before you place a child
in it.
. Do not leave an unsecured child
restraint system in your vehicle.
Unsecured child restraint sys-
tems can be thrown around in-
side of the vehicle in a sudden
stop, turn or accident; they can
strike and injure vehicle occu-
pants as well as result in serious
injuries or death to the child.
CAUTION
When you install a child restraint
system, follow the manufacturer ’s
instructions supplied with it. After
installing the child restraint system,
check to ensure that it is held
securely in position. If it is not held tight and secure, the danger of your
child suffering personal injury in the
event of an accident may be in-
creased.
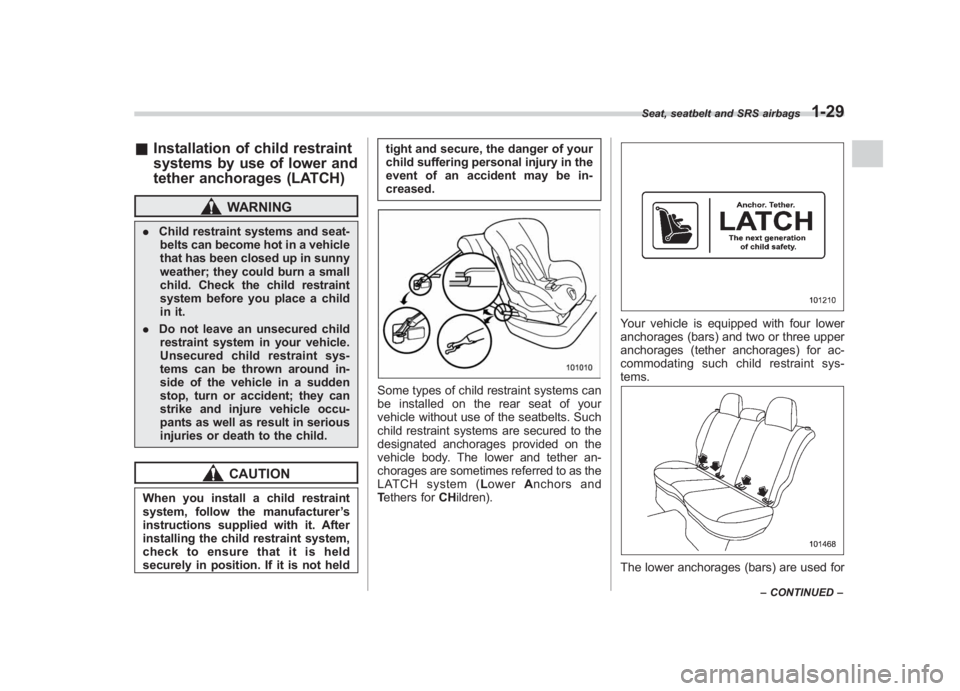
Some types of child restraint systems can
be installed on the rear seat of your
vehicle without use of the seatbelts. Such
child restraint systems are secured to the
designated anchorages provided on the
vehicle body. The lower and tether an-
chorages are sometimes referred to as the
LATCH system (
Lower Anchors and
T ethers for CHildren).
Your vehicle is equipped with four lower
anchorages (bars) and two or three upper
anchorages (tether anchorages) for ac-
commodating such child restraint sys-
tems.The lower anchorages (bars) are used for
Seat, seatbelt and SRS airbags
1-29
–CONTINUED –
1
Page 76 of 459
Black plate (74,1)
北米Model "A1110BE-C" EDITED: 2010/ 12/ 17
1-44
Seat, seatbelt and SRS airbags
lift the front passenger ’s seat cushion
using his/her feet.
. Do not place any article under the front
passenger ’s seat, or squeeze any article
from behind and under the seat. This may
lift the seat cushion.
. Do not squeeze any article between
the front passenger ’s seat and side trim/
pillar, door or center console box. This
may lift the seat cushion.
! If the passenger ’s frontal airbag OFF
indicator illuminates and the ON
indicator turns off even when the
front passenger ’s seat is occupied
by an adult
This can be caused by the adult incor-
rectly sitting in the front passenger ’s seat.
Turn the ignition switch to the “LOCK”
position. Ask the front passenger to set
the seatback to the upright position, sit up
straight in the center of the seat cushion,
correctly fasten the seatbelt, position his/
her legs out forward, and adjust the seat to
the rearmost position. Turn the ignition
switch to the “ON”position. If the OFF
indicator remains illuminated while the ON
indicator remains off, take the following
actions.
. Turn the ignition switch to the “LOCK”
position.
. Ensure that there are no articles, books, shoes, or other objects trapped
under the seat, at the rear of the seat, or
on the side of the seat.
.
Ensure that the backward-forward po-
sition and seatback of front passenger ’s
seat are locked into place securely by
moving the seat back and forth.
. Next, turn the ignition switch to the
“ON ”position and wait 6 seconds to allow
the system to complete self-checking.
Following the system check, both indica-
tors turn off for 2 seconds. Now, the ON
indicator should illuminate while the OFF
indicator remains off.
If the OFF indicator still remains illumi-
nated while the ON indicator remains off,
ask the occupant to move to the rear seat
and immediately contact your SUBARU
dealer for an inspection.
! Effect vehicle modifications made
for persons with disabilities may
have on SUBARU advanced frontal
airbag system operation (U.S. only)
Changing or moving any parts of the front
seats, rear seat, seatbelts, front bumper,
front side frame, radiator panel, instrument
panel, combination meter, steering wheel,
steering column, tire, suspension or floor
panel can affect the operation of the
SUBARU advanced airbag system. If
you have any questions, you may contact the following SUBARU distributors.
Subaru of America, Inc.
Customer Dealer Services Department
P.O. Box 6000
Cherry Hill, NJ 08034-6000
1-800-SUBARU3 (1-800-782-2783)
Servco Subaru Inc., dba Subaru Hawaii
2850 Pukoloa Street, Suite 202, Honolulu,
HI 96819
808-839-2273
Shen
’s Corporation dba Prestige Automo-
bile
491, East Marine Drive, Route 1 Dededo,
Guam
671-633-2698
Trebol Motors
P.O. Box 11204, San Juan, Puerto Rico
00910
787-793-2828
There are currently no SUBARU distribu-
tors in any other U.S. territories. If you are
in such an area, please contact the
SUBARU distributor or dealer from which
Page 88 of 459
Black plate (86,1)
北米Model "A1110BE-C" EDITED: 2010/ 12/ 17
1-56
Seat, seatbelt and SRS airbags
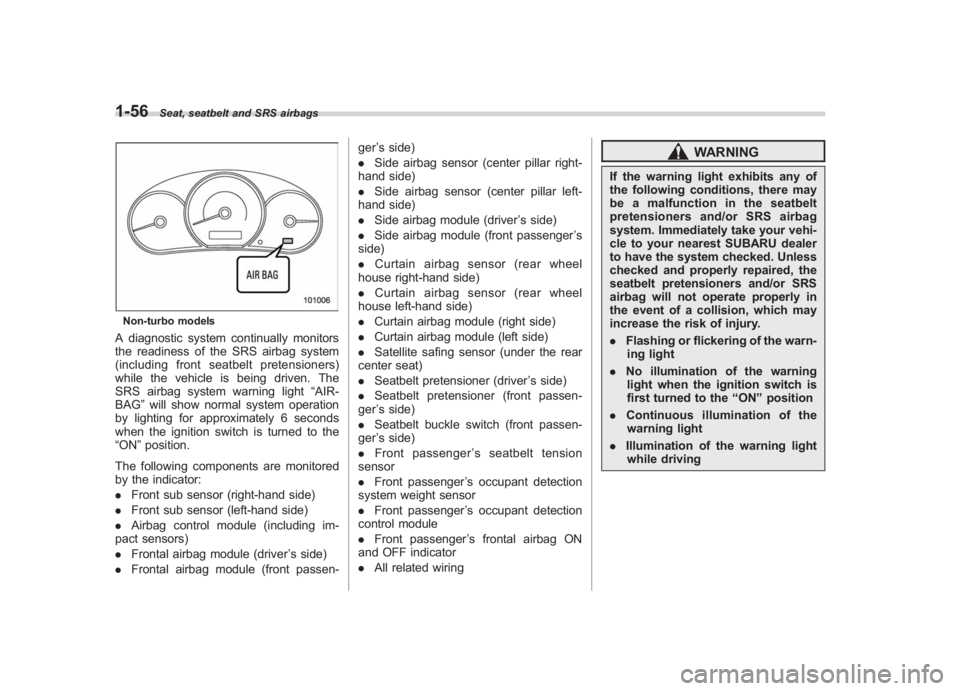
Non-turbo modelsA diagnostic system continually monitors
the readiness of the SRS airbag system
(including front seatbelt pretensioners)
while the vehicle is being driven. The
SRS airbag system warning light “AIR-
BAG ”will show normal system operation
by lighting for approximately 6 seconds
when the ignition switch is turned to the
“ON ”position.
The following components are monitored
by the indicator:
. Front sub sensor (right-hand side)
. Front sub sensor (left-hand side)
. Airbag control module (including im-
pact sensors)
. Frontal airbag module (driver ’s side)
. Frontal airbag module (front passen- ger
’s side)
. Side airbag sensor (center pillar right-
hand side)
. Side airbag sensor (center pillar left-
hand side)
. Side airbag module (driver ’s side)
. Side airbag module (front passenger ’s
side)
. Curtain airbag sensor (rear wheel
house right-hand side)
. Curtain airbag sensor (rear wheel
house left-hand side)
. Curtain airbag module (right side)
. Curtain airbag module (left side)
. Satellite safing sensor (under the rear
center seat)
. Seatbelt pretensioner (driver ’s side)
. Seatbelt pretensioner (front passen-
ger ’s side)
. Seatbelt buckle switch (front passen-
ger ’s side)
. Front passenger ’s seatbelt tension
sensor
. Front passenger ’s occupant detection
system weight sensor
. Front passenger ’s occupant detection
control module
. Front passenger ’s frontal airbag ON
and OFF indicator
. All related wiring
WARNING
If the warning light exhibits any of
the following conditions, there may
be a malfunction in the seatbelt
pretensioners and/or SRS airbag
system. Immediately take your vehi-
cle to your nearest SUBARU dealer
to have the system checked. Unless
checked and properly repaired, the
seatbelt pretensioners and/or SRS
airbag will not operate properly in
the event of a collision, which may
increase the risk of injury.
.Flashing or flickering of the warn-
ing light
. No illumination of the warning
light when the ignition switch is
first turned to the “ON ”position
. Continuous illumination of the
warning light
. Illumination of the warning light
while driving
Page 116 of 459
Black plate (116,1)
北米Model "A1110BE-C" EDITED: 2010/ 12/ 17
2-26
Keys and doors
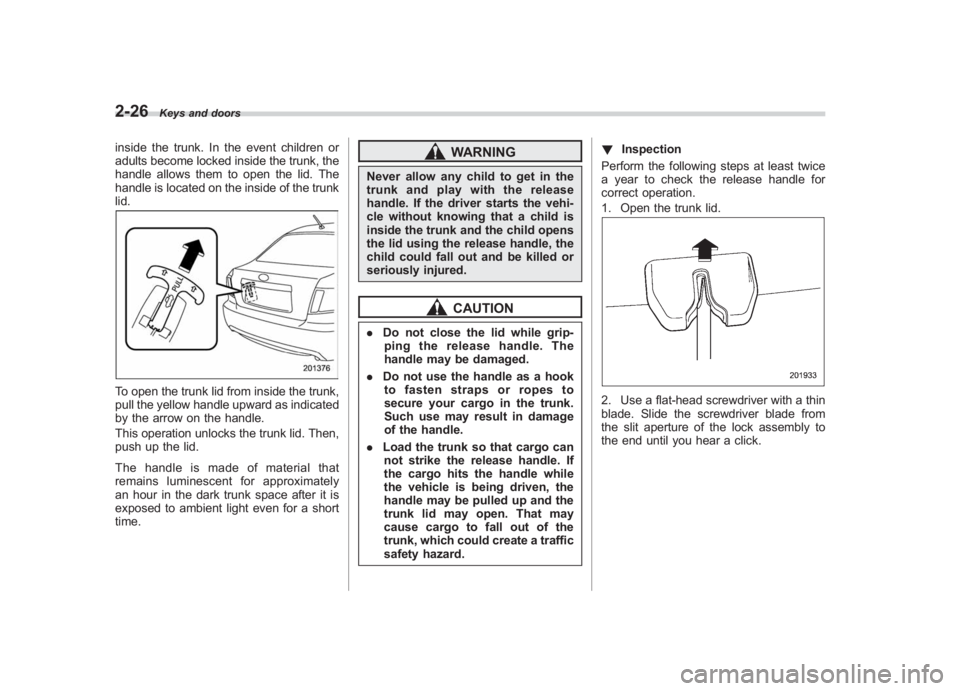
inside the trunk. In the event children or
adults become locked inside the trunk, the
handle allows them to open the lid. The
handle is located on the inside of the trunk
lid.To open the trunk lid from inside the trunk,
pull the yellow handle upward as indicated
by the arrow on the handle.
This operation unlocks the trunk lid. Then,
push up the lid.
The handle is made of material that
remains luminescent for approximately
an hour in the dark trunk space after it is
exposed to ambient light even for a short
time.
WARNING
Never allow any child to get in the
trunk and play with the release
handle. If the driver starts the vehi-
cle without knowing that a child is
inside the trunk and the child opens
the lid using the release handle, the
child could fall out and be killed or
seriously injured.
CAUTION
. Do not close the lid while grip-
ping the release handle. The
handle may be damaged.
. Do not use the handle as a hook
to fasten straps or ropes to
secure your cargo in the trunk.
Such use may result in damage
of the handle.
. Load the trunk so that cargo can
not strike the release handle. If
the cargo hits the handle while
the vehicle is being driven, the
handle may be pulled up and the
trunk lid may open. That may
cause cargo to fall out of the
trunk, which could create a traffic
safety hazard. !
Inspection
Perform the following steps at least twice
a year to check the release handle for
correct operation.
1. Open the trunk lid.
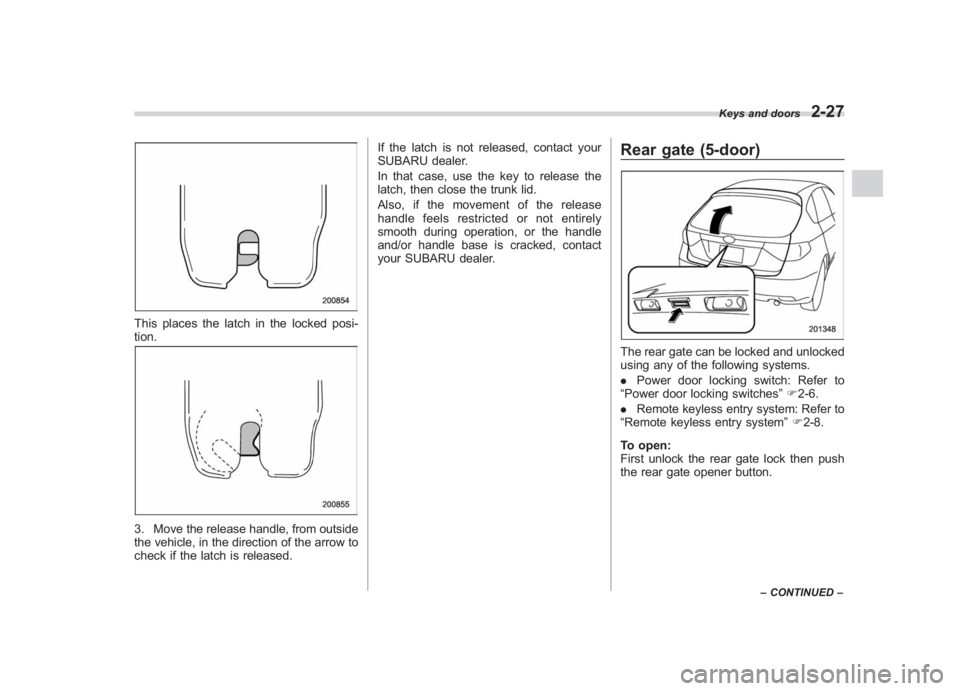
2. Use a flat-head screwdriver with a thin
blade. Slide the screwdriver blade from
the slit aperture of the lock assembly to
the end until you hear a click.
Page 117 of 459
Black plate (117,1)
北米Model "A1110BE-C" EDITED: 2010/ 12/ 17
This places the latch in the locked posi-
tion.3. Move the release handle, from outside
the vehicle, in the direction of the arrow to
check if the latch is released. If the latch is not released, contact your
SUBARU dealer.
In that case, use the key to release the
latch, then close the trunk lid.
Also, if the movement of the release
handle feels restricted or not entirely
smooth during operation, or the handle
and/or handle base is cracked, contact
your SUBARU dealer.
Rear gate (5-door)The rear gate can be locked and unlocked
using any of the following systems.
.
Power door locking switch: Refer to
“Power door locking switches ”F 2-6.
. Remote keyless entry system: Refer to
“Remote keyless entry system ”F 2-8.
To open:
First unlock the rear gate lock then push
the rear gate opener button.
Keys and doors
2-27
– CONTINUED –
2
Page 119 of 459
Black plate (119,1)
北米Model "A1110BE-C" EDITED: 2010/ 12/ 17
Moonroof (if equipped)
WARNING
Never let anyone ’shands,arms,
head or any objects protrude from
the moonroof. A person could be
seriously injured if the vehicle stops
suddenly or turns sharply or if the
vehicle is involved in an accident.
To avoid serious personal injury
caused by entrapment, always con-
form to the following instructions
without exception.
. Before closing the moonroof,
make sure that no one ’s hands,
arms, head or other objects will
be accidentally caught in the
moonroof.
. Before leaving the vehicle, al-
ways remove the key from the
ignition switch for safety and
never allow an unattended child
to remain in the vehicle. Failure
to follow this procedure could
result in injury to a child operat-
ing the moonroof. .
Never try to check the anti-en-
trapment function by deliberately
placing part of your body in the
moonroof.
CAUTION
. Do not sit on the edge of the open
moonroof.
. Do not operate the moonroof if
falling snow or extremely cold
conditions have caused it to
freeze shut.
. The anti-entrapment function
does not operate when the moon-
roof is being tilted down. Be sure
to confirm that it is safe to do so
before tilting the moonroof down.
The moonroof has both tilting and sliding
functions.
The moonroof operates only when the
ignition switch is in the “ON ”position.
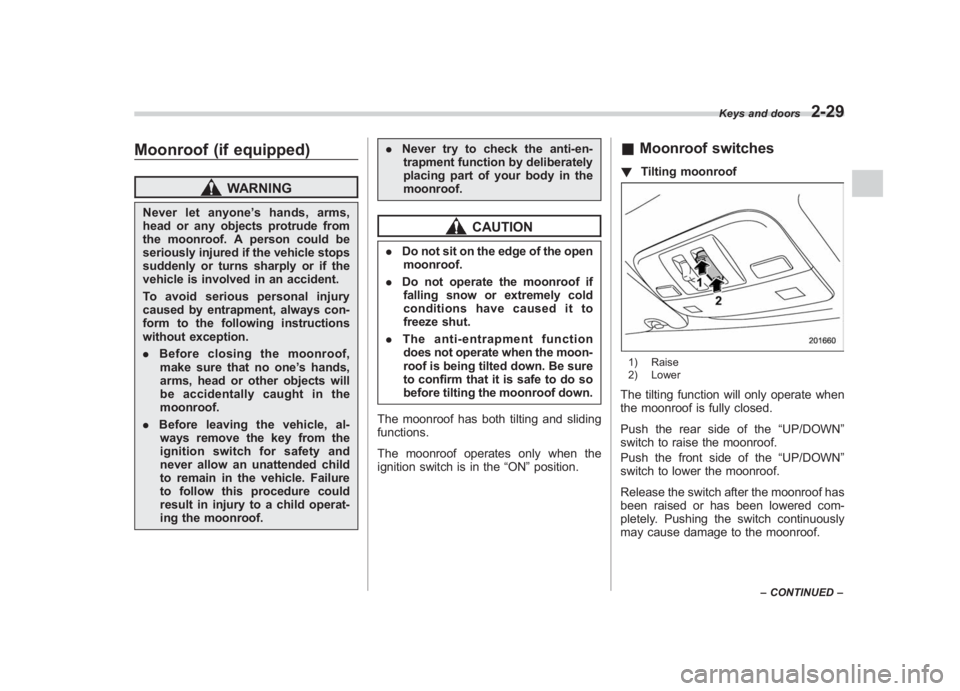
& Moonroof switches! Tilting moonroof1) Raise
2) LowerThe tilting function will only operate when
the moonroof is fully closed.
Push the rear side of the “UP/DOWN”
switch to raise the moonroof.
Push the front side of the “UP/DOWN”
switch to lower the moonroof.
Release the switch after the moonroof has
been raised or has been lowered com-
pletely. Pushing the switch continuously
may cause damage to the moonroof.
Keys and doors
2-29
– CONTINUED –
2
Page 121 of 459
Black plate (5,1)
北米Model "A1110BE-C" EDITED: 2010/ 11/ 17
Ignition switch ..................................................... 3-3
LOCK.................................................................. 3-3
Acc..................................................................... 3-4
ON...................................................................... 3-4
START ................................................................ 3-4
Key reminder chime ............................................ 3-5
Ignition switch light ............................................. 3-5
Hazard warning flasher ....................................... 3-5
Meters and gauges. ............................................. 3-6
Combination meter illumination ........................... 3-6
Canceling the function for meter/gauge needle movement upon turning on the ignition
switch ............................................................... 3-6
Meter/Gauge needle illumination setting (turbo models except STI) ............................................ 3-7
Speedometer ....................................................... 3-8
Odometer/Trip meter ............................................ 3-8
Tachometer ......................................................... 3-9
Fuel gauge ......................................................... 3-10
Temperature gauge (turbo models) ..................... 3-11
REV indicator light and buzzer (STI). ................ 3-11
Setting the alarm-level engine speed ................... 3-12
Deactivating the REV alarm system ..................... 3-13
Warning and indicator lights............................. 3-13
Seatbelt warning light and chime ........................ 3-14
SRS airbag system warning light ........................ 3-15
Front passenger ’s frontal airbag ON and OFF
indicators ......................................................... 3-16
CHECK ENGINE warning light/Malfunction indicator lamp .................................................. 3-16 Coolant temperature low indicator light (non-
turbo models)/Coolant temperature high
warning light (non-turbo models) ...................... 3-17
Charge warning light .......................................... 3-18
Oil pressure warning light .................................. 3-18
AT OIL TEMP warning light (AT models) .............. 3-18
Rear differential oil temperature warning light (STI) ................................................................ 3-19
Low tire pressure warning light (U.S.-spec. models) ........................................................... 3-19
ABS warning light .............................................. 3-21
Brake system warning light ................................ 3-21
Low fuel warning light ....................................... 3-22
Hill start assist warning light (MT models –if
equipped)/Hill start assist OFF indicator light
(STI) ................................................................ 3-22
Door open warning light .................................... 3-23
All-Wheel Drive warning light (AT models) ..... ..... 3-23
Vehicle Dynamics Control operation indicator light ................................................................ 3-23
Vehicle Dynamics Control warning light/Vehicle Dynamics Control OFF indicator light/Traction
Control OFF indicator light (STI) ....................... 3-23
Security indicator light ....................................... 3-25
SPORT mode indicator light (AT models) ............ 3-25
SI-DRIVE indicator light (STI) .............................. 3-26
Shift-up indicator light (STI) ............................... 3-26
Select lever/gear position indicator (AT models) ..................................................... 3-26
Turn signal indicator lights ................................. 3-26
High beam indicator light ................................... 3-26
Cruise control indicator light .............................. 3-26
Instruments and controls
3