Page 145 of 458

3-26Instruments and controls
& SI-DRIVE indicator light (STI)
1) Intelligent (I) mode
2) Sport (S) mode
3) Sport Sharp (S#) mode
This light indicates the current SI-DRIVE mode.
For details of SI-DRIVE mode, refer to “SI-
DRIVE (STI) ”F 7-28.
& Shift-up indicator light (STI)
While selecting the Intelligent (I) mode of
SI-DRIVE, this indicator light illuminates
and informs the driver about the upshift
timing for fuel-efficient driving. &
Select lever/gear position in-
dicator (AT models)
When the ignition switch is turned to the “ON ”position, all of the select lever/gear
position indicators illuminate for 2 sec-
onds, and then the indicator shows the
position of the select lever.
When the manual mode is selected, the
gear position indicator (which shows the
current gear selection) and the upshift/
downshift indicator light up. Refer to“ Automatic transmission ”F 7-22. &
Turn signal indicator lights
These lights show the operation of the turn
signal or lane change signal.
If the indicator lights do not blink or blink
rapidly, the turn signal bulb may be burned
out. Replace the bulb as soon as possible.
Refer to “Replacing bulbs ”F 11-47.
& High beam indicator light
This light shows that the headlights are in
the high beam mode.
This indicator light also illuminates when
the headlight flasher is operated. &Cruise control indica-
tor light
This light illuminates when the “CRUISE ”
main switch is pressed. NOTE . If you press the “CRUISE ”main
switch button while turning the ignition switch “ON ”, the cruise control func-
tion is deactivated and the cruise
control indicator light flashes. To re-
activate the cruise control function,
turn the ignition switch back to the“ Acc ”or “LOCK ”position, and then
Page 146 of 458

turn it again to the“ON ”position.
. If this indicator light and the CHECK
ENGINE warning light/malfunction in-
dicator lamp flash simultaneously dur-
ing driving, have the vehicle checked
by your nearest SUBARU dealer. & Cruise control set in-
dicator light
This light illuminates when vehicle speed
has been set. &Front fog light indicator
light (if equipped)
This indicator light illuminates while the
front fog lights are illuminated. & Headlight indicator
light (if equipped)
This indicator light illuminates when the
headlight switch is placed in the “”or
“” position. &
Driver ’s control center differ-
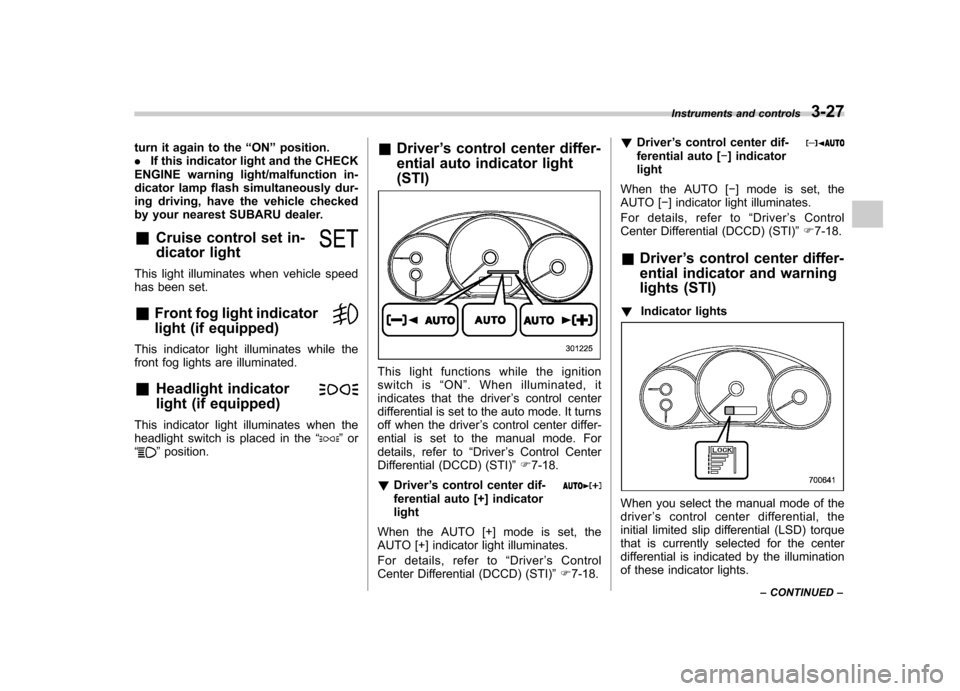
ential auto indicator light (STI)
This light functions while the ignition
switch is “ON ”. When illuminated, it
indicates that the driver ’s control center
differential is set to the auto mode. It turns
off when the driver ’s control center differ-
ential is set to the manual mode. For
details, refer to “Driver ’s Control Center
Differential (DCCD) (STI) ”F 7-18.
! Driver ’s control center dif-
ferential auto [+] indicatorlight
When the AUTO [+] mode is set, the
AUTO [+] indicator light illuminates.
For details, refer to “Driver ’sControl
Center Differential (DCCD) (STI) ”F 7-18. !
Driver ’s control center dif-
ferential auto [ ] indicator
light
When the AUTO [ ] mode is set, the
AUTO [ ] indicator light illuminates.
For details, refer to “Driver ’s Control
Center Differential (DCCD) (STI) ”F 7-18.
& Driver ’s control center differ-
ential indicator and warning
lights (STI)
! Indicator lights
When you select the manual mode of the driver ’s control center differential, the
initial limited slip differential (LSD) torque
that is currently selected for the center
differential is indicated by the illumination
of these indicator lights. Instruments and controls
3-27
– CONTINUED –
Page 147 of 458
3-28Instruments and controls
!Warning light
All the indicator lights will flash in the event
that the driver ’s control center differential
has a malfunction. Have the vehicle
inspected by your SUBARU dealer. For
details, refer to “Driver ’s Control Center
Differential (DCCD) (STI) ”F 7-18.
& REV indicator light (STI)
This light illuminates when the engine
speed reaches a level set by driver or
when the tachometer needle enters the
red zone. Clock
The time changes by 1 minute each time the
“+ ” button or “ ” button is pressed.
Pressing the “+ ” button moves the dis-
played time forward, while pressing the “ ”
button moves the displayed time back.
Pressing and holding either button
changes the displayed time continuously.
CAUTION
To ensure safety, do not attempt to
set the time while driving, as an
accident from inadequate attention
to the road could result.
NOTE
If the battery is disconnected, the time
will be erased. After reconnecting the
battery, set the correct time.
Page 148 of 458

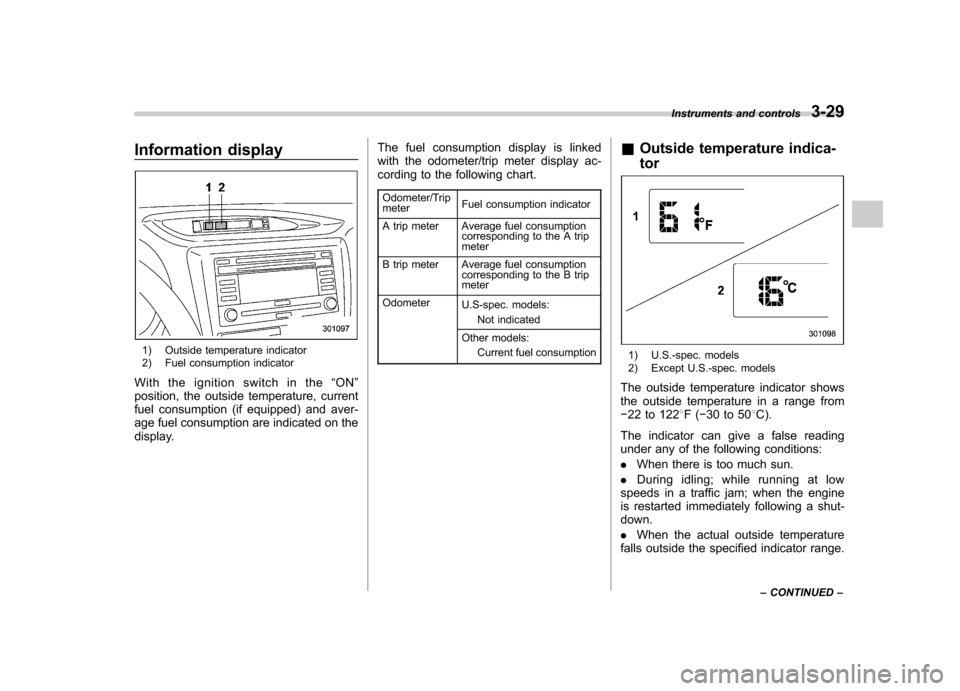
Information display
1) Outside temperature indicator
2) Fuel consumption indicator
With the ignition switch in the “ON ”
position, the outside temperature, current
fuel consumption (if equipped) and aver-
age fuel consumption are indicated on the
display. The fuel consumption display is linked
with the odometer/trip meter display ac-
cording to the following chart.
Odometer/Trip meter Fuel consumption indicator
A trip meter Average fuel consumption corresponding to the A trip meter
B trip meter Average fuel consumption corresponding to the B trip meter
Odometer U.S-spec. models:
Not indicated
Other models: Current fuel consumption &
Outside temperature indica- tor1) U.S.-spec. models
2) Except U.S.-spec. models
The outside temperature indicator shows
the outside temperature in a range from 22 to 122 8F( 30 to 50 8C).
The indicator can give a false reading
under any of the following conditions: . When there is too much sun.
. During idling; while running at low
speeds in a traffic jam; when the engine
is restarted immediately following a shut- down. . When the actual outside temperature
falls outside the specified indicator range. Instruments and controls
3-29
– CONTINUED –
Page 149 of 458

3-30Instruments and controls
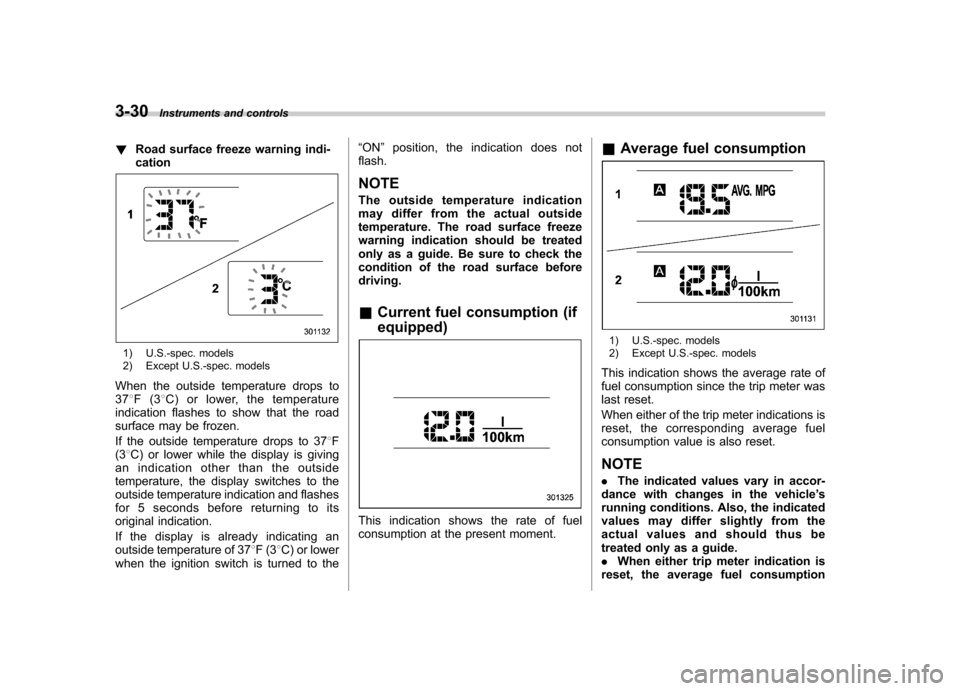
! Road surface freeze warning indi- cation
1) U.S.-spec. models
2) Except U.S.-spec. models
When the outside temperature drops to 37 8F(3 8C) or lower, the temperature
indication flashes to show that the road
surface may be frozen.
If the outside temperature drops to 37 8F
(3 8C) or lower while the display is giving
an indication other than the outside
temperature, the display switches to the
outside temperature indication and flashes
for 5 seconds before returning to its
original indication.
If the display is already indicating an
outside temperature of 37 8F(3 8C) or lower
when the ignition switch is turned to the “
ON ”position, the indication does not
flash. NOTE
The outside temperature indication
may differ from the actual outside
temperature. The road surface freeze
warning indication should be treated
only as a guide. Be sure to check the
condition of the road surface beforedriving. & Current fuel consumption (if equipped)
This indication shows the rate of fuel
consumption at the present moment. &
Average fuel consumption
1) U.S.-spec. models
2) Except U.S.-spec. models
This indication shows the average rate of
fuel consumption since the trip meter was
last reset.
When either of the trip meter indications is
reset, the corresponding average fuel
consumption value is also reset. NOTE . The indicated values vary in accor-
dance with changes in the vehicle ’s
running conditions. Also, the indicated
values may differ slightly from the
actual values and should thus be
treated only as a guide.. When either trip meter indication is
reset, the average fuel consumption
Page 150 of 458

corresponding to that trip meter indica-
tion is not shown until the vehicle has
subsequently covered a distance of 1
mile (or 1 km). &Turn off display of fuel con-
sumption indicator
The display of the fuel consumption
indicator can be turned off.
To turn off the display of the indicator, turn
the ignition switch to the “LOCK ”position
and press the “+ ” button adjacent to the
information display for approximately 5
seconds. Then, the information display
and the clock display will blink for 3
seconds to notify that the display of the
fuel consumption has been turned off.
To restore the indicator, once again pressthe “+ ” button for approximately 5 sec-
onds. NOTE . The initial display setting of the fuel
consumption indicator of your vehicle
has been set to operational at the time
of shipment from the factory. . The average fuel consumption is
calculated even while the indicator is
not displayed.. Even if you turn off the fuel con-
sumption indicator, the fuel consump-
tion indicator will automatically turn on when the battery voltage is discon-
nected and then reconnected for bat-
tery replacement or fuse replacement.
Light control switch
The light control switch operates when the
key is inserted into the ignition switch.
Regardless of the position of the light
control switch, the illuminated lights are
turned off when the key is removed from
the ignition switch. NOTE
Even if the key is removed from the
ignition switch, the lights can be illu-
minated by operating the light control
switch from
“OFF ”to the “
”or “”
position. In this case, if the driver ’s
door is opened, a chirp sound will
inform the driver that the lights are illuminated.
CAUTION
. Use of any lights for a long period
of time while the engine is not
running can cause the battery todischarge.
. Before leaving the vehicle, make
sure that the light control switch
is turned to the “OFF ”position. If
the vehicle is left unattended for
a long time with the light control
switch set to a position otherthan “OFF ”, the battery may be
Instruments and controls
3-31
– CONTINUED –
Page 151 of 458

3-32Instruments and controls
discharged.
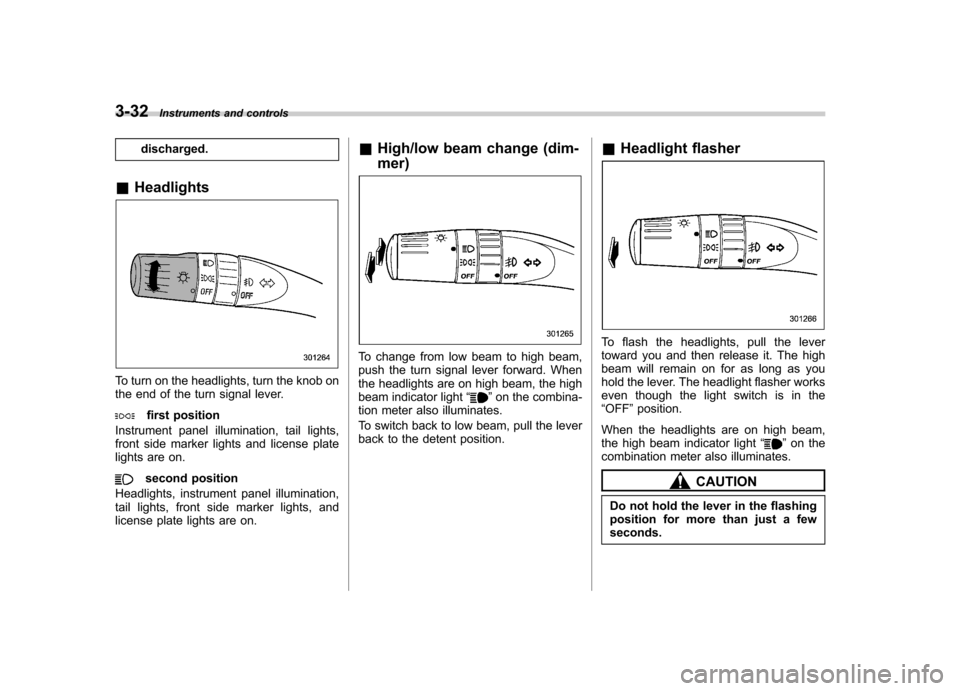
& Headlights
To turn on the headlights, turn the knob on
the end of the turn signal lever.
first position
Instrument panel illumination, tail lights,
front side marker lights and license plate
lights are on.
second position
Headlights, instrument panel illumination,
tail lights, front side marker lights, and
license plate lights are on. &
High/low beam change (dim- mer)
To change from low beam to high beam,
push the turn signal lever forward. When
the headlights are on high beam, the high
beam indicator light “
”on the combina-
tion meter also illuminates.
To switch back to low beam, pull the lever
back to the detent position. &
Headlight flasher
To flash the headlights, pull the lever
toward you and then release it. The high
beam will remain on for as long as you
hold the lever. The headlight flasher works
even though the light switch is in the“OFF ”position.
When the headlights are on high beam,
the high beam indicator light “
”on the
combination meter also illuminates.
CAUTION
Do not hold the lever in the flashing
position for more than just a fewseconds.
Page 152 of 458

&Daytime running light system
WARNING
The brightness of the illumination of
the high beam headlights is reduced
by the daytime running light system.
The light switch must always be
turned to the “
”position when it
is dark outside.
The high beam headlights will automati-
cally illuminate at reduced brightness
when the engine has started, under the
following conditions: . The select lever is in a position other
than the “P ”position (AT models).
. The parking brake is fully released.
. The light switch is in the “OFF ”or “
”
position.
NOTE
When the light switch is in the “
”
position, the front side marker lights,
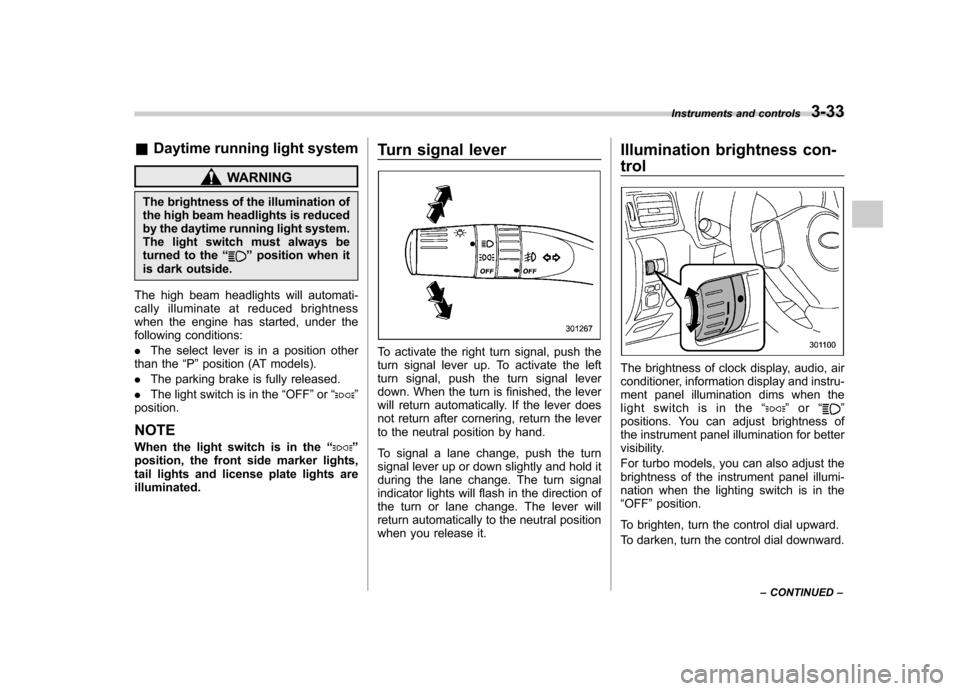
tail lights and license plate lights areilluminated. Turn signal lever
To activate the right turn signal, push the
turn signal lever up. To activate the left
turn signal, push the turn signal lever
down. When the turn is finished, the lever
will return automatically. If the lever does
not return after cornering, return the lever
to the neutral position by hand.
To signal a lane change, push the turn
signal lever up or down slightly and hold it
during the lane change. The turn signal
indicator lights will flash in the direction of
the turn or lane change. The lever will
return automatically to the neutral position
when you release it.Illumination brightness con- trol
The brightness of clock display, audio, air
conditioner, information display and instru-
ment panel illumination dims when the
light switch is in the
“
”or “”
positions. You can adjust brightness of
the instrument panel illumination for better
visibility.
For turbo models, you can also adjust the
brightness of the instrument panel illumi-
nation when the lighting switch is in the“ OFF ”position.
To brighten, turn the control dial upward.
To darken, turn the control dial downward. Instruments and controls
3-33
– CONTINUED –