2011 SKODA OCTAVIA TOUR seats
[x] Cancel search: seatsPage 4 of 183

Contents3
Using the system
Safety
Driving Tips
General Maintenance
Breakdown assistance
Technical Data
ContentsLayout of this Owner's Manual
(explanations)
. . . . . . . . . . . . . . . . . . . . . . . . . .
Using the system
. . . . . . . . . . . . . . . . . . . . .
Cockpit
. . . . . . . . . . . . . . . . . . . . . . . . . . . . . . . . . . . . . . . .
Overview . . . . . . . . . . . . . . . . . . . . . . . . . . . . . . . . . . . .
The brief instruction
. . . . . . . . . . . . . . . . . . . . . . . . . .
Basic functions and important information . . . . .
Instruments and Indicator/Warning Lights
. .
Overview of the instrument cluster . . . . . . . . . . . .
Engine revolutions counter . . . . . . . . . . . . . . . . . . . .
Speedometer . . . . . . . . . . . . . . . . . . . . . . . . . . . . . . . . .
Engine coolant temperature Display . . . . . . . . . . .
Fuel gauge . . . . . . . . . . . . . . . . . . . . . . . . . . . . . . . . . . .
Counter for distance driven . . . . . . . . . . . . . . . . . . .
Service Interval Display . . . . . . . . . . . . . . . . . . . . . . .
Digital clock . . . . . . . . . . . . . . . . . . . . . . . . . . . . . . . . . .
Recommended gear* . . . . . . . . . . . . . . . . . . . . . . . . .
Multi-functional indicator (onboard computer)* .
Warning lights . . . . . . . . . . . . . . . . . . . . . . . . . . . . . . . .
Unlocking and locking
. . . . . . . . . . . . . . . . . . . . . . . .
Key . . . . . . . . . . . . . . . . . . . . . . . . . . . . . . . . . . . . . . . . . .
Changing the battery in the remote control key
Electronic immobiliser . . . . . . . . . . . . . . . . . . . . . . . .
Child safety lock . . . . . . . . . . . . . . . . . . . . . . . . . . . . . .
Central locking system . . . . . . . . . . . . . . . . . . . . . . . .
Remote control* . . . . . . . . . . . . . . . . . . . . . . . . . . . . . .
Synchronisation of the remote control . . . . . . . . .
Anti-theft alarm system* . . . . . . . . . . . . . . . . . . . . . .
Power windows* . . . . . . . . . . . . . . . . . . . . . . . . . . . . .
Lights and Visibility
. . . . . . . . . . . . . . . . . . . . . . . . . . .
Lights . . . . . . . . . . . . . . . . . . . . . . . . . . . . . . . . . . . . . . . .
Interior lighting . . . . . . . . . . . . . . . . . . . . . . . . . . . . . . . Visibility . . . . . . . . . . . . . . . . . . . . . . . . . . . . . . . . . . . . .
Windshield wiper and wash system . . . . . . . . . . . .
Rear-view mirror . . . . . . . . . . . . . . . . . . . . . . . . . . . . .
Seats and Stowage
. . . . . . . . . . . . . . . . . . . . . . . . . . .
Front seats . . . . . . . . . . . . . . . . . . . . . . . . . . . . . . . . . .
Head restraints . . . . . . . . . . . . . . . . . . . . . . . . . . . . . . .
Middle rear head restraint* . . . . . . . . . . . . . . . . . . . .
Rear seats . . . . . . . . . . . . . . . . . . . . . . . . . . . . . . . . . . .
Pedals . . . . . . . . . . . . . . . . . . . . . . . . . . . . . . . . . . . . . . .
luggage compartment . . . . . . . . . . . . . . . . . . . . . . . .
Net partition* (Combi) . . . . . . . . . . . . . . . . . . . . . . . .
The roof rack* . . . . . . . . . . . . . . . . . . . . . . . . . . . . . . . .
Cup holder . . . . . . . . . . . . . . . . . . . . . . . . . . . . . . . . . . .
Note holder . . . . . . . . . . . . . . . . . . . . . . . . . . . . . . . . . .
Ashtray* . . . . . . . . . . . . . . . . . . . . . . . . . . . . . . . . . . . . .
Cigarette lighter*, power sockets . . . . . . . . . . . . . .
Storage compartments . . . . . . . . . . . . . . . . . . . . . . .
Overview . . . . . . . . . . . . . . . . . . . . . . . . . . . . . . . . . . . .
Storage compartment on the front passenger side
Storage compartment on the driver's side . . . . . .
Storage compartment on the dash panel . . . . . . .
Storage compartment in front centre console* .
Storage compartment in the front doors . . . . . . .
Front seat armrest with storage compartment*
Rear seat armrest with storage compartment* .
Storage compartment in re ar centre console* . .
Seat backrest with opening for skis* . . . . . . . . . . .
Clothes hooks* . . . . . . . . . . . . . . . . . . . . . . . . . . . . . . .
Heating and air conditioning system
. . . . . . . .
Air outlet vents . . . . . . . . . . . . . . . . . . . . . . . . . . . . . .
Heating . . . . . . . . . . . . . . . . . . . . . . . . . . . . . . . . . . . . . .
Climatic* . . . . . . . . . . . . . . . . . . . . . . . . . . . . . . . . . . . . .
Starting-off and Driving
. . . . . . . . . . . . . . . . . . . . . .
Setting steering wheel position . . . . . . . . . . . . . . .
Ignition lock . . . . . . . . . . . . . . . . . . . . . . . . . . . . . . . . . . Starting the engine . . . . . . . . . . . . . . . . . . . . . . . . . . .
Switching off the engine . . . . . . . . . . . . . . . . . . . . . .
Shifting . . . . . . . . . . . . . . . . . . . . . . . . . . . . . . . . . . . . . .
Handbrake . . . . . . . . . . . . . . . . . . . . . . . . . . . . . . . . . . .
Rear parking aid* . . . . . . . . . . . . . . . . . . . . . . . . . . . . .
Cruise control system (CCS)* . . . . . . . . . . . . . . . . . .
Communication
. . . . . . . . . . . . . . . . . . . . . . . . . . . . . . .
Mobile phones and two-way radio systems . . . .
Safety
. . . . . . . . . . . . . . . . . . . . . . . . . . . . . . . . . . . . . .
Passive Safety
. . . . . . . . . . . . . . . . . . . . . . . . . . . . . . . .
Basic information . . . . . . . . . . . . . . . . . . . . . . . . . . . .
Correct seated position . . . . . . . . . . . . . . . . . . . . . . .
Seat belts
. . . . . . . . . . . . . . . . . . . . . . . . . . . . . . . . . . . . .
Why seat belts? . . . . . . . . . . . . . . . . . . . . . . . . . . . . . .
The physical principle of a frontal collision . . . . .
Important safety information regarding the use of seat
belts . . . . . . . . . . . . . . . . . . . . . . . . . . . . . . . . . . . . . . . .
How are seat belts correctly fastened? . . . . . . . .
Airbag system
. . . . . . . . . . . . . . . . . . . . . . . . . . . . . . . .
Description of the airbag system . . . . . . . . . . . . . .
Front airbags . . . . . . . . . . . . . . . . . . . . . . . . . . . . . . . .
side airbags* . . . . . . . . . . . . . . . . . . . . . . . . . . . . . . . . .
Head airbags* . . . . . . . . . . . . . . . . . . . . . . . . . . . . . . . .
Deactivating an airbag . . . . . . . . . . . . . . . . . . . . . . . .
Transporting children safely
. . . . . . . . . . . . . . . . .
What you should know about transporting children!
Child seat . . . . . . . . . . . . . . . . . . . . . . . . . . . . . . . . . . . .
Attaching a child seat using the “ISOFIX” system
Attaching child seat using the “Top Tether”* system
6799101015151516161616171718182129292930303034353637404043
4445484949505051535357585960606061616262626363636464646566666769737373
7475767677778080818181828585858687898990929495979799102103
s2lk.2.book Page 3 Monday, April 18, 2011 7:41 AM
Page 12 of 183

The brief instruction11
Using the system
Safety
Driving Tips
General Maintenance
Breakdown assistance
Technical Data
Seat belt height adjuster– Move the height adjuster in the desired direction up or down fig. 4 .
– Then pull firmly on the belt to ensure that the seat belt height adjuster has
correctly locked in place.
Further information page 87, “Seat belt height adjuster”.
WARNING
Adjust the height of the belt in such a wa y that the shoulder part of the belt is
positioned approximately across the midd le of your shoulder - on no account
across your neck!Adjusting the front seats Adjusting a seat in a forward/back direction Adjusting height of seat*
Adjust the angle of the seat backrest
Adjusting lumbar support*
Further information page 49, “Adjusting the front seats”.
WARNING
Only adjust the driver seat when the vehicle is stationary - risk of injury!Electric exterior mirror adjustment*Further information page 48, “Exterior mirror”.
Fig. 4 Front seat: Seat belt height
adjusterFig. 5 Controls at seat
A1
Heating of the external mirror
Adjusting left and right exterior mirrors simultaneously
Adjusting the right-hand exterior mirror
Switching off operating control
A2A3A4
Fig. 6 Inner part of door: Rotary knob
s2lk.2.book Page 11 Monday, April 18, 2011 7:41 AM
Page 38 of 183

Unlocking and locking37
Using the system
Safety
Driving Tips
General Maintenance
Breakdown assistance
Technical Data
The interior monitor and the towing protec
tion monitoring are switched on again
automatically the next time the car is locked.
Note
•
You can switch the interior monitor and the towing protection monitoring off if
there is a possibility that movements from (e.g. children or animals) inside the
vehicle interior or if the vehicle must be tr ansported (e.g. by train or ship) or towed,
might trigger the alarm.
•
The opened storage compartment for spectacles reduces the effectiveness of
the interior monitor. In orde r to ensure the function of the interior monitor to be
fully operational, always close the storage compartment for spectacles before
locking the vehicle.
Power windows*Buttons on the driver's doorThe power windows operate only when ignition is switched on.Opening a window – A window is opened by pressing lightly on the respective button in the door. The process stops when one releases the button.
– Additionally you can open the window automatically (fully opened) by pressing the button up to the stop. Renewed pres sing of the button causes the window
to stop immediately.
Closing a window– A window is closed through pulling lightl y on the respective button in the door.
The closing process stops wh en one releases the button.
– Additionally you can close the window automatically (fully closed) by pulling the button up to the stop. Renewed pulling of the button causes the window to stop
immediately.
The buttons for the individual windows are located in the armrest of the driver's
door fig. 32 , front passenger door and in the rear doors* page 38.
Buttons for the power windows in the armrest for the driver Button for the power window in the driver's door
Button for the power window in the front passenger's door
Button for the power window in the rear door on the right*
Button for the power window in the rear door on the left*
Safety pushbutton*
Safety pushbutton*
You can deactivate the buttons for power windows at rear doors by pressing the
safety pushbutton fig. 32 . The buttons for power windows at rear doors are
activated again by pressing the safety pushbutton again.
If the buttons for the rear doors ar e deactivated, the indicator light
in the safety
switch lights up.
WARNING
•
If you lock the vehicle from the outs ide, do not leave any person in the
vehicle since it is no longer possible to open the windows from the inside in an
emergency.
•
The system is fitted with a force limiter page 38. If there is an obstacle,
the closing process is stopped and the window goes down by several centime-
tres. You should then take particular care when closing the windows! You may
otherwise suffer severe injuries as a result of getting an arm, for example,
jammed in the window!
•
It is recommended to deactivate the el ectrically operated power windows in
the rear doors (safety pushbutton) fig. 32 when children are being trans-
ported on the rear seats.
Fig. 32 Buttons on the driver's door
ABCDS
S
S
S
S
s2lk.2.book Page 37 Monday, April 18, 2011 7:41 AM
Page 42 of 183

Lights and Visibility41
Using the system
Safety
Driving Tips
General Maintenance
Breakdown assistance
Technical Data
Activating the function daylight driving lights– Pull the turn signal light lever towards the steering wheel up to 3 seconds after
switching on the ignition and at the same time, slide it to the top and hold it in
this position for at least 3 seconds.
The daytime driving light is a combination of low-beam and parking light (front and
rear), including licence plate light.
When the daylight driving lights are switched on, the lighting of the instrument
cluster is switched on as well.Fog lights*
Switching on the fog lights– First of all turn the light switch into position
or
fig. 35 .
– Pull the light switch into position .
The rear fog light warning light
page 21 lights up in the instrument cluster
when the fog light is switched off.
Rear fog light
Switching on the rear fog light– First of all turn the light switch into position
or
fig. 35 .
– Pull the switch into position .
The rear fog light warning light
page 21 lights up in the instrument cluster
when the fog light is switched off. Only the rear fog light of the trailer ligh
ts up automatically when you are towing a
trailer using a factory-fitted towing device which is fitted with the rear fog light.
The rear fog light is located in the re ar light array on the driver's side.
Caution
The rear fog light should only b e s w i t c h e d o n i f v i s i b i l i t y i s p a r t i c u l a r l y p o o r ( c o n f o r m
with any varying legal provisions) to avoid dazzling vehicles behind your vehicle.Headlamp range adjustment
Once the low beam is switched on you can then adapt the range of
the headlights to the load of the vehicle.– Turn the control dial fig. 36 until you have adjusted the low beam so that
oncoming traffic is not dazzled.
Settings
The positions correspond approximately to the following vehicle loads: Front seats occupied, luggage compartment empty.
All seats occupied, luggage compartment empty.
All seats occupied, luggage compartment laden.
Driver seat occupied, luggage compartment laden.
Caution
Set the headlight beam adjustment in such a way as to avoid dazzling oncoming
traffic.
Fig. 35 Dash panel: Light switch
1
2
Fig. 36 Dash panel: Lights and Visibility
-123
s2lk.2.book Page 41 Monday, April 18, 2011 7:41 AM
Page 50 of 183

Seats and Stowage49
Using the system
Safety
Driving Tips
General Maintenance
Breakdown assistance
Technical Data
Seats and StowageFront seatsBasic informationThe front seats have a wide range of differ ent settings and can thus be matched to
the physical characteristics of the driver and front passenger. Correct adjustment of
the seats is particularly important for:•
safely and quickly reaching the controls,
•
a relaxed, fatigue-free body position,
•
achieving the maximum protection offered by the seat belts and the airbag
system.
WARNING
•
Never transport more occupants than the maximum seating in the vehicle.
•
Each occupant must correctly fasten the seat belt belonging to the seat. Chil-
dren must be fastened page 97, “Transporting children safely” with a suitable
restraint system.
•
The front seats and the head restraints must always be adjusted to match
the body size of the seat occupant as well as the seat belts must always be
correctly fastened in order to provide an optimal protection for you and your
occupants.
•
Keep your feet in the footwell at all ti mes while driving. Never place your feet
on the dash panel, out of the window or on the seats. This is particularly impor-
tant for the front seat passenger. You will be exposed to increased risk of injury
if it becomes necessary to apply the brak e or in the event of an accident. If an
airbag is deployed, you may suffer fata l injuries when adopting an incorrect
seated position!
•
It is important for the driver and front passenger to maintain a distance of at
least 25 cm from the steering wheel or dash panel. Not maintaining this
minimum distance will mean that the airbag system will not be able to properly
protect you - hazard! The front seats and the head restraints must always also
be correctly adjusted to match the body size of the occupant.
•
Ensure that there are no objects in the footwell as any objects may get
behind the pedals during a driving or braking manoeuvre. You would then no
longer be able to operate the clutch, to brake or accelerate.
Adjusting the front seatsAdjusting a seat in a forward/back direction–Pull the lever fig. 47 up and push the seat into the desired position.
– Release the lever and push the seat further until the lock is heard to engage.Adjusting height of seat*– Lift the seat if required by pulling or pumping lever upwards.
– Lower the seat if required by pushing or pumping lever downwards.Adjust the angle of the seat backrest– Relieve any pressure on the seat backrest (do not lean on it) and turn the hand-
wheel fig. 47 to adjust the desired angle of the backrest.Adjusting lumbar support*– Turn the wheel until you have set the most comfortable curvature of the seat
upholstery in the area of your spine.
The driver's seat should be adjusted in such a way that the pedals can be fully
pressed to the floor with slightly bent legs.
The seat backrest on the driver's seat sh ould be adjusted in such a way that the
upper point of the steering wheel can be easily reached with slightly bent arms.
Fig. 47 Controls at seat
1
1
2
2
3
4
s2lk.2.book Page 49 Monday, April 18, 2011 7:41 AM
Page 51 of 183
Seats and Stowage
50WARNING
•
Only adjust the driver seat when the vehicle is stationary - risk of injury!
•
Take care when adjusting the seat! Adju sting the seat without care can lead
to bruises or injuries.
•
The seat backrests must not be angled too far back when driving otherwise
this will affect proper operation of the se at belts and of the airbag system - risk
of injury!
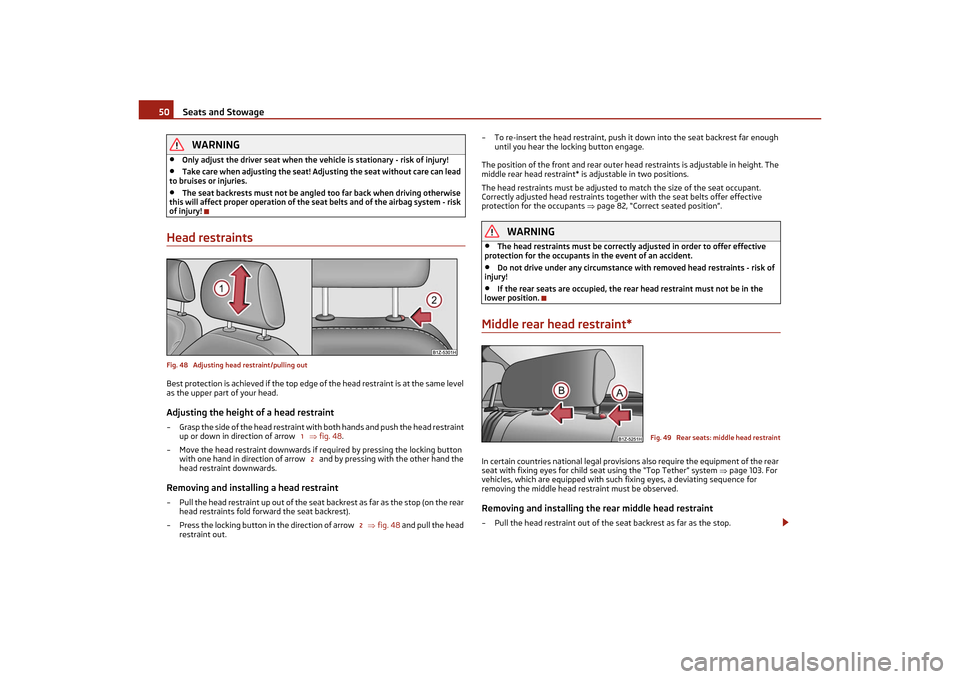
Head restraintsFig. 48 Adjusting head restraint/pulling outBest protection is achieved if the top edge of the head restraint is at the same level
as the upper part of your head.Adjusting the height of a head restraint– Grasp the side of the head restraint with both hands and push the head restraint
up or down in direction of arrow fig. 48 .
– Move the head restraint downwards if required by pressing the locking button with one hand in direction of arrow and by pressing with the other hand the
head restraint downwards.Removing and installing a head restraint– Pull the head restraint up out of the seat backrest as far as the stop (on the rear
head restraints fold forward the seat backrest).
– Press the locking button in the direction of arrow fig. 48 and pull the head
restraint out. – To re-insert the head restraint, push it down into the seat backrest far enough
until you hear the locking button engage.
The position of the front and rear outer head restraints is adjustable in height. The
middle rear head restraint* is adjustable in two positions.
The head restraints must be adjusted to match the size of the seat occupant.
Correctly adjusted head restraints together with the seat belts offer effective
protection for the occupants page 82, “Correct seated position”.
WARNING
•
The head restraints must be correctly adjusted in order to offer effective
protection for the occupants in the event of an accident.
•
Do not drive under any circumstance with removed head restraints - risk of
injury!
•
If the rear seats are occupied, the rear head restraint must not be in the
lower position.
Middle rear head restraint*In certain countries national legal provisions also require the equipment of the rear
seat with fixing eyes for child seat using the “Top Tether” system page 103. For
vehicles, which are equipped with such fixing eyes, a deviating sequence for
removing the middle head restraint must be observed.Removing and installing the rear middle head restraint– Pull the head restraint out of the seat backrest as far as the stop.
12
2
Fig. 49 Rear seats: middle head restraint
s2lk.2.book Page 50 Monday, April 18, 2011 7:41 AM
Page 52 of 183

Seats and Stowage51
Using the system
Safety
Driving Tips
General Maintenance
Breakdown assistance
Technical Data
– Press the locking button in the direction of arrow , press simultaneously the
locking button into the opening using a flat screwdriver with a width of
maximum 5 mm and pull out the head restraint page 50, fig. 49 .
– To re-insert the head restraint, push it down into the seat backrest far enough
until you hear the locking button engage.
WARNING
•
The head restraints must be correctly adjusted in order to offer effective
protection for the occupants in the event of an accident.
•
Do not drive under any circumstance with removed head restraints - risk of
injury!
•
If the rear seats are occupied, the rear head restraint must not be in the
lower position.
Rear seatsFolding the rear seats forwardsFig. 50 Fold the seat cushion forwards/unlock the seat backrestTo enlarge the luggage comp artment, the rear seats can be folded forwards, if
necessary remove the seat cushions. The rear seats can be folded forward individ-
ually on vehicles with divided rear seats*.Folding seats forwards– Before folding the rear seats forwards, you must adapt the position of the front seats in such a way that they are not damaged when the rear seats are folded
forwards. – Pull up the seat cushion in direction of
arrow and fold forwards in direction
of arrow fig. 50.
– Press the unlocking knob and fo ld the seat backrest forwards.
If the front seats are too far back, we recommend that you have the rear head
restraints removed before the seat backrests are folded forward. Store the removed
head restraints in such a way that they cannot be damaged or soiled. Observe the
guidelines page 53, “luggage compartment”.
Move seats into the initial positionMove seats into the initial position– Install the head restraint in th e slightly lifted seat backrest.
– Place the rear lateral seat belt be hind the edge of the side trim panel
fig. 51 .
– Then push the seat backrest back into the upright position until the securing knob clicks into place - check by pulling on the seat backrest.
– Make sure that the red pin is covered fig. 50 .
– Move the seat cushion into its original position.
WARNING
•
The belts and the belt locks must be in their original position after folding
back the seat cushions and the seat ba ckrests - they must be ready to use.
•
The seat backrests must be securely interlocked in position so that no
objects in the luggage co mpartment can slide forwar ds if there is sudden
braking - risk of injury!
A
B
1
2
A
Fig. 51 Lock the seat backrest
C
B
s2lk.2.book Page 51 Monday, April 18, 2011 7:41 AM
Page 53 of 183
Seats and Stowage
52
•
Pay attention that the seat backrests are correctly interlocked. It is only then
that the three-point seat belt for the midd le seat can reliably fulfil its function.
•
Before folding the seat backrest back into the secure position, place the rear
lateral seat belt behind the edge of the side trim panel. Take suitable measures
to prevent that the seat belt is jammed between the seat backrest and the side
trim panel and is thus damaged.
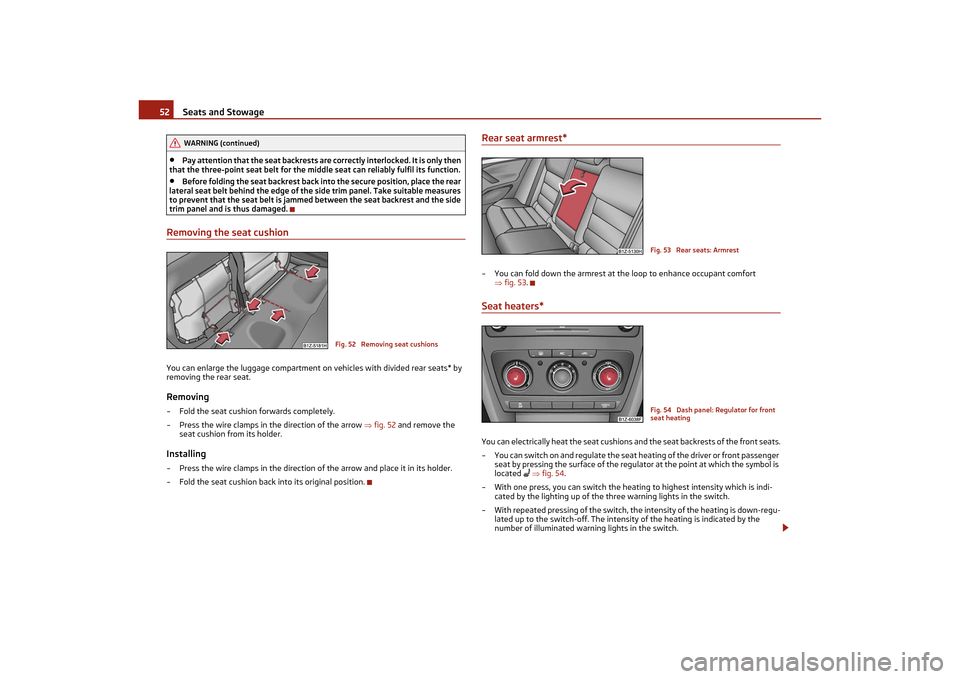
Removing the seat cushionYou can enlarge the luggage compartment on vehicles with divided rear seats* by
removing the rear seat.Removing– Fold the seat cushion forwards completely.
– Press the wire clamps in the direction of the arrow fig. 52 and remove the
seat cushion from its holder.Installing– Press the wire clamps in the direction of the arrow and place it in its holder.
– Fold the seat cushion back into its original position.
Rear seat armrest*– You can fold down the armrest at th e loop to enhance occupant comfort
fig. 53 .Seat heaters*You can electrically heat the seat cushions and the seat backrests of the front seats.
– You can switch on and regulate the seat heating of the driver or front passenger seat by pressing the surface of the regulator at the point at which the symbol is
located
fig. 54 .
– With one press, you can switch the heating to highest intensity which is indi- cated by the lighting up of the three warning lights in the switch.
– With repeated pressing of the switch, th e intensity of the heating is down-regu-
lated up to the switch-off. The intensit y of the heating is indicated by the
number of illuminated warning lights in the switch.
WARNING (continued)
Fig. 52 Removing seat cushions
Fig. 53 Rear seats: ArmrestFig. 54 Dash panel: Regulator for front
seat heating
s2lk.2.book Page 52 Monday, April 18, 2011 7:41 AM