2011 SKODA OCTAVIA TOUR belt
[x] Cancel search: beltPage 53 of 183

Seats and Stowage
52
•
Pay attention that the seat backrests are correctly interlocked. It is only then
that the three-point seat belt for the midd le seat can reliably fulfil its function.
•
Before folding the seat backrest back into the secure position, place the rear
lateral seat belt behind the edge of the side trim panel. Take suitable measures
to prevent that the seat belt is jammed between the seat backrest and the side
trim panel and is thus damaged.
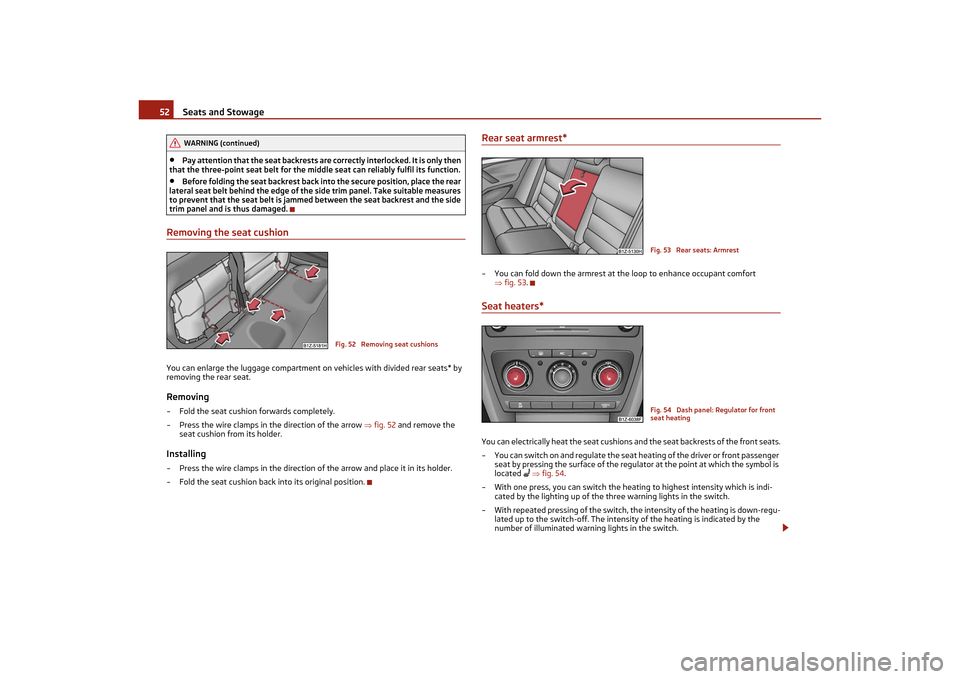
Removing the seat cushionYou can enlarge the luggage compartment on vehicles with divided rear seats* by
removing the rear seat.Removing– Fold the seat cushion forwards completely.
– Press the wire clamps in the direction of the arrow fig. 52 and remove the
seat cushion from its holder.Installing– Press the wire clamps in the direction of the arrow and place it in its holder.
– Fold the seat cushion back into its original position.
Rear seat armrest*– You can fold down the armrest at th e loop to enhance occupant comfort
fig. 53 .Seat heaters*You can electrically heat the seat cushions and the seat backrests of the front seats.
– You can switch on and regulate the seat heating of the driver or front passenger seat by pressing the surface of the regulator at the point at which the symbol is
located
fig. 54 .
– With one press, you can switch the heating to highest intensity which is indi- cated by the lighting up of the three warning lights in the switch.
– With repeated pressing of the switch, th e intensity of the heating is down-regu-
lated up to the switch-off. The intensit y of the heating is indicated by the
number of illuminated warning lights in the switch.
WARNING (continued)
Fig. 52 Removing seat cushions
Fig. 53 Rear seats: ArmrestFig. 54 Dash panel: Regulator for front
seat heating
s2lk.2.book Page 52 Monday, April 18, 2011 7:41 AM
Page 58 of 183

Seats and Stowage57
Using the system
Safety
Driving Tips
General Maintenance
Breakdown assistance
Technical Data
Net partition* (Combi)Use the net partition be hind the rear seatsFig. 62 Folding down the storage compartment cover/pulling out the net partitionPulling out– Fold down the storage compartmen t cover behind the rear seats fig. 62 - left.
– Pull the net partition at the bracket out of the housing in direction of the holders .
– Insert the cross rod into one of the mo unts and push the cross rod forwards.
– In the same way, fix the cross rod to the other side of the vehicle, mount .
– Fold the storage compartment cover downwards.Folding– Fold down the storage compartmen t cover behind the rear seats fig. 62 .
– Pull the cross rod back slightly, first on the one side then on the other side and
take the cross rod out of the mounts .
– Hold the cross rod in such a way that the net partition can roll up slowly and
without damage into housing .
– Fold the storage compartment cover downwards.
If you wish to use the entire luggage compartment, you can remove the luggage
compartment cover page 56, fig. 61 .
WARNING
•
First check for yourself that the cross road is inserted into the mounts in
the front position!
•
Pay attention that the rear seat backrest is correctly interlocked. It is only
then that the three-point seat belt for the middle seat can reliably fulfil its
function.
Using the net partition behind the front seatsPulling out– Fold the rear seats forwards page 51
– Pull the net partition net at the plate out of the housing fig. 63 .
– Insert the cross rod into the mount first on the one side and push the cross rod forwards.
– In the same way, fix the cross rod to the other side of the vehicle, mount .Folding–Pull the cross rod back slightly, first on the one side then on the other side and
take the cross rod out of the mounts fig. 63 .
– Hold the cross rod in such a way that th e net partition can roll up slowly and
without damage into housing .
– Fold the rear seats back into their original position.
A
B
C
C
C
C
B
C
Fig. 63 Pull out the net partition
A
B
C
C
C
B
s2lk.2.book Page 57 Monday, April 18, 2011 7:41 AM
Page 59 of 183

Seats and Stowage
58WARNING
•
The belt locks and the belts must be in their original position after folding
back the seat cushions and the seat backrests - they must be ready to use.
•
The seat backrests must be securely interlocked in position so that no
objects in the luggage compartment can slide forwards if there is sudden
braking - risk of injury!
•
Pay attention that the rear seat backrest is correctly interlocked. It is only
then that the three-point seat belt for the middle seat can reliably fulfil its func-
tion.
•
First check for yourself that the cross road is inserted into the mounts in
the front position!
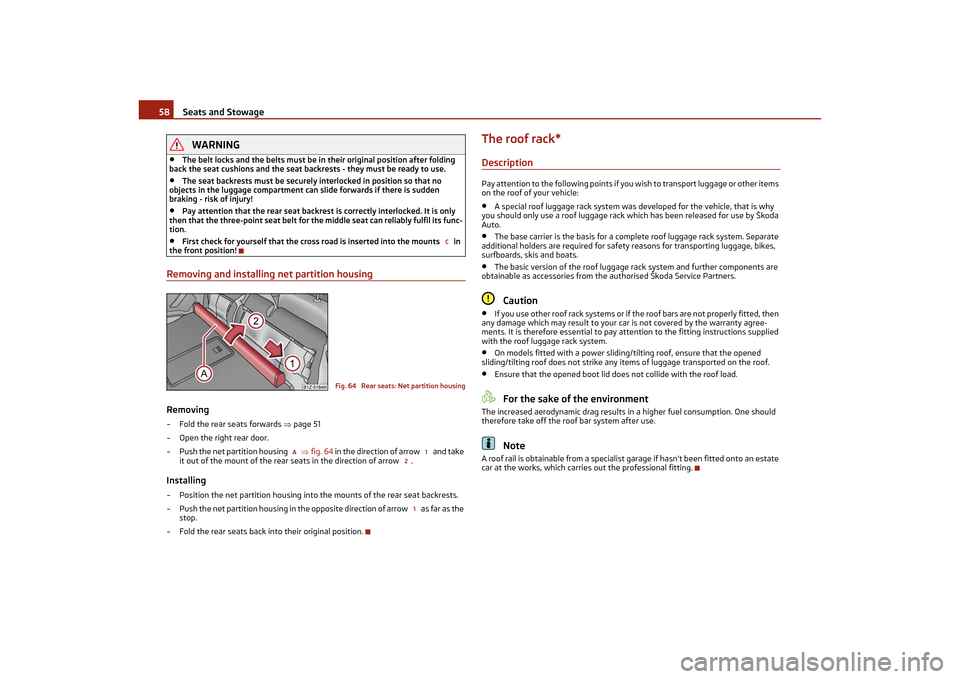
Removing and installing net partition housingRemoving– Fold the rear seats forwards page 51
– Open the right rear door.
– Push the net partition housing fig. 64 in the direction of arrow and take
it out of the mount of the rear seats in the direction of arrow .Installing– Position the net partition housing into the mounts of the rear seat backrests.
– Push the net partition housing in the opposite direction of arrow as far as the stop.
– Fold the rear seats back in to their original position.
The roof rack*DescriptionPay attention to the following points if you wish to transport luggage or other items
on the roof of your vehicle:•
A special roof luggage rack system was developed for the vehicle, that is why
you should only use a roof luggage rack which has been released for use by Škoda
Auto.
•
The base carrier is the basis for a complete roof luggage rack system. Separate
additional holders are required for safety reasons for transporting luggage, bikes,
surfboards, skis and boats.
•
The basic version of the roof luggage ra ck system and further components are
obtainable as accessories from the authorised Škoda Service Partners.Caution
•
If you use other roof rack systems or if th e roof bars are not properly fitted, then
any damage which may result to your car is not covered by the warranty agree-
ments. It is therefore essential to pay atte ntion to the fitting instructions supplied
with the roof luggage rack system.
•
On models fitted with a power sliding/tilting roof, ensure that the opened
sliding/tilting roof does not strike any items of luggage transported on the roof.
•
Ensure that the opened boot lid do es not collide with the roof load.For the sake of the environment
The increased aerodynamic drag results in a higher fuel consumption. One should
therefore take off the roof bar system after use.
Note
A roof rail is obtainable from a specialist garage if hasn't been fitted onto an estate
car at the works, which carries out the professional fitting.
C
Fig. 64 Rear seats: Net partition housing
A
1
21
s2lk.2.book Page 58 Monday, April 18, 2011 7:41 AM
Page 82 of 183

Passive Safety81
Using the system
Safety
Driving Tips
General Maintenance
Breakdown assistance
Technical Data
SafetyPassive SafetyBasic informationDriving the safe way
Passive safety measures reduce the risk of injury in accident situa-
tions.In this section you will find important information, tips and notes on the subject of
passive safety in your vehicle. We have combined everything here which you should
be familiar with, for example, regarding seat belts, airbags, child seats and safety of
children. It is therefore important, in particular, to comply with the notes and warn-
ings in this section for your own interest and in the interest of those travelling with
you.
WARNING
•
This chapter contains important information on how to use the vehicle for
the driver and his occupants. You will find further information on safety, which
concerns you and those travelling with yo u, in the following chapters of this
Owner's Manual.
•
The complete on-board literature shou ld always be in the vehicle. This
applies in particular, if you rent out or sell the vehicle.
Safety equipment
The safety equipment is part of th e occupant protection and it can
reduce the risk of injuries in accident situations.“Do not put at risk” your safety and the safe ty of those travelling with you . In the
event of an accident, the safety equipment can reduce the risk of injuries. The
following list contains part of th e safety equipment in your vehicle:•
Three-point seat belts for all the seats,
•
belt force limiter for front seats and outer rear seats*,
•
belt tensioner for front seats,
•
seat belt height adjuster for front seats,
•
front airbag for the driver and the front seat passenger*,
•
side airbags*,
•
head airbags*,
•
anchoring points for child seat using the “ISOFIX” system,
•
anchoring points for child seat using the “Top Tether” system,
•
head restraint adjustable for height,
•
adjustable steering column.
The specified safety equipment works toge ther, in order to optimally protect you
and those travelling with yo u in accident situations. The safety equipment does not
protect you or the people travelling with you, if you or your occupants adopt an
incorrect seated position or the equipment is not correctly adjusted or used.
For this reason you will be provided with information on why this equipment is very
important, how it protects you and the occupants, what should be observed when
using the equipment and how you and the peop le travelling with you can make full
use of the existing safety equipment. This Owner's Manual contains important
warning notes, which you and those travelli ng with you should pay attention to in
order to reduce a risk of injury.
Safety concerns everybody!
Before setting off
The driver is always fully responsible for his occupants and for the
operating safety of the vehicle.For your own safety and the safety of the people travelling with you, please pay
attention to the following points before setting off:•
Ensure that the lighting and the turn signal system are functioning properly.
•
Inspect the tyre inflation pressure.
•
Ensure that all the windows offer a good visibility to the outside.
•
Safely attach the items of luggage page 53, “Loading the luggage compart-
ment”.
•
Ensure that no objects can obstruct the pedal.
•
Adjust the mirror, the front seat and the head restraint to match your body size.
s2lk.2.book Page 81 Monday, April 18, 2011 7:41 AM
Page 83 of 183

Passive Safety
82
•
Point out to your occupants that the head restraints must be adjusted to match
their body size.
•
Protect the children in suit able child seats with correctly fastened seat belts
page 97, “Transporting children safely”.
•
Adopt the correct seated position page 82, “Correct seated position”. Also
inform your occupants to adop t the correct seated position.
•
Fasten the seat belt correctly. Also inform your occupants to properly fasten the
seat belts page 87, “How are seat belts correctly fastened?”.
What influences the driving safety?
The driving safety is primarily determined by the style of driving and
the personal behaviour of all the occupants.The driver is fully responsible for himself and his occupants. If your driving safety is
effected, you place yourself and the oncoming traffic at risk. Please refer to the
following guidelines.•
Do not get distracted from concentrating on the traffic situation, e.g. by your
occupants or mobile phone calls.
•
Never drive when your driving ability is impaired, e.g. through medication,
alcohol, drugs.
•
Keep to the traffic regulations and the permissible speed limit.
•
Adjust the driving speed at all times to th e road condition as well as to the traffic
and weather conditions.
•
Take regular breaks on long journe ys - at the latest every two hours.
Correct seated positionCorrect seated position for the driver
Correct seated position for the driver is important for safe and
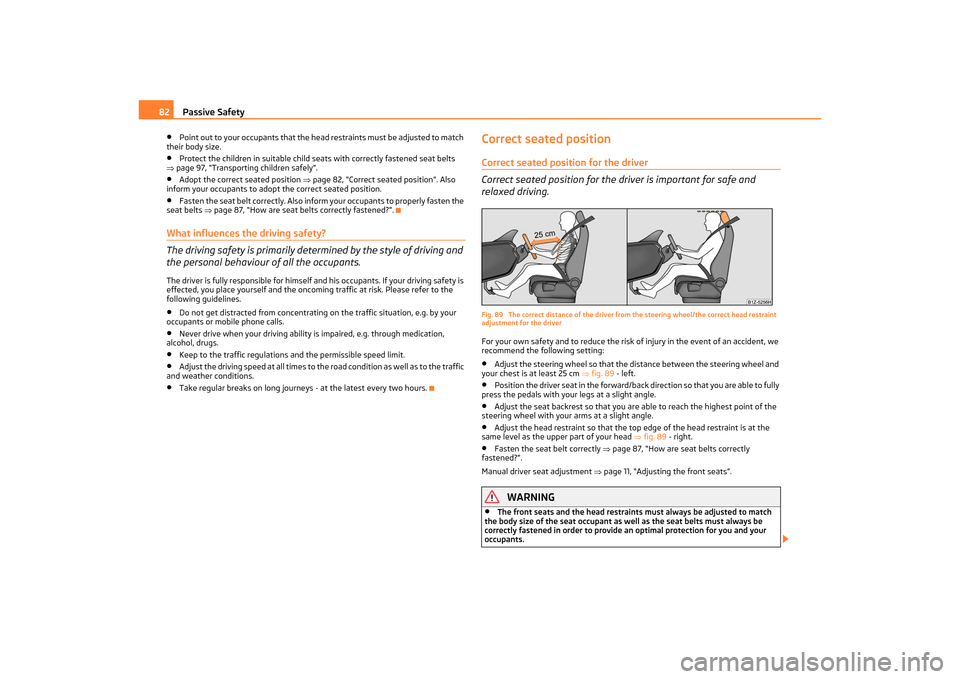
relaxed driving.Fig. 89 The correct distance of the driver fr om the steering wheel/the correct head restraint
adjustment for the driverFor your own safety and to reduce the risk of injury in the event of an accident, we
recommend the following setting:•
Adjust the steering wheel so that the distance between the steering wheel and
your chest is at least 25 cm fig. 89 - left.
•
Position the driver seat in the forward/back direction so that you are able to fully
press the pedals with your legs at a slight angle.
•
Adjust the seat backrest so that you ar e able to reach the highest point of the
steering wheel with your arms at a slight angle.
•
Adjust the head restraint so that the to p edge of the head restraint is at the
same level as the upper part of your head fig. 89 - right.
•
Fasten the seat belt correctly page 87, “How are seat belts correctly
fastened?”.
Manual driver seat adjustment page 11, “Adjusting the front seats”.
WARNING
•
The front seats and the head restraints must always be adjusted to match
the body size of the seat occupant as well as the seat belts must always be
correctly fastened in order to provide an optimal protection for you and your
occupants.
s2lk.2.book Page 82 Monday, April 18, 2011 7:41 AM
Page 84 of 183

Passive Safety83
Using the system
Safety
Driving Tips
General Maintenance
Breakdown assistance
Technical Data
•
The driver must maintain a distance of at least 25 cm to the steering wheel
page 82, fig. 89 - left. Not maintaining this minimum distance will mean that
the airbag system will not be able to properly protect you - hazard!
•
When driving, hold the steering wheel with both hands firmly on the outer
edge in the 9 o'clock and 3 o'clock positi on. Never hold the steering wheel firmly
in the 12 o'clock position or in another way (e.g. in the middle of the steering
wheel or at the inner steering wheel edge). In such cases, injuries to the arms,
the hands and the head can occur when the driver airbag is deployed.
•
The seat backrests must not be angled too far back when driving otherwise
this will affect proper operation of the se at belts and of the airbag system - risk
of injury!
•
Ensure that there are no objects in the footwell as any objects may get
behind the pedals during a driving or braking manoeuvre. You would then no
longer be able to operate the clutch, to brake or accelerate.
Correct seated position for the front passenger
The front passenger must maintain a distance of at least 25 cm from
the dash panel so that the airbag offers him the greatest possible
safety it is deployed.For the safety of the front passenger and to reduce the risk of injury in the event of
an accident, we recommend the following setting:•
Adjust the front passenger seat as far as possible to the rear.
•
Adjust the head restraint so that the top edge of the head restraint is at the
same level as the upper part of your head page 82, fig. 89 - right.
•
Fasten the seat belt correctly page 87, “How are seat belts correctly
fastened?”.
In exceptional cases the front passenger airbag can be deactivated page 95,
“Deactivating an airbag”.
Manual front passenger adjustment page 11, “Adjusting the front seats”.
WARNING
•
The front seats and the head restraints must always be adjusted to match
the body size of the seat occupant as well as the seat belts must always be
correctly fastened in order to provide an optimal protection for you and your
occupants.
•
The front passenger must maintain a distance of at least 25 cm to the dash
panel. Not maintaining this minimum dist ance will mean that the airbag system
will not be able to prop erly protect you - hazard!
•
Keep your feet in the footwell at all times while driving. Never place your feet
on the dash panel, out of the window or on the seats. You will be exposed to
increased risk of injury if it becomes ne cessary to apply the brake or in the event
of an accident. If an airbag is deployed, you may suffer fatal injuries when
adopting an incorrect seated position!
•
The seat backrests must not be angled too far back when driving otherwise
this will affect proper operation of the seat belts and of the airbag system - risk
of injury!
Correct seated position for the occupants on the rear seats
Occupants on the rear seats must sit upright, keep the feet in the
footwell and must have their seat belts correct ly fastened.To reduce the risk of injury in the event of a sudden braking manoeuvre or an acci-
dent, the occupants on the rear seats must observe the following:•
Adjust the head restraints so that the top edge of the head restraints is at the
same level as the upper part of your head page 82, fig. 89 - on the right.
•
Fasten the seat belt correctly page 87, “How are seat belts correctly
fastened?”.
•
If you are transporting page 97, “Transporting children safely” children in the
vehicle, please use a suitable child restraint system.
WARNING
•
The head restraints must always be adju sted to match the body size, in order
to offer an optimal protection for you and your occupants.
•
Keep your feet in the footwell at all times while driving. Never place your feet
out of the window or on the seats. You will be exposed to increased risk of injury
if it becomes necessary to apply the brak e or in the event of an accident. If an
airbag is deployed, you may suffer fata l injuries when adopting an incorrect
seated position!
•
If the occupants on the rear seats are not sitting upright, the risk of injury is
increased due to incorrect routing of the seat belt.
WARNING (continued)
WARNING (continued)
s2lk.2.book Page 83 Monday, April 18, 2011 7:41 AM
Page 85 of 183

Passive Safety
84
Examples of an incorrect seated position
An incorrect seated posi tion can lead to severe injuries or death for
the occupants.Seat belts offer their optimum protection on ly if the webbing of the seat belts is
properly routed. Incorrect seated positions considerably reduce the protective func-
tions of the seat belts and therefore increase the risk of injury due to an incorrect
routing of the seat belt. The driver is fully responsible for himself and the occupants,
in particular for the children. Do not permit an occupant to adopt an incorrect seated
position when the car is moving.
The following list contains the examples of seated positions which are dangerous
for the occupants. This list is not complete, however we would like you to get
familiar with this subject.
Therefore, while the car is moving never:•
stand up in the vehicle,
•
stand up on the seats,
•
kneel onto the seats,
•
tilt the seat backrest fully to the back,
•
lean against the dash panel,
•
lie on the rear seats,
•
only sit on the front area of the seat,
•
sit to the side,
•
lean out of the window,
•
put the feet out of the window,
•
put the feet on the dash panel,
•
put the feet on the seat upholstery,
•
occupy the footwell,
•
have the seat belt not fastened,
•
occupy the luggage compartment.
WARNING
•
If the occupant adopts an incorrect seat ed position, he is exposed to life-
threatening injuries, in case he is hit by a deployed airbag.
•
Before setting off, please adopt the correct seated position and do not
change this seated position while the car is moving. Also advise your occupants to adopt the correct seated
position and not to change this seated position
while the car is moving.
WARNING (continued)
s2lk.2.book Page 84 Monday, April 18, 2011 7:41 AM
Page 86 of 183

Seat belts85
Using the system
Safety
Driving Tips
General Maintenance
Breakdown assistance
Technical Data
Seat beltsWhy seat belts?It is a proven fact that seat belt s offer good protection in accidents fig. 90. Thus
wearing a seat belt is a legal requirement in most countries.
Seat belts which have been correctly fast ened and adjusted hold the occupants of
the car in the correct seated position fig. 90. The seat belts reduce the kinetic
energy (energy of motion) to a considerable extent. They also prevent uncontrolled
movements which, in turn, may we ll result in severe injuries.
The occupants of a vehicle who have fastened and correctly adjusted their seat belt,
profit to a major extent from the fact that the kinetic energy is optimally absorbed
by the belts. The structure of the front end of the vehicle and other passive safety
measures, such as the airbag system, also contribute to reducing the kinetic energy.
The energy produced is thus absorbed and there is less risk of injury.
Accident statistics prove that seat belts which are fastened and properly adjusted
reduce the risk of an injury and enhance th e chance of survival in a major accident
page 85.
It is important that you pay attention to safety measures, particularly when trans-
porting children in the vehicle page 97, “What you should know about trans-
porting children!”.
WARNING
•
F a s t e n y o u r s e a t b e l t e a c h t i m e b e f o r e s e t t i n g o f f , a l s o w h e n d r i v i n g i n t o w n !
This also applies to the people seat ed at the rear - risk of injury!
•
Expectant women must also always wear a seat belt. This is the only way of
ensuring optimal protection for the unborn child page 87.
•
It i s i m po rta n t f or th e b el t we bb in g to be p rop er ly rou te d i f th e s ea t be lts a re
to offer the maximum protection. You can see a description of how safety belts
should be fitted properly on the next pages.Note
Please comply with any differing legal requirements when using the seat belts.The physical principle of a frontal collisionFig. 91 The driver is thrown forward if not we aring a belt/the rear seat occupant is thrown
forward if not wearing a beltThe physical principle of a frontal accident can be explained quite simply:
Motion energy, so-called kinetic energy, is produced as soon as the vehicle is
moving, both for the vehicle and its occupants. The magnitude of this kinetic energy
depends essentially on the speed at which the vehicle is travelling and on the
weight of the vehicle and the occupants. The greater the speed and weight
increase, the greater the amount of energy which has to be absorbed in the event
of an accident.
The speed of the vehicle is, nevertheless, the most important factor. Doubling the
speed of the vehicle from 25 km/h up to 50 km/hour increases the kinetic energy
four times.
Fig. 90 Driver wearing seat belt
WARNING (continued)
s2lk.2.book Page 85 Monday, April 18, 2011 7:41 AM