2011 SKODA OCTAVIA window
[x] Cancel search: windowPage 101 of 248

3
- start engine
Applies to all models:
Position 1 To
lock the steering , with the ignition key withdrawn, turn the steering wheel un-
til the steering locking pin is heard to engage. You should always lock the steering
as a general rule if you leave your vehicle. This acts as a deterrent against possible
theft of your vehicle ⇒ .
Position 2 Move the steering wheel back and forward a little if the ignition key cannot, or
cannot easily be turned into this position, in order to release the steering lock.
Position
3 The engine is started in this position. At the same time switched on low beam or
main beam or other electrical components with major power consumption are
briefly switched off. The ignition key moves back into position
2 when one relea-
ses the key.
The ignition key must be turned back into position 1 each time before starting
the engine again. The starter repeat lock in the ignition lock prevents the starter
being engaged when the engine is running and thus getting damaged.
Ignition key withdrawal lock (automatic gearbox)
You can only withdraw the ignition key after switching off the ignition if the selec-
tor lever is in position P.WARNING
● When driving, the ignition key must always be in the position 2 (ignition
switched on) without the engine running. This position is indicated by the
warning lights coming on. If this is not the case, it could result in unexpected
locking of the steering wheel - risk of accident!
● Only remove the ignition key from the ignition lock when the vehicle has
come to a standstill (by applying the handbrake or moving the selector lever
into the position
P). The steering lock can engage immediately - risk of acci-
dent!
● Always withdraw the ignition key if you are going to leave the vehicle,
even for a short time. This is particularly important if children are left in the
vehicle. The children might otherwise start the engine or switch on electrical
equipment (e.g. power windows) - risk of accident or injury! Starting the engine
General You can only start the engine only using an original ignition key.
Manual gearbox
– Place the gearshift lever into neutral and put on the handbrake firmly before
starting the engine.
– Engage the clutch pedal and keep it depressed until the engine starts.
If you start the engine without depressing the clutch pedal, the engine does not
start and the following message appears in the Information display Depress
clutch! or CLUTCH in the display of the instrument cluster.
– Let go of the key as soon as the engine starts otherwise there may be damage
to the starter.
Automatic gearbox
– Place the gearshift lever into P or N before starting the engine, and apply the
handbrake firmly.
– Let go of the key as soon as the engine starts otherwise there may be damage
to the starter.
The engine running noises may louder at first be louder for a short time after
starting the cold engine until oil pressure can be built up in the hydraulic valve
clearance compensation. This is quite normal and is not an operating problem.
If the engine does not start ...
You can use the battery of another vehicle as a jump-start aid ⇒
page 206. WARNING
● Never run the engine in non ventilated or enclosed areas. The exhaust
gases of the engine contain besides the odorless and colourless carbon mon-
oxide a poisonous gas - hazard! Carbon monoxide can cause unconsciousness
and death.
● Never leave your vehicle unattended with the engine running. £ 99
Starting-off and Driving Using the system Safety Driving Tips General Maintenance Breakdown assistance Technical data
Page 123 of 248

Voice control
Dialogue On vehicles which are factory-fitted with the navigation system Co-
lumbus, it is only possible to operate the voice control via this de-
vice, see the operating instructions for Columbus.
The period of time in which the system is ready to receive voice commands and to
carry them out is called a dialogue. The system gives audible feedback and guides
you if necessary through the relevant functions.
Optimum understanding of the commands depends on several factors:
● Speak with a normal tone of voice without intonation and excessive pauses.
● Avoid a bad pronunciation.
● Close the doors, windows and sliding roof, in order to reduce or stop disturbing
exterior noise.
● It is recommended to speak louder at higher speeds, so that the tone of your
voice is louder than the increased surrounding noise.
● During the dialogue limit additional noise in the vehicle, e.g. simultaneously
talking occupants.
● Do not speak, if the system makes an announcement.
● The microphone for voice control is inserted in the moulded headliner and di-
rected to the driver and front passenger. Therefore the driver and the front pas-
senger can operate the equipment.
If a voice command is not detected, the system answers with
“Sorry?” and a new
entry can be performed. After the 2nd error the system repeats the aid. After the
3rd error the answer “Procedure cancelled ” is given and the dialogue is ended.
Switch on voice control (dialogue)
● by briefly pressing the button on the adapter
1)
⇒ fig. 112 ;
● by pressing the 1 button on the multi-function steering wheel for a longer
time ⇒ fig. 113. Switching off voice control (dialogue)
If the system is currently playing a message, you will need to end the message
currently being played:
●
by briefly pressing the button on the adapter
1)
;
● by pressing the 1 button on the multi-function steering wheel for a longer
time.
If the system expects a voice command, you can end the dialogue yourself:
● Do some with the CANCEL voice command;
● by pressing the button on the adapter
1)
;
● by pressing the 1 button on the multi-function steering wheel for a longer
time. Note
● The dialogue of an incoming call is immediately interrupted.
● The voice control is only possible in vehicles fitted with a multi-function steer-
ing wheel with telephone control or a phone holder and adapter.
Voice commands Basic voice commands for operating the telephone control unit
Voice command Action
HELP After this command the system repeats all possible
commands.
CALL XYZ With this command you call up the contact from the
phone book ⇒ page 122. PHONE BOOK After this command, for example the phone book can
be repeated, a voice entry for the contact can be up-
dated or deleted etc. CALL HISTORY Lists of dialed numbers, missed calls etc.
DIAL NUMBER After this command a phone number can be entered
which establishes a connection to the requested par-
ty.
REDIAL After this command the system selects the last se-
lected number.
£1)
Not valid for vehicles which are fitted with the radio navigation system Columbus. 121
Communication Using the system Safety Driving Tips General Maintenance Breakdown assistance Technical data
Page 130 of 248

Voice control
Dialogue On vehicles which are factory-fitted with the navigation system Co-
lumbus, it is only possible to operate the voice control via this de-
vice, see the operating instructions for Columbus.
The period of time in which the system is ready to receive voice commands and to
carry them out is called a dialogue. The system gives audible feedback and guides
you if necessary through the relevant functions.
Optimum understanding of the commands depends on several factors:
● Speak with a normal tone of voice without intonation and excessive pauses.
● Avoid a bad pronunciation.
● Close the doors, windows and sliding roof, in order to reduce or stop disturbing
exterior noise.
● It is recommended to speak louder at higher speeds, so that the tone of your
voice is louder than the increased surrounding noise.
● During the dialogue limit additional noise in the vehicle, e.g. simultaneously
talking occupants.
● Do not speak, if the system makes an announcement.
● The microphone for voice control is inserted in the moulded headliner and di-
rected to the driver and front passenger. Therefore the driver and the front pas-
senger can operate the equipment.
Switch on voice control (dialogue)
You can start the dialogue at any time by pressing the 1 button on the multi-
function steering wheel ⇒ page 125.
If the system does not recognise your command, it repeats the first part of the aid
and thus a new entry is possible. After the 2nd error the system repeats the sec-
ond part of the aid. After the 3rd error the answer
“Procedure cancelled ” is given
and the dialogue is ended.
Switching off voice control (dialogue)
If the system is currently playing a message, you will need to end the message
currently being played by pressing the 1 button on the multi-function steering
wheel. If the system expects a voice command, you can end the dialogue yourself:
●
Do some with the CANCEL voice command;
● by pressing the 1 button on the multi-function steering wheel.
Note
The dialogue of an incoming call is immediately interrupted.
Voice commands Basic voice commands for operating the telephone control unit
Voice command Action
HELP After this command the system repeats all possible
commands.
CALL NAME After this command a name can be entered which es-
tablishes a connection to the requested partner. DIAL NUMBER After this command a phone number can be entered
which establishes a connection to the requested par-
ty.
REDIAL The last selected telephone number is selected.
READ ADDRESSBOOK The system reads the contacts in the telephone
book.
READ MESSAGES The system reads the messages which were received
while the telephone was connected with the hands-
free system. SHORT DIALOGUE Help is clearly reduced (good operating knowledge
provided).
LONG DIALOGUE Help is not reduced (suitable for beginners).
CANCEL The dialogue is ended.
Store voice recording of a contact
If automatic name recognition does not work reliably for some contacts, you will
can choose to save your own voice entry for the contact in the menu point
Phone
book - Voice Tag - Record.
You can also store your own voice entry using voice control in the menu FURTHER
OPTIONS . 128
Communication
Page 133 of 248

Safety
Passive Safety
Basic information
Driving the safe way Passive safety measures reduce the risk of injury in accident situa-
tions.
In this section you will find important information, tips and notes on the subject of
passive safety in your vehicle. We have combined everything here which you
should be familiar with, for example, regarding seat belts, airbags, child seats and
safety of children. It is therefore important, in particular, to comply with the notes
and warnings in this section for your own interest and in the interest of those
travelling with you. WARNING
● This chapter contains important information on how to use the vehicle for
the driver and his occupants. You will find further information on safety, which
concerns you and those travelling with you, in the following chapters of this
Owner's Manual.
● The complete on-board literature should always be in the vehicle. This ap-
plies in particular, if you rent out or sell the vehicle.
Safety equipment The safety equipment is part of the occupant protection and it can
reduce the risk of injuries in accident situations.
“Do not put at risk
” your safety and the safety of those travelling with you . In the
event of an accident, the safety equipment can reduce the risk of injuries.
The following list contains part of the safety equipment in your vehicle:
● three-point seat belts for all the seats;
● belt force limiter for front and outer rear seats;
● belt tensioners for front seats; ●
seat belt height adjusters for front seats;
● front airbag for the driver and front passenger;
● side airbags;
● head airbags;
● anchoring points for child seat using the “ISOFIX” system;
● anchoring points for child seat using the “Top Tether” system;
● head restraints adjustable for height;
● adjustable steering column.
The specified safety equipment works together, in order to optimally protect you
and those travelling with you in accident situations. The safety equipment does
not protect you or the people travelling with you, if you or your occupants adopt
an incorrect seated position or the equipment is not correctly adjusted or used.
For this reason you will be provided with information on why these equipment
components are very important, how it protects you and the occupants, what
should be observed when using the equipment and how you and the people trav-
elling with you can make full use of the existing safety equipment. This Owner's
Manual contains important warning notes, which you and those travelling with
you should pay attention to in order to reduce a risk of injury.
Safety concerns everybody!
Before setting off The driver is always fully responsible for his occupants and for the
operating safety of the vehicle.
For your own safety and the safety of the people travelling with you, please pay
attention to the following points before setting off.
● Ensure that the lighting and the turn signal system are functioning properly.
● Inspect the tyre inflation pressure.
● Ensure that all the windows offer a good visibility to the outside.
● Safely attach the items of luggage ⇒ page 66
, Loading the luggage compart-
ment. £ 131
Passive Safety Using the system Safety Driving Tips General Maintenance Breakdown assistance Technical data
Page 135 of 248

WARNING
● The front seats and the head restraints must always be adjusted to match
the body size of the seat occupant as well as the seat belts must always be
correctly fastened in order to provide an optimal protection for you and your
occupants.
● The driver must maintain a distance of at least 25 cm to the steering wheel
⇒ fig. 116 left. Not maintaining this minimum distance will mean that the air-
bag system will not be able to properly protect you - hazard!
● When driving, hold the steering wheel with both hands firmly on the outer
edge in the 9 o'clock and 3 o'clock position. Never hold the steering wheel
firmly in the 12 o'clock position or in another way (e.g. in the middle of the
steering wheel or at the inner steering wheel edge). In such cases, injuries to
the arms, the hands and the head can occur when the driver airbag is de-
ployed.
● The seat backrests must not be angled too far back when driving other-
wise this will affect proper operation of the seat belts and of the airbag sys-
tem - risk of injury!
● Ensure that there are no objects in the footwell as any objects may get be-
hind the pedals during a driving or braking manoeuvre. You would then no
longer be able to operate the clutch, to brake or accelerate.
Correct seated position for the front passenger The front passenger must maintain a distance of at least 25 cm
from the dash panel so that the airbag offers him the greatest pos-
sible safety it is deployed.
For the safety of the front passenger and to reduce the risk of injury in the event
of an accident, we recommend the following setting:
● Adjust the front passenger seat as far as possible to the rear.
● Adjust the head restraint so that the top edge of the head restraint is at the
same level as the upper part of your head ⇒
fig. 116 - right.
● Fasten the seat belt correctly ⇒
page 137, How are seat belts correctly fas-
tened?.
In exceptional cases the front passenger airbag can be deactivated ⇒ page 145,
Deactivating an airbag.
Manual front passenger adjustment ⇒ page 60, Adjusting the front seats. Electrical front passenger seat adjustment
⇒
page 61, Adjusting front seats elec-
trically. WARNING
● The front seats and the head restraints must always be adjusted to match
the body size of the seat occupant as well as the seat belts must always be
correctly fastened in order to provide an optimal protection for you and your
occupants.
● The front passenger must maintain a distance of at least 25 cm to the dash
panel. Not maintaining this minimum distance will mean that the airbag sys-
tem will not be able to properly protect you - hazard!
● Always keep your feet in the footwell when the car is being driven - never
place your feet on the instrument panel, out of the window or on the surfaces
of the seats. You will be exposed to increased risk of injury if it becomes nec-
essary to apply the brake or in the event of an accident. If an airbag is de-
ployed, you may suffer fatal injuries when adopting an incorrect seated posi-
tion!
● The seat backrests must not be angled too far back when driving other-
wise this will affect proper operation of the seat belts and of the airbag sys-
tem - risk of injury!
Correct seated position for the occupants on the rear seats Occupants on the rear seats must sit upright, keep the feet in the
footwell and must have their seat belts correctly fastened.
To reduce the risk of injury in the event of a sudden braking manoeuvre or an acci-
dent, the occupants on the rear seats must observe the following:
● Adjust the head restraints so that the top edge of the head restraints is at the
same level as the upper part of your head ⇒ fig. 116 - on the right.
● Fasten the seat belt correctly ⇒ page 137,
How are seat belts correctly fas-
tened?.
● If you are transporting ⇒ page 147, Transporting children safely
children in the
vehicle, please use a suitable child restraint system. £ 133
Passive Safety Using the system Safety Driving Tips General Maintenance Breakdown assistance Technical data
Page 136 of 248

WARNING
● The head restraints must always be adjusted to match the body size, in or-
der to offer an optimal protection for you and your occupants.
● Always keep your feet in the footwell when the car is being driven - never
put your feet out of the window or on the surfaces of the seats. You will be
exposed to increased risk of injury if it becomes necessary to apply the brake
or in the event of an accident. If the head airbag is deployed and when adopt-
ing an incorrect seated position, you are exposing yourself to an increased risk
of injury and in the event of an accident you may suffer fatal injuries!
● If the occupants on the rear seats are not sitting upright, the risk of injury
is increased due to incorrect routing of the seat belt.
Examples of an incorrect seated position An incorrect seated position can lead to severe injuries or death for
the occupants.
Seat belts offer their optimum protection only if the webbing of the seat belts is
properly routed. Incorrect seated positions considerably reduce the protective
functions of the seat belts and therefore increase the risk of injury due to an in-
correct routing of the seat belt. The driver is fully responsible for himself and the
occupants, in particular for the children. Do not permit an occupant to adopt an
incorrect seated position when the car is moving.
The following list contains the examples of seated positions which are dangerous
for the occupants. This list is not complete, however we would like you to get in-
terested in this subject.
Therefore, while the car is moving never:
● stand up in the vehicle;
● stand up on the seats;
● kneel on the seats;
● tilt the seat backrest fully to the back;
● lean against the dash panel;
● lie on the rear seat bench;
● only sit on the front area of the seat;
● sit to the side;
● lean out of the window;
● put the feet out of the window; ●
put the feet on the dash panel;
● put the feet on the seat upholstery;
● transport somebody in the footwell;
● have the seat belt not fastened when driving;
● occupy the luggage compartment. WARNING
● If the occupant adopts an incorrect seated position, he is exposed to life-
threatening injuries, in case he is hit by a deployed airbag.
● Before setting off, please adopt the correct seated position and do not
change this seated position while the car is moving. Also advise your occu-
pants to adopt the correct seated position and not to change this seated posi-
tion while the car is moving. 134
Passive Safety
Page 146 of 248
Head airbags
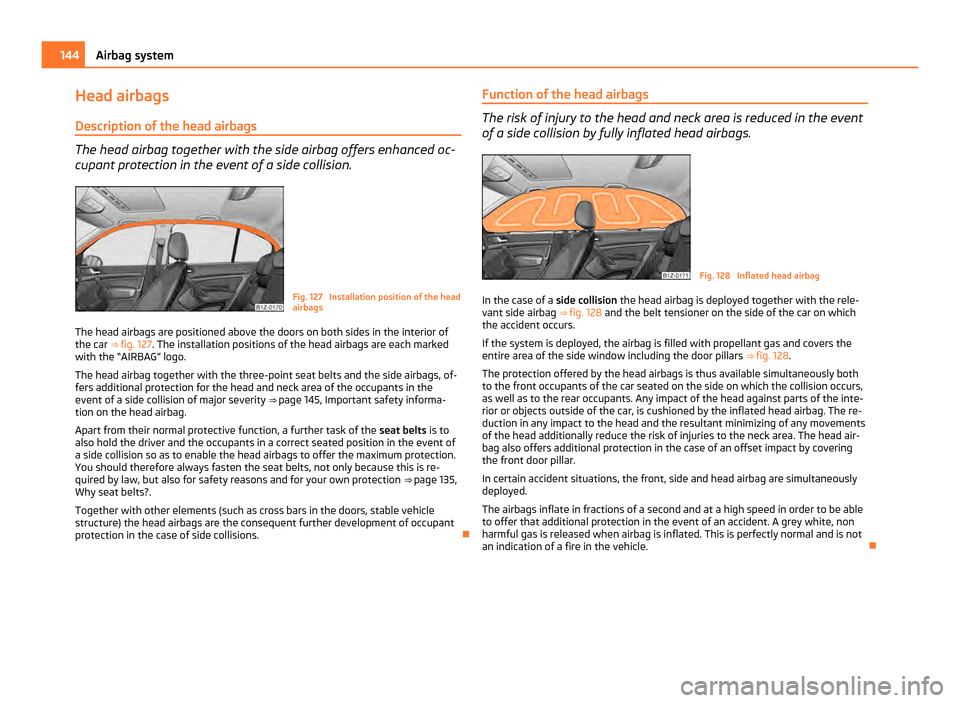
Description of the head airbags The head airbag together with the side airbag offers enhanced oc-
cupant protection in the event of a side collision. Fig. 127 Installation position of the head
airbags
The head airbags are positioned above the doors on both sides in the interior of
the car ⇒ fig. 127. The installation positions of the head airbags are each marked
with the
“AIRBAG” logo.
The head airbag together with the three-point seat belts and the side airbags, of-
fers additional protection for the head and neck area of the occupants in the
event of a side collision of major severity ⇒ page 145, Important safety informa-
tion on the head airbag.
Apart from their normal protective function, a further task of the seat belts is to
also hold the driver and the occupants in a correct seated position in the event of
a side collision so as to enable the head airbags to offer the maximum protection.
You should therefore always fasten the seat belts, not only because this is re-
quired by law, but also for safety reasons and for your own protection ⇒ page 135,
Why seat belts?.
Together with other elements (such as cross bars in the doors, stable vehicle
structure) the head airbags are the consequent further development of occupant
protection in the case of side collisions. Function of the head airbags The risk of injury to the head and neck area is reduced in the event
of a side collision by fully inflated head airbags. Fig. 128 Inflated head airbag
In the case of a side collision the head airbag is deployed together with the rele-
vant side airbag ⇒
fig. 128 and the belt tensioner on the side of the car on which
the accident occurs.
If the system is deployed, the airbag is filled with propellant gas and covers the
entire area of the side window including the door pillars ⇒ fig. 128 .
The protection offered by the head airbags is thus available simultaneously both
to the front occupants of the car seated on the side on which the collision occurs,
as well as to the rear occupants. Any impact of the head against parts of the inte-
rior or objects outside of the car, is cushioned by the inflated head airbag. The re-
duction in any impact to the head and the resultant minimizing of any movements
of the head additionally reduce the risk of injuries to the neck area. The head air-
bag also offers additional protection in the case of an offset impact by covering
the front door pillar.
In certain accident situations, the front, side and head airbag are simultaneously
deployed.
The airbags inflate in fractions of a second and at a high speed in order to be able
to offer that additional protection in the event of an accident. A grey white, non
harmful gas is released when airbag is inflated. This is perfectly normal and is not
an indication of a fire in the vehicle. 144
Airbag system
Page 147 of 248

Important safety information on the head airbag
Correct use of the airbag system considerably reduces the risk of
injury! WARNING
● It is essential to always switch off ⇒ page 145 , Deactivating an airbag the
front passenger airbag when attaching a child safety seat on the front pas-
senger seat where the child is seated with its back facing in direction of travel
(in some countries also when the child is facing the direction of travel). If this
is not done, there is a risk of the child suffering severe or even fatal injuries if
the front passenger airbag is deployed. When transporting a child on the front
passenger seat, please comply with the appropriate national regulations re-
garding the use of child safety seats.
● There must not be any objects in the deployment area of the head airbags
which might prevent the airbags from inflating properly.
● Only hang light items of clothing on the clothes hooks to the vehicle. Nev-
er leave any heavy or sharp-edged objects in the pockets of the items of cloth-
ing. In addition, it is not permitted to use clothes hangers for hanging up
items of clothing.
● The airbag control unit operates together with the sensors, which are at-
tached in the front doors. For this reason no adjustments must be carried out
at the doors as well as at the door panels (for example additional installation
of loudspeakers). Resulting damages can have a negative affect on the opera-
tion of the airbag system. All work on the front doors and their panels must
only be carried out by a specialist garage.
● There must not be any other persons (e.g. children) or animals between
the car occupant and the deployment area of the head airbag. In addition,
none of the occupants should lean their head out of the window when driving,
or extend their arms and hands out of the window.
● The sun visors must not be swivelled to the side windows into the deploy-
ment area of the head airbags if any objects, such as ball-point pens etc. are
attached to them. This might result in injuries to the occupants if the head air-
bag is deployed.
● Installing impermissible accessories in the area of the head airbags may
considerably impair the protection offered by the head airbag in the event of it
being deployed. When the deployed head airbag is inflated, parts of the acces- WARNING (Continued)
sories fitted may in certain circumstances be thrown into the interior of the
car and cause injuries to the occupants ⇒
page 197, Accessories, changes and
replacement of parts.
● Any work on the head airbag system including installing and removing sys-
tem components because of other repair work (e.g. removing headliner) must
only be carried out by a specialist garage.
Deactivating an airbag Deactivating airbags If any airbags have been deactivated, switch them on again as
soon as possible so that they are able to again provide their proper
protection.
There is the technical means installed within your vehicle to switch off the front,
side or head airbag (take out of commission).
This is why you should have the deactivation of the airbags carried out by a spe-
cialist garage.
On vehicles equipped with the switch for deactivation of the airbags, you can de-
activate the front passenger airbag by means of this switch ⇒
page 146.
Deactivation of airbags is envisaged only for particular instances, such as if:
● You must in exceptional cases use a child seat on the front passenger seat
where the child is seated with its back to the direction of travel (in some countries
this must be in the direction of travel due to other legal regulations applying)
⇒ page 147,
Important safety information regarding the use of child safety seats ;
● you are not able to maintain the distance of at least 25 cm between middle of
steering wheel and chest, despite the driver seat being correctly adjusted;
● special attachments are required in the area of the steering wheel because of
a physical disability;
● you have installed other seats (e.g. orthopaedic seats without side airbags).
Monitoring the airbag system
The functionality of the airbag system is also monitored electronically when one
airbag has been switched off. £ 145
Airbag system Using the system Safety Driving Tips General Maintenance Breakdown assistance Technical data