2011 Seat Ibiza SC ESP
[x] Cancel search: ESPPage 108 of 278

106Lights and visibility
–Release the lever. The washer system stops and the wipers con-
tinue until the end of the cycle.
– Move the lever towards the steering wheel to switch off.
WARNING
● Worn and dirty wiper blades reduce visibility and safety levels while
driving.
● Always note the corresponding warnings on ⇒ page 203.
CAUTION
In icy conditions, always check that the wiper blade is not frozen to the
glass before using the wiper for the first time. If you switch on the wiper
when the wiper blade is frozen to the glass, this could damage both the
wiper blade and the wiper motor.
Note
● The rear window wiper will only work when the ignition is switched on.
● Depending on the version of the model, when you engage reverse gear
and with the headlight wiper activated, the lamps are wiped.
Headlight washer*
The headlight washers clean the headlight lenses. The headlight washers are activated automatically when the windscreen
washer is used and the windscreen wiper lever is pulled towards the steer-
ing wheel for at least 1.5 seconds – provided the dipped beam headlights
or main beams are switched on. Clean off stubborn dirt (insects, etc.) from
the headlights at regular intervals, for instance when filling the fuel tank.
Note
● To ensure that the headlight washers work properly in winter, keep the
nozzle holders in the bumper free of snow and remove any ice with a de-icer
spray.
● To remove water, the windscreen wipers will be activated from time to
time, the headlight wipers will be activated every three cycles.
Rear view mirrors
Adjusting the rear view mirrors
Before beginning any journey, adjust the rear view mirrors for correct visibil-
ity.
Interior mirror
It is dangerous to drive if you cannot see clearly through the
rear window. Manual anti-dazzle function for interior mirror
In the basic mirror position, the lever at the bottom edge of the mirror
should be at the front. Pull the lever to the back to select the anti-dazzle
function.
Page 112 of 278

110Seats and storage compartments
Seats and storage compartments
The importance of correct seat adjustment
Proper seat adjustment optimises the level of protection of-
fered by seat belts and airbags.
Your vehicle has five seats, two in the front and three in the rear. Each seat
is equipped with a three-point seat belt.
The driver seat and the front passenger seat can be adjusted in many ways
to suit the physical requirements of the vehicle occupants. The correct seat
position is very important for:
● a fast and easy operation of all controls on the instrument panel,
● a relaxed posture which does not cause drowsiness,
● a safe driving ⇒ page 7,
● ensuring that the seat belts and airbag system provide maximum pro-
tection ⇒ page 18.
WARNING
● If the driver and passengers assume improper sitting positions, they
may sustain critical injuries.
● More people than available seats must never be transported in your
vehicle.
● Every passenger in the vehicle must properly fasten and wear the
seat belt belonging to his or her seat. Children must be protected with an
appropriate child restraint system ⇒ page 42, Child safety.
● The front seats and all head restraints must always be adjusted to
body size and the seat belt must always be properly adjusted to provide
you and your passengers with optimum protection.
WARNING (Continued)
● Always keep your feet on the footwell when the vehicle is moving;
never rest them on the dash panel, out of the window or on the seat. This
is also applied to passengers. An incorrect sitting position exposes you
to an increased risk of injury in case of a sudden braking or an accident.
If the airbag is triggered, you could sustain severe injuries due to an in-
correct sitting position.
● It is important for the driver and front passenger to keep a distance of
at least 25 cm from the steering wheel and dash panel. Failure to respect
the minimum distance means that the airbag will not protect you. Risk of
fatal injury. The distance between the driver and the steering wheel or
between the front passenger and the dash panel should always be as
great as possible.
● Adjust the driver or front passenger seat only when the vehicle is sta-
tionary. Otherwise, your seat could move unexpectedly while the vehicle
is moving. This could increase the risk of an accident and therefore, in-
jury. In addition, while adjusting your seat, you will assume an incorrect
sitting position. Risk of fatal accidents.
● Special guidelines apply to installing a child seat on the front passen-
ger seat. When installing a child seat, please observe the warnings de-
scribed in ⇒ page 42, Child safety.
Page 116 of 278

114Seats and storage compartments
WARNING (Continued)
● Exercise caution when securing the seat height into forwards/back-
wards position. Injuries can be caused if the seat height is adjusted with-
out due care and attention.
● To move the seat lengthways, pull upwards and not sideways on the
lever, as the force exerted on it in this position could damage it.
Heated seats*
The front seat cushions and backrests can be heated electri-
cally.
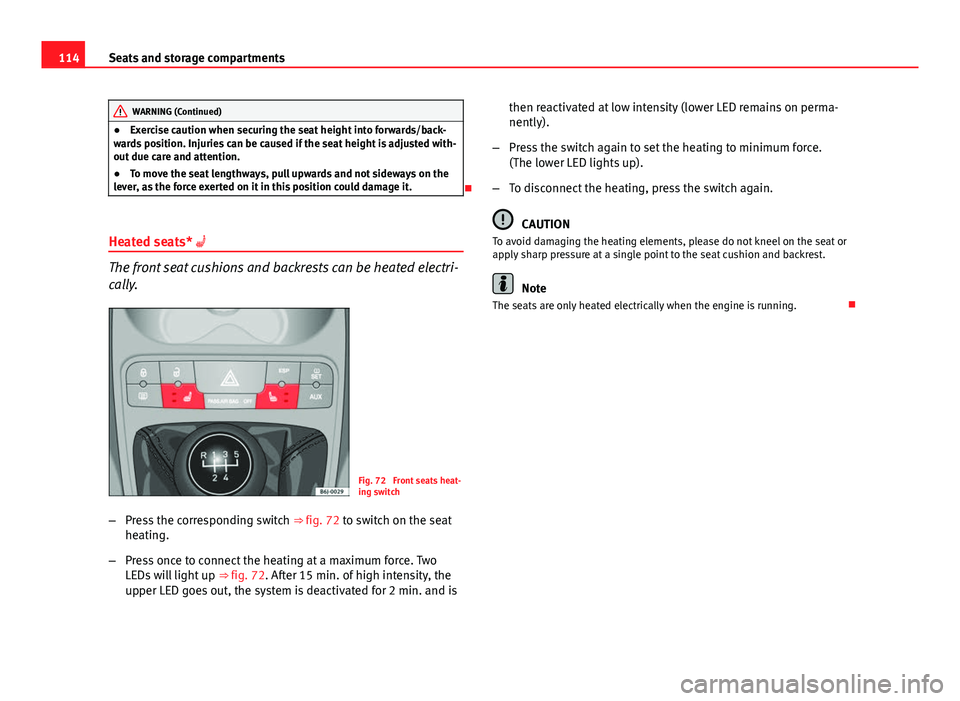
Fig. 72 Front seats heat-
ing switch
– Press the corresponding switch ⇒ fig. 72 to switch on the seat
heating.
– Press once to connect the heating at a maximum force. Two
LEDs will light up ⇒ fig. 72. After 15 min. of high intensity, the
upper LED goes out, the system is deactivated for 2 min. and is then reactivated at low intensity (lower LED remains on perma-
nently).
– Press the switch again to set the heating to minimum force.
(The lower LED lights up).
– To disconnect the heating, press the switch again.
CAUTION
To avoid damaging the heating elements, please do not kneel on the seat or
apply sharp pressure at a single point to the seat cushion and backrest.
Note
The seats are only heated electrically when the engine is running.
Page 126 of 278

124Seats and storage compartments
Rear shelf
Fig. 89 Rear shelf
Removing the shelf
– Disengage the loops ⇒ fig. 89 B
from the retaining pins A
–
Extract the cover from its slot, in its rest position and pull out-
wards.
WARNING
Do not place heavy or hard objects on the rear shelf, because they will
endanger the vehicle occupants in case of sudden braking.
CAUTION
● Before closing the tailgate, ensure that the rear shelf is correctly fitted.
● An overloaded luggage compartment could mean that the rear shelf is
not correctly seated and it may be bent or damaged.
● If the luggage compartment is overloaded, remove the tray.
Note
● Ensure that, when placing items of clothing on the luggage compart-
ment cover, rear visibility is not reduced.
Roof rack*
Please observe the following points if you intend to carry loads on the roof:
● For safety reasons, only luggage racks and accessories approved by
SEAT should be used.
● It is essential that you follow the assembly instructions included with
the bars exactly, being especially careful to position front and rear luggage
compartment cover bars on the special housings on the longitudinal bars.
You must also respect their position according to the direction of travel indi-
cated in the assembly manual. Not following these instructions may dam-
age the bodywork.
● Pay special attention to the tightening torque of the attachment bolts
and check them following a short journey. If necessary, retighten the bolts
and check them at regular intervals.
● Distribute the load evenly. A maximum load of 40 kg only is permitted
for each roof rack system support bar, the load must be distributed evenly
along the entire length. However, the maximum load permitted for the en-
tire roof (including the support system) of 75 kg must not be exceeded nor
should the total weight of the vehicle be exceeded. See the Technical Data
section.
● When transporting heavy or large objects on the roof, any change in the
normal vehicle behaviour due to a change in the centre of gravity or an in-
creased wind resistance must be taken into account. For this reason, a suit-
able speed and driving style must be used.
● For those vehicles fitted with a sliding/tilting sunroof*, ensure that it
does not interfere with the load on the roof rack system when opened.
Page 134 of 278

132Air conditioning
Automatic mode
In automatic mode air temperature, air flow and distribution
are automatically regulated so that a specified temperature
is attained as quickly as possible, and then maintained.
Switching on automatic mode
– Press the button AUTO
. The indication
⇒ fig. 95 7 is visible.
– Press keys 10
and 11 ⇒ fig. 95 to adjust the desired tempera-
ture inside the vehicle. We recommend 22 °C (72 °F).
A comfortable interior climate is quickly reached when a temperature of
+22 °C (72 °F) is set in automatic mode. Therefore, we recommend you not
to change this adjustment, except as necessary to suit individual preferen-
ces or particular circumstances. It is possible to select interior temperatures
from +18 °C (64 °F) to +29 °C (86 °F). If a lower or higher temperature is se-
lected, LO or HI are respectively displayed on the screen. These are approxi-
mate temperatures which may slightly vary depending on the outside condi-
tions.
Climatronic maintains a constant temperature. To do it, it automatically reg-
ulates the supplied air temperature, the blower speed and the air distribu-
tion. The system also considers the sunlight radiation, so there is no need
for manual readjustment. Therefore, automatic mode almost always pro-
vides the best comfort for the vehicle occupants throughout the year.
Automatic mode is switched off whenever an adjustment is made using the
buttons for the air distribution, blower or AC
. The temperature continues to
self-regulate. Manual mode
In manual mode the air temperature, flow, and the desired
air distribution can be adjusted.
Switching on manual mode
– Press one of the buttons ⇒ fig. 95 14
to 16 or press the blower
control 8 and 9 down. The indicator is switched off 3.
Temperature
It is possible to select interior temperatures from +18 °C (64 °F) to +29 °C
(86 °F). These are approximate temperatures which may slightly vary de-
pending on the outside conditions.
If a temperature below 18 °C (64 °F) is selected, the screen will show LO. In
this setting the system runs at maximum cooling output and the tempera-
ture is not regulated.
If a temperature above 29 °C (86 °F) is selected, the screen will show HI. In
this setting the system runs at maximum heating output and the tempera-
ture is not controlled.
Blower
The blower can be adjusted with buttons 8
and 9 ⇒ fig. 95. If the blower
is off (level 1 is not shown on the screen) and button 9 is kept pressed
down, the Climatronic switches off. Then OFF is displayed on the screen.
Air distribution
The air distribution is adjusted using the buttons
, and . It is also
possible to open and close some of the air outlets separately.
Switching the air conditioning on and off
Pressing the button AC
the air cooling system can be switched off in order
to save fuel. The temperature continues to self-regulate. The set tempera-
ture can then only be reached if it is higher than the outside temperature.
Page 138 of 278

136Driving
Safety
Electronic Stability Programme (ESP)*
ESP helps make driving safer in certain situations.
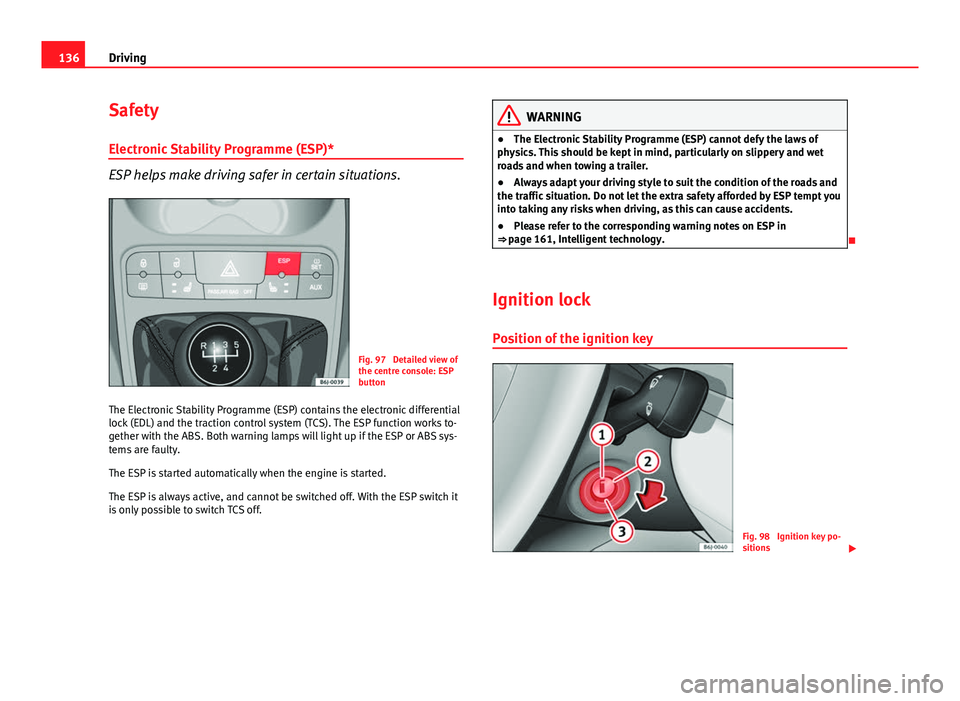
Fig. 97 Detailed view of
the centre console: ESP
button
The Electronic Stability Programme (ESP) contains the electronic differential
lock (EDL) and the traction control system (TCS). The ESP function works to-
gether with the ABS. Both warning lamps will light up if the ESP or ABS sys-
tems are faulty.
The ESP is started automatically when the engine is started.
The ESP is always active, and cannot be switched off. With the ESP switch it
is only possible to switch TCS off.
WARNING
● The Electronic Stability Programme (ESP) cannot defy the laws of
physics. This should be kept in mind, particularly on slippery and wet
roads and when towing a trailer.
● Always adapt your driving style to suit the condition of the roads and
the traffic situation. Do not let the extra safety afforded by ESP tempt you
into taking any risks when driving, as this can cause accidents.
● Please refer to the corresponding warning notes on ESP in
⇒ page 161, Intelligent technology.
Ignition lock Position of the ignition key
Fig. 98 Ignition key po-
sitions
Page 139 of 278

137
Driving
Ignition switched off, steering lock 1
In this position
⇒ fig. 98 the ignition and the engine are OFF and the steer-
ing may get locked.
For the Steering lock to operate without the ignition key, turn the steering
wheel until it locks with an audible sound. You should always lock the steer-
ing wheel when you leave your vehicle. This will help prevent vehicle theft
⇒
.
Switching the ignition or the glow plug system on 2
Turn the ignition key to this position and release it. If the key cannot be
turned or it is difficult to turn from position 1 to position 2, move the
steering wheel from one side to the other until it is released.
Starting 3
The engine is started when the key is in this position. Electrical components
with a high power consumption are switched off temporarily.
Every time the vehicle is started again, the ignition key must be turned to
position 1
. The
repetitive start prevention lock of the ignition prevents
possible damage to the starter motor if the engine is already running.
WARNING
● The ignition key must NOT be removed from the lock until the vehicle
comes to a standstill. Otherwise, the steering could be immediately
blocked- Risk of accident!
● Always remove the key from the ignition when leaving the vehicle,
even for a short period. This is especially important if children or disa-
bled people are left alone in the vehicle. They could accidentally start the
engine or work electrical equipment such as the electric windows, conse-
quently resulting in an accident.
● Unsupervised use of the keys could start the engine or any electrical
system, such as the electric window. This could result in serious injury.
CAUTION
The starter motor will only work when the engine is stopped (ignition key
position 3
).
Electronic immobiliser
The immobiliser prevents unauthorised persons from driv-
ing the vehicle.
Inside the key there is a chip that deactivates the electronic immobiliser au-
tomatically when the key is inserted into the ignition.
The immobiliser will be activated again automatically as soon as you pull
the key out of the ignition lock.
The engine can only be started using a genuine SEAT key with its correct
code.
Note
A perfect operation of the vehicle is ensured if genuine SEAT keys are used.
Safety FirstOperating InstructionsPractical TipsTechnical Specifications
Page 143 of 278

141
Driving
● There is enough LPG in the tank.
● The temperature of the vehicle coolant is above 30 °C.
● Engine speed while driving is above 1200 rpm.
Automatic switch from LPG to petrol
When the vehicle is operating in LPG mode and one of these conditions is
met, the system automatically switches to petrol mode, the notification changed to petrol mode is displayed and the green indicator lamp on the in-
strument panel goes out:
● When the engine is started.
● If the LPG tank is empty.
● If there is a fault in the LPG system.
● At very low temperatures, below 10 °C.
Manual switch from petrol to LPG
Press the GAS
button on the centre console ⇒ fig. 99 to change mode. The
notification changed to GAS mode is displayed. When the following condi-
tions are met, the system switches to LPG mode, the green indicator lamp
on the instrument panel lights up and the notification displayed changes to changed to GAS mode .
● There is enough LPG in the tank.
● The temperature of the vehicle coolant is above 30 °C.
● Engine speed while driving is above 1200 rpm.
Manual switch from LPG to petrol
Press the GAS
button on the centre console ⇒
fig. 99 to change mode. The
green lamp on the instrument panel goes out and the notification changed
to petrol mode is displayed.
Running on petrol
Run the engine with petrol for short journeys at regular intervals to avoid
problems in the petrol system.
WARNING
LPG is a highly explosive and inflammable substance. It may cause se-
vere burns and other injury.
● Due care must be taken to avoid any risk of fire or explosion.
● When parking the vehicle in a closed area (for example in a garage),
make sure that there is adequate ventilation, either natural or mechani-
cal, to neutralise the LPG in the event of a leak.
Note
● If frequent short journeys are made, especially when the outside tem-
perature is low, the vehicle will tend to run on petrol more often than on
LPG. Therefore, the petrol tank may empty before the LPG tank.
● The notification LPG mode not possible may be displayed.
Start-Stop function* Description and operation
The Start-Stop function stops the engine when the vehicle is stop-
ped and starts it automatically when required.
– When the vehicle is stopped, put it in neutral and release the
clutch pedal. The engine will stop.
– When the clutch pedal is pressed, the engine starts again.
– The instrument panel screen displays information about the sta-
tus of the Start-Stop function ⇒
fig. 101.
Safety FirstOperating InstructionsPractical TipsTechnical Specifications