2011 Seat Ibiza SC radio
[x] Cancel search: radioPage 86 of 278
84Unlocking and locking
Anti-theft alarm system*
Description of anti-theft alarm system*
The anti-theft alarm triggers if unauthorised movements are
detected around the vehicle.
The anti-theft alarm makes it more difficult to break into the vehicle or steal
it. The system will initiate acoustic and optical warning signals when your
vehicle is tried to be forced.
The anti-theft alarm system is automatically connected on locking the vehi-
cle. For this, either rotate the key in the locking position or press button
2 on the radio-frequency remote control*. The system is immediately acti-
vated and the turn signal light located on the driver door will flash along
with the turn signals, indicating that the alarm and the locking security sys-
tem (double lock) have been turned on.
If any of the doors or the bonnet are open, they will not be included in the
protection zones of the vehicle when the alarm is connected. If the door or
the bonnet are subsequently closed, they will be automatically included in
the protection areas of the vehicle and the turn signals will flash according-
ly when the doors close.
● The turn signal light will flash twice on opening and deactivating the
alarm..
● The turn signal light will flash once on closing and activating the alarm.
When does the system trigger an alarm?
The system triggers an alarm if the following unauthorised actions are car-
ried out when the car is locked: ●
Opening of vehicle with mechanical key without switching ignition on
within the next 15 seconds
● Opening a door
● Opening the bonnet
● Opening the tailgate
● Ignition switched on with a non-validated key.
● Movements in the driving compartment (vehicles with a volume sensor)
● Towing of the vehicle 1)
● Tilt angle (tow-away protection) 1)
● Undue manipulation of the alarm
● Battery handling
The acoustic signals sound and the turn signals flash for approx. 30 sec-
onds. This may be repeated up to 10 times depending on the country.
Opening all the doors in manual mode
In vehicles without alarm, when opening the driver door manually all the
doors are opened.
How to switch the alarm off
To deactivate the anti-theft alarm, turn the key to the opening direction,
open the door and switch the ignition on, or press the unlocking button
on the remote control.
In vehicles equipped with an anti-theft alarm system, you have 15 seconds
to insert the key in the ignition lock and activate the ignition if the vehicle is
opened using the driver door key.
Otherwise, the alarm will trigger for 30 sec. and the ignition will be blocked.
1)
With vehicles fitted with a tow-away protection
Page 124 of 278
122Seats and storage compartments
Auxiliary audio input connection (AUX)*
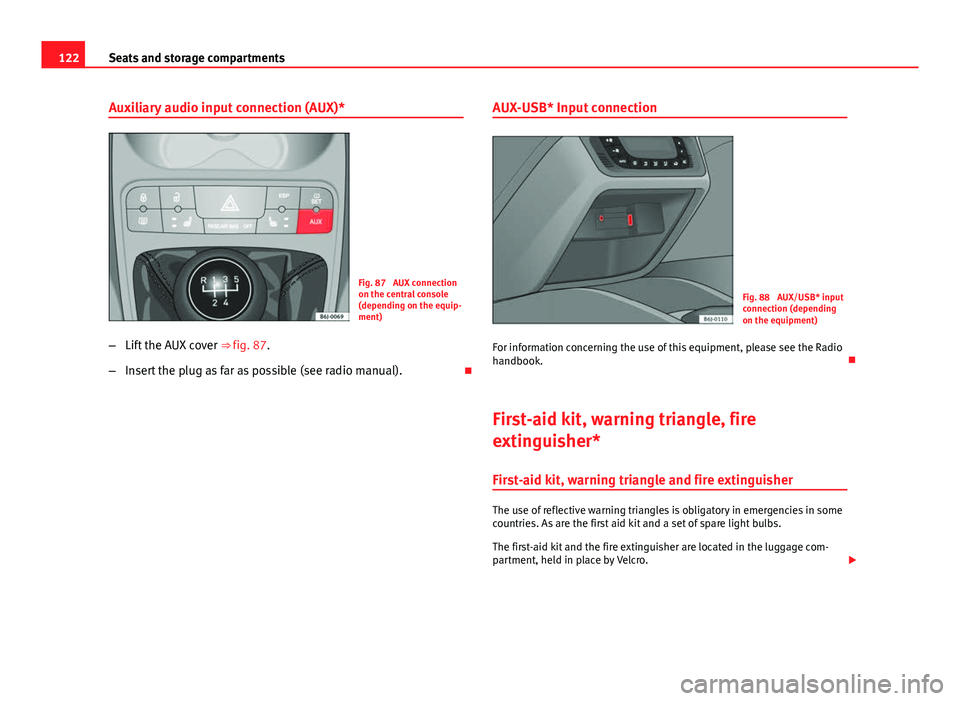
Fig. 87 AUX connection
on the central console
(depending on the equip-
ment)
– Lift the AUX cover ⇒ fig. 87.
– Insert the plug as far as possible (see radio manual). AUX-USB* Input connectionFig. 88 AUX/USB* input
connection (depending
on the equipment)
For information concerning the use of this equipment, please see the Radio
handbook.
First-aid kit, warning triangle, fire
extinguisher* First-aid kit, warning triangle and fire extinguisher
The use of reflective warning triangles is obligatory in emergencies in some
countries. As are the first aid kit and a set of spare light bulbs.
The first-aid kit and the fire extinguisher are located in the luggage com-
partment, held in place by Velcro.
Page 177 of 278

175
Vehicle maintenance and cleaning
Care of the vehicle exterior Automatic car washing tunnel
The vehicle paintwork is so durable that the vehicle can normally be washed
without problems in an automatic car wash tunnel. However, the paintwork
wear depends to a large extent on the kind of the car wash tunnel, the
brushes used, its water filtering and the type of cleaning and preservative
products.
Before going through a car wash, be sure to take the usual precautions such
as closing the windows and sunroof. There is nothing to note apart from
that.
If the vehicle has special accessories such as spoilers or a roof rack or two-
way radio aerial, etc., it is advisable to consult the car wash tunnel operator.
After washing, the brakes could take some time to respond as the brake
discs and pads could be wet, or even frozen in winter. Dry the brakes by
braking several times.
WARNING
Water, ice and salt on the brakes can reduce braking efficiency. Risk of
accident.
CAUTION
Before putting the vehicle through the car washing tunnel, do not tighten
the aerial if it is folded because it can be damaged. Washing by hand
Vehicle washing
–
First soften the dirt and rinse it off with water.
– Clean your vehicle from top to bottom with a soft sponge, a
glove or a brush. Use very light pressure.
– Rinse the sponge or glove often with clean water.
– Special car shampoo should only be used for very stubborn dirt.
– Leave the wheels, sill panels etc. until last, using a different
sponge or glove.
– Rinse the vehicle thoroughly with water.
– Dry the vehicle surface gently with a chamois leather.
– In cold temperature, dry the rubber seals and their surfaces to
prevent them from freezing. Apply silicone spray to the rubber
seals.
After washing the vehicle
– After washing, avoid sudden and sharp braking. “Dry” the
brakes by braking several times ⇒ page 166, Braking capacity
and braking distance.
Safety FirstOperating InstructionsPractical TipsTechnical Specifications
Page 183 of 278

181
Vehicle maintenance and cleaning
WARNING
Never clean the dash panel and the airbag module surface with cleaners
containing solvents. Solvents cause the surface to become porous. If the
airbag triggered, plastic parts could become detached and cause inju-
ries.
CAUTION
Cleaning products which contain solvents will damage the material.
Wooden trim cleaning*
– Clean the wooden trim with a water-moistened clean cloth.
– If this does not provide satisfactory results, use a gentle soap
solution.
CAUTION
Cleaning products which contain solvents will damage the material.
Cloth seat covers and fabric trim cleaning
Cloth seat covers and fabric trim on the doors, headlining etc. can be
cleaned with a special interior cleaner or with dry foam and a soft brush. Cleaning the radio and climate controls
To clean the radio and/or climate controls, use a soft damp cloth. For more
resistant dirt, a neutral soap solution may be used.
Leather cleaning*
Normal cleaning
– Moisten a cotton or woollen cloth with water and wipe over the
leather surfaces.
Cleaning stubborn stains
– More stubborn dirt can be removed using a mild soap solution
(pure liquid soap; two tablespoons diluted in one litre of water)
and a cloth.
– Do not let the water soak through the leather or soak into the
seams.
– Then wipe off with a soft, dry cloth.
Leather maintenance
– The leather should be treated twice a year with a special leath-
er-care product, available in your Authorised Service Centre.
– Apply these products very sparingly.
– Then wipe off with a soft, dry cloth.
SEAT does everything possible to preserve the genuine qualities of this nat-
ural product. Due to the natural properties of the specially selected hides
employed, the finished leather has a certain sensitivity to grease and dirt,
Safety FirstOperating InstructionsPractical TipsTechnical Specifications
Page 186 of 278
184Accessories, parts replacement and modifications
WARNING
Incorrectly performed modifications or other kind of work on your vehicle
can lead to malfunctions and cause accidents.
Roof aerial*
The vehicle can be fitted with a foldable* and anti-theft* roof aerial, which
can be folded backwards, when, for example, going through an automatic
carwash.
To fold
Unscrew the aerial rod, tilting it backwards into a horizontal position and
then screw in again.
To return to working position
Continue in the reverse order to the previous instruction.
CAUTION
If an automatic car wash tunnel is used, before entering the tunnel, put the
aerial down parallel to the roof and do not tighten to avoid damage.
Mobile telephones and two-way radios
You will require an external aerial for mobile phones and
two-way radios. SEAT has approved for your vehicle the use of mobile telephones and two-
way radios providing under the following conditions: ●
The correct installation of an external aerial,
● transmitting power of maximum 10 watts.
An only external aerial is needed to give the equipment its optimal reach.
First consult your Authorised Service Centre if you wish to use a mobile tele-
phone or a two-way radio with a transmitting power output in excess of
10 watts. Here you will receive information concerning the technical possi-
bilities for retrofitting this equipment.
Mobile telephones and two-way radios should be only fitted by a special-
ised workshop, for example an Authorised Service Centre.
WARNING
● Always concentrate primarily on driving. If you are distracted while
driving you could have an accident.
● Never attach the telephone mountings to the surfaces covering the
airbag units or within the range of the airbags. There is a high danger of
injury if the airbag is triggered.
● Using your mobile telephones or two-way radios in the vehicle with-
out an external aerial, electromagnetic radiation in the vehicle could ex-
ceed authorised limits. This also may occur to external aerials that have
not been correctly installed.
CAUTION
Failure to consider the above-mentioned conditions could cause the elec-
tronics to malfunction. The most common causes of faults are:
● no external aerial,
● external aerial incorrectly installed,
● transmitting power output in excess of 10 watts.
Page 187 of 278
185
Accessories, parts replacement and modifications
Note
Please observe the operating instructions of your mobile telephone / two-
way radio.
Fitting a towing bracket*
It is possible to fit a towing bracket to the rear of the vehicle.
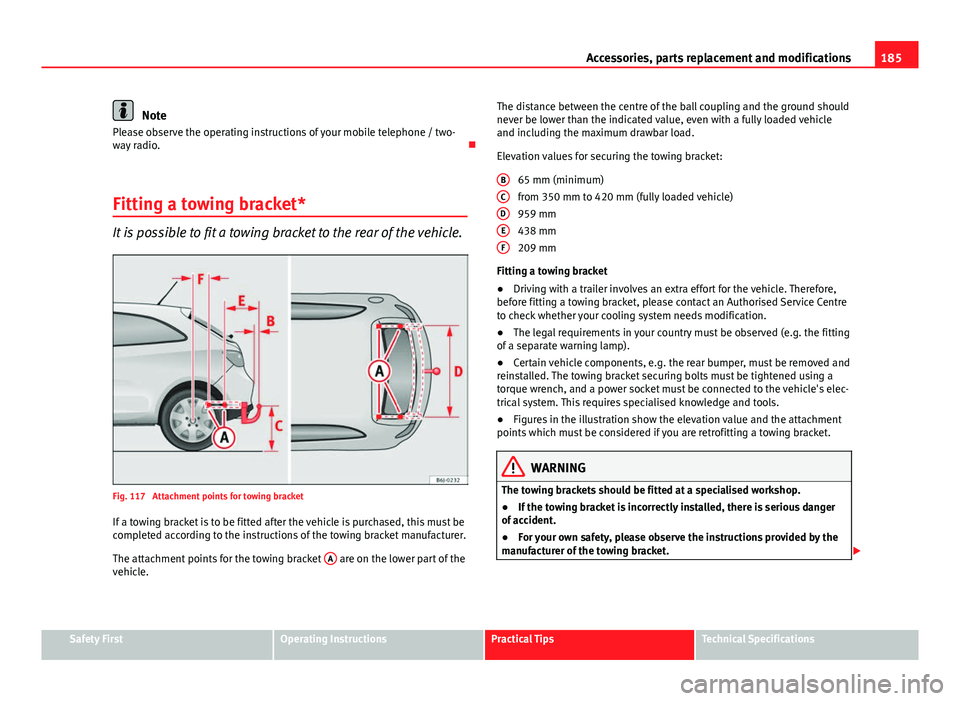
Fig. 117 Attachment points for towing bracket If a towing bracket is to be fitted after the vehicle is purchased, this must be
completed according to the instructions of the towing bracket manufacturer.
The attachment points for the towing bracket A
are on the lower part of the
vehicle. The distance between the centre of the ball coupling and the ground should
never be lower than the indicated value, even with a fully loaded vehicle
and including the maximum drawbar load.
Elevation values for securing the towing bracket:
65 mm (minimum)
from 350 mm to 420 mm (fully loaded vehicle)
959 mm
438 mm
209 mm
Fitting a towing bracket
● Driving with a trailer involves an extra effort for the vehicle. Therefore,
before fitting a towing bracket, please contact an Authorised Service Centre
to check whether your cooling system needs modification.
● The legal requirements in your country must be observed (e.g. the fitting
of a separate warning lamp).
● Certain vehicle components, e.g. the rear bumper, must be removed and
reinstalled. The towing bracket securing bolts must be tightened using a
torque wrench, and a power socket must be connected to the vehicle's elec-
trical system. This requires specialised knowledge and tools.
● Figures in the illustration show the elevation value and the attachment
points which must be considered if you are retrofitting a towing bracket.
WARNING
The towing brackets should be fitted at a specialised workshop.
● If the towing bracket is incorrectly installed, there is serious danger
of accident.
● For your own safety, please observe the instructions provided by the
manufacturer of the towing bracket.
BCDEF
Safety FirstOperating InstructionsPractical TipsTechnical Specifications
Page 192 of 278
190Checking and refilling levels
The LPG tank ⇒ fig. 120 in the spare wheel well has a capacity of 52.8 litres.
If the outside temperatures are very low, it may not be possible to complete-
ly fill the LPG tank.
Pump attachments
There are a variety of types of LPG pump, and the methods of use may vary.
Therefore, let the pump operator fill the tank when refuelling for the first
time or fill from another pump.
Noises when refuelling with LPG
When refuelling with LPG, noises may be heard. These noises are insignifi-
cant.
WARNING
Failure to refuel or handle LPG in the correct way could result in a fire,
cause an explosion or lead to injuries.
● LPG is a highly explosive and inflammable substance. It may cause
severe burns and other injury.
● Switch off the engine before refuelling.
● Always disconnect mobile phones and any other radiophony applian-
ces, as electromagnetic waves may produce sparks and cause a fire.
● Do not remain in the vehicle while refuelling. If it is absolutely neces-
sary to enter the vehicle, close the door and touch a metal surface before
touching the attachment again. This will prevent the generation of static
electricity and any possible fires while refuelling.
● Small quantities of LPG may leak out after refuelling. If LPG comes in-
to contact with skin, there is a risk of freezing.
● Do not smoke and always keep bare flames away from the tank during
refuelling. Failure to do so may lead to an explosion.
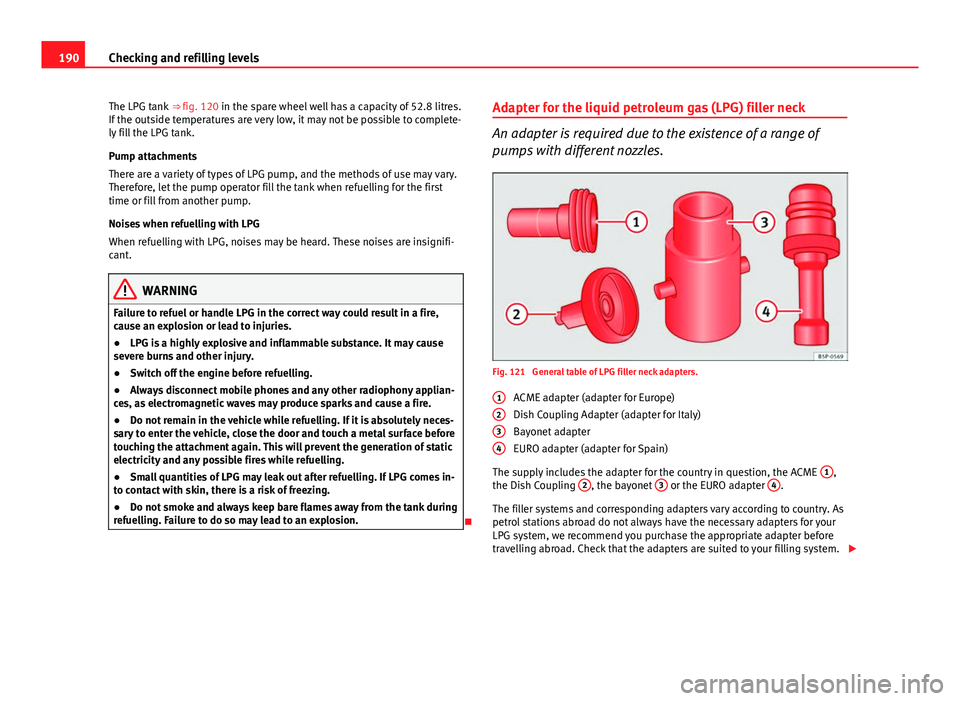
Adapter for the liquid petroleum gas (LPG) filler neck
An adapter is required due to the existence of a range of
pumps with different nozzles.
Fig. 121 General table of LPG filler neck adapters.
ACME adapter (adapter for Europe)
Dish Coupling Adapter (adapter for Italy)
Bayonet adapter
EURO adapter (adapter for Spain)
The supply includes the adapter for the country in question, the ACME 1
,
the Dish Coupling 2, the bayonet 3 or the EURO adapter 4.
The filler systems and corresponding adapters vary according to country. As
petrol stations abroad do not always have the necessary adapters for your
LPG system, we recommend you purchase the appropriate adapter before
travelling abroad. Check that the adapters are suited to your filling system.
1
234
Page 227 of 278

225
If and when
NumberConsumerAmps36Main beam headlight, right10, 15 c)37Main beam headlight, left10, 15c)38Engine heater3039Vacant 4012 Volt Input/Cigarette lighter1541Heated seats control unit / Cup Holder2542Horn2043Panorama sunroof3044Windscreen wipers2045Heated rear window30
46Radio / Bluetooth / USB + AUX-In / DC-DC con-
verter for Start-Stop20
47Climatronic / autoclima / Gateway / Diagnosis /
Automatic gearbox (ZSS lock)5
48Locking unit2549Electric windows (front)2550Rear electric windows3051Automatic gearbox control unit2552Alarm15
53Electro-kinetic pump relay/bi-turbo fuel control
unit15
54Reverse light for automatic gearbox/ Fog light /
Cornering light15
55Transformer on15, 20b)56Rear window wiper1057Dipped beam headlights (right side) / Daylight1558Dipped beam headlights (to the left) / Daylight15a)
If it is LPG.
b) Ampere rating according to motorisation.
c) If it has Start-Stop or not. Fuses below steering wheel in relay holder
PTC fuses
NumberConsumerAmps1Supplementary electrical heating using air402Supplementary electrical heating using air403Supplementary electrical heating using air40
AUX 1 Fuses
NumberConsumerAmps
1Left daytime light AFS lamp15, 20
a)Navigator, Bluetooth, MDI, radio control lever20
2Right daytime light AFS lamp15, 20a)Instrument panel / ESP relay53Headlight washer pump20a)
If it has Start-Stop or not.
AUX 3 Fuses
NumberConsumerAmps1Trailer control unit152Trailer control unit203Trailer control unit20
Safety FirstOperating InstructionsPractical TipsTechnical Specifications