Page 150 of 232

148
Changing a bulb
CHANGING A BULB
Ty p e A
All glass bulb: pull gently
as it is fi tted by pressure.
High pressure washing
Open the bonnet. To access the bulbs,
reach behind the headlamp unit.
Carry out the operations in reverse
order to refi t each bulb and check that
the bonnet is closed securely.
Ty p e C
Halogen bulb: release the
retaining spring from its
housing.
Ty p e B
Bayonet bulb: press
on the bulb then turn it
anticlockwise.
Halogen bulbs must be changed
with the headlamp off. Wait a few
minutes (risk of serious burns).
Do not touch the bulb directly with your
fi ngers, use lint-free cloths.
It is normal for condensation to form
inside the headlamps. Regular use of
the vehicle eliminates this misting. The bulbs must be changed with
the ignition off or with the battery
disconnected. Wait approximately
3 minutes after changing the bulb
before reconnecting the battery.
Check that the lamps operate correctly
after each operation.
When using this type of washing
on stubborn dirt, do not persist
on the headlamps, the lamps and
their edges to avoid damaging their
coating and seals.
Types of bulb
Various types of bulb are fi tted to your
vehicle. To remove them:
Page 152 of 232

150
Changing a bulb
4.
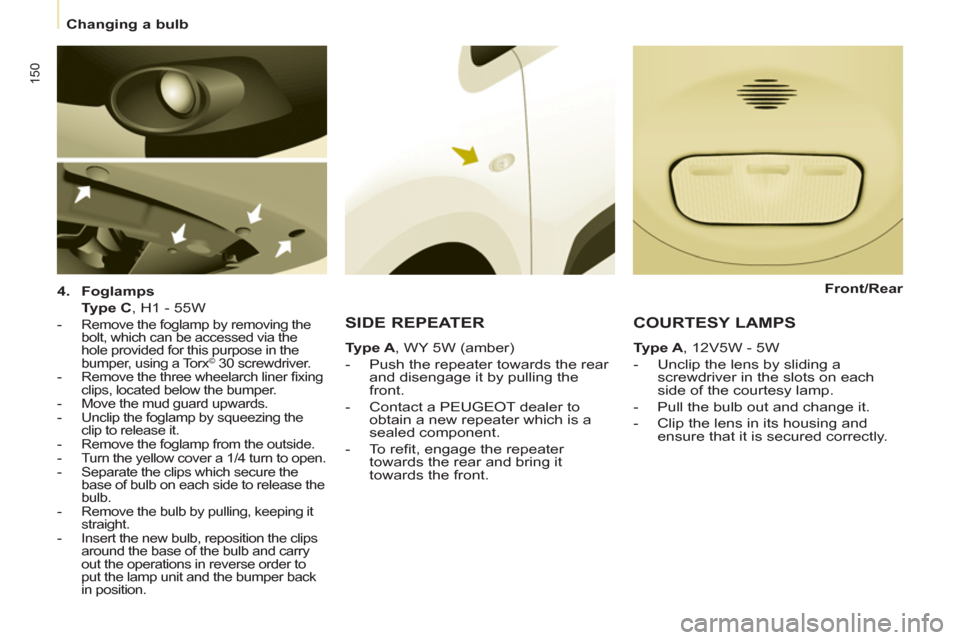
Foglamps
Type C
, H1 - 55W
- Remove the foglamp by removing the
bolt, which can be accessed via the
hole provided for this purpose in the
bumper, using a Torx
© 30 screwdriver.
- Remove the three wheelarch liner fi xing
clips, located below the bumper.
- Move the mud guard upwards.
- Unclip the foglamp by squeezing the
clip to release it.
- Remove the foglamp from the outside.
- Turn the yellow cover a 1/4 turn to open.
- Separate the clips which secure the
base of bulb on each side to release the
bulb.
- Remove the bulb by pulling, keeping it
straight.
- Insert the new bulb, reposition the clips
around the base of the bulb and carry
out the operations in reverse order to
put the lamp unit and the bumper back
in position.
SIDE REPEATER
Ty p e A
, WY 5W (amber)
- Push the repeater towards the rear
and disengage it by pulling the
front.
- Contact a PEUGEOT dealer to
obtain a new repeater which is a
sealed component.
- To refi t, engage the repeater
towards the rear and bring it
towards the front.
COURTESY LAMPS
Type A
, 12V5W - 5W
- Unclip the lens by sliding a
screwdriver in the slots on each
side of the courtesy lamp.
- Pull the bulb out and change it.
- Clip the lens in its housing and
ensure that it is secured correctly.
Front/Rear
Page 170 of 232

9.2
EMERGENCY OR ASSISTANCE CALL
EMERGENCY CALL
In an emergency, press this button for more than2 seconds. Flashing of the green indicator lamp and a
voice message confi rm that the call has been made to the
PEUGEOT Emergency team * .
Pressin
g this button again immediately cancels the request. The green
indicator lamp goes off.
ASSISTANCE CALL
If you purchased your vehicle outside the PEUGEOT dealer network,
we invite you to have a dealer check the confi guration of these servicesand, if desired, modifi ed to suit your wishes. In a multi-lingual country, confi guration is possible in the offi cial national language of your choice.
When the i
gnition is switched on, the green
indicator lamp comes on for 3 seconds
indicating that the system is operating correctly. Pressin
g this button again immediately cancels the request.
The cancellation is confi rmed b
y a voice message.
Press this button for more than 2 seconds to re
questassistance if the vehicle breaks down.
A voice message confi rms that the call has been made * .
OPERATION OF THE SYSTEM The green indicator lamp remains on (without fl ashing) whencommunication is established. It goes off at the end of communication.
This call is dealt with b
y the PEUGEOT Emergency team which receiveslocating information from the vehicle and can send a detailed alert to theappropriate emergency services. In countries in which the team is not
operational, or when the locating service has been expressly declined,
the call is dealt with directly by the emergency services (11 2) without the
vehicle location.
I
f an impact is detected by the airbag ECU, and independentlyof the deployment of any airbags, an emergency call is made
automatically.
If the oran
ge indicator lamp fl ashes: there is
a system malfunction.
I
f the orange indicator lamp is on continuously: the backup battery must be replaced.
In both cases, consult a PEU
GEOT dealer.
*
This service is subject to conditions and availability.
Consult a PEUGEOT dealer.
Page 172 of 232

9.4
01
1
55
101
22
334466
131
111
99
144155
77881212161
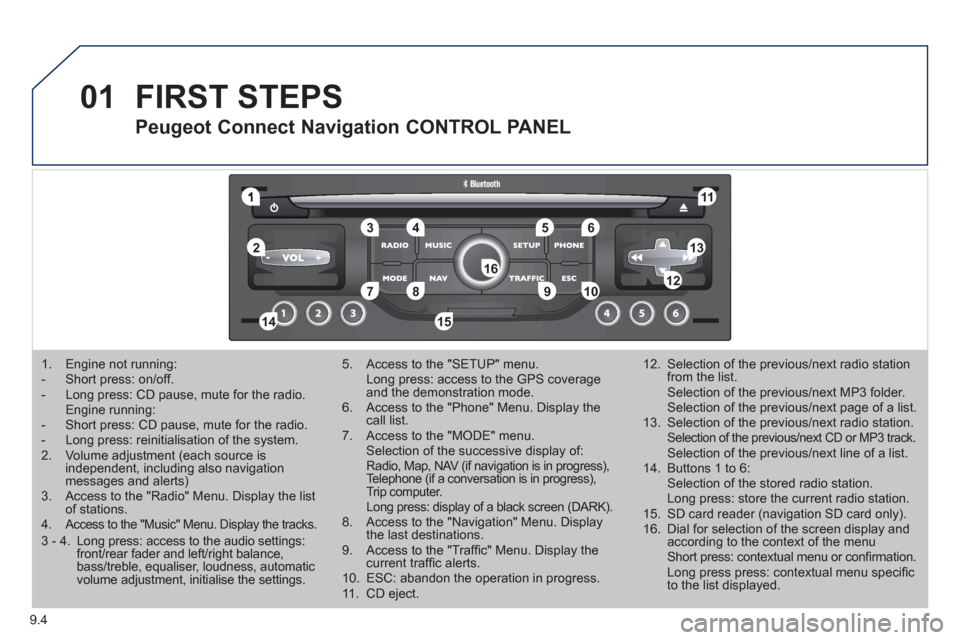
1. Engine not running: - Short press: on/off.- Long press: CD pause, mute for the radio.Engine running:- Short press: CD pause, mute for the radio. - Long press: reinitialisation of the system. 2. Volume adjustment (each source is independent, including also navigation messages and alerts)3. Access to the "Radio" Menu. Display the list of stations. 4. Access to the "Music" Menu. Display the tracks.
5. Access to the "SETUP" menu. Long press: access to the GPS coverage and the demonstration mode.6. Access to the "Phone" Menu. Display thecall list. 7. Access to the "MODE" menu. Selection of the successive display of:Radio, Map, NAV (if navigation is in progress), Telephone (if a conversation is in progress),Trip computer. Long press: display of a black screen (DARK).8. Access to the "Navigation" Menu. Display the last destinations.9. Access to the "Traffi c" Menu. Display thecurrent traffi c alerts. 10. ESC: abandon the operation in progress. 11. CD eject.
12. Selection of the previous/next radio station from the list. Selection of the previous/next MP3 folder. Selection of the previous/next page of a list.
13. Selection of the previous/next radio station. Selection of the previous/next CD or MP3 track. Selection of the previous/next line of a list.
14. Buttons 1 to 6: Selection of the stored radio station. Long press: store the current radio station.
15. SD card reader (navigation SD card only).
16. Dial for selection of the screen display andaccording to the context of the menu Short press: contextual menu or confi rmation. Long press press: contextual menu specifi c to the list displayed.
FIRST STEPS
Peugeot Connect Navigation CONTROL PANEL
3 - 4. Long press: access to the audio settings: front/rear fader and left/right balance,bass/treble, equaliser, loudness, automatic volume adjustment, initialise the settings.