Page 145 of 232

143
QUICK HEL
P
7
Changing a wheel
1. PARKING THE VEHICLE
- Tthe occupants must get out of the
vehicle and wait in a safe location.
- If possible, park the vehicle on level,
stable and non-slippery ground.
- Apply the parking brake, switch
off the ignition and engage fi rst or
reverse gear.
- If available, place a chock under
the wheel diagonally opposite the
one to be changed.
If the vehicle is fi tted with a towbar,
it is sometimes necessary to raise
the vehicle slightly to make it easier
to remove the spare wheel from its
carrier.
On certain types of ground and/or
if considerable loads are being
transported, call a PEUGEOT dealer.
CHANGING A WHEEL
2. TOOLS
- The tools are stowed in a storage
compartment located under the
front seat. If necessary, move the
seat forward to access the storage
compartment from the rear.
- Unscrew the nut then take out the
jack and the wheelbrace.
1.
Wheelbrace.
2.
Jack.
3.
Alloy wheel embellisher remover.
4.
Chock.
The jack and the tool kit are specifi c to
your vehicle. Do not use them for other
purposes.
Page 151 of 232

149
QUICK HELP
7
Changing a bulb
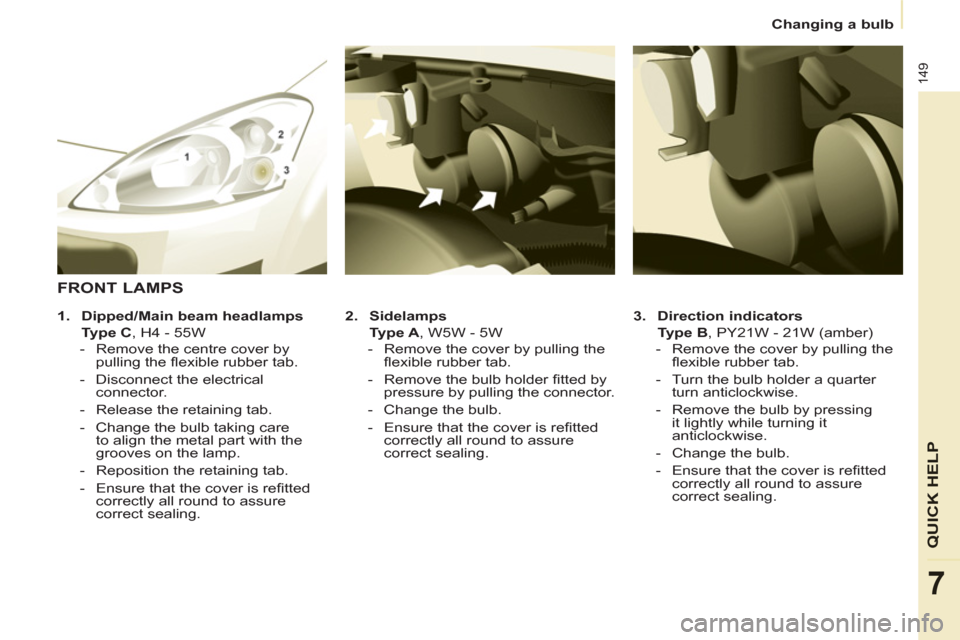
3.
Direction indicators
Type B
, PY21W - 21W (amber)
- Remove the cover by pulling the
fl exible rubber tab.
- Turn the bulb holder a quarter
turn anticlockwise.
- Remove the bulb by pressing
it lightly while turning it
anticlockwise.
- Change the bulb.
- Ensure that the cover is refi tted
correctly all round to assure
correct sealing.
2.
Sidelamps
Ty p e A
, W5W - 5W
- Remove the cover by pulling the
fl exible rubber tab.
- Remove the bulb holder fi tted by
pressure by pulling the connector.
- Change the bulb.
- Ensure that the cover is refi tted
correctly all round to assure
correct sealing.
FRONT LAMPS
1.
Dipped/Main beam headlamps
Type C
, H4 - 55W
- Remove the centre cover by
pulling the fl exible rubber tab.
- Disconnect the electrical
connector.
- Release the retaining tab.
- Change the bulb taking care
to align the metal part with the
grooves on the lamp.
- Reposition the retaining tab.
- Ensure that the cover is refi tted
correctly all round to assure
correct sealing.
Page 153 of 232

151
QUICK HELP
7
Changing a bulb
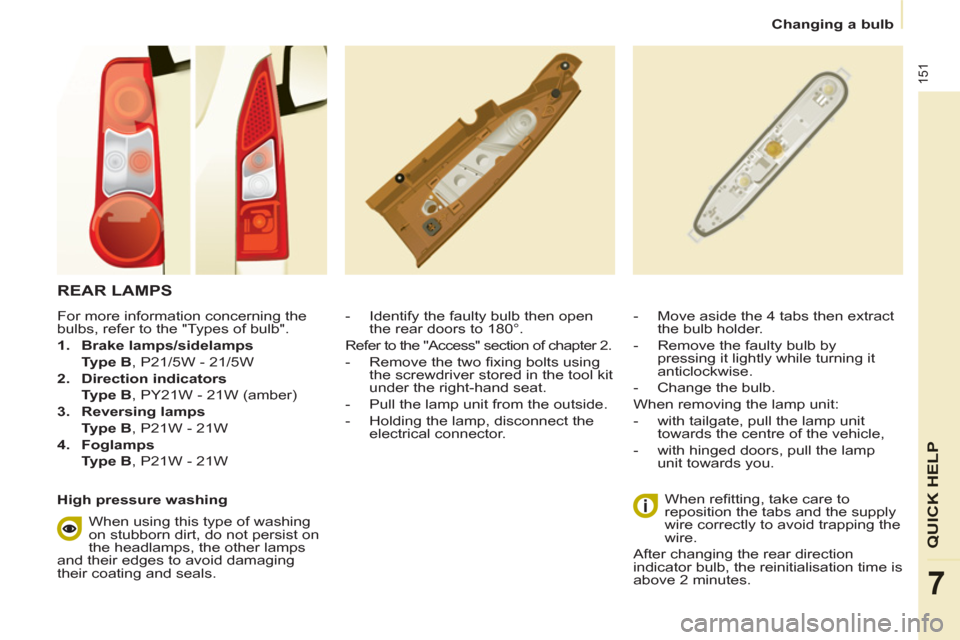
REAR LAMPS
- Identify the faulty bulb then open
the rear doors to 180°.
Refer to the "Access" section of chapter 2.
- Remove the two fi xing bolts using
the screwdriver stored in the tool kit
under the right-hand seat.
- Pull the lamp unit from the outside.
- Holding the lamp, disconnect the
electrical connector.
When refi tting, take care to
reposition the tabs and the supply
wire correctly to avoid trapping the
wire.
After changing the rear direction
indicator bulb, the reinitialisation time is
above 2 minutes.
- Move aside the 4 tabs then extract
the bulb holder.
- Remove the faulty bulb by
pressing it lightly while turning it
anticlockwise.
- Change the bulb.
When removing the lamp unit:
- with tailgate, pull the lamp unit
towards the centre of the vehicle,
- with hinged doors, pull the lamp
unit towards you.
For more information concerning the
bulbs, refer to the "Types of bulb".
1.
Brake lamps/sidelamps
Type B
, P21/5W - 21/5W
2.
Direction indicators
Type B
, PY21W - 21W (amber)
3.
Reversing lamps
Type B
, P21W - 21W
4.
Foglamps
Type B
, P21W - 21W
High pressure washing
When using this type of washing
on stubborn dirt, do not persist on
the headlamps, the other lamps
and their edges to avoid damaging
their coating and seals.
Page 154 of 232
152
Changing a bulb
NUMBER PLATE LAMPS
- Unscrew the two nuts.
- Push the pins.
- If necessary, disconnect the
connector to remove the light.
- Change the bulb.
With tailgate
- Move aside the plastic lens using a
screwdriver.
- Change the bulb.
- Replace the plastic lens and press
on it.
THIRD BRAKE LIGHT
Type A, W16W - 16W
With hinged doors
- Unclip the interior trim.
- Disconnect the connector by
moving aside its tab.
- Turn the bulb holder a quarter turn
anticlockwise.
- Change the bulb.
- Put the bulb holder back in place
and reconnect the connector.
- Put the trim back in place.
Type A
, W5W - 5W
Page 166 of 232

Weights
164
WEIGHTS AND TOWED LOADS (KG)
General points
For more information, refer to your
registration certifi cate.
In each country, it is imperative that
the towed loads authorised by local
legislation are complied with. To fi nd
out your vehicle's towing capacities
and its gross train weight, consult a
PEUGEOT dealer. The braked towed weight with load
transfer can be increased on condition
that the equivalent of this load is
removed from the vehicle so that the
GTW is not exceeded. Warning: towing
using a lightly loaded towing vehicle
may have an adverse effect on its road
holding.
The speed of a towing vehicle must not
exceed 50 mph (80 km/h) (comply with
the legislation in force in your country). High ambient temperatures may result
in a reduction in the performance
of the vehicle in order to protect the
engine; when the ambient temperature
is higher than 37 °C, limit the towed
weight.
The kerb weight is equal to the weight
without load + driver (75 kg) + fuel tank
fi lled to 90 %.
The GTW and towed load values
indicated are valid up to a maximum
altitude of 1 000 metres; the towed
load mentioned must be reduced by
10 % for each additional 1 000 metres.
Page 178 of 232

04
7
8
9
9.10
To clear a destination; from steps 1 to 3, select "Choose from last destinations".
A long press on one of the destinations displays a list of actions from which you can select:
Delete entr
y
D
elete listRepeat steps 5 to 7
for the "Street" and "House number" functions. Turn the dial and select
OK.
Pr
ess the dial to confi rm.
Select the "Save to address book" function to record the address
entered in a directory fi le. Press the dial to confi rm the selection.
Peu
geot Connect Navigation allows up to 500 contact fi les to be
recorded.
To speed up the process, the post code can be entered directl
y
after selecting the "Postal code" function.
Use the virtual ke
ypad to enter the letters and digits.
Then select "
Start route guidance"
and the press the dial to confi rm.
During guidance, pressing the endof the lighting stalk repeats the last guidance instruction.
Map settin
gs
You can zoom in/zoom out on the map usin
g the dial.
It is possible to move the map or select its orientation via theshort-cut menu of the FULL SCREEN MAP.
Press M
ODE until the map is displayed full screen. Press the dial
then select "Map settings". Select "2.5D Map" or "2D Map" and in
the latter case, select "North Up" or "Heading Up".
Select the route type:
"Fast route", "
Short route" or "Optimized route" and press the dial
to confi rm.
It is also
possible to select a destination via "Choose from address
book" or "Choose from last destinations".
Choose from last destinations Choose from address bookStart route
guidance
NAVIGATION - GUIDANCE
Page 204 of 232

9.36
01
1
22
10101111
133144155
33445566778899
122
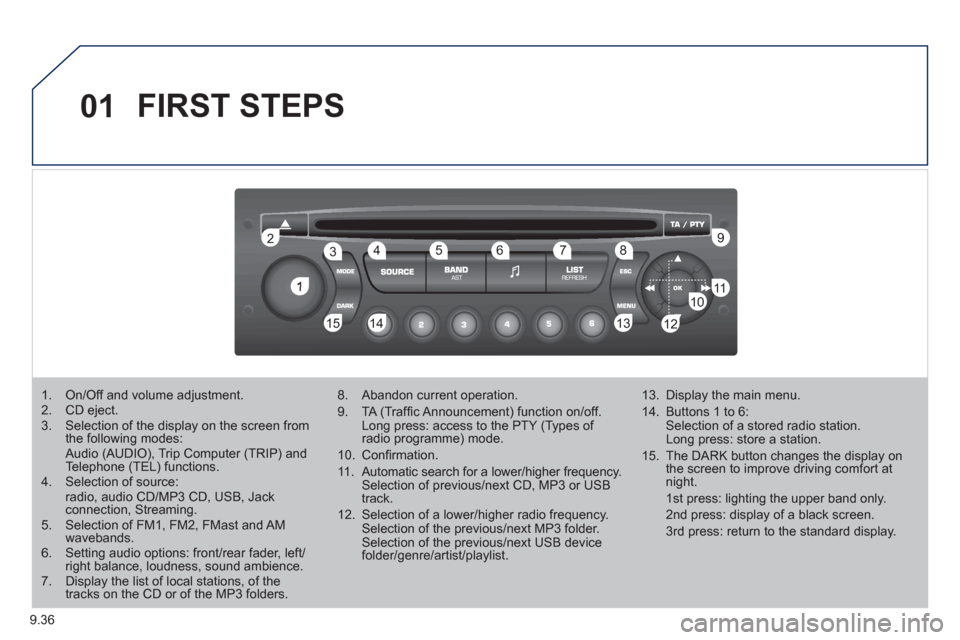
FIRST STEPS
1. On/Off and volume adjustment. 2. CD eject. 3. Selection of the display on the screen from the following modes: Audio (AUDIO), Trip Computer (TRIP) and Telephone (TEL) functions. 4. Selection of source:radio, audio CD/MP3 CD, USB, Jackconnection, Streaming.
5. Selection of FM1, FM2, FMast and AMwavebands.6. Setting audio options: front/rear fader, left/right balance, loudness, sound ambience.7. Display the list of local stations, of thetracks on the CD or of the MP3 folders.
8. Abandon current operation.
9. TA (Traffi c Announcement) function on/off. Long press: access to the PTY (Types of radio programme) mode.
10. Confi rmation.
11. Automatic search for a lower/higher frequency. Selection of previous/next CD, MP3 or USB track.
12. Selection of a lower/higher radio frequency. Selection of the previous/next MP3 folder. Selection of the previous/next USB devicefolder/genre/artist/playlist.
13. Display the main menu.
14. Buttons 1 to 6: Selection of a stored radio station. Long press: store a station.
15. The DARK button changes the display on the screen to improve driving comfort at night.
1st press: lighting the upper band only.
2nd press: display of a black screen.
3rd press: return to the standard display.
Page 226 of 232
168
Instruments and controls
Passenger's airbag
deactivation 119
Gearbox 40
ESP 109
Parking sensors 106-107
Electric mirrors 102
Headlamp beam height adjustment 50
Stop & Start 43
Ignition switch 46
Wiper control 51-52
Automatic rain sensitive wipers 51
Windscreen/
headlamp wash 52, 136
Trip computer Section 9
Cruise control 53-55
Speed limiter 56-58
Lighting controls 48-49
Automatic illumination of
headlamps 49
Foglamps 49
Daytime running lamps 49
INSTRUMENTS AND CONTROLS
Parking brake 105
Instrument panels,
screens, dials 27-28
Warning lamps,
indicator lamps 29-34
Indicators, gauge 35
Setting the time in
the instrument panel 28
Lighting dimmer 38
Gear shift indicator 39
Audio equipment steering
mounted controls Section 9
Steering wheel adjustment 42
Horn 105