2011 Peugeot 308 SW BL change
[x] Cancel search: changePage 155 of 336
!
DRIVING
When the cruise control is switched
on, be careful if you maintain the
pressure on one of the programmed
speed changing buttons: this may
result in a very rapid change in the
speed of your vehicle.
Do not use the cruise control on
slippery roads or in heavy traffi c.
On a steep descent, the cruise
control will not be able to prevent
the vehicle from exceeding the pro-
grammed speed.
To avoid any risk of jamming of the
pedals:
- ensure that the mat is positioned
correctly,
- never fi t one mat on top of
another.
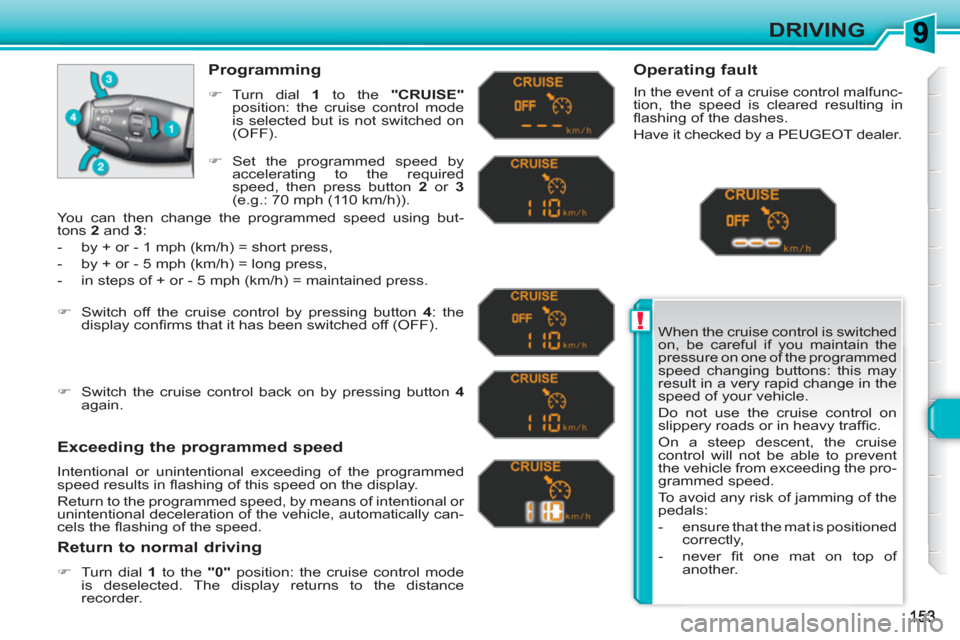
Programming
�)
Turn dial 1
to the "CRUISE"
position: the cruise control mode
is selected but is not switched on
(OFF).
Exceeding the programmed speed
Intentional or unintentional exceeding of the programmed
speed results in fl ashing of this speed on the display.
Return to the programmed speed, by means of intentional or
unintentional deceleration of the vehicle, automatically can-
cels the fl ashing of the speed.
Return to normal driving
�)
Turn dial 1
to the "0"
position: the cruise control mode
is deselected. The display returns to the distance
recorder.
Operating fault
In the event of a cruise control malfunc-
tion, the speed is cleared resulting in
fl ashing of the dashes.
Have it checked by a PEUGEOT dealer.
�)
Set the programmed speed by
accelerating to the required
speed, then press button 2
or 3
(e.g.: 70 mph (110 km/h)).
�)
Switch off the cruise control by pressing button 4
: the
display confi rms that it has been switched off (OFF).
�)
Switch the cruise control back on by pressing button 4
again.
You can then change the programmed speed using but-
tons 2
and 3
:
- by + or - 1 mph (km/h) = short press,
- by + or - 5 mph (km/h) = long press,
- in steps of + or - 5 mph (km/h) = maintained press.
Page 163 of 336

10
!
161
CHECKS
CHECKING LEVELS
Check all of these levels regularly and
top them up if necessary, unless other-
wise indicated.
If a level drops signifi cantly, have the
corresponding system checked by a
PEUGEOT dealer.
Brake fluid level
In addition, as the cooling system is
pressurised, wait at least one hour after
switching off the engine before carrying
out any work.
To avoid any risk of scalding, unscrew
the cap by two turns to allow the pres-
sure to drop. When the pressure has
dropped, remove the cap and top up
the level.
Oil level
The reading will only be correct
if the vehicle is on level ground
and the engine has been off for
more than 15 minutes.
The check is carried out either when the igni-
tion is switched on using the oil level indicator
on the instrument panel, or using the dipstick.
The brake fl uid level should be
close to the "MAX" mark. If it is
not, check the brake pad wear.
Changing the fl uid
Refer to the Warranty and Maintenance
Record for details of the interval for this
operation.
Power steering fluid level
The power steering fl uid level
should be close to the "MAX"
mark. Unscrew the cap, with the
engine cold, to check the level.
Screenwash and headlamp
wash fluid
In the case of vehicles fi tted
with headlamp washers, the
minimum level of this fl uid is
indicated by an audible signal
and a message on the multifunction
screen.
Top up the level when you stop the ve-
hicle.
Engine oil change
Refer to the Warranty and Maintenance
Record for details of the interval for this
operation.
In order to maintain the reliability of the
engine and emission control system,
the use of additives in the engine oil is
prohibited.
Oil specifi cation
The oil must correspond to your engine
and conform to the manufacturer's rec-
ommendations.
Fluid specifi cation
The brake fl uid must conform to the
manufacturer's recommendations and
fulfi l the DOT4 standards.
Changing the coolant
The coolant does not have to be
changed.
Fluid specifi cation
For optimum cleaning and to avoid
freezing, this fl uid must not be topped
up with or replaced with water.
Coolant level
The coolant level should be
close to the "MAX" mark but
should never exceed it.
When the engine is warm, the tempera-
ture of the coolant is regulated by the fan.
This can operate with the ignition off.
On vehicles which are fi tted with a
particle emission fi lter, the fan may
operate after the vehicle has been
switched off, even if the engine is
cold.
Fluid specifi cation
The coolant must conform to the manu-
facturer's recommendations.
When working under the bonnet,
take care, as certain areas of the
engine may be extremely hot (risk
of burns).
Page 164 of 336

1
!
i
162
CHECKS
Avoid prolonged contact of used oil
or fl uids with the skin.
Most of these fl uids are harmful to
health or indeed very corrosive.
Do not discard used oil or fl uids
into sewers or onto the ground.
Take used oil to a PEUGEOT dealer
(France) or an authorised waste dis-
posal site.
Diesel additive level (Diesel
engine with particle emission
filter)
A low additive level is indicated by light-
ing of the service warning lamp, accom-
panied by an audible warning and a
message on the multifunction screen.
Used products
CHECKS
Unless otherwise indicated, check
these components in accordance with
the Warranty and Maintenance and Re-
cord and according to your engine.
Otherwise, have them checked by a
PEUGEOT dealer.
Battery
The battery does not require
any maintenance.
However, check that the ter-
minals are clean and correctly
tightened, particularly in sum-
mer and winter.
When carrying out work on the battery,
refer to the "Practical information" sec-
tion for details of the precautions to be
taken before disconnecting the battery
and following its reconnection.
Air filter and passenger compartment filter
Refer to the Warranty and
Maintenance and Record for
details of the replacement in-
tervals for these components.
Depending on the environ-
ment (e.g. dusty atmosphere) and the
use of the vehicle (e.g. city driving),
replace them twice as often if neces-
sary
(refer to the "Engines" section).
A clogged passenger compartment fi lter
may have an adverse effect on the per-
formance of the air conditioning system
and generate undesirable odours.
Particle emission filter (Diesel)
It is imperative that the maintenance of
the particle emission fi lter is carried out
by a PEUGEOT dealer.
Oil filter
Replace the oil fi lter each time
the engine oil is changed.
Refer to the Warranty and
Maintenance and Record for
details of the replacement in-
terval for this component.
Following prolonged operation of
the vehicle at very low speed or at
idle, you may, in exceptional cir-
cumstances, notice the emission
of water vapour at the exhaust on
acceleration. This does not affect
the behaviour of the vehicle or the
environment.
Topping up
This additive must be topped up by a
PEUGEOT dealer without delay.
Page 165 of 336
10
!
163
CHECKS
Only use products recommended
by PEUGEOT or products of equiv-
alent quality and specifi cations.
In order to optimise the operation
of units as important as the braking
system, PEUGEOT selects and of-
fers very specifi c products.
To avoid damaging the electrical
units, the use of a high pressure
washer in the engine compartment
is strictly prohibited
.
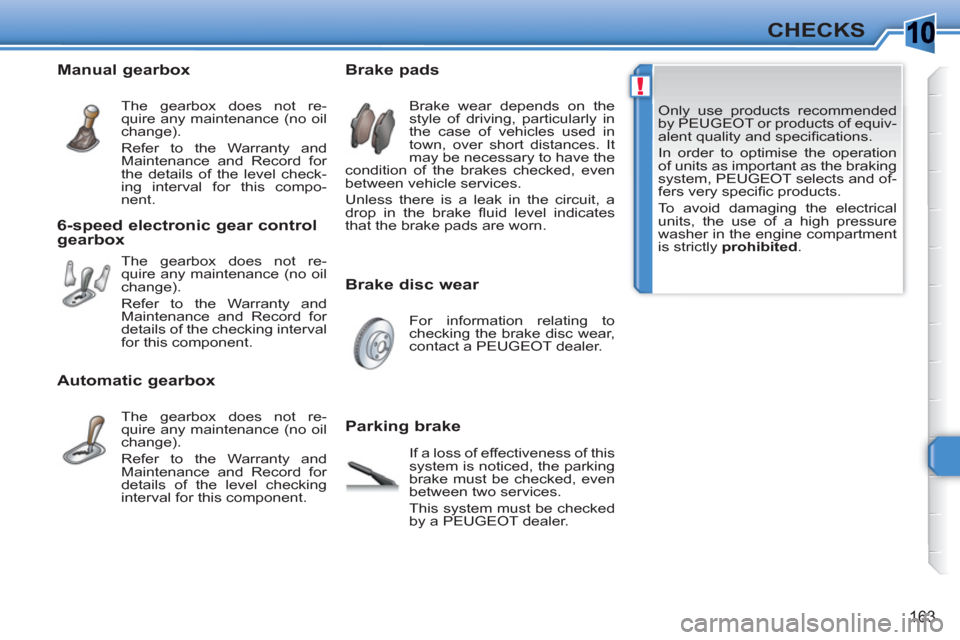
Brake disc wear
Brake pads
Parking brake
Brake wear depends on the
style of driving, particularly in
the case of vehicles used in
town, over short distances. It
may be necessary to have the
condition of the brakes checked, even
between vehicle services.
Unless there is a leak in the circuit, a
drop in the brake fl uid level indicates
that the brake pads are worn.
For information relating to
checking the brake disc wear,
contact a PEUGEOT dealer.
If a loss of effectiveness of this
system is noticed, the parking
brake must be checked, even
between two services.
This system must be checked
by a PEUGEOT dealer.
Manual gearbox
The gearbox does not re-
quire any maintenance (no oil
change).
Refer to the Warranty and
Maintenance and Record for
the details of the level check-
ing interval for this compo-
nent.
6-speed electronic gear control
gearbox
The gearbox does not re-
quire any maintenance (no oil
change).
Refer to the Warranty and
Maintenance and Record for
details of the checking interval
for this component.
Automatic gearbox
The gearbox does not re-
quire any maintenance (no oil
change).
Refer to the Warranty and
Maintenance and Record for
details of the level checking
interval for this component.
Page 179 of 336
1
i
177
PRACTICAL INFORMATION
Parking the vehicle
Immobilise the vehicle where it
does not block traffi c: the ground
must be level, stable and non-slip-
pery ground.
Apply the parking brake, switch off
the ignition and engage fi rst gear *
to lock the wheels.
If necessary, place a chock under
the wheel diagonally opposite the
wheel to be changed.
It is imperative that you ensure that
the occupants get out of the vehicle
and wait where they are safe.
Never go underneath a vehicle
raised using a jack; use an axle
stand.
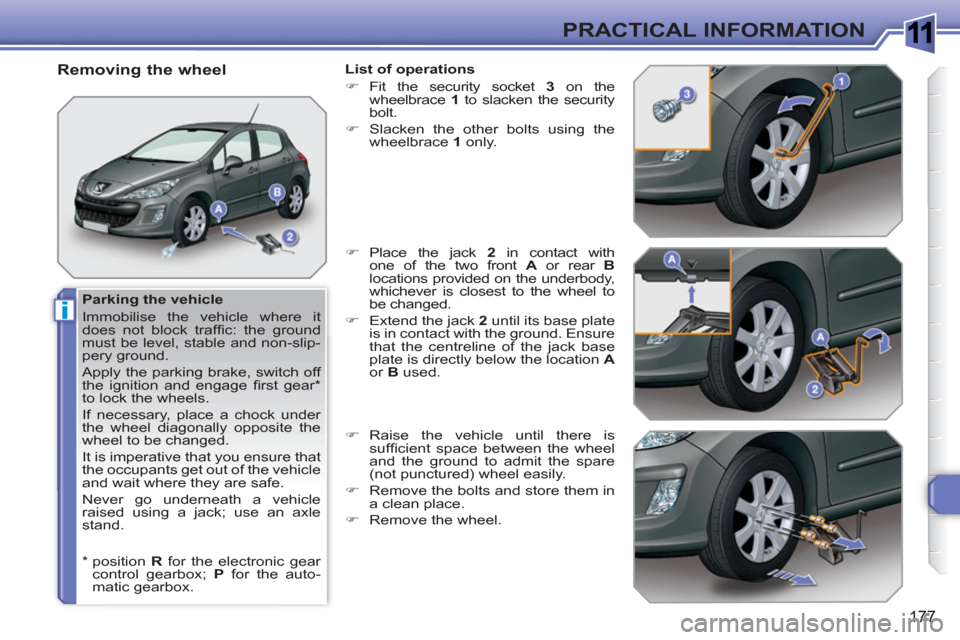
Removing the wheel
List of operations
�)
Fit the security socket 3
on the
wheelbrace 1
to slacken the security
bolt.
�)
Slacken the other bolts using the
wheelbrace 1
only.
�)
Place the jack 2
in contact with
one of the two front A
or rear B
locations provided on the underbody,
whichever is closest to the wheel to
be changed.
�)
Extend the jack 2
until its base plate
is in contact with the ground. Ensure
that the centreline of the jack base
plate is directly below the location A
or B
used.
�)
Raise the vehicle until there is
suffi cient space between the wheel
and the ground to admit the spare
(not punctured) wheel easily.
�)
Remove the bolts and store them in
a clean place.
�)
Remove the wheel.
*
position R
for the electronic gear
control gearbox; P
for the auto-
matic gearbox.
Page 182 of 336
1
i
!
180
PRACTICAL INFORMATION
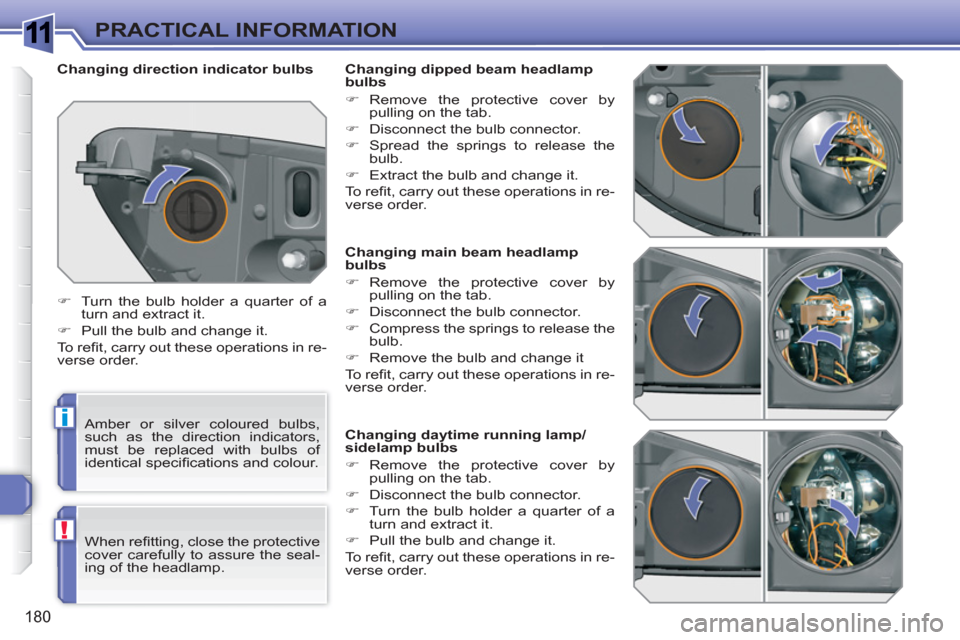
Changing main beam headlamp
bulbs
�)
Remove the protective cover by
pulling on the tab.
�)
Disconnect the bulb connector.
�)
Compress the springs to release the
bulb.
�)
Remove the bulb and change it
To r efi t, carry out these operations in re-
verse order.
Changing daytime running lamp/
sidelamp bulbs
�)
Remove the protective cover by
pulling on the tab.
�)
Disconnect the bulb connector.
�)
Turn the bulb holder a quarter of a
turn and extract it.
�)
Pull the bulb and change it.
To r efi t, carry out these operations in re-
verse order.
Changing dipped beam headlamp
bulbs
�)
Remove the protective cover by
pulling on the tab.
�)
Disconnect the bulb connector.
�)
Spread the springs to release the
bulb.
�)
Extract the bulb and change it.
To r efi t, carry out these operations in re-
verse order.
Changing direction indicator bulbs
�)
Turn the bulb holder a quarter of a
turn and extract it.
�)
Pull the bulb and change it.
To r efi t, carry out these operations in re-
verse order.
Amber or silver coloured bulbs,
such as the direction indicators,
must be replaced with bulbs of
identical specifi cations and colour.
When refi tting, close the protective
cover carefully to assure the seal-
ing of the headlamp.
Page 184 of 336
1
i
182
PRACTICAL INFORMATION
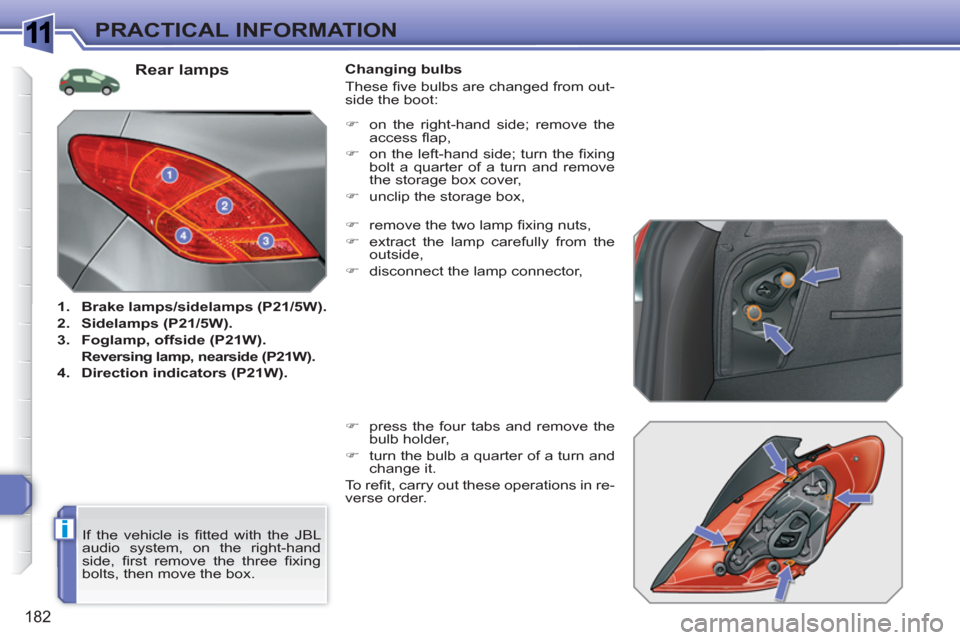
Rear lamps
1.
Brake lamps/sidelamps (P21/5W).
2.
Sidelamps (P21/5W).
3.
Foglamp,
offside
(P21W).
Reversing lamp,
nearside
(P21W).
4.
Direction indicators (P21W).
Changing bulbs
These fi ve bulbs are changed from out-
side the boot:
�)
remove the two lamp fi xing nuts,
�)
extract the lamp carefully from the
outside,
�)
disconnect the lamp connector,
�)
press the four tabs and remove the
bulb holder,
�)
turn the bulb a quarter of a turn and
change it.
To r efi t, carry out these operations in re-
verse order.
If the vehicle is fi tted with the JBL
audio system, on the right-hand
side, fi rst remove the three fi xing
bolts, then move the box.
�)
on the right-hand side; remove the
access fl ap,
�)
on the left-hand side; turn the fi xing
bolt a quarter of a turn and remove
the storage box cover,
�)
unclip the storage box,
Page 185 of 336
1
183
PRACTICAL INFORMATION
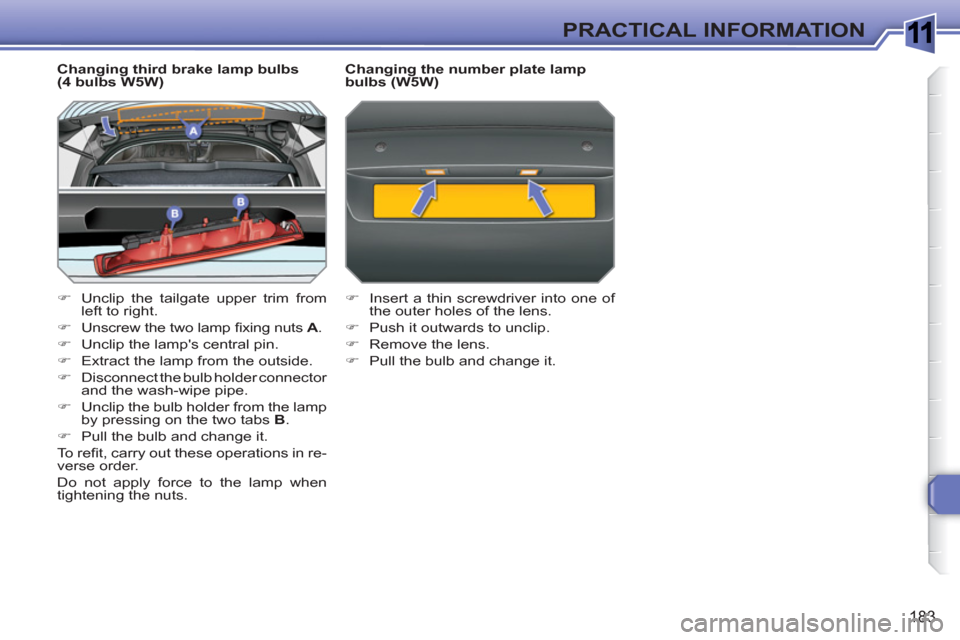
Changing third brake lamp bulbs
(4 bulbs W5W)
�)
Unclip the tailgate upper trim from
left to right.
�)
Unscrew the two lamp fi xing nuts A
.
�)
Unclip the lamp's central pin.
�)
Extract the lamp from the outside.
�)
Disconnect the bulb holder connector
and the wash-wipe pipe.
�)
Unclip the bulb holder from the lamp
by pressing on the two tabs B
.
�)
Pull the bulb and change it.
To r efi t, carry out these operations in re-
verse order.
Do not apply force to the lamp when
tightening the nuts.
Changing the number plate lamp
bulbs (W5W)
�)
Insert a thin screwdriver into one of
the outer holes of the lens.
�)
Push it outwards to unclip.
�)
Remove the lens.
�)
Pull the bulb and change it.