Page 290 of 336
288
06
6 4
5
3 2 1
SELECTING/PLAYING MUSIC
CD, MP3/WMA CD
The playing and displaying of an MP3/WMA compilatioon may dependon the recording programme and/or the settings used. Werecommend the ISO 9660 fi le standard.
Press the MUSIC button.
Select the "Select music" function andpress the dial to confi rm.
Press the up or down button to selectthe next/previous folder.
Select the music source required:CD, MP3/WMA CD. Press the dial to confi rm. Play begins.
SELECT MUSIC
Press the MUSIC button again or select the "Music" Menu function andpress the dial to confi rm.
Press one of the buttons to select amusic track.
Press and hold one of the buttons for fast forward or rewind play.
"MUSIC" MENU
The list of tracks or MP3/WMA fi les appears under "Music" Menu.
MUSIC MEDIA PLAYERS
Page 291 of 336
289
3 1
2
06
1
4
2
3
5
4
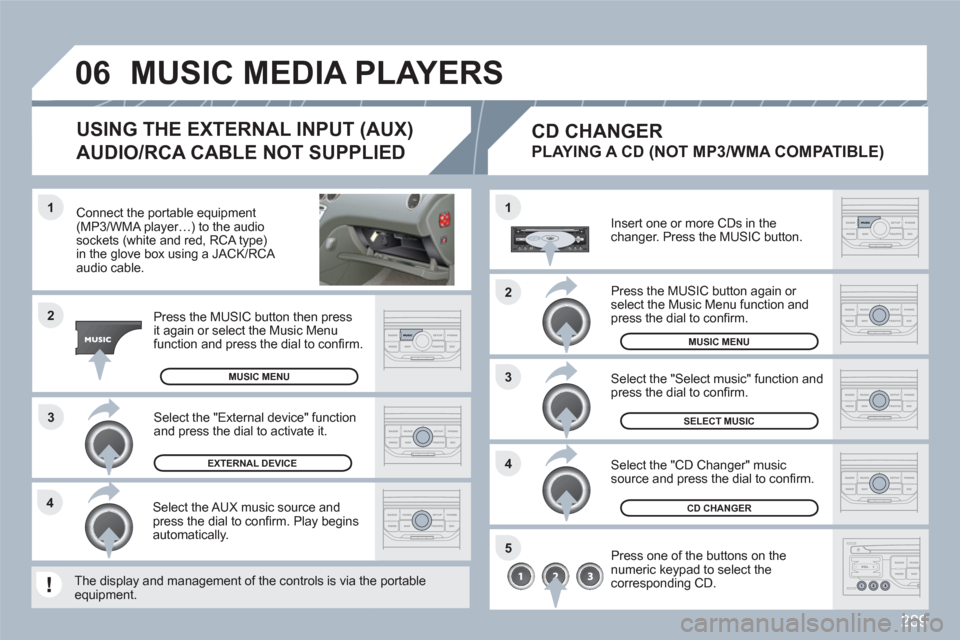
Connect the portable equipment(MP3/WMA player…) to the audiosockets (white and red, RCA type) in the glove box using a JACK/RCA audio cable.
Press the MUSIC button then pressit again or select the Music Menufunction and press the dial to confi rm.
Select the AUX music source andpress the dial to confi rm. Play beginsautomatically.
Select the "External device" function and press the dial to activate it.
EXTERNAL DEVICE
The display and management of the controls is via thee portableequipment.
USING THE EXTERNAL INPUT (AUX)
AUDIO/RCA CABLE NOT SUPPLIED
MUSIC MEDIA PLAYERS
MUSIC MENU
CD CHANGER
SELECT MUSIC
MUSIC MENU
Insert one or more CDs in the changer. Press the MUSIC button.
Press one of the buttons on the numeric keypad to select thecorresponding CD.
Select the "CD Changer" musicsource and press the dial to confi rm.
Select the "Select music" function and press the dial to confi rm.
CD CHANGER
PLAYING A CD (NOT MP3/WMA COMPATIBLE)
Press the MUSIC button again or select the Music Menu function and press the dial to confi rm.
Page 295 of 336
293
09 STEERING MOUNTED CONTROLS
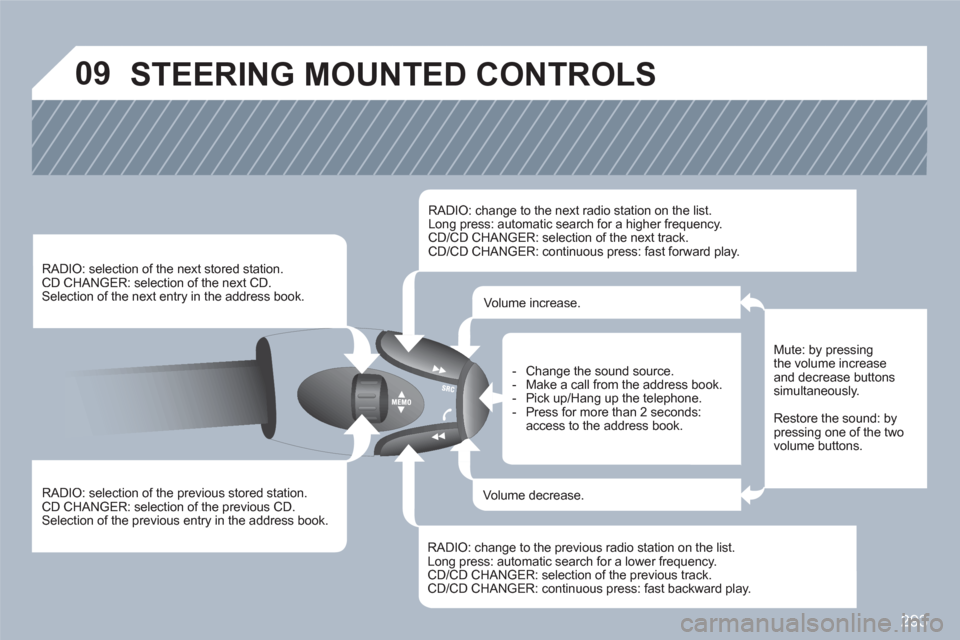
RADIO: selection of the previous stored station.
CD CHANGER: selection of the previous CD. Selection of the previous entry in the address book.
RADIO: selection of the next stored station. CD CHANGER: selection of the next CD.
Selection of the next entry in the address book.
RADIO: change to the next radio station on the list.
Long press: automatic search for a higher frequency. CD/CD CHANGER: selection of the next track.
CD/CD CHANGER: continuous press: fast forward play.
RADIO: change to the previous radio station on the list. Long press: automatic search for a lower frequency.CD/CD CHANGER: selection of the previous track.CD/CD CHANGER: continuous press: fast backward play.
- Change the sound source.
- Make a call from the address book.
- Pick up/Hang up the telephone.
- Press for more than 2 seconds:access to the address book.
Volume increase.
Volume decrease.
Mute: by pressingthe volume increase and decrease buttonssimultaneously.
Restore the sound: by pressing one of the twovolume buttons.
Page 304 of 336
302
11
22
10101111
133144155
33445566778899
122
01 FIRST STEPS
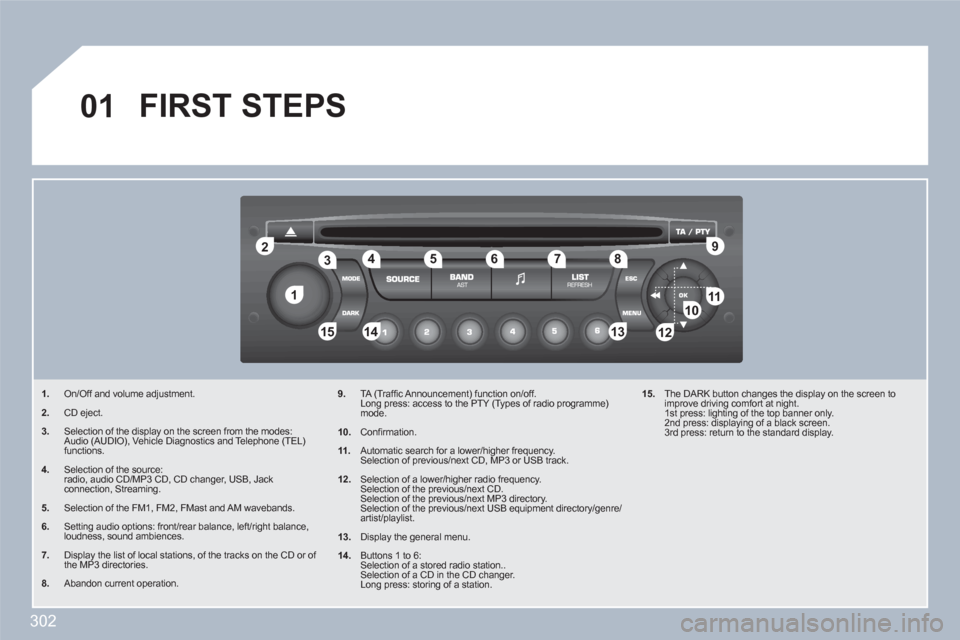
1.On/Off and volume adjustment.
2.CD eject.
3.Selection of the display on the screen from the modes: Audio (AUDIO), Vehicle Diagnostics and Telephone (TEL) functions.
4.Selection of the source: radio, audio CD/MP3 CD, CD changer, USB, Jack connection, Streaming.
5.Selection of the FM1, FM2, FMast and AM wavebands.
6.Setting audio options: front/rear balance, left/right balance, loudness, sound ambiences.
7.Display the list of local stations, of the tracks on the CD or of the MP3 directories.
8.Abandon current operation.
9.TA (Traffi c Announcement) function on/off. Long press: access to the PTY (Types of radio programme)mode.
10.
Confi rmation.
11.
Automatic search for a lower/higher frequency. Selection of previous/next CD, MP3 or USB track.
12.
Selection of a lower/higher radio frequency. Selection of the previous/next CD. Selection of the previous/next MP3 directory. Selection of the previous/next USB equipment directory/genre/artist/playlist.
13.
Display the general menu.
14.
Buttons 1 to 6: Selection of a stored radio station.. Selection of a CD in the CD changer. Long press: storing of a station.
15.
The DARK button changes the display on the screen toimprove driving comfort at night. 1st press: lighting of the top banner only. 2nd press: displaying of a black screen. 3rd press: return to the standard display.
Page 306 of 336
304
2
33
44
1
22
44
33
11
03AUDIO
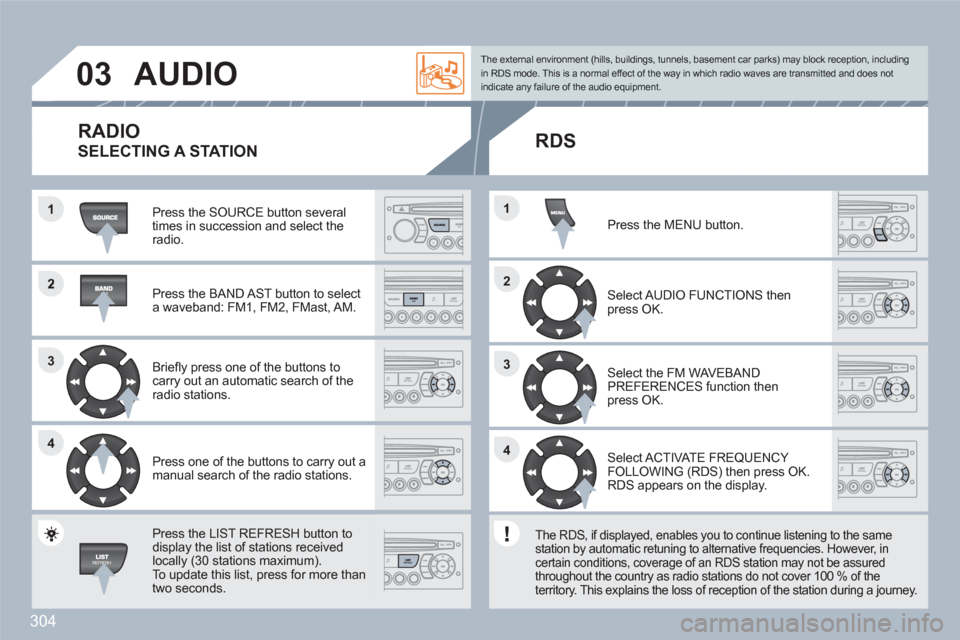
Press the SOURCE button several times in succession and select theradio.
Press the BAND AST button to select a waveband: FM1, FM2, FMast, AM.
Briefl y press one of the buttons to carry out an automatic search of theradio stations.
Press one of the buttons to carry out a manual search of the radio stations.
Press the LIST REFRESH button todisplay the list of stations receivedlocally (30 stations maximum).
To update this list, press for more than two seconds.
Select ACTIVATE FREQUENCY FOLLOWING (RDS) then press OK. RDS appears on the display.
Select the FM WAVEBANDPREFERENCES function thenpress OK.
Select AUDIO FUNCTIONS then press OK.
Press the MENU button.
The external environment (hills, buildings, tunnels, basement car parks) may block reception, including in RDS mode. This is a normal effect of the way in which radio waves are transmitted and does notindicate any failure of the audio equipment.
RDS
The RDS, if displayed, enables you to continue listening to the samestation by automatic retuning to alternative frequencies. However, in certain conditions, coverage of an RDS station may not be assuredthroughout the country as radio stations do not cover 100 % of theterritory. This explains the loss of reception of the station during a journey.
RADIO
SELECTING A STATION
Page 307 of 336
305
03
11
11
22
3333
22
AUDIO
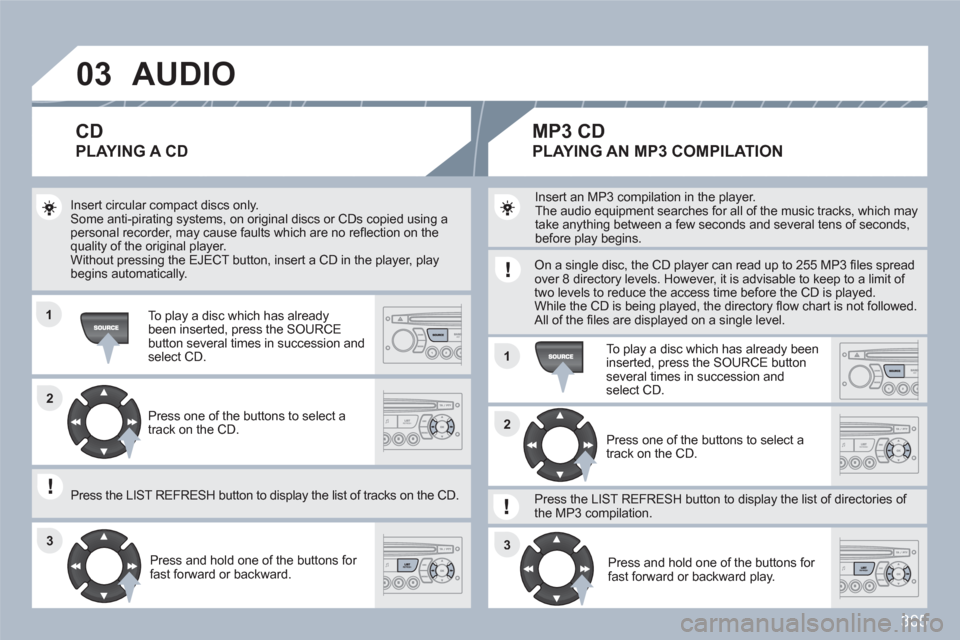
Insert circular compact discs only. Some anti-pirating systems, on original discs or CDs copied using apersonal recorder, may cause faults which are no refl ection on thequality of the original player. Without pressing the EJECT button, insert a CD in the player, playbegins automatically.
To play a disc which has already been inserted, press the SOURCE button several times in succession andselect CD.
Press and hold one of the buttons for fast forward or backward.
Insert an MP3 compilation in the player.
The audio equipment searches for all of the music tracks, which may take anything between a few seconds and several tens of seconds,before play begins.
On a single disc, the CD player can read up to 255 MP3 fi les spreadover 8 directory levels. However, it is advisable to keep to a limit of two levels to reduce the access time before the CD is played. While the CD is being played, the directory fl ow chart is not followed.All of the fi les are displayed on a single level.
To play a disc which has already been inserted, press the SOURCE buttonseveral times in succession and select CD.
Press and hold one of the buttons for fast forward or backward play.
CD
PLAYING A CD
MP3 CD
PLAYING AN MP3 COMPILATION
Press one of the buttons to select atrack on the CD.
Press the LIST REFRESH button to display the list of tracks on the CD.
Press one of the buttons to select atrack on the CD.
Press the LIST REFRESH button to display the list of directories of the MP3 compilation.
Page 308 of 336
306
03
11
22
33
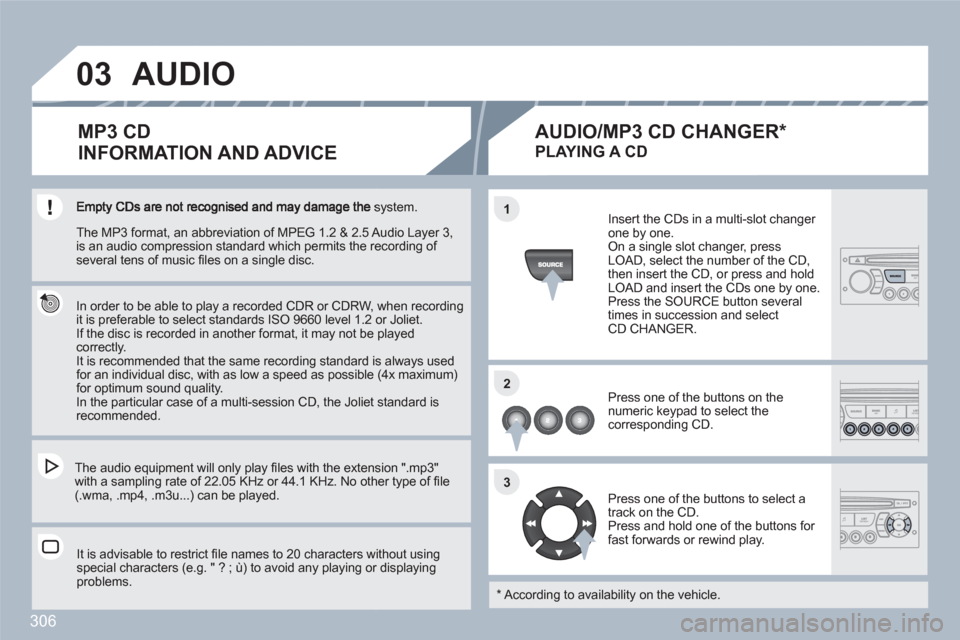
system.
In order to be able to play a recorded CDR or CDRW, when recordingit is preferable to select standards ISO 9660 level 1.2 or Joliet.
If the disc is recorded in another format, it may not be playedcorrectly.
It is recommended that the same recording standard is always usedfor an individual disc, with as low a speed as possible (4x maximum) for optimum sound quality.
In the particular case of a multi-session CD, the Joliet standard is recommended.
The audio equipment will only play fi les with the extension ".mp3" with a sampling rate of 22.05 KHz or 44.1 KHz. No othher type of fi le (.wma, .mp4, .m3u...) can be played.
It is advisable to restrict fi le names to 20 characters wwithout using special characters (e.g. " ? ; ˘) to avoid any playing orr displayingproblems.
MP3 CD
INFORMATION AND ADVICE
AUDIO
Insert the CDs in a multi-slot changer one by one. On a single slot changer, press LOAD, select the number of the CD, then insert the CD, or press and hold LOAD and insert the CDs one by one.
Press the SOURCE button severaltimes in succession and selectCD CHANGER.
Press one of the buttons on the numeric keypad to select the corresponding CD.
Press one of the buttons to select a track on the CD.
Press and hold one of the buttons for fast forwards or rewind play.
PLAYING A CD
*
According to availability on the vehicle.
AUDIO/MP3 CD CHANGER *
The MP3 format, an abbreviation of MPEG 1.2 & 2.5 AAudio Layer 3,is an audio compression standard which permits the reecording of several tens of music fi les on a single disc.
Page 310 of 336
308
33
44
11
55
22
PEUGEOT CONNECT USB
USING THE PEUGEOT CONNECT USB
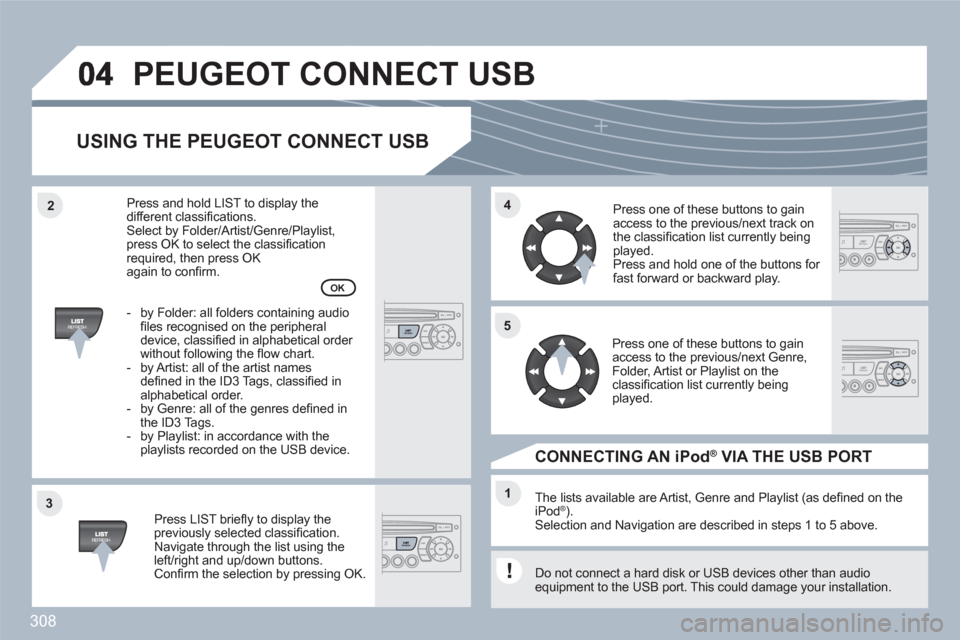
Press LIST briefl y to display thepreviously selected classifi cation.Navigate through the list using theleft/right and up/down buttons. Confi rm the selection by pressing OK.
The lists available are Artist, Genre and Playlist (as defi ned on theiPod ®). ®
Selection and Navigation are described in steps 1 to 5 above.
Do not connect a hard disk or USB devices other than audio equipment to the USB port. This could damage your installation.
CONNECTING AN iPod ®VIA THE USB PORT ®
Press one of these buttons to gainaccess to the previous/next track on the classifi cation list currently beingplayed.
Press and hold one of the buttons for fast forward or backward play.
Press one of these buttons to gainaccess to the previous/next Genre,Folder, Artist or Playlist on the classifi cation list currently beingplayed.
Press and hold LIST to display thedifferent classifi cations. Select by Folder/Artist/Genre/Playlist, press OK to select the classifi cation required, then press OK again to confi rm.
- by Folder: all folders containing audiofi les recognised on the peripheraldevice, classifi ed in alphabetical order without following the fl ow chart.
- by Artist: all of the artist namesdefi ned in the ID3 Tags, classifi ed in alphabetical order.
- by Genre: all of the genres defi ned inthe ID3 Tags.
- by Playlist: in accordance with the playlists recorded on the USB device.
OK