2011 Peugeot 308 CC ECO mode
[x] Cancel search: ECO modePage 59 of 292

3
ii
i
57
COMFORT
When the engine is cold, to prevent
too great a distribution of cold air,
the air fl ow will reach its optimum
level gradually.
In cold weather, it favours the distri-
bution of warm air to the windscreen,
side windows and footwells only. On entering the vehicle, if the in-
terior temperature is much colder
or warmer than the comfort value,
there is no need to change the value displayed in order to obtain the
comfort required. The system cor-
rects the difference in temperature
automatically and as quickly as
possible.
The air conditioning can only operate
with the engine running. The driver and his front pas-
senger can each adjust the
temperature to their require-
ments.
�)
Turn control 2
or 3
to the left or to
the right respectively to decrease or
increase this value.
A setting around the value 21 provides
optimum comfort. However, depending
on your requirements, a setting between
18 and 24 is normal.
You are advised to avoid a left/right set-
ting difference of more than 3.
4. Automatic visibility programme
The automatic comfort pro-
gramme may not be suffi cient
to quickly demist or defrost the
windscreen and side windows
(humidity, several passengers,
ice, etc.).
�)
In this case, select the automatic
visibility programme.
The system automatically controls the
air conditioning, the air fl ow and the air
intake and provides optimum distribu-
tion of the ventilation to the windscreen
and side windows.
Automatic operation
�)
Press the "AUTO"
button.
The indicator lamp on the
button comes on.
2. Driver's side adjustment
DUAL-ZONE DIGITAL AIR
CONDITIONING
We recommend the use of this mode:
it permits automatic and optimised ad-
justment of all of the functions, passen-
ger compartment temperature, air fl ow,
air distribution and air recirculation, in
accordance with the comfort value that
you have chosen.
This system is designed to operate effec-
tively in all seasons, with automatic adap-
tation in the "cabriolet" confi guration. The value indicated on the display cor-
responds to a level of comfort and not
to a temperature in degrees Celsius or
Fahrenheit.
�)
To switch it off, press the "visibility"
button again or press the "AUTO"
button, the indicator lamp in the but-
ton goes off and the indicator lamp
in the "AUTO"
button comes on.
1. Automatic comfort programme
3. Passenger side adjustment
With Stop & Start, when demist-
ing has been activated, the STOP
mode is not available.
Page 79 of 292
4
i
i
77
ACCESS
The rear windows do not have an
automatic mode or safety anti-
pinch function for closing.
Approximately 45 seconds after re-
moving the ignition key or opening
a door none of the windows can be
opened or closed. The ignition must
be switched back on in order to
open or close the windows.
ELECTRIC WINDOW
CONTROLS
Fitted with an anti-pinch system on the
front windows and a system which con-
trols all four windows on all models.
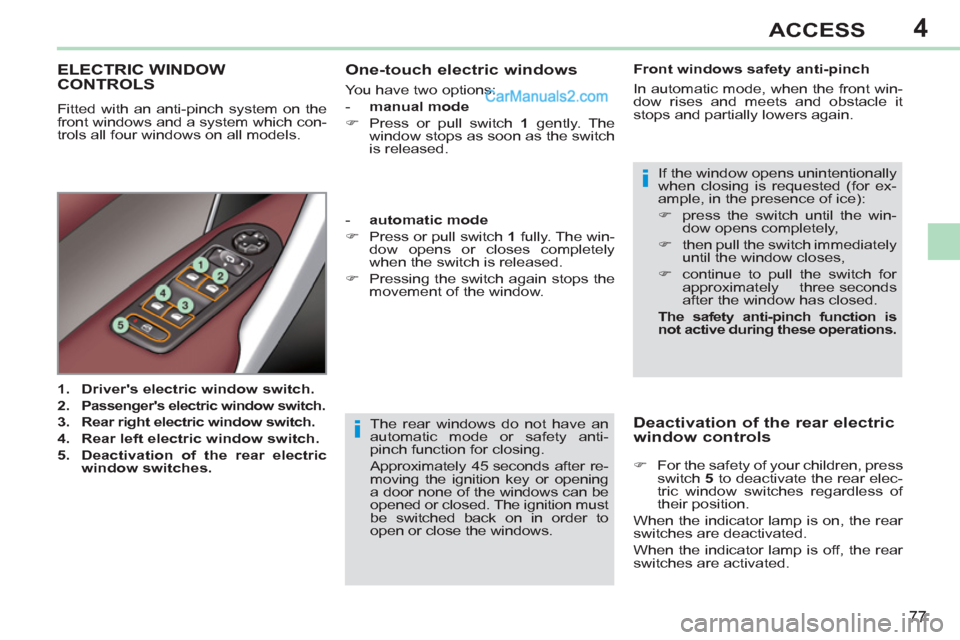
1.
Driver's electric window switch.
2.
Passenger's electric window switch.
3.
Rear right electric window switch.
4.
Rear left electric window switch.
5.
Deactivation of the rear electric
window switches.
If the window opens unintentionally
when closing is requested (for ex-
ample, in the presence of ice):
�)
press the switch until the win-
dow opens completely,
�)
then pull the switch immediately
until the window closes,
�)
continue to pull the switch for
approximately three seconds
after the window has closed.
The safety anti-pinch function is
not active during these operations.
Front windows safety anti-pinch
In automatic mode, when the front win-
dow rises and meets and obstacle it
stops and partially lowers again.
- automatic mode
�)
Press or pull switch 1
fully. The win-
dow opens or closes completely
when the switch is released.
�)
Pressing the switch again stops the
movement of the window.
One-touch electric windows
You have two options:
- manual mode
�)
Press or pull switch 1
gently. The
window stops as soon as the switch
is released.
Deactivation of the rear electric
window controls
�)
For the safety of your children, press
switch 5
to deactivate the rear elec-
tric window switches regardless of
their position.
When the indicator lamp is on, the rear
switches are deactivated.
When the indicator lamp is off, the rear
switches are activated.
Page 95 of 292
5
i
i
93
VISIBILITY
Special position of the
windscreen wipers
This position permits release of the
windscreen wiper blades.
It is used for cleaning or replacement
of the blades. It can also be useful, in
winter, to detach the blades from the
windscreen.
In the moment following switching the
ignition off, any action on the stalk posi-
tions the wipers vertically on the wind-
screen.
To park the wipers after this has been
done, switch on the ignition and operate
the stalk.
To maintain the effectiveness of
the "fl at-blade" wiper blades, it is
advisable to:
- handle them with care,
- clean them regularly using
soapy water,
- avoid using them to retain card-
board on the windscreen,
- replace them at the fi rst signs of
wear.
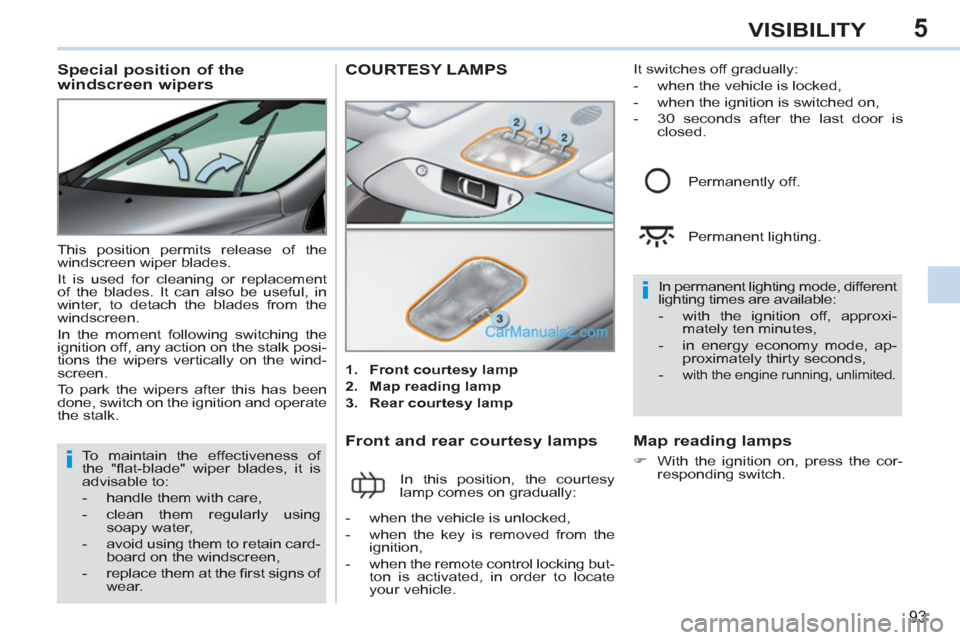
COURTESY LAMPS
1.
Front courtesy lamp
2.
Map reading lamp
3.
Rear courtesy lamp
Front and rear courtesy lamps
In this position, the courtesy
lamp comes on gradually: In permanent lighting mode, different
lighting times are available:
- with the ignition off, approxi-
mately ten minutes,
- in energy economy mode, ap-
proximately thirty seconds,
-
with the engine running, unlimited.
- when the vehicle is unlocked,
- when the key is removed from the
ignition,
- when the remote control locking but-
ton is activated, in order to locate
your vehicle. Permanently off.
Permanent lighting.
Map reading lamps
�)
With the ignition on, press the cor-
responding switch.
It switches off gradually:
- when the vehicle is locked,
- when the ignition is switched on,
- 30 seconds after the last door is
closed.
Page 96 of 292

5
i
i
94
VISIBILITY
INTERIOR MOOD LIGHTING
Different lighting times are available:
- when the ignition is off, approxi-
mately ten minutes,
- in energy economy mode, ap-
proximately thirty seconds,
- when the engine is running, no
limit. Your vehicle is fi tted with two boot lamps;
one in the left-hand boot side trim and a
second in the boot lid interior trim.
They come on automatically when the
boot is opened and switch off automati-
cally when the boot is closed.
They cannot be deactivated manually.
INTERIOR WELCOME LIGHTING
BOOT LIGHTING
The remote switching on of the passen-
ger compartment lighting makes your
entry into the vehicle easier in poor
light. It is activated in accordance with
the light intensity detected by the bright-
ness sensor.
Switching on
�)
Press the open padlock on the re-
mote control.
The front door sill lighting, the footwell
lighting and the courtesy lamps come
on; your vehicle is also unlocked.
Switching off
The interior welcome lighting switch-
es off automatically after a set time or
when one of the doors is opened.
Programming
The dimmed passenger compartment
lighting improves visibility in the vehicle
when the light is poor.
Switching on
At night, the footwell lighting and the
front courtesy mood lamp come on
automatically when the sidelamps are
switched on.
Switching off
The interior mood lighting switches off
automatically when the sidelamps are
switched off.
Programming
The welcome lighting duration is
associated with and identical to
that of the automatic guide-me-
home lighting. The function is activated or
deactivated via the vehicle
confi guration menu.
This function is activated
by default. The lighting duration is se-
lected via the vehicle con-
fi guration menu.
Page 125 of 292
8
i
123
DRIVING
GEAR SHIFT INDICATOR *
System which reduces fuel consump-
tion by advising the driver to change up
on vehicles fi tted with a manual gear-
box.
Operation
The system intervenes only when driv-
ing economically.
Depending on the driving situation and
your vehicle's equipment, the system
may advise you to skip one or more
gears. You can follow this instruc-
tion without engaging the intermediate
gears.
The gear engagement recommendations
must not be considered compulsory. In
fact, the confi guration of the road, the
amount of traffi c and safety remain de-
termining factors when choosing the best
gear. Therefore, the driver remains respon-
sible for deciding whether or not to follow
the advice given by the system.
This function cannot be deactivated.
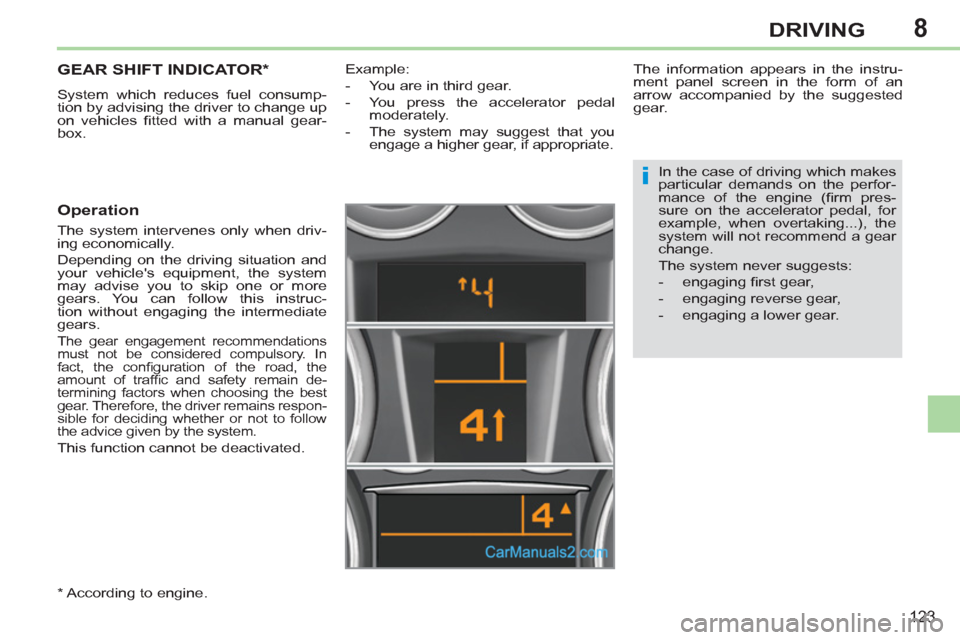
The information appears in the instru-
ment panel screen in the form of an
arrow accompanied by the suggested
gear.
In the case of driving which makes
particular demands on the perfor-
mance of the engine (fi rm pres-
sure on the accelerator pedal, for
example, when overtaking...), the
system will not recommend a gear
change.
The system never suggests:
- engaging fi rst gear,
- engaging reverse gear,
- engaging a lower gear.
*
According to engine.
Example:
- You are in third gear.
- You press the accelerator pedal
moderately.
- The system may suggest that you
engage a higher gear, if appropriate.
Page 126 of 292
8
!
124
DRIVING
HILL START ASSIST *
System which keeps your vehicle im-
mobilised temporarily (approximately
2 seconds) when starting on a gradi-
ent, the time it takes to move your foot
from the brake pedal to the accelerator
pedal.
This function is only active when:
- the vehicle is completely stationary,
with your foot on the brake pedal,
- in particular conditions on a slope,
- with the driver’s door closed.
The hill start assist cannot be deacti-
vated.
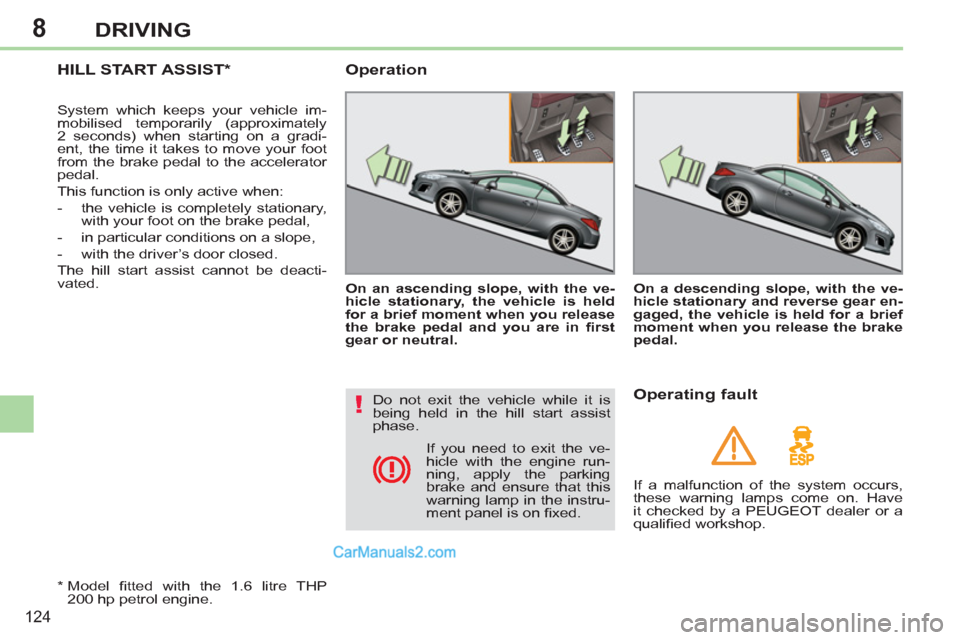
On an ascending slope, with the ve-
hicle stationary, the vehicle is held
for a brief moment when you release
the brake pedal and you are in fi rst
gear or neutral.
Operation
On a descending slope, with the ve-
hicle stationary and reverse gear en-
gaged, the vehicle is held for a brief
moment when you release the brake
pedal.
*
Model fi tted with the 1.6 litre THP
200 hp petrol engine.
Do not exit the vehicle while it is
being held in the hill start assist
phase.
Operating fault
If a malfunction of the system occurs,
these warning lamps come on. Have
it checked by a PEUGEOT dealer or a
qualifi ed workshop. If you need to exit the ve-
hicle with the engine run-
ning, apply the parking
brake and ensure that this
warning lamp in the instru-
ment panel is on fi xed.
Page 129 of 292
8
PRND
!i
127
DRIVING
Return to automatic operation
�)
At any time, press the button select-
ed again to quit the programme en-
gaged and return to auto-adaptive
mode.
Manual operation
�)
Select position M
for sequential
changing of the six gears.
�)
Push the lever towards the +
sign to
change up a gear.
�)
Pull the lever towards the -
sign to
change down a gear.
It is only possible to change from one
gear to another if the vehicle speed and
engine speed permit; otherwise, the
gearbox will operate temporarily in au-
tomatic mode.
M
and the gears engaged
manually appear in succes-
sion in the instrument panel.
If the engine speed is too low or too
high, the gear selected fl ashes for a few
seconds, then the actual gear engaged
is displayed.
It is possible to change from position D
(automatic) to position M
(manual) at
any time.
When the vehicle is stationary or mov-
ing very slowly, the gearbox selects
gear M1
automatically.
The sport and snow programmes do not
operate in manual mode.
Invalid value during manual
operation
This symbol is displayed if a
gear is not engaged correctly
(selector between two posi-
tions).
Stopping the vehicle
Before switching off the engine, you
can engage position P
or N
to place the
gearbox in neutral.
In both cases, apply the parking brake
to immobilise the vehicle.
Operating fault
There is a risk of damage to the
gearbox:
- if you press the accelerator and
brake pedals at the same time,
- if you force the lever from posi-
tion P
to another position when
the battery is fl at.
To reduce fuel consumption during
a long period stationary with the
engine running (traffi c jam, etc.),
place the gear lever in position N
and apply the parking brake.
If the lever is not in position P
,
when the driver's door is opened
or approximately 45 seconds after
the ignition is switched off, there is
an audible signal is heard accom-
panied by a message.
�)
Return the lever to position P
;
the audible signal stops and the
message disappears.
When the ignition is on, the il-
lumination of this warning lamp,
accompanied by an audible
signal and a message in the
multifunction screen, indicates a gear-
box malfunction.
In this case, the gearbox switches to
emergency mode and is locked in 3rd
gear. You may feel a substantial knock
when changing from P
to R
and from N
to R
. This will not cause any damage to
the gearbox.
Do not exceed a speed of 60 mph
(100 km/h), local speed restrictions per-
mitting.
Have it checked by a PEUGEOT dealer
or a qualifi ed workshop.
This warning lamp may also come on if
a door is opened.
Page 130 of 292
8
!
i
i
128
DRIVING
STOP & START
The Stop & Start system puts the en-
gine temporarily into standby - STOP
mode - during stops in the traffi c (red
lights, traffi c jams, etc...). The engine
restarts automatically - START mode -
as soon as you want to move off. The
restart takes place instantly, quickly and
silently.
Perfect for urban use, the Stop & Start
system reduces fuel consumption and
exhaust emissions as well as offering
the comfort of silence when stationary.
Operation
Going into engine STOP mode
The "ECO"
warning lamp comes
on in the instrument panel and
the engine goes into standby:
- with a manual gearbox
, at speeds
below 12 mph (20 km/h), when you
put the gear lever into neutral, and
you release the clutch pedal.
A time counter calculates
the sum of the periods in
STOP mode during a jour-
ney. It rests itself to zero
every time the ignition is
switched on with the key. For your comfort when parking,
STOP mode is not available for a
few seconds after coming out of re-
verse gear.
STOP mode does not affect the
functionality of the vehicle, such
as braking, power steering, for ex-
ample.
Never refuel with the engine in
STOP mode; you must switch off
the ignition with the key.
Special cases: STOP mode
unavailable
STOP mode is not invoked when:
- the driver's door is open,
- the driver's seat belt is not fas-
tened,
- the vehicle has not exceeded 6 mph
(10 km/h) since the last engine start
using the key,
- the engine is needed to maintain a
comfortable temperature in the pas-
senger compartment,
- demisting is active,
- some special conditions (battery
charge, engine temperature, brak-
ing assistance, ambient tempera-
ture...) where the engine is needed
to assure control of a system.
The "ECO"
warning lamp fl ash-
es for a few seconds, then goes
off.
This operation is perfectly normal.
In STOP mode of Stop & Start, the
"AIRWAVE" system stops working.