2011 Peugeot 3008 Hybrid 4 key
[x] Cancel search: keyPage 127 of 280
CHILD SAFETY
This system is independent
and in no circumstances does
it take the place of the central
locking control.
Check the status of the child lock
each time you switch on the ignition.
Always remove the key from the igni-
tion when leaving the vehicle, even
for a short time.
In the event of a serious impact, the
electric child lock is deactivated auto-matically to permit the exit of the rear
passengers.
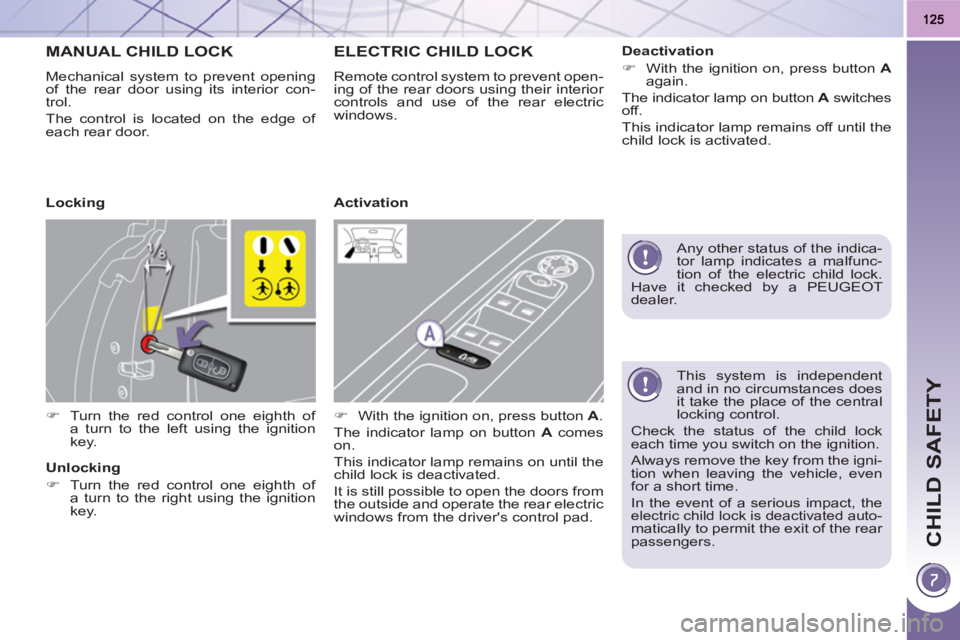
MANUAL CHILD LOCK
Mechanical system to prevent opening
of the rear door using its interior con-
trol.
The control is located on the edge of
each rear door.
�)
Turn the red control one eighth of
a turn to the left using the ignition
key.
ELECTRIC CHILD LOCK
Remote control system to prevent open-
ing of the rear doors using their interior
controls and use of the rear electric
windows.
�)
With the ignition on, press button A
.
The indicator lamp on button A
comes
on.
This indicator lamp remains on until the
child lock is deactivated.
It is still possible to open the doors from
the outside and operate the rear electric
windows from the driver's control pad.
Locking
Unlocking
�)
Turn the red control one eighth of
a turn to the right using the ignition
key.
Activation
Deactivation
�)
With the ignition on, press button A
again.
The indicator lamp on button A
switches
off.
This indicator lamp remains off until the
child lock is activated.
Any other status of the indica-
tor lamp indicates a malfunc-
tion of the electric child lock.
Have it checked by a PEUGEOT
dealer.
Page 135 of 280

133
If at least one of the two airbag
warning lamps come on con-
tinuously, do not install a child
seat on the front passenger seat.
Have the system checked by a
PEUGEOT dealer.
Operating fault
If this warning lamp comes on in
the instrument panel, accompa-
nied by an audible warning and
a message in the multifunction
screen, contact a PEUGEOT
dealer to have the system checked. The
airbags may no longer be deployed in the
event of a serious impact.
Reactivation
When you remove the child seat, turn
the switch to the "ON"
position to re-
activate the airbag and so assure the
safety of your front passenger in the
event of an impact.
With the ignition on, this warn-
ing lamp comes on in the seat
belt and passenger's front air-
bag warning lamps display for
approximately one minute, if
the passenger's front airbag is
activated. To assure the safety of your
child, the passenger's front
airbag must be deactivated
when you install a "rear facing" child
seat on the front passenger seat.
Otherwise, the child would risk being
seriously injured or killed if the airbag
were deployed.
According to version, this
warning lamp comes on either
in the instrument panel or in
the seat belt and passenger's
front airbag warning lamps
display when the ignition is on and until
the airbag is reactivated. If this warning lamp fl ashes,
contact a PEUGEOT dealer.
The passenger's front airbag
may no longer be deployed in
the event of a serious impact.
Deactivation
Only the passenger's front airbag can
be deactivated:
�)
with the ignition off
, insert the key
in the passenger airbag deactivation
switch,
�)
turn it to the "OFF"
position,
�)
then, remove the key keeping the
switch in the new position.
Page 187 of 280
PRACTICAL INFORMATION
185
Do not disconnect the termi-
nals while the engine is run-
ning.
Do not charge the batteries
without disconnecting the ter-
minals fi rst.
Do not push the vehicle to start the
engine.
The batteries contain harm-
ful substances such as sul-
phuric acid and lead. They
must be disposed of in accordance
with regulations and must not, in any
circumstances, be discarded with
household waste.
Take used remote control batteries
and vehicle batteries to a special col-
lection point.
It is advisable to disconnect
the battery if the vehicle is to
be left unused for more than
one month.
Before disconnecting the battery
Wait 2 minutes after switching off
the ignition before disconnecting the
battery.
Close the windows and the doors be-
fore disconnecting the battery.
Following reconnection of the
battery
Following reconnection of the battery,
switch on the ignition and wait 1 minute
before starting to permit initialisation
of the electronic systems. However, if
problems remain following this opera-
tion, contact a PEUGEOT dealer.
Referring to the corresponding section,
you must yourself reinitialise:
- the remote control key,
- the panoramic sunroof blind,
- the satellite navigation system.
Page 192 of 280
PRACTICAL INFORMATION
190
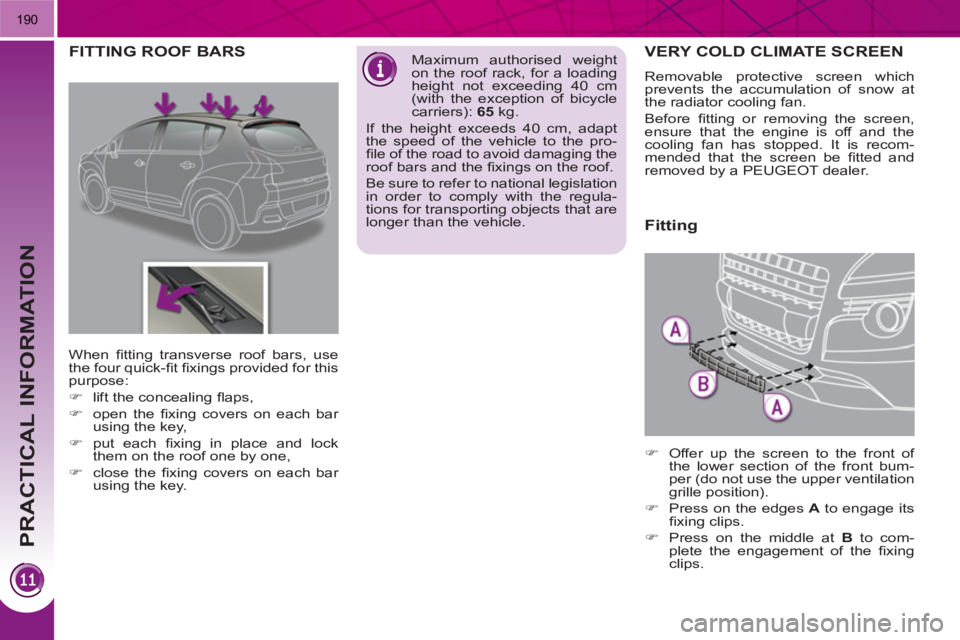
VERY COLD CLIMATE SCREEN
Removable protective screen which
prevents the accumulation of snow at
the radiator cooling fan.
Before fi tting or removing the screen,
ensure that the engine is off and the
cooling fan has stopped. It is recom-
mended that the screen be fi tted and
removed by a PEUGEOT dealer.
FITTING ROOF BARS
Maximum authorised weight
on the roof rack, for a loading
height not exceeding 40 cm
(with the exception of bicycle
carriers): 65
kg.
If the height exceeds 40 cm, adapt
the speed of the vehicle to the pro-
fi le of the road to avoid damaging the
roof bars and the fi xings on the roof.
Be sure to refer to national legislation
in order to comply with the regula-
tions for transporting objects that are
longer than the vehicle.
When fi tting transverse roof bars, use
the four quick-fi t fi xings provided for this
purpose:
�)
lift the concealing fl aps,
�)
open the fi xing covers on each bar
using the key,
�)
put each fi xing in place and lock
them on the roof one by one,
�)
close the fi xing covers on each bar
using the key.
Fitting
�)
Offer up the screen to the front of
the lower section of the front bum-
per (do not use the upper ventilation
grille position).
�)
Press on the edges A
to engage its
fi xing clips.
�)
Press on the middle at B
to com-
plete the engagement of the fi xing
clips.
Page 206 of 280
204
01
2ABC3DEF
5JKL4GHI6MNO
8TUV7PQRS9WXYZ
0*#
1
RADIO MEDIANAV ESC TRAFFIC
SETUPADDR
BOOK
1
10
2
3
4
612
9
7
8
115
TU PQRS
0*
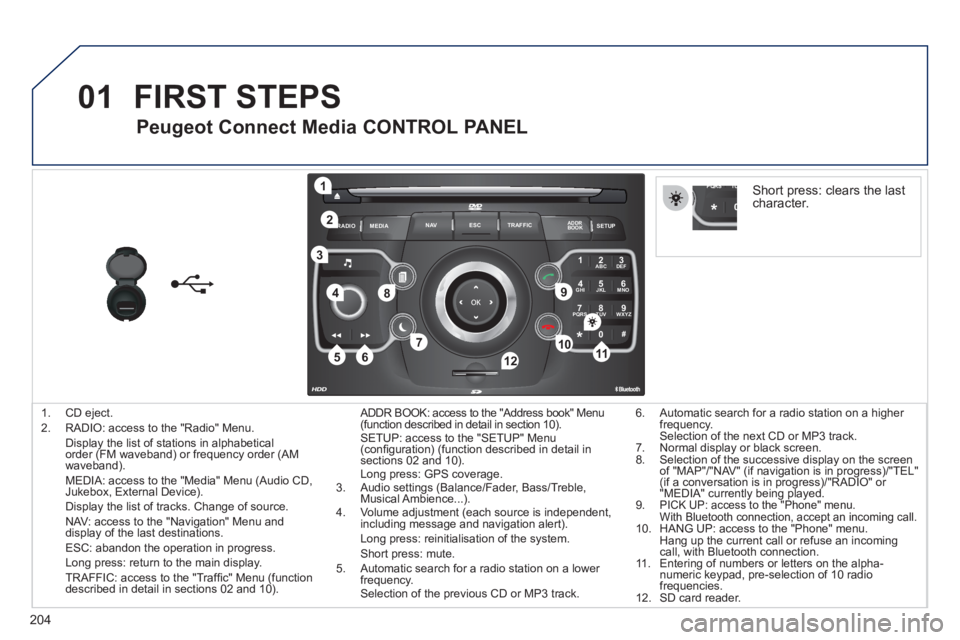
1. CD eject.
2. RADIO: access to the "Radio" Menu.
Display the list of stations in alphabetical order (FM waveband) or frequency order (AM
waveband).
MEDIA: access to the "Media" Menu (Audio CD,Jukebox, External Device).
Display the list of tracks. Change of source.
NAV: access to the "Navigation" Menu and
display of the last destinations.
ESC: abandon the operation in progress.
Long press: return to the main display.
TRAFFIC: access to the "Traffi c" Menu (function
described in detail in sections 02 and 10). ADDR B
OOK: access to the "Address book" Menu (function described in detail in section 10). SETUP: access to the "SETUP" Menu(confi guration) (function described in detail insections 02 and 10).
Long press: GPS coverage.
3. Audio settings (Balance/Fader, Bass/Treble, Musical Ambience...).
4. Volume adjustment (each source is independent,
including message and navigation alert).
Long press: reinitialisation of the system.
Short press: mute.
5. Automatic search for a radio station on a lower
frequency.Selection of the previous CD or MP3 track.
FIRST STEPS
Peugeot Connect Media CONTROL PANEL
6. Automatic search for a radio station on a higher
frequency.Selection of the next CD or MP3 track.
7. Normal display or black screen.
8. Selection of the successive display on the screenof "MAP"/"NAV" (if navigation is in progress)/"TEL" (if a conversation is in progress)/"RADIO" or "MEDIA" currently being played.
9. PICK UP: access to the "Phone" menu. With Bluetooth connection, accept an incoming call. 10. HANG UP: access to the "Phone" menu.
Hang up the current call or refuse an incomingcall, with Bluetooth connection.
11. Entering of numbers or letters on the alpha-numeric keypad, pre-selection of 10 radio
frequencies.
12.
SD card reader.
Short press: clears the last character.
Page 207 of 280

205
01
2ABC3DEF
5JKL4GHI6MNO
8TUV7PQRS9WXYZ
0*#
1
13
14
13. OK: confi rmation of the highlighted item on
the screen.
- 4-direction navigator: press to the left/right.
When the "RADIO" screen is displayed: selectionof the previous/next frequency.
When "MEDIA" is displayed: selection of the
previous
/next track.
When "MAP" or "NAV" is displayed: horizontal
movement of the map. - 4-direction navi
gator: press up/down.
When "RADIO" is displayed: selection of
the previous/next radio station on the list.
When the "MEDIA" screen is displayed: selection
of the MP3 directory.
When "MAP" or "NAV" is displayed: vertical movement of the map.
Switch to the next or previous page of a menu.
Movement on the virtual keypad displayed.
FIRST STEPS
14. Rotation of the ring:
When the "RADIO" screen is displayed: selection
of the previous/next radio station on the list.
When the "MEDIA" screen is displayed: selection
of the previous/next CD or MP3 track.
When "MAP" or "NAV" is displayed: front/rea
r
map zoom.
M
ovement of the menu selection curser.
Peugeot Connect Media NAVIGATOR
Page 216 of 280
214
04
2ABC3DEF5JKL4GHI6MNO8TUV7PQRS9WXYZ0*#
1RADIO MEDIANAVESC TRAFFIC
SETUPADDR
BOOK
2ABC3DEF5JKL4GHI6MNO8TUV7PQRS9WXYZ0*#
1RADIO MEDIANAV ESC TRAFFIC
SETUPADDR
BOOK
NAV
1
2
3
4
5
6
2ABC3DEF5JKL4GHI6MNO8TUV7PQRS9WXYZ0*#
1RADIO MEDIANAV ESC TRAFFIC
SETUPADDR
BOOK
2ABC3DEF5JKL4GHI6MNO8TUV7PQRS9WXYZ0*#
1RADIO MEDIANAV ESC TRAFFIC
SETUPADDR
BOOK
2ABC3DEF5JKL4GHI6MNO8TUV7PQRS9WXYZ0*#
1RADIO MEDIANAV ESC TRAFFIC
SETUPADDR
BOOK
2ABC3DEF5JKL4GHI6MNO8TUV7PQRS9WXYZ0*#
1RADIO MEDIANAV ESC TRAFFIC
SETUPADDR
BOOK
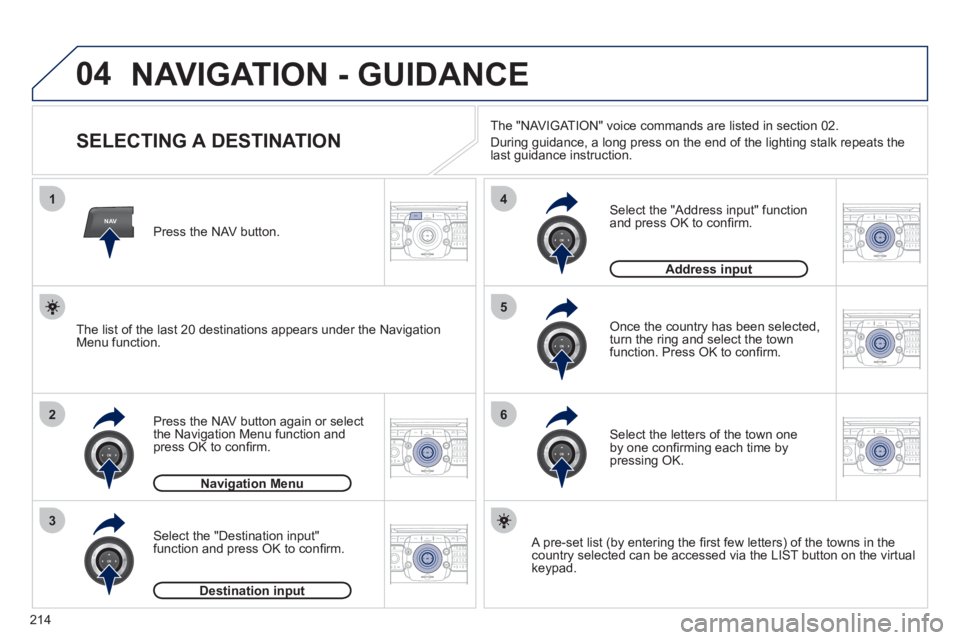
NAVIGATION - GUIDANCE
SELECTING A DESTINATION
Press the NAV button again or select
the Navigation Menu function and
press OK to confi rm.
Select the "Destination input" function and press OK to confi rm. Pr
ess the NAV button.
Select the letters of the town oneby one confi rming each time by pressing OK.
Once the country has been selected,
turn the ring and select the town
function. Press OK to confi rm.
Navigation Menug
Destination inputp
A pre-set list (by entering the fi rst few letters) of the towns in thecountry selected can be accessed via the LIST button on the virtual
keypad.
Select the "Address input" function
and press OK to confi rm.
Address inputp
The list of the last 20 destinations appears under the NavigationMenu function.The "NAVI
GAT ION" voice commands are listed in section 02.
Durin
g guidance, a long press on the end of the lighting stalk repeats the last guidance instruction.
Page 217 of 280
215
04
2ABC3DEF5JKL4GHI6MNO8TUV7PQRS9WXYZ0*#
1RADIO MEDIANAV ESC TRAFFIC
SETUPADDR
BOOK7
8
9
10
11
2ABC3DEF5JKL4GHI6MNO8TUV7PQRS9WXYZ0*#
1RADIO MEDIANAV ESC TRAFFIC
SETUPADDR
BOOK
2ABC3DEF5JKL4GHI6MNO8TUV7PQRS9WXYZ0*#
1RADIO MEDIANAV ESC TRAFFIC
SETUPADDR
BOOK
2ABC3DEF5JKL4GHI6MNO8TUV7PQRS9WXYZ0*#
1RADIO MEDIANAV ESC TRAFFIC
SETUPADDR
BOOK
2ABC3DEF5JKL4GHI6MNO8TUV7PQRS9WXYZ0*#
1RADIO MEDIANAV ESC TRAFFIC
SETUPADDR
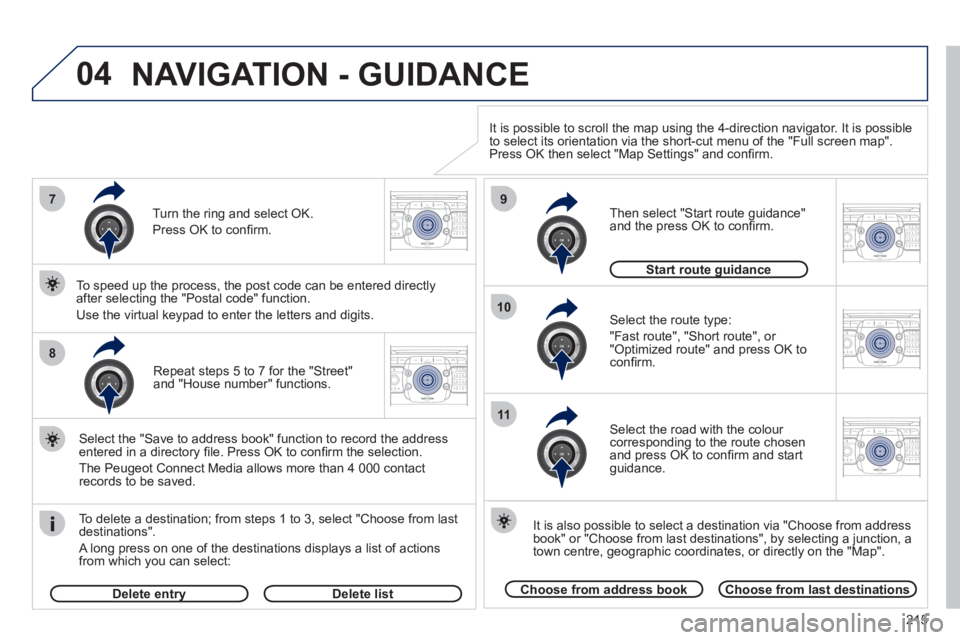
BOOKRepeat steps 5 to 7 for the "Street" and "House number" functions.
To delete a destination; from ste
ps 1 to 3, select "Choose from last destinations".
A long press on one of the destinations displays a list of actions
from which you can select:
Select the "Save to address book" function to record the address
entered in a directory fi le. Press OK to confi rm the selection.
The Peu
geot Connect Media allows more than 4 000 contact
records to be saved.
To speed up the process, the post code can be entered directl
y
after selecting the "Postal code" function.
Use the virtual keypad to enter the letters and digits.
Select the route type:
"Fast route"
, "Short route", or "Optimized route" and press OK to confi rm.
Then select "Start route
guidance"
and the press OK to confi rm.
It is also
possible to select a destination via "Choose from address
book" or "Choose from last destinations", by selecting a junction, a
town centre, geographic coordinates, or directly on the "Map".
Choose from last destinationsChoose from address book
Start route guidanceg
It is possible to scroll the map using the 4-direction navigator. It is possible
to select its orientation via the short-cut menu of the "Full screen map".
Press OK then select "Map Settings" and confi rm.
Select the road with the colour corresponding to the route chosen
and press OK to confi rm and start guidance.
Turn the rin
g and select OK.
Press
OK to confi rm.
Delete entryyDelete list
NAVIGATION - GUIDANCE