2011 Peugeot 3008 Hybrid 4 ESP
[x] Cancel search: ESPPage 71 of 280
69
On entering the vehicle, if the
interior temperature is much
colder or warmer than the
comfort value, there is no need to
change the value displayed in order
to obtain the comfort required more
quickly. The system corrects the dif-
ference in temperature automatically
and as quickly as possible.
The air conditioning only operates when
the engine is running, except in STOP
mode of Stop & Start. The driver and front passenger
can each adjust the tempera-
ture to their requirements.
�)
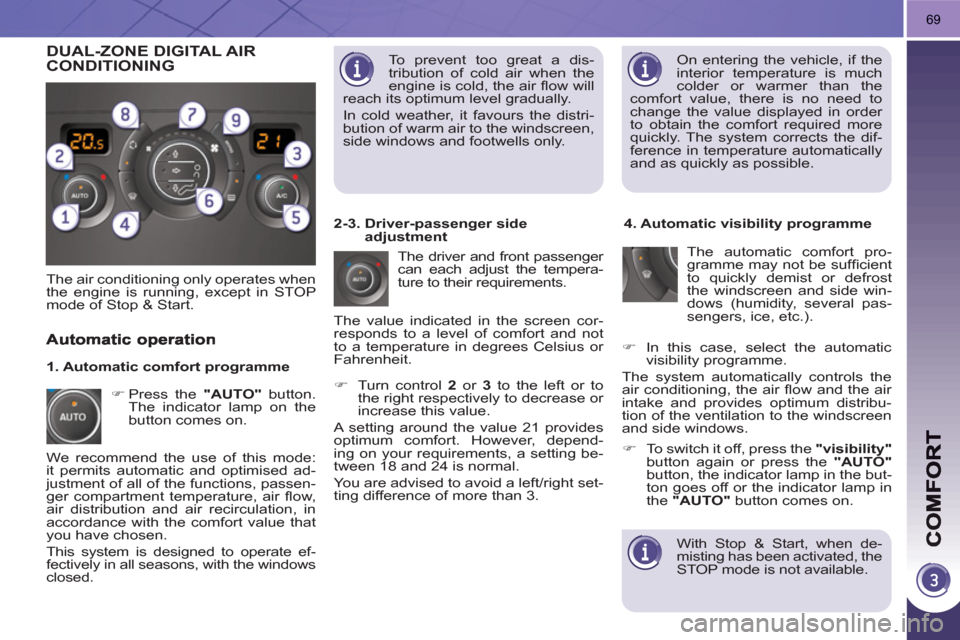
Turn control 2
or 3
to the left or to
the right respectively to decrease or
increase this value.
A setting around the value 21 provides
optimum comfort. However, depend-
ing on your requirements, a setting be-
tween 18 and 24 is normal.
You are advised to avoid a left/right set-
ting difference of more than 3.
4. Automatic visibility programme
The automatic comfort pro-
gramme may not be suffi cient
to quickly demist or defrost
the windscreen and side win-
dows (humidity, several pas-
sengers, ice, etc.).
�)
Press the "AUTO"
button.
The indicator lamp on the
button comes on.
2-3. Driver-passenger side
adjustment
DUAL-ZONE DIGITAL AIR
CONDITIONING
We recommend the use of this mode:
it permits automatic and optimised ad-
justment of all of the functions, passen-
ger compartment temperature, air fl ow,
air distribution and air recirculation, in
accordance with the comfort value that
you have chosen.
This system is designed to operate ef-
fectively in all seasons, with the windows
closed.
The value indicated in the screen cor-
responds to a level of comfort and not
to a temperature in degrees Celsius or
Fahrenheit.
�)
To switch it off, press the "visibility"
button again or press the "AUTO"
button, the indicator lamp in the but-
ton goes off or the indicator lamp in
the "AUTO"
button comes on.
1. Automatic comfort programme To prevent too great a dis-
tribution of cold air when the
engine is cold, the air fl ow will
reach its optimum level gradually.
In cold weather, it favours the distri-
bution of warm air to the windscreen,
side windows and footwells only.
With Stop & Start, when de-
misting has been activated, the
STOP mode is not available.
�)
In this case, select the automatic
visibility programme.
The system automatically controls the
air conditioning, the air fl ow and the air
intake and provides optimum distribu-
tion of the ventilation to the windscreen
and side windows.
Page 79 of 280
77
The seat cushion lowers to be
covered by the seat back; this
leaves a fl at boot fl oor, if the
adjustable fl oor is in the intermediate
position.
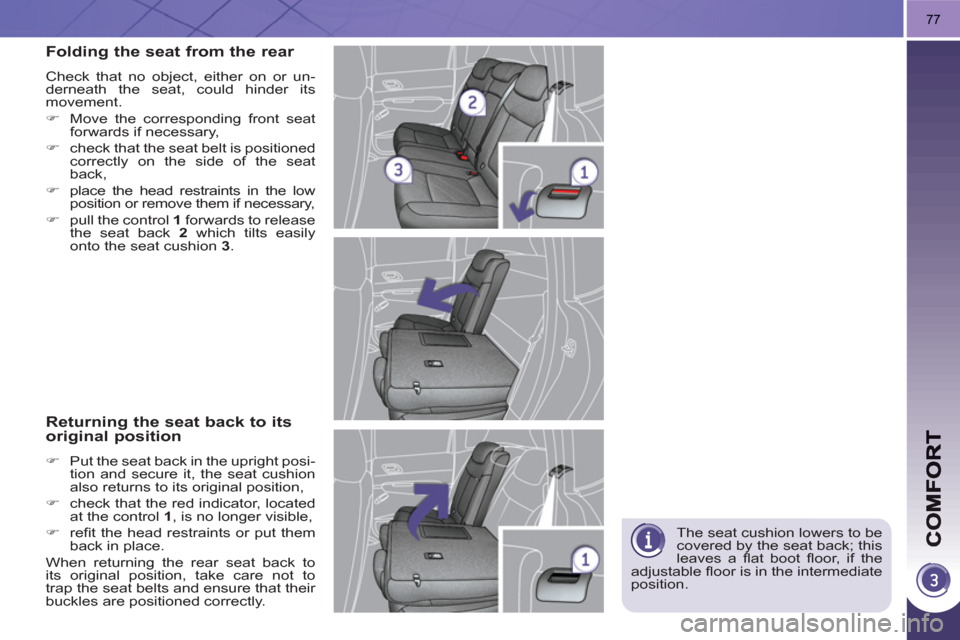
Folding the seat from the rear
Check that no object, either on or un-
derneath the seat, could hinder its
movement.
�)
Move the corresponding front seat
forwards if necessary,
�)
check that the seat belt is positioned
correctly on the side of the seat
back,
�)
place the head restraints in the low
position or remove them if necessary,
�)
pull the control 1
forwards to release
the seat back 2
which tilts easily
onto the seat cushion 3
.
Returning the seat back to itsoriginal position
�)
Put the seat back in the upright posi-
tion and secure it, the seat cushion
also returns to its original position,
�)
check that the red indicator, located
at the control 1
, is no longer visible,
�)
refi t the head restraints or put them
back in place.
When returning the rear seat back to
its original position, take care not to
trap the seat belts and ensure that their
buckles are positioned correctly.
Page 81 of 280

79
The objects observed are, in re-
ality, closer than they appear.
Take this into account in order
to correctly judge the distance of vehi-
cles approaching from behind.
MIRRORS
Door mirrors
Each fi tted with an adjustable mirror
glass permitting the lateral rearward
vision necessary for overtaking or par-
king. They can also be folded for par-
king in confi ned spaces.
Folding
- Automatic: lock the vehicle using
the remote control or the key.
- Manual: with the ignition on, pull
control A
rearwards.
The folding and unfolding of the
door mirrors using the remote
control can be deactivated by a
PEUGEOT dealer.
Fold the mirrors when putting your
vehicle through an automatic car
wash.
Adjustment
Unfolding
- Automatic: unlock the vehicle using
the remote control or the key.
- Manual: with the ignition on, pull
control A
rearwards.
If the mirrors are folded using
control A
, they will not unfold
when the vehicle is unlocked.
Pull again on control A
.
�)
Move control A
to the right or to
the left to select the corresponding
mirror.
�)
Move control B
in all four directions
to adjust.
�)
Return control A
to the central position.
Demisting - Defrosting
If your vehicle is fi tted with heated mir-
rors, the demisting-defrosting operates
with the engine running, by switching
on the heated rear screen (refer to the
"Rear screen demist-defrost" page).
Page 98 of 280
96
LIGHTING CONTROLS
System for selection and control of the
various front and rear lamps providing
the vehicle's lighting.
Main lighting
The various front and rear lamps of
the vehicle are designed to adapt the
lighting progressively in relation to the
climatic conditions and so improve the
driver's visibility:
- sidelamps, to be seen,
- dipped beam headlamps to see
without dazzling other drivers,
- main beam headlamps to see clearly
when the road is clear,
- directional headlamps for improved
visibility when cornering.
Additional lighting
Other lamps are installed to fulfi l
the requirements of particular driving
conditions:
- a rear foglamp to be seen from a
distance,
-
front foglamps for even better visibility,
- daytime running lamps to be seen
during the day.
Programming
Various automatic lighting control modes
are also available according to the fol-
lowing options:
- guide-me-home lighting,
- automatic lighting,
- directional headlamps.
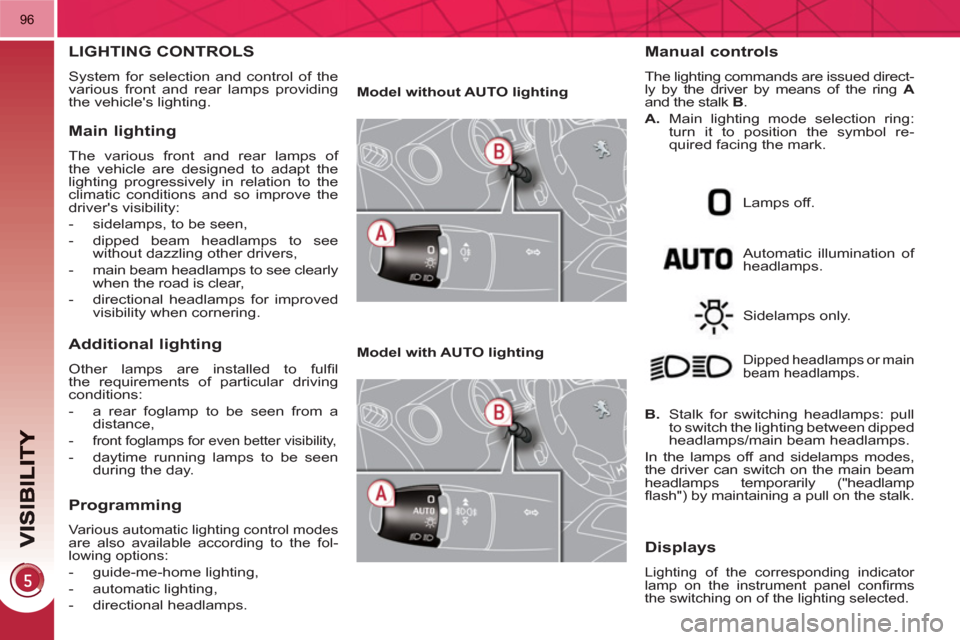
Model without AUTO lighting
Model with AUTO lighting
Automatic illumination of
headlamps.
Manual controls
The lighting commands are issued direct-
ly by the driver by means of the ring A
and the stalk B
.
A.
Main lighting mode selection ring:
turn it to position the symbol re-
quired facing the mark.
Lamps off.
Sidelamps only.
B.
Stalk for switching headlamps: pull
to switch the lighting between dipped
headlamps/main beam headlamps.
In the lamps off and sidelamps modes,
the driver can switch on the main beam
headlamps temporarily ("headlamp
fl ash") by maintaining a pull on the stalk.
Dipped headlamps or main
beam headlamps.
Displays
Lighting of the corresponding indicator
lamp on the instrument panel confi rms
the switching on of the lighting selected.
Page 105 of 280
103
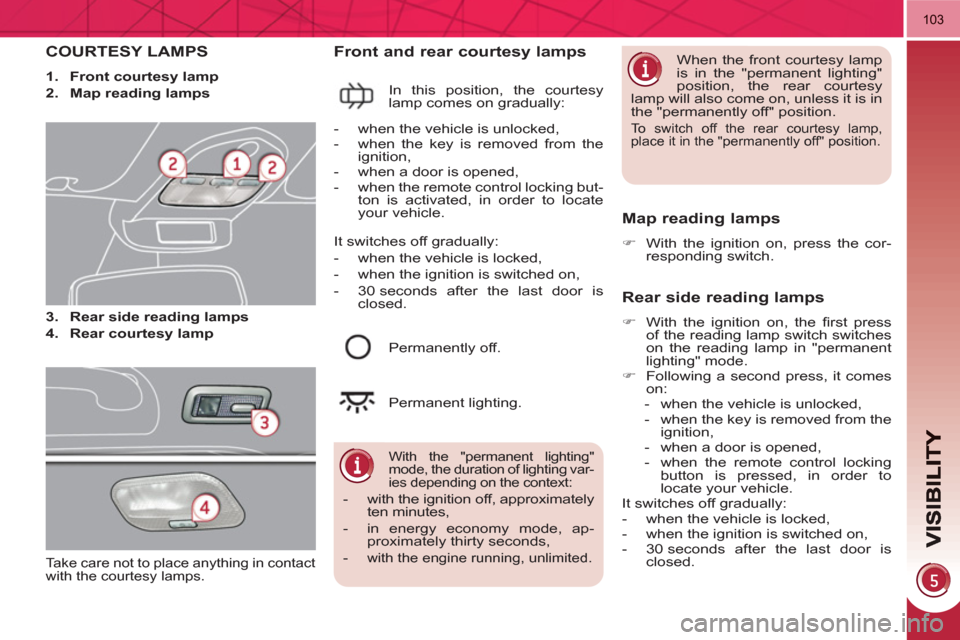
COURTESY LAMPS
1.
Front courtesy lamp
2.
Map reading lamps
3.
Rear side reading lamps
4.
Rear courtesy lamp
Front and rear courtesy lamps
In this position, the courtesy
lamp comes on gradually:
Map reading lamps
�)
With the ignition on, press the cor-
responding switch.
With the "permanent lighting"
mode, the duration of lighting var-
ies depending on the context:
- with the ignition off, approximately
ten minutes,
- in energy economy mode, ap-
proximately thirty seconds,
-
with the engine running, unlimited.
- when the vehicle is unlocked,
- when the key is removed from the
ignition,
- when a door is opened,
- when the remote control locking but-
ton is activated, in order to locate
your vehicle.
Permanently off.
Permanent lighting. When the front courtesy lamp
is in the "permanent lighting"
position, the rear courtesy
lamp will also come on, unless it is in
the "permanently off" position. To switch off the rear courtesy lamp,
place it in the "permanently off" position.
Rear side reading lamps
�)
With the ignition on, the fi rst press
of the reading lamp switch switches
on the reading lamp in "permanent
lighting" mode.
�)
Following a second press, it comes
on:
- when the vehicle is unlocked,
- when the key is removed from the
ignition,
- when a door is opened,
- when the remote control locking
button is pressed, in order to
locate your vehicle.
It switches off gradually:
- when the vehicle is locked,
- when the ignition is switched on,
- 30 seconds after the last door is
closed.
It switches off gradually:
- when the vehicle is locked,
- when the ignition is switched on,
- 30 seconds after the last door is
closed.
Take care not to place anything in contact
with the courtesy lamps.
Page 128 of 280
126
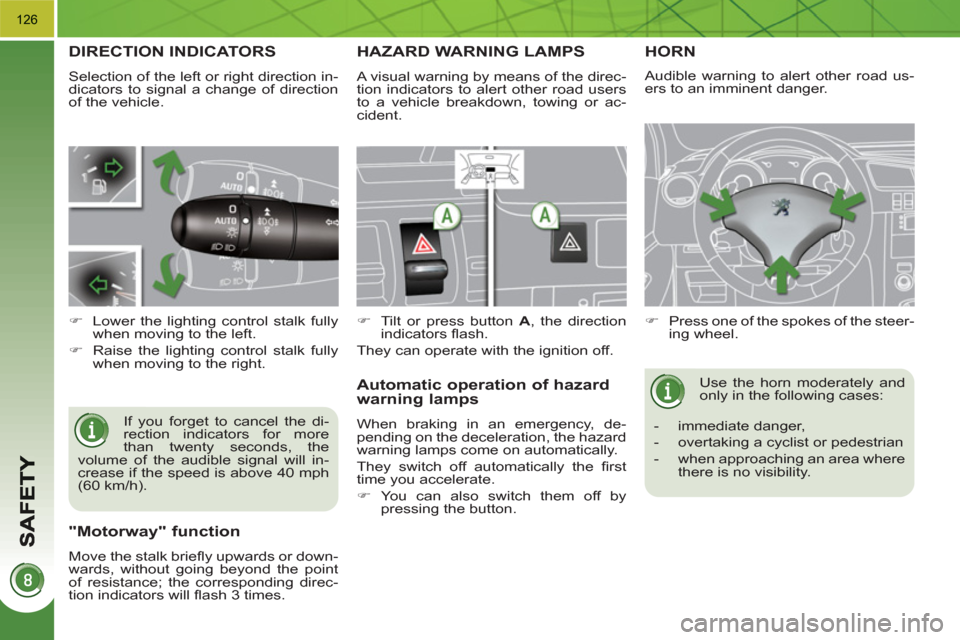
DIRECTION INDICATORS
Selection of the left or right direction in-
dicators to signal a change of direction
of the vehicle.
If you forget to cancel the di-
rection indicators for more
than twenty seconds, the
volume of the audible signal will in-
crease if the speed is above 40 mph
(60 km/h).
�)
Lower the lighting control stalk fully
when moving to the left.
�)
Raise the lighting control stalk fully
when moving to the right.
HAZARD WARNING LAMPS
A visual warning by means of the direc-
tion indicators to alert other road users
to a vehicle breakdown, towing or ac-
cident.
�)
Tilt or press button A
, the direction
indicators fl ash.
They can operate with the ignition off.
Automatic operation of hazard
warning lamps
When braking in an emergency, de-
pending on the deceleration, the hazard
warning lamps come on automatically.
They switch off automatically the fi rst
time you accelerate.
�)
You can also switch them off by
pressing the button.
HORN
�)
Press one of the spokes of the steer-
ing wheel.
Use the horn moderately and
only in the following cases:
- immediate danger,
- overtaking a cyclist or pedestrian
- when approaching an area where
there is no visibility.
Audible warning to alert other road us-
ers to an imminent danger.
"Motorway" function
Move the stalk briefl y upwards or down-
wards, without going beyond the point
of resistance; the corresponding direc-
tion indicators will fl ash 3 times.
Page 129 of 280

127
ELECTRONIC STABILITY PROGRAMME (ESP)
Electronic stability programme (ESP)
incorporating the following systems:
- the anti-lock braking system (ABS)
and the electronic brake force distri-
bution system (EBFD),
- the emergency braking assistance,
- the traction control (ASR),
- the dynamic stability control (DSC).
Definitions
Anti-skid regulation (ASR)
The ASR system (also known as Trac-
tion Control) optimises traction in order
to avoid wheel slip by acting on the
brakes of the driving wheels and on the
engine. It also improves the directional
stability of the vehicle on acceleration.
Dynamic stability control (DSC)
If there is a difference between the path
followed by the vehicle and that re-
quired by the driver, the DSC monitors
each wheel and automatically acts on
the brake of one or more wheels and
on the engine to return the vehicle to
the required path, within the limits of the
laws of physics.
Emergency braking assistance
In an emergency, this system enables
you to reach the optimum braking pres-
sure more quickly and therefore reduce
the stopping distance.
It is triggered in relation to the speed at
which the brake pedal is pressed. This
is felt by a reduction in the resistance of
the pedal and an increase in the effec-
tiveness of the braking.
Anti-lock braking system (ABS) and
electronic brake force distribution
system (EBFD)
This system improves the stability and
manoeuvrability of your vehicle when
braking and offers improved control, in
particular on poor or slippery road sur-
faces.
The ABS prevents wheel lock in the
event of emergency braking.
The electronic brake force distribution
system manages the braking pressure
wheel by wheel.
When this warning lamp
comes on, accompanied by an
audible signal and a message,
it indicates that there is a fault
with the ABS, which could cause loss of
control of the vehicle when braking.
When this warning lamp comes
on, coupled with the STOP
warning lamp, accompanied
by an audible signal and a
message, it indicates that there is a fault
with the electronic brake force distribu-
tion (EBFD), which could cause loss of
control of the vehicle when braking.
You must stop as soon as it is safe
to do so.
In both cases, contact a PEUGEOT
dealer or a qualifi ed workshop.
When changing wheels (tyres
and rims), make sure that
these are approved for your
vehicle.
Normal operation of the ABS may
make itself felt by slight vibrations of
the brake pedal.
In emergency braking, press
very fi rmly without releasing
the pressure.
Anti-lock braking system (ABS) and
electronic brake force distribution
(EBFD)
Page 130 of 280
128
Dynamic stability control (DSC) The DSC system offers excep-
tional safety in normal driving,
but this should not encourage
the driver to take extra risks or drive
at high speed.
The correct functioning of the system
depends on observation of the man-
ufacturer's recommendations regard-
ing the wheels (tyres and rims), the
braking components, the electronic
components and the PEUGEOT
assembly and operation procedures.
After an impact, have the system
checked by a PEUGEOT dealer.
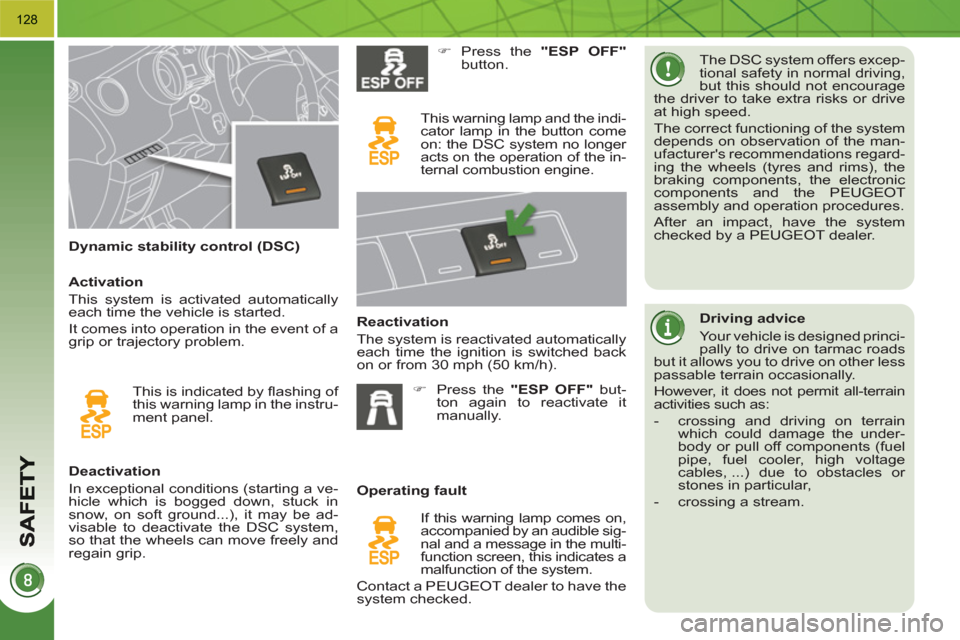
Deactivation
In exceptional conditions (starting a ve-
hicle which is bogged down, stuck in
snow, on soft ground...), it may be ad-
visable to deactivate the DSC system,
so that the wheels can move freely and
regain grip.
�)
Press the "ESP OFF"
button.
This warning lamp and the indi-
cator lamp in the button come
on: the DSC system no longer
acts on the operation of the in-
ternal combustion engine.
Reactivation
The system is reactivated automatically
each time the ignition is switched back
on or from 30 mph (50 km/h).
Operating fault
If this warning lamp comes on,
accompanied by an audible sig-
nal and a message in the multi-
function screen, this indicates a
malfunction of the system.
Contact a PEUGEOT dealer to have the
system checked. This is indicated by fl ashing of
this warning lamp in the instru-
ment panel.
Activation
This system is activated automatically
each time the vehicle is started.
It comes into operation in the event of a
grip or trajectory problem.
�)
Press the "ESP OFF"
but-
ton again to reactivate it
manually.
Driving advice
Your vehicle is designed princi-
pally to drive on tarmac roads
but it allows you to drive on other less
passable terrain occasionally.
However, it does not permit all-terrain
activities such as:
- crossing and driving on terrain
which could damage the under-
body or pull off components (fuel
pipe, fuel cooler, high voltage
cables, ...) due to obstacles or
stones in particular,
- crossing a stream.