Page 4 of 248
2
CONTENTS
Instrument panels 19Indicator and warning lamps 20Indicators 28Adjustment buttons 32Screens without audio system 33Screens with audio system 3516/9 colour screen(Peugeot Connect Navigation) 40Trip computer 42
�„�„�„�„�„�„�„
�„
Ventilation 45Heating 47Manual air conditioning 47Rear screen demist - defrost 49Digital air conditioning 50Front seats 52Rear seats 54Mirrors 57Steering wheel adjustment 59Interior fi ttings 59
�„�„�„�„�„�„�„�„�„�„
COMFORT 45�Î67
Remote control key 68Window controls 72Rear quarter windows 73Doors 74
Boot 76Panoramic sunroof 78Fuel tank 79Misfuel prevention 81
�„�„�„�„�„�„�„�„
ACCESS 68 �Î81
Lighting control stalk 82Headlamp adjustment 85Wiper control stalk 86Courtesy lamps 89
�„�„�„�„
VISIBILITY 82 �Π89
Child seats 90Isofi x child seats 96Child lock 100
�„�„�„
CHILD
SAFETY 90�Π100 FAMILIARISATION 4
�Π16
INSTRUMENTS and
CONTROLS 19 �Î445
4
3
2
1
ECO-DRIVING 17 �Î18
Page 12 of 248
i
10
FAMILIARISATION
SITTING COMFORTABLY
Also...
5.
Access to the rear seats (3-door).
6.
Armrest (except 3-door).
7.
Heated seat.
Front seat adjustment
Steering wheel adjustment
1.
Forwards-backwards adjustment.
2.
Height adjustment.
3.
Seat back angle adjustment.
4.
Head restraint height adjustment.
��
52
1.
Releasing the adjustment mechanism.
2.
Adjustment for height and reach.
3.
Locking the adjustment mechanism.
As a safety precaution, these operations
must only be carried out when stationary.
��
59
Page 20 of 248

18
Limit the causes of excess
consumption
Spread loads throughout the vehicle;
place the heaviest items in the bottom
of the boot, as close as possible to the
rear seats.
Limit the loads carried in the vehicle
and reduce wind resistance (roof bars,
roof rack, bicycle carrier, trailer...). Use
a roof box in preference.
Remove roof bars and roof racks after
use.
At the end of winter, remove snow
tyres and refi t your summer tyres.
Observe the recommendations
on maintenance
Check the tyre pressures regularly,
when cold, referring to the label in the
door aperture, driver's side.
Carry out this check in particular:
- before a long journey,
- at each change of season,
- after a long period out of use.
Don't forget the spare wheel and the
tyres on any trailer or caravan.
Have your vehicle serviced regularly (en-
gine oil, oil fi lter, air fi lter...) and observe the
schedule of operations recommended by
the manufacturer.
When refuelling, do not continue after
the 3 rd cut-off of the nozzle to avoid
any overfl ow.
At the wheel of your new vehicle, it is only
after the fi rst 1 800 miles (3 000 kilome-
tres) that you will see the fuel consumption
settle down to a consistent average.
Page 54 of 248
2
52
FRONT SEATS
Seat consisting of a seat cushion, seat
back and head restraint which can all
be adjusted to adapt your position for
maximum ease of driving and comfort.
1. Forwards-backwards adjustment
�)
Lift the control and slide the seat for-
wards or backwards.
2. Driver's or passenger's seat
height adjustment
�)
Pull the handle upwards or push it
downwards as many times as neces-
sary to obtain the required position.
3. Seat back angle adjustment
�)
Push the handle towards the rear.
Page 55 of 248

2
!
!
53
No person or object must prevent
the seat slide from returning to its
initial position; return to this posi-
tion is necessary for the seat to
lock in place.
Take care not to trap the seat belt
to avoid hindering the passage of
the rear passengers.
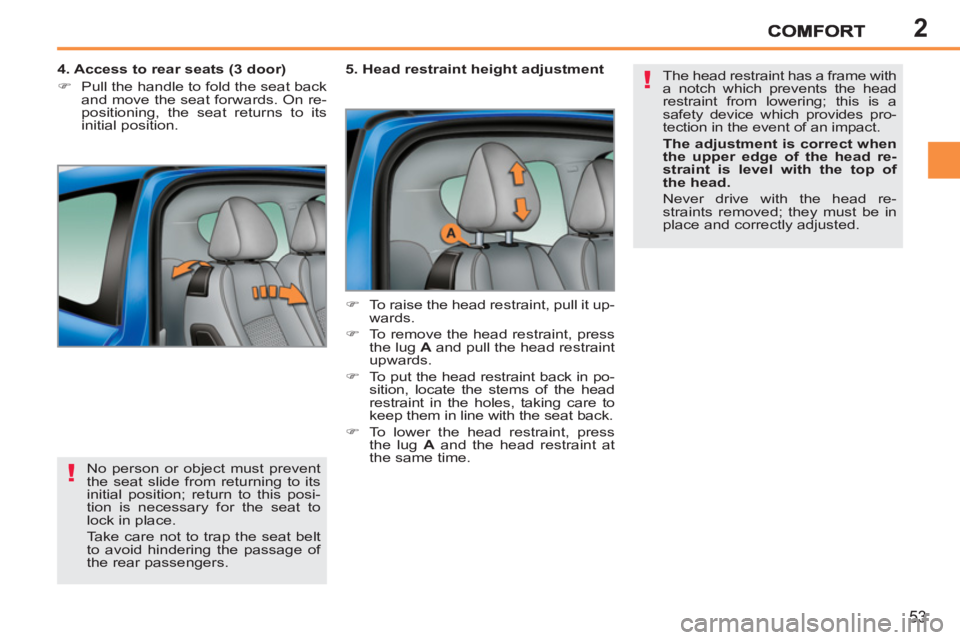
4. Access to rear seats (3 door)
�)
Pull the handle to fold the seat back
and move the seat forwards. On re-
positioning, the seat returns to its
initial position.
5. Head restraint height adjustment
�)
To raise the head restraint, pull it up-
wards.
�)
To remove the head restraint, press
the lug A
and pull the head restraint
upwards.
�)
To put the head restraint back in po-
sition, locate the stems of the head
restraint in the holes, taking care to
keep them in line with the seat back.
�)
To lower the head restraint, press
the lug A
and the head restraint at
the same time. The head restraint has a frame with
a notch which prevents the head
restraint from lowering; this is a
safety device which provides pro-
tection in the event of an impact.
The adjustment is correct when
the upper edge of the head re-
straint is level with the top of
the head.
Never drive with the head re-
straints removed; they must be in
place and correctly adjusted.
Page 56 of 248

2
!
i
COMFORT
54
REAR SEATS
Bench seat the left-hand part (2/3) or
right-hand part (1/3) of which can be
folded to adapt the load space in the
boot.
Never drive with the head re-
straints removed; they must be in
place and correctly adjusted.
As the head restraints are not in-
terchangeable, take care to put
them back in their original position
when refi tting.
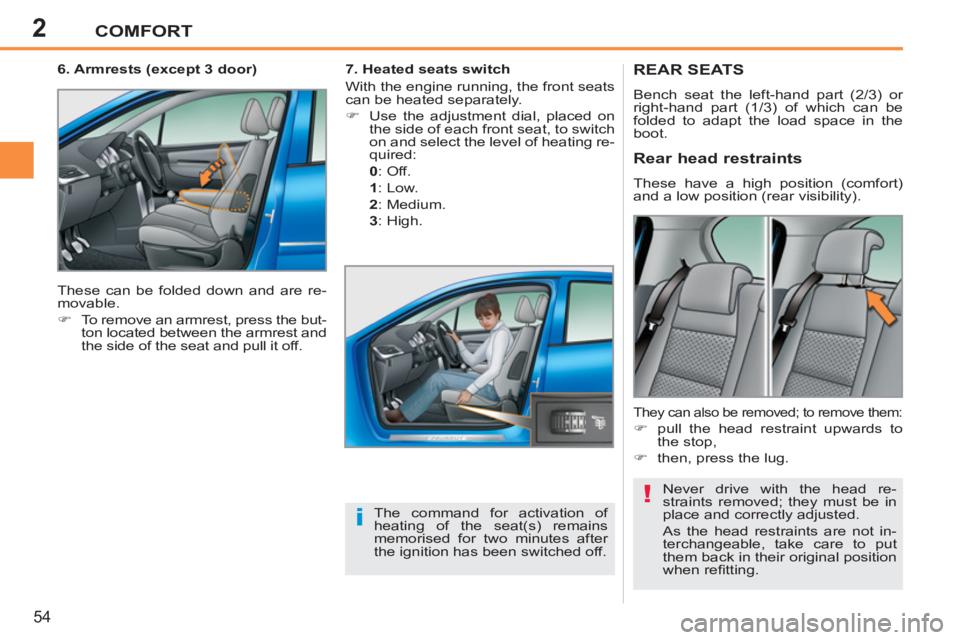
Rear head restraints
These have a high position (comfort)
and a low position (rear visibility).
The command for activation of
heating of the seat(s) remains
memorised for two minutes after
the ignition has been switched off.
7. Heated seats switch
With the engine running, the front seats
can be heated separately.
�)
Use the adjustment dial, placed on
the side of each front seat, to switch
on and select the level of heating re-
quired:
0
:
Off.
1
:
Low.
2
:
Medium.
3
:
High.
They can also be removed; to remove them:
�)
pull the head restraint upwards to
the stop,
�)
then, press the lug.
6. Armrests (except 3 door)
These can be folded down and are re-
movable.
�)
To remove an armrest, press the but-
ton located between the armrest and
the side of the seat and pull it off.
Page 58 of 248
2
!
i
COMFORT
56
Folding the seat (SW)
This operation can be carried out at the
rear seats or through the opening rear
screen.
To avoid damaging a seat when folding it:
�)
move the corresponding front seat
forward if necessary,
�)
place the head restraints in the low
position, Check that no object could hinder
the movement of the bench seat,
either above or below.
Repositioning the seat (SW)
The seat cushion lowers in order
to be covered by the seat back;
this quickly gives you a fl at boot
fl oor.
�)
pull the control 1
forward to release
the seat back 2
which folds easily
onto the seat cushion 3
.
�)
When repositioning the rear seat,
straighten the seat back 2
and lock it.
�)
Check that the red indicator, located
at control 1
, is no longer visible.
Page 66 of 248
2
i
COMFORT
64
Hooks
Rear parcel shelf (Saloon)
To remove the shelf:
�)
unhook the two cords,
�)
raise the shelf slightly, then remove it. The hooks can be used to secure shop-
ping bags.
When changing a wheel
The hooks facilitate access to the
spare wheel by holding up the
boot carpet by its cord.
You have two storage options:
- either upright behind the front seats,
- or upright behind the rear seats.