2011 PEUGEOT 207 seats
[x] Cancel search: seatsPage 68 of 248
2
i
COMFORT
66
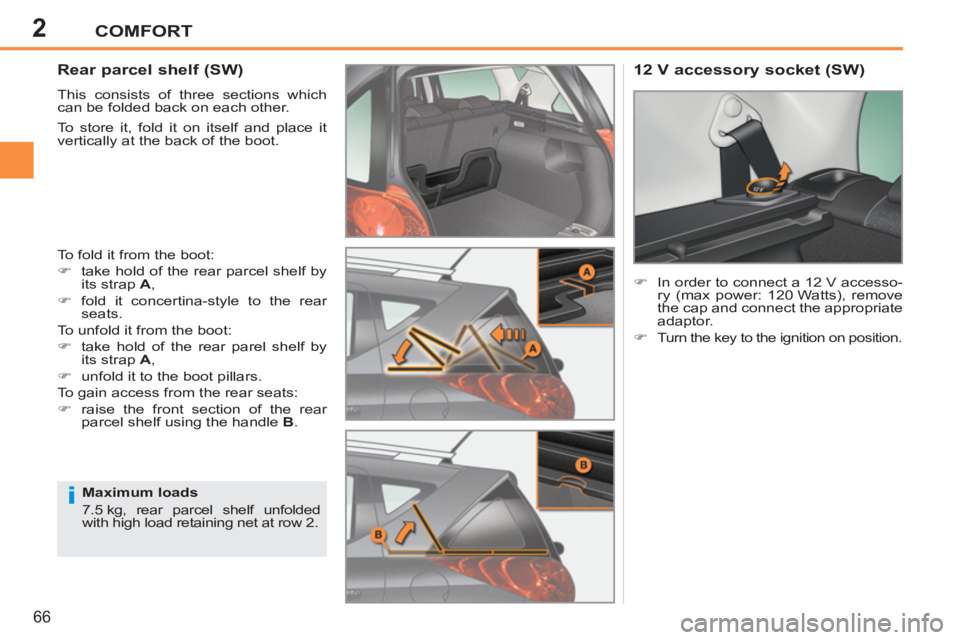
Rear parcel shelf (SW)
This consists of three sections which
can be folded back on each other.
To store it, fold it on itself and place it
vertically at the back of the boot.
To fold it from the boot:
�)
take hold of the rear parcel shelf by
its strap A
,
�)
fold it concertina-style to the rear
seats.
To unfold it from the boot:
�)
take hold of the rear parel shelf by
its strap A
,
�)
unfold it to the boot pillars.
To gain access from the rear seats:
�)
raise the front section of the rear
parcel shelf using the handle B
.
12 V accessory socket (SW)
�)
In order to connect a 12 V accesso-
ry (max power: 120 Watts), remove
the cap and connect the appropriate
adaptor.
�)
Turn the key to the ignition on position.
Maximum loads
7.5 kg, rear parcel shelf unfolded
with high load retaining net at row 2.
Page 69 of 248
2
i
COMFORT
67
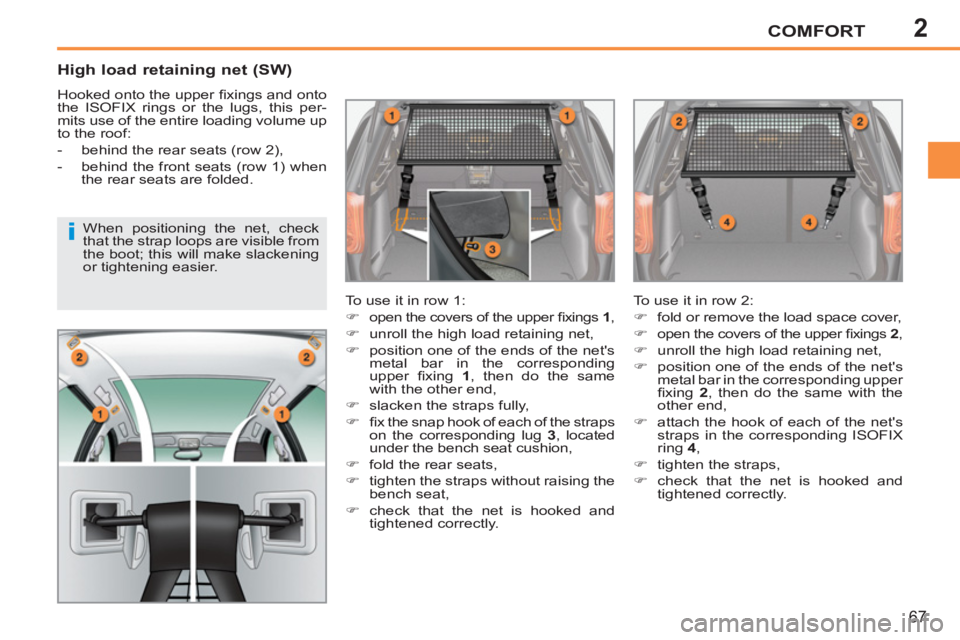
High load retaining net (SW)
Hooked onto the upper fi xings and onto
the ISOFIX rings or the lugs, this per-
mits use of the entire loading volume up
to the roof:
- behind the rear seats (row 2),
- behind the front seats (row 1) when
the rear seats are folded.
To use it in row 1:
�)
open the covers of the upper fi xings 1
,
�)
unroll the high load retaining net,
�)
position one of the ends of the net's
metal bar in the corresponding
upper fi xing 1
, then do the same
with the other end,
�)
slacken the straps fully,
�)
fi x the snap hook of each of the straps
on the corresponding lug 3
, located
under the bench seat cushion,
�)
fold the rear seats,
�)
tighten the straps without raising the
bench seat,
�)
check that the net is hooked and
tightened correctly. To use it in row 2:
�)
fold or remove the load space cover,
�)
open the covers of the upper fi xings 2
,
�)
unroll the high load retaining net,
�)
position one of the ends of the net's
metal bar in the corresponding upper
fi xing 2
, then do the same with the
other end,
�)
attach the hook of each of the net's
straps in the corresponding ISOFIX
ring 4
,
�)
tighten the straps,
�)check that the net is hooked and
tightened correctly.
When positioning the net, check
that the strap loops are visible from
the boot; this will make slackening
or tightening easier.
Page 75 of 248
3
!
73
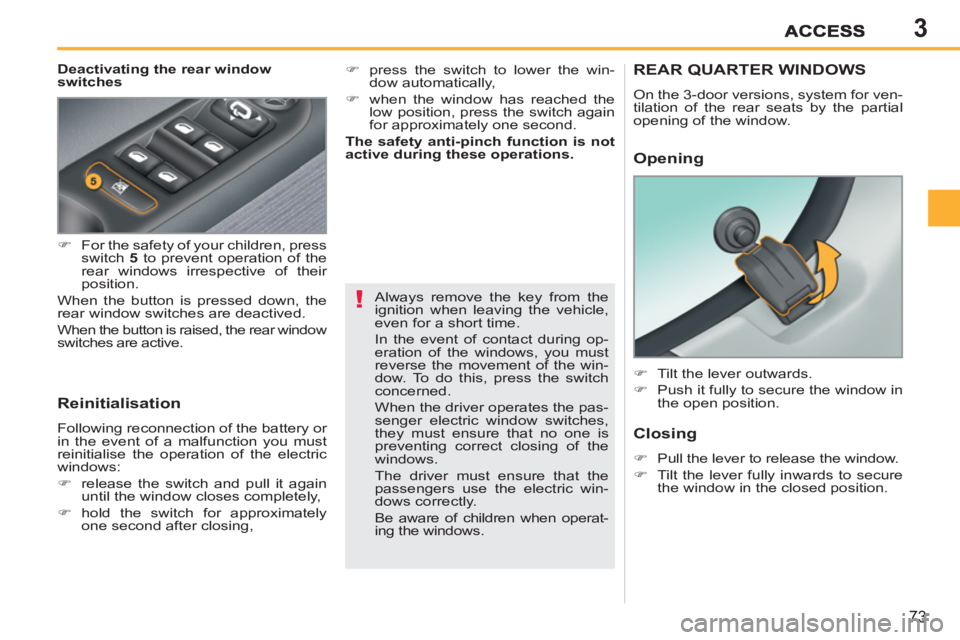
Deactivating the rear window
switches
Reinitialisation
Following reconnection of the battery or
in the event of a malfunction you must
reinitialise the operation of the electric
windows:
�)
release the switch and pull it again
until the window closes completely,
�)
hold the switch for approximately
one second after closing, Always remove the key from the
ignition when leaving the vehicle,
even for a short time.
In the event of contact during op-
eration of the windows, you must
reverse the movement of the win-
dow. To do this, press the switch
concerned.
When the driver operates the pas-
senger electric window switches,
they must ensure that no one is
preventing correct closing of the
windows.
The driver must ensure that the
passengers use the electric win-
dows correctly.
Be aware of children when operat-
ing the windows.
REAR QUARTER WINDOWS
On the 3-door versions, system for ven-
tilation of the rear seats by the partial
opening of the window.
Opening
�)
For the safety of your children, press
switch 5
to prevent operation of the
rear windows irrespective of their
position.
When the button is pressed down, the
rear window switches are deactived.
When the button is raised, the rear window
switches are active.
Closing
�)
Pull the lever to release the window.
�)
Tilt the lever fully inwards to secure
the window in the closed position.
�)
Tilt the lever outwards.
�)
Push it fully to secure the window in
the open position.
�)
press the switch to lower the win-
dow automatically,
�)
when the window has reached the
low position, press the switch again
for approximately one second.
The safety anti-pinch function is not
active during these operations.
Page 78 of 248

3ACCESS
76
Emergency control
System which locks or unlocks the
doors mechanically in the event of a
malfunction of the central locking.
�)
Insert the key in the lock, located on
the edge of the door, then turn it one
eighth of a turn.
Locking the driver's door
�)
Insert the key in the lock, then turn it
to the right.
Unlocking the driver's door
�)
Insert the key in the lock, then turn it
to the left.
Locking the front and rear
passenger doors
Unlocking the front and rear
passenger doors
�)
Pull the interior door opening control.
- when the engine is run-
ning
, this warning lamp
comes on, accompanied
by a message on the mul-
tifunction screen for a few
seconds,
- when the vehicle is moving
(speed
above 6 mph (10 km/h)), this warn-
ing lamp comes on, accompanied
by an audible signal and a message
on the multifunction screen for a
few seconds.
Tailgate release
System for mechanical unlocking of the
boot in the event of a central locking
malfunction.
Unlocking
�)
Fold back the rear seats to gain
access to the lock from inside the
boot.
�)
Insert a small screwdriver into hole A
of the lock to unlock the tailgate.
Opening
�)
After unlocking the vehicle using the
remote control or the key, pull the
handle and raise the tailgate.
BOOT (SALOON)
Closing
If the tailgate is not closed correctly:
Page 92 of 248
5
i
CHILD SAFETY
90
PEUGEOT recommends
that
children should travel in the rear
seats
of your vehicle:
- "rearwards-facing"
up to the
age of 2,
- "forwards-facing"
over the
age of 2.
GENERAL POINTS RELATING
TO CHILD SEATS
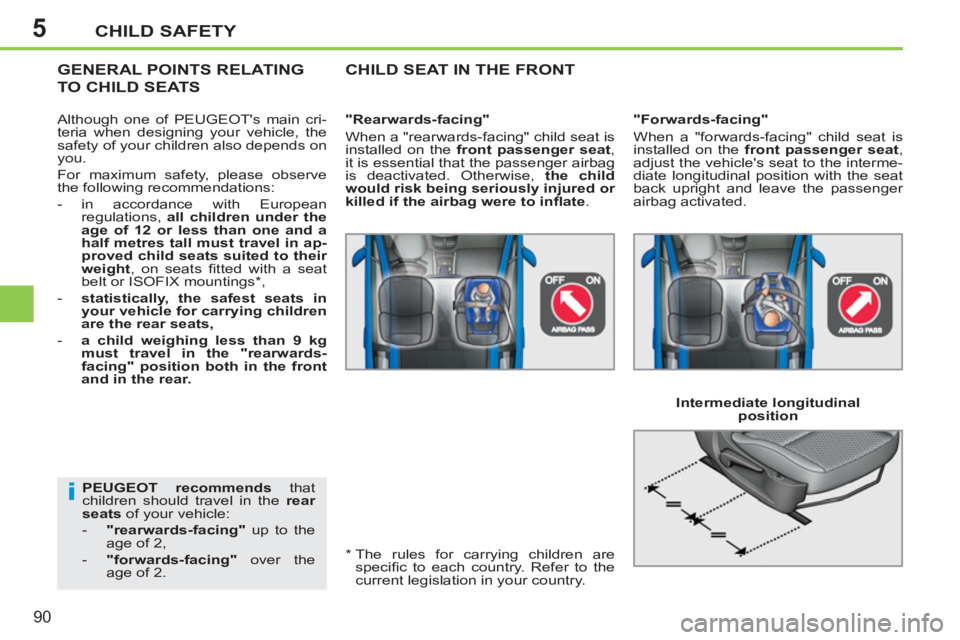
CHILD SEAT IN THE FRONT
"Rearwards-facing"
When a "rearwards-facing" child seat is
installed on the front passenger seat
,
it is essential that the passenger airbag
is deactivated. Otherwise, the child
would risk being seriously injured or
killed if the airbag were to infl ate
.
*
The rules for carrying children are
specifi c to each country. Refer to the
current legislation in your country. Although one of PEUGEOT's main cri-
teria when designing your vehicle, the
safety of your children also depends on
you.
For maximum safety, please observe
the following recommendations:
- in accordance with European
regulations, all children under the
age of 12 or less than one and a
half metres tall must travel in ap-
proved child seats suited to their
weight
, on seats fi tted with a seat
belt or ISOFIX mountings * ,
- statistically, the safest seats in
your vehicle for carrying children
are the rear seats,
- a child weighing less than 9 kg
must travel in the "rearwards-
facing" position both in the front
and in the rear.
Intermediate longitudinal
position
"Forwards-facing"
When a "forwards-facing" child seat is
installed on the front passenger seat
,
adjust the vehicle's seat to the interme-
diate longitudinal position with the seat
back upright and leave the passenger
airbag activated.
Page 94 of 248
5CHILD SAFETY
92
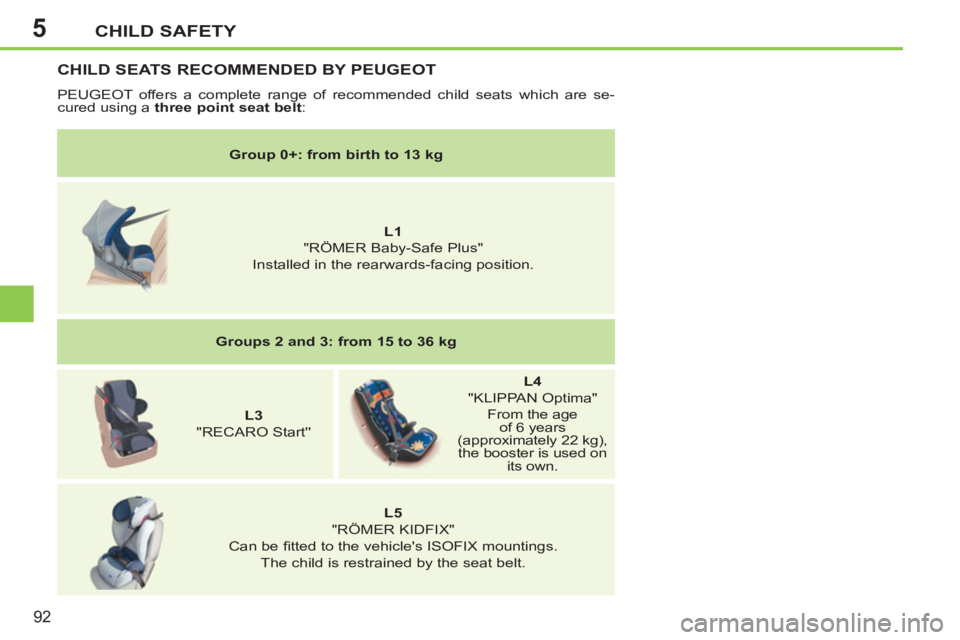
CHILD SEATS RECOMMENDED BY PEUGEOT
PEUGEOT offers a complete range of recommended child seats which are se-
cured using a three point seat belt
:
Group 0+: from birth to 13 kg
L1
"RÖMER Baby-Safe Plus"
Installed in the rearwards-facing position.
Groups 2 and 3: from 15 to 36 kg
L3
"RECARO Start''
L4
"KLIPPAN Optima"
From the age
of 6 years
(approximately 22 kg),
the booster is used on
its own.
L5
"RÖMER KIDFIX"
Can be fi tted to the vehicle's ISOFIX mountings.
The child is restrained by the seat belt.
Page 95 of 248
5CHILD SAFETY
93
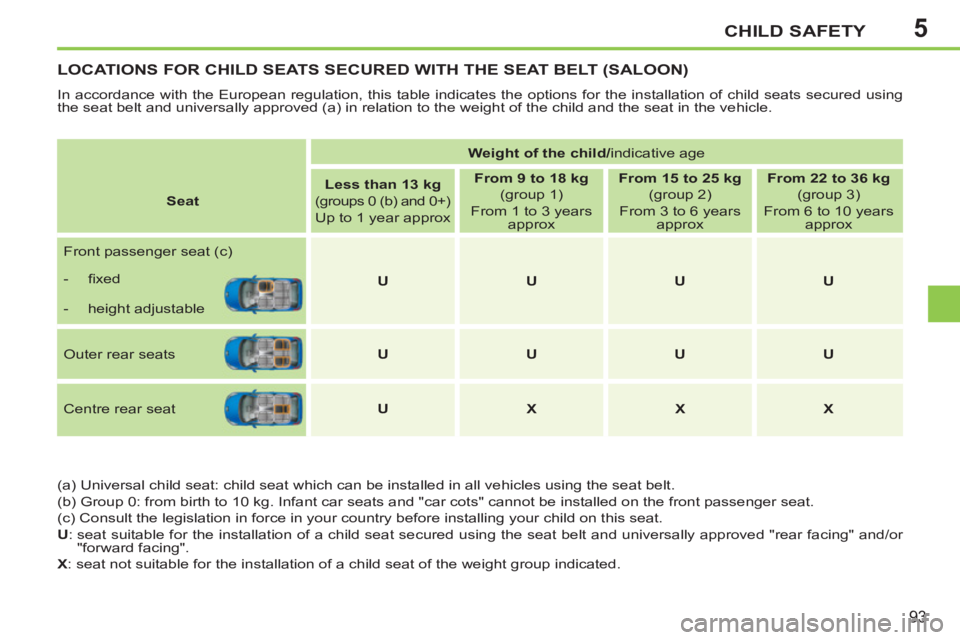
LOCATIONS FOR CHILD SEATS SECURED WITH THE SEAT BELT (SALOON)
In accordance with the European regulation, this table indicates the options for the installation of child seats secured using
the seat belt and universally approved (a) in relation to the weight of the child and the seat in the vehicle.
(a) Universal child seat: child seat which can be installed in all vehicles using the seat belt.
(b) Group 0: from birth to 10 kg. Infant car seats and "car cots" cannot be installed on the front passenger seat.
(c) Consult the legislation in force in your country before installing your child on this seat.
U
: seat suitable for the installation of a child seat secured using the seat belt and universally approved "rear facing" and/or
"forward facing".
X
: seat not suitable for the installation of a child seat of the weight group indicated.
Weight of the child/
indicative age
Seat
Less than 13 kg
(groups 0 (b) and 0+)
Up to 1 year approx
From 9 to 18 kg
(group 1)
From 1 to 3 years
approx
From 15 to 25 kg
(group 2)
From 3 to 6 years
approx
From 22 to 36 kg
(group 3)
From 6 to 10 years
approx
Front passenger seat (c)
U
U
U
U
- fi xed
- height adjustable
Outer rear seats
U
U
U
U
Centre rear seat
U
X
X
X
Page 96 of 248
5CHILD SAFETY
94
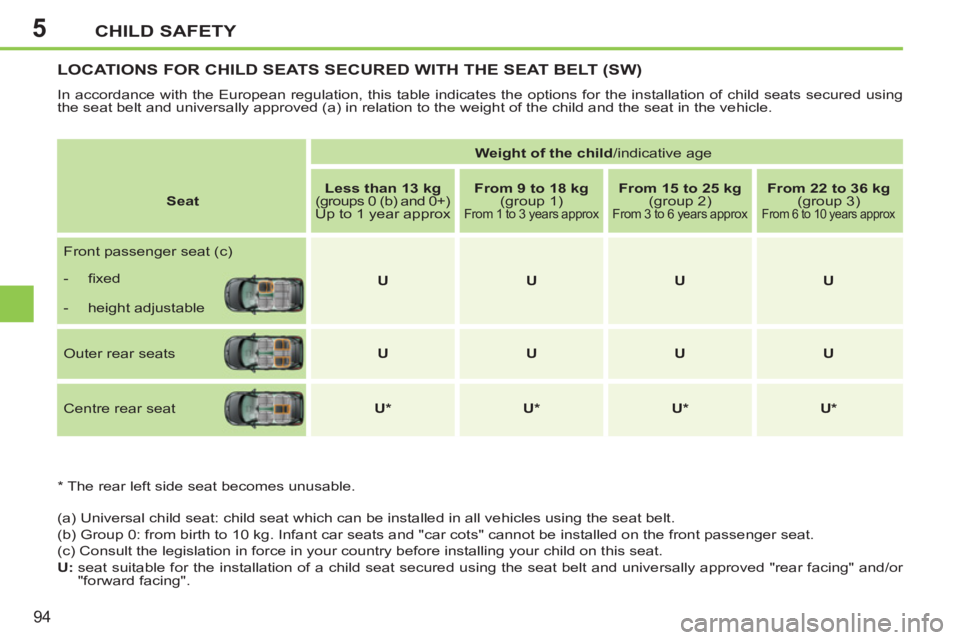
LOCATIONS FOR CHILD SEATS SECURED WITH THE SEAT BELT (SW)
In accordance with the European regulation, this table indicates the options for the installation of child seats secured using
the seat belt and universally approved (a) in relation to the weight of the child and the seat in the vehicle.
(a) Universal child seat: child seat which can be installed in all vehicles using the seat belt.
(b) Group 0: from birth to 10 kg. Infant car seats and "car cots" cannot be installed on the front passenger seat.
(c) Consult the legislation in force in your country before installing your child on this seat.
U:
seat suitable for the installation of a child seat secured using the seat belt and universally approved "rear facing" and/or
"forward facing".
Weight of the child
/indicative age
Seat
Less than 13 kg
(groups 0 (b) and 0+)
Up to 1 year approx
From 9 to 18 kg
(group 1)
From 1 to 3 years approx
From 15 to 25 kg
(group 2)
From 3 to 6 years approx
From 22 to 36 kg
(group 3)
From 6 to 10 years approx
Front passenger seat (c)
U
U
U
U
- fi xed
- height adjustable
Outer rear seats
U
U
U
U
Centre rear seat
U *
U *
U *
U *
*
The rear left side seat becomes unusable.