2011 PEUGEOT 207 fold seats
[x] Cancel search: fold seatsPage 55 of 248
2
!
!
53
No person or object must prevent
the seat slide from returning to its
initial position; return to this posi-
tion is necessary for the seat to
lock in place.
Take care not to trap the seat belt
to avoid hindering the passage of
the rear passengers.
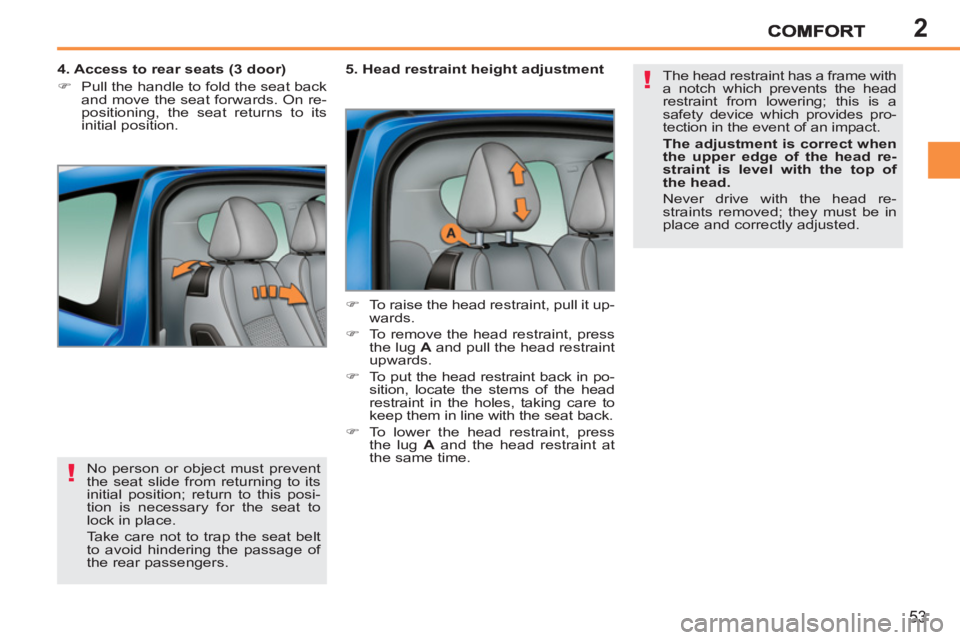
4. Access to rear seats (3 door)
�)
Pull the handle to fold the seat back
and move the seat forwards. On re-
positioning, the seat returns to its
initial position.
5. Head restraint height adjustment
�)
To raise the head restraint, pull it up-
wards.
�)
To remove the head restraint, press
the lug A
and pull the head restraint
upwards.
�)
To put the head restraint back in po-
sition, locate the stems of the head
restraint in the holes, taking care to
keep them in line with the seat back.
�)
To lower the head restraint, press
the lug A
and the head restraint at
the same time. The head restraint has a frame with
a notch which prevents the head
restraint from lowering; this is a
safety device which provides pro-
tection in the event of an impact.
The adjustment is correct when
the upper edge of the head re-
straint is level with the top of
the head.
Never drive with the head re-
straints removed; they must be in
place and correctly adjusted.
Page 56 of 248
2
!
i
COMFORT
54
REAR SEATS
Bench seat the left-hand part (2/3) or
right-hand part (1/3) of which can be
folded to adapt the load space in the
boot.
Never drive with the head re-
straints removed; they must be in
place and correctly adjusted.
As the head restraints are not in-
terchangeable, take care to put
them back in their original position
when refi tting.
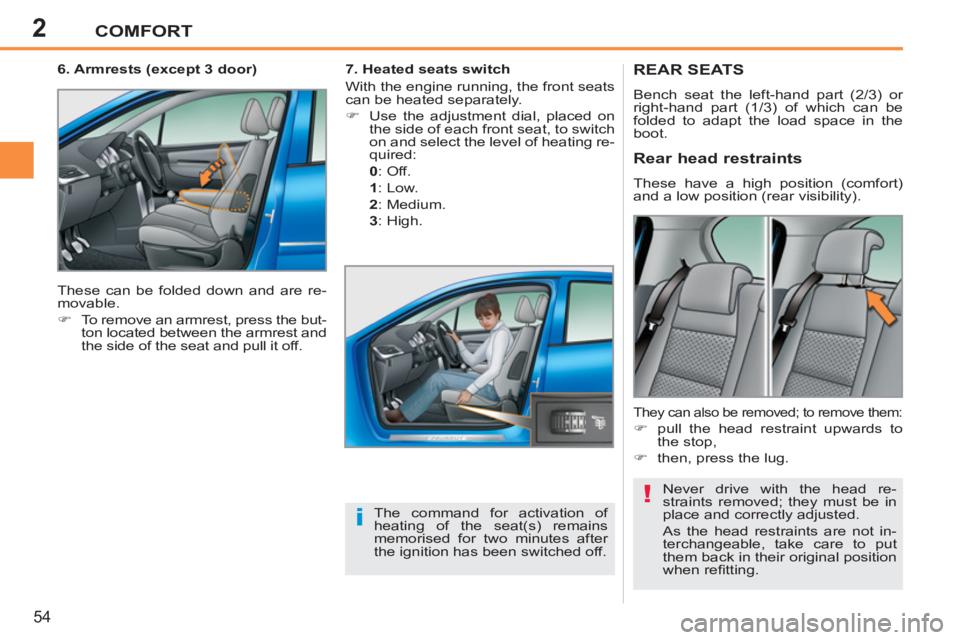
Rear head restraints
These have a high position (comfort)
and a low position (rear visibility).
The command for activation of
heating of the seat(s) remains
memorised for two minutes after
the ignition has been switched off.
7. Heated seats switch
With the engine running, the front seats
can be heated separately.
�)
Use the adjustment dial, placed on
the side of each front seat, to switch
on and select the level of heating re-
quired:
0
:
Off.
1
:
Low.
2
:
Medium.
3
:
High.
They can also be removed; to remove them:
�)
pull the head restraint upwards to
the stop,
�)
then, press the lug.
6. Armrests (except 3 door)
These can be folded down and are re-
movable.
�)
To remove an armrest, press the but-
ton located between the armrest and
the side of the seat and pull it off.
Page 58 of 248
2
!
i
COMFORT
56
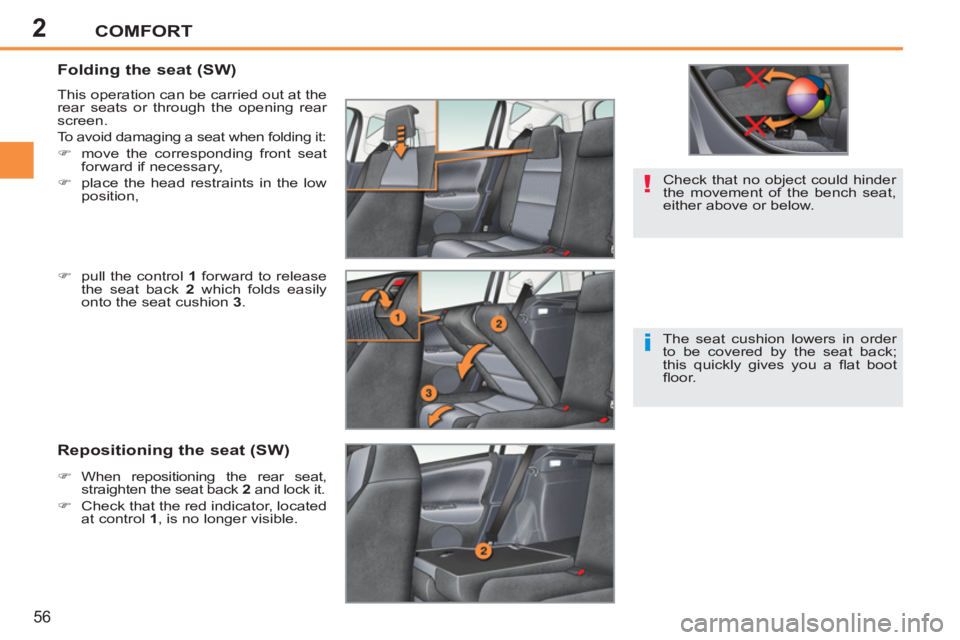
Folding the seat (SW)
This operation can be carried out at the
rear seats or through the opening rear
screen.
To avoid damaging a seat when folding it:
�)
move the corresponding front seat
forward if necessary,
�)
place the head restraints in the low
position, Check that no object could hinder
the movement of the bench seat,
either above or below.
Repositioning the seat (SW)
The seat cushion lowers in order
to be covered by the seat back;
this quickly gives you a fl at boot
fl oor.
�)
pull the control 1
forward to release
the seat back 2
which folds easily
onto the seat cushion 3
.
�)
When repositioning the rear seat,
straighten the seat back 2
and lock it.
�)
Check that the red indicator, located
at control 1
, is no longer visible.
Page 68 of 248
2
i
COMFORT
66
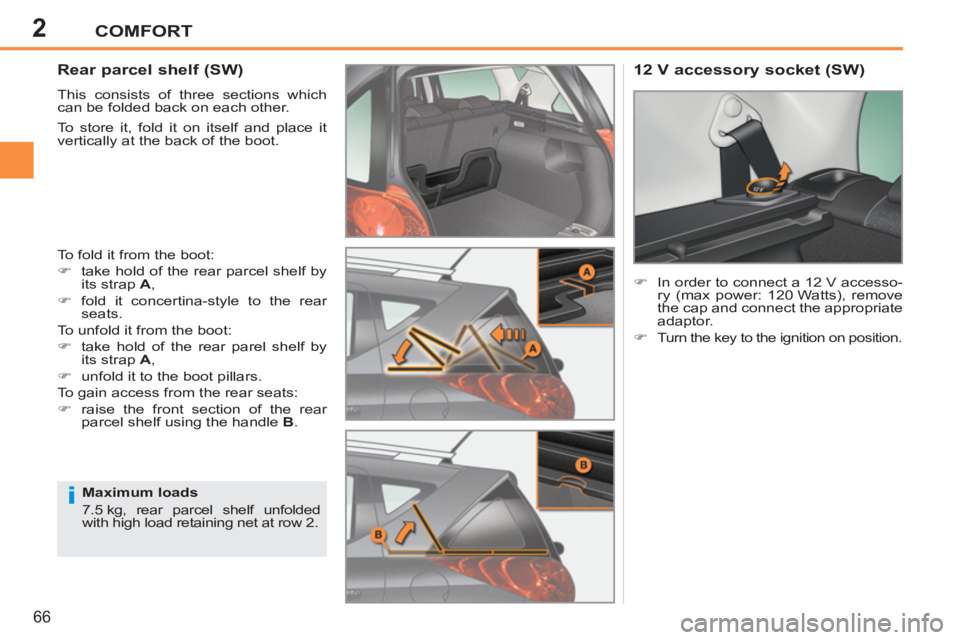
Rear parcel shelf (SW)
This consists of three sections which
can be folded back on each other.
To store it, fold it on itself and place it
vertically at the back of the boot.
To fold it from the boot:
�)
take hold of the rear parcel shelf by
its strap A
,
�)
fold it concertina-style to the rear
seats.
To unfold it from the boot:
�)
take hold of the rear parel shelf by
its strap A
,
�)
unfold it to the boot pillars.
To gain access from the rear seats:
�)
raise the front section of the rear
parcel shelf using the handle B
.
12 V accessory socket (SW)
�)
In order to connect a 12 V accesso-
ry (max power: 120 Watts), remove
the cap and connect the appropriate
adaptor.
�)
Turn the key to the ignition on position.
Maximum loads
7.5 kg, rear parcel shelf unfolded
with high load retaining net at row 2.
Page 69 of 248
2
i
COMFORT
67
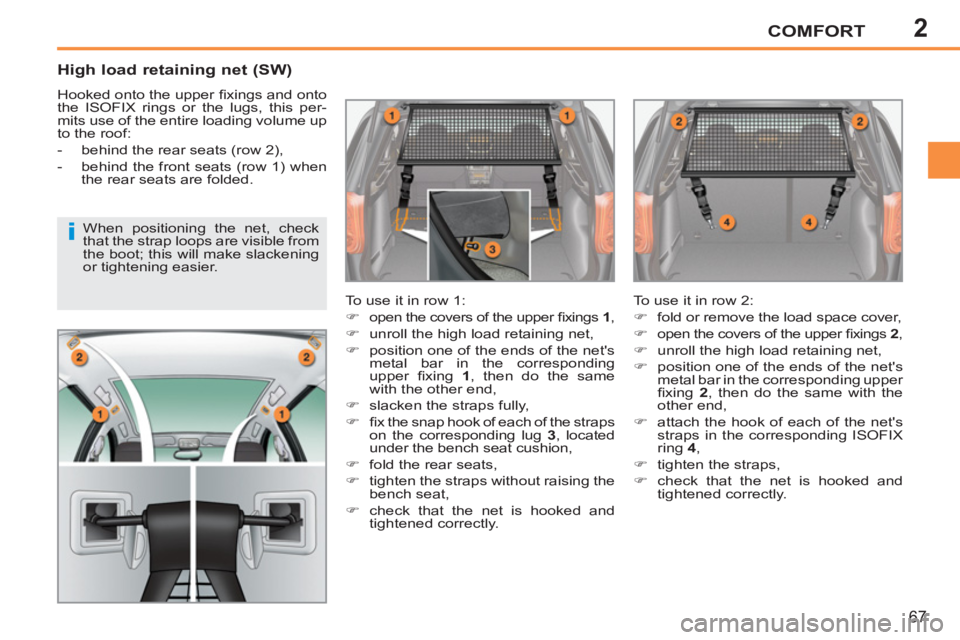
High load retaining net (SW)
Hooked onto the upper fi xings and onto
the ISOFIX rings or the lugs, this per-
mits use of the entire loading volume up
to the roof:
- behind the rear seats (row 2),
- behind the front seats (row 1) when
the rear seats are folded.
To use it in row 1:
�)
open the covers of the upper fi xings 1
,
�)
unroll the high load retaining net,
�)
position one of the ends of the net's
metal bar in the corresponding
upper fi xing 1
, then do the same
with the other end,
�)
slacken the straps fully,
�)
fi x the snap hook of each of the straps
on the corresponding lug 3
, located
under the bench seat cushion,
�)
fold the rear seats,
�)
tighten the straps without raising the
bench seat,
�)
check that the net is hooked and
tightened correctly. To use it in row 2:
�)
fold or remove the load space cover,
�)
open the covers of the upper fi xings 2
,
�)
unroll the high load retaining net,
�)
position one of the ends of the net's
metal bar in the corresponding upper
fi xing 2
, then do the same with the
other end,
�)
attach the hook of each of the net's
straps in the corresponding ISOFIX
ring 4
,
�)
tighten the straps,
�)check that the net is hooked and
tightened correctly.
When positioning the net, check
that the strap loops are visible from
the boot; this will make slackening
or tightening easier.
Page 78 of 248

3ACCESS
76
Emergency control
System which locks or unlocks the
doors mechanically in the event of a
malfunction of the central locking.
�)
Insert the key in the lock, located on
the edge of the door, then turn it one
eighth of a turn.
Locking the driver's door
�)
Insert the key in the lock, then turn it
to the right.
Unlocking the driver's door
�)
Insert the key in the lock, then turn it
to the left.
Locking the front and rear
passenger doors
Unlocking the front and rear
passenger doors
�)
Pull the interior door opening control.
- when the engine is run-
ning
, this warning lamp
comes on, accompanied
by a message on the mul-
tifunction screen for a few
seconds,
- when the vehicle is moving
(speed
above 6 mph (10 km/h)), this warn-
ing lamp comes on, accompanied
by an audible signal and a message
on the multifunction screen for a
few seconds.
Tailgate release
System for mechanical unlocking of the
boot in the event of a central locking
malfunction.
Unlocking
�)
Fold back the rear seats to gain
access to the lock from inside the
boot.
�)
Insert a small screwdriver into hole A
of the lock to unlock the tailgate.
Opening
�)
After unlocking the vehicle using the
remote control or the key, pull the
handle and raise the tailgate.
BOOT (SALOON)
Closing
If the tailgate is not closed correctly:
Page 109 of 248
6
i
SAFETY
107
The driver must ensure that the
passengers use the seat belts cor-
rectly and that they are all properly
restrained before setting off.
Wherever you are seated in the ve-
hicle, always fasten your seat belt,
even for short journeys.
Do not invert the seat belt buckles
as they will not fulfi l their role fully.
If the seats have armrests * , the lap
part of the seat belt must always
pass under the armrest.
The seat belts are fi tted with an in-
ertia reel permitting automatic ad-
justment of the length of the strap
to your size. The seat belt is stored
automatically when not in use.
Before and after use, ensure that
the seat belt is reeled in correctly.
The lower part of the strap must be
positioned as low as possible on
the pelvis.
The upper part must be positioned
in the hollow of the shoulder.
The inertia reels are fi tted with an
automatic locking device which
comes into operation in the event of
a collision, on emergency braking
or if the vehicle rolls over. You can
release the device by pulling rapidly
on the strap and releasing it.
*
According to model. In order to be effective, a seat belt:
- must be tightened as close to the
body as possible,
- must restrain one adult only,
- must not bear any trace of cuts or
fraying,
- must be pulled in front of you with a
smooth movement, checking that it
does not twist,
- must not be transformed or modifi ed
to avoid altering its performance.
In accordance with current safety regu-
lations, all repairs and checks must be
carried out by a PEUGEOT dealer who
can guarantee that the work is carried
out correctly, or qualifi ed workshop.
Have your seat belts checked regularly
by a PEUGEOT dealer or a qualifi ed
workshop and particularly if the straps
show signs of damage.
Clean the seat belt straps with soapy
water or a textile cleaning product, sold
by PEUGEOT dealers.
After folding or moving a seat or rear
bench seat, ensure that the seat belt is
positioned and rolled up correctly.
Recommendations for children:
- use a suitable child seat if the pas-
senger is less than 12 years old or
shorter than one metre fi fty,
- do not use the strap-guide * when
a child seat is installed,
- never use the same seat belt to
secure more than one person,
- never allow a child to travel on
your lap.
Depending on the nature and se-
riousness of the impacts
, the pre-
tensioning device may be triggered
before and independently of the air-
bags. Triggering of the pre-tensioners
is accompanied by a slight emission of
harmless smoke and a noise, due to
the activation of the pyrotechnic car-
tridge incorporated in the system.
In all cases, the airbag warning lamp
comes on.
Following an impact, have the seat
belts system checked, and if neces-
sary replaced, by a PEUGEOT dealer
or a qualifi ed workshop.
Page 151 of 248

9PRACTICAL INFORMATION
149
Dashboard fuses
The fusebox is placed in the lower dash-
board (left-hand side).
Access to the fuses
�)
refer to the "Access to the tools"
paragraph.
Fuse tables
Fuse N°
Rating
Functions
G39
20 A
Not used.
G40
20 A
Driver and passenger heated seats.
Fuse N°
Rating
Functions
F1
15 A
Rear wiper.
F2
-
Not used.
F3
5 A
Airbags and pre-tensioners control unit.
F4
10 A
Clutch pedal switch, diagnostic socket,
electrochromatic rear view mirror, air conditioning,
steering wheel angle sensor, particle emission fi lter
pump (Diesel).
F5
30 A
Electric windows, rear one-touch electric windows,
panoramic sunroof (SW).
F6
30 A
Front one-touch electric windows, folding mirrors
supply.
F7
5 A
Front and rear courtesy lamps, map reading lamps,
sun visor lighting, glove box lighting.