Page 149 of 407
NOTE:
If you change the horn beep and light flash
feature with the keyfob, the display screen
(if so equipped) will not show the current
mode and cannot be used to change the
mode. Use the keyfob to return to the pre-
vious mode and re-enable the display
screen control.
To deactivate:Press and hold the
Page 150 of 407
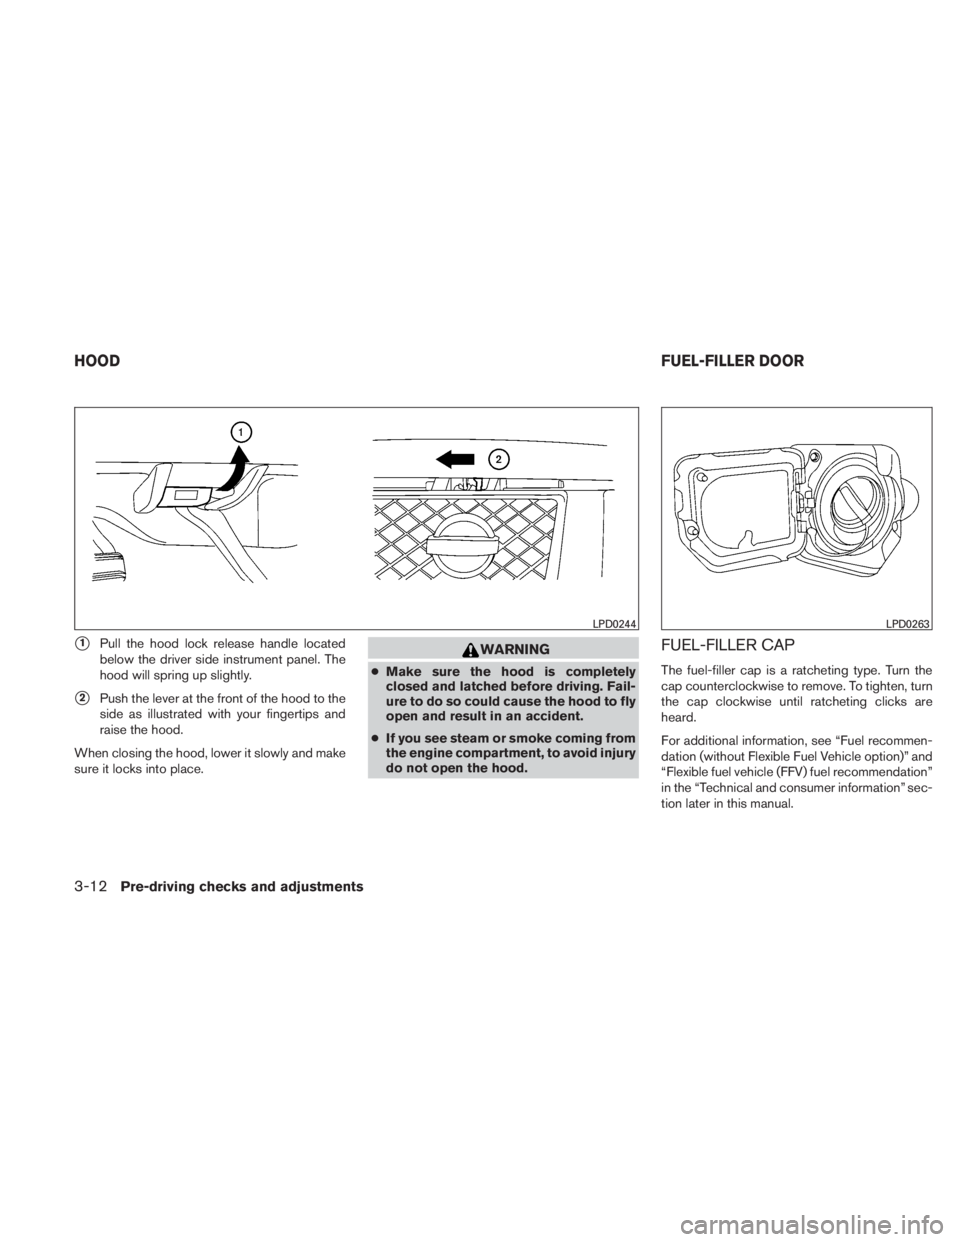
�1Pull the hood lock release handle located
below the driver side instrument panel. The
hood will spring up slightly.
�2Push the lever at the front of the hood to the
side as illustrated with your fingertips and
raise the hood.
When closing the hood, lower it slowly and make
sure it locks into place.
Page 151 of 407

WARNING
●Gasoline is extremely flammable and
highly explosive under certain condi-
tions. You could be burned or seriously
injured if it is misused or mishandled.
Always stop the engine and do not
smoke or allow open flames or sparks
near the vehicle when refueling.
● Do not attempt to top off the fuel tank
after the fuel pump nozzle shuts off
automatically. Continued refueling may
cause fuel overflow, resulting in fuel
spray and possibly a fire.
● Use only an original equipment type
fuel-filler cap as a replacement. It has a
built-in safety valve needed for proper
operation of the fuel system and emis-
sion control system. An incorrect cap
can result in a serious malfunction and
possible injury. It could also cause the
malfunction indicator light to come on.
● Never pour fuel into the throttle body to
attempt to start your vehicle. ●
Do not fill a portable fuel container on a
truck bed liner, rubber truck bed mat, or
other insulating material. Static elec-
tricity can cause an explosion of flam-
mable liquid, vapor or gas in any vehicle
or trailer. To reduce the risk of serious
injury or death when filling portable fuel
containers:
– Always place the container on the ground when filling.
– Do not use electronic devices when filling.
– Keep the pump nozzle in contact with the container while you are fill-
ing it.
– Use only approved portable fuel con- tainers for flammable liquid.
Page 154 of 407
VANITY MIRRORS (if so equipped)
To access the vanity mirror, pull the sun visor
down and flip open the mirror cover (if so
equipped) . Some vanity mirrors are illuminated
and turn on when the mirror cover is open.
REARVIEW MIRROR (if so equipped)
The night position�1reduces glare from the
headlights of vehicles behind you at night.
Use the day position
�2when driving in daylight
hours.
Page 155 of 407
AUTOMATIC ANTI-GLARE
REARVIEW MIRROR (if so equipped)
The inside mirror is designed so that it automati-
cally dims during night time conditions and ac-
cording to the intensity of the headlights of the
vehicle following you. The automatic anti-glare
feature is activated when the ignition switch is in
the ON position.
The indicator light will illuminate when the auto-
matic anti-glare feature is operating.
NOTE:
Do not hang any objects over the sensors
�1or apply glass cleaner to the sensors.
Doing so will reduce the sensitivity of the
sensors, resulting in improper operation.
Type A
With the ignition switch placed in the ON posi-
tion, press the
Page 162 of 407

The automatic drive positioner system has two
features:● Memory storage function
● Entry/exit function
MEMORY STORAGE FUNCTION
Two positions for the driver’s seat, accelerator
and brake pedals, and outside mirrors can be
stored in the automatic drive positioner memory.
Follow these procedures to use the memory sys-
tem.
1. Place the shift selector in the P (Park) posi- tion.
2. Place the ignition switch in the ON position.
3. Adjust the driver’s seat, accelerator and brake pedals, and outside mirrors to the
desired positions by manually operating
each adjusting switch. For additional infor- mation, see “Seats” in the “Safety—Seats,
seat belts and supplemental restraint sys-
tem” section of this manual and “Pedal posi-
tion adjustment” and “Outside mirrors” ear-
lier in this section.
During this step, do not place the ignition
switch in any position other than ON.
4. Push the SET switch and, within 5 seconds, push the memory switch (1 or 2) .
The indicator light for the pushed memory
switch will come on and stay on for approxi-
mately 5 seconds after pushing the switch.
After the indicator light goes off, the se-
lected positions are stored in the selected
memory (1 or 2) .
If a new memory is stored in the same memory
switch, the previous memory will be deleted.
Linking a keyfob to a stored memory
position
Each keyfob can be linked to a stored memory
position (memory switch 1 or 2) with the follow-
ing procedure. 1. Follow the steps for storing a memory posi- tion.
Page 163 of 407
2. While the indicator light for the memoryswitch being set is illuminated for 5 sec-
onds, press the
Page 176 of 407

NOTE:
If you change the horn beep or the lamp
flash feature with the keyfob, the display
screen will not show the current mode. Use
the keyfob to return to the previous mode
and re-enable the display screen control.
Keyless Remote Response — Lights:Select
to turn on or turn off the hazard indicator flash
mode used when the LOCK or UNLOCK button
on the keyfob is pressed. NOTE:
If you change the horn beep or the lamp
flash feature with the keyfob, the mode will
not be changed with the display. Use the
keyfob to return to the previous mode and
re-enable the display control.
Auto Re-Lock Time:
Select to set the length of
time before doors automatically re-lock.
Sensitivity of Automatic Headlights: Select
to change the sensitivity setting of the automatic
headlights:
● Lower: less sensitive, automatic headlights
will take longer to come on when the head-
light sensor senses less ambient light.
● Higher: more sensitive, automatic headlights
will come on quicker when the headlight
sensor senses less ambient light.
Automatic Headlights Off Delay: Select to
change the setting for the length of time the
automatic headlights remain on after exiting the
vehicle.
Speed Dependent Wiper: Select to turn on or
turn off the driving speed dependent intermittent
wiper function.
Return All Settings to Default: Select to
change all VEHICLE ELECTRONICS SYSTEMS
to their default settings.System settings
Select the “System Settings” key by using the
joystick and pressing the ENTER button. The
SYSTEM SETTINGS screen will be displayed.
Language/unit
The LANGUAGE/UNIT screen will appear when
selecting the “Language/Unit” key and pressing
the ENTER button.
Language: English or French
Unit: US — mile, °F, MPG
Metric — km, °C, L/100 km
 will not show the current
mode and cannot be used to change the
mode. Use the keyfob to r")

To access the vanity mirror, pull the sun visor
down and flip open the mirror cover (if so
equipped) . Some vanity mirrors are illuminated
and turn on when the mirror c")

The inside mirror is designed so that it automati-
cally dims during night time conditions and ac-
cording to the intensity of the headlights of t")
