2011 NISSAN TIIDA oil level
[x] Cancel search: oil levelPage 91 of 3787
AT-74
< SERVICE INFORMATION >
TROUBLE DIAGNOSIS
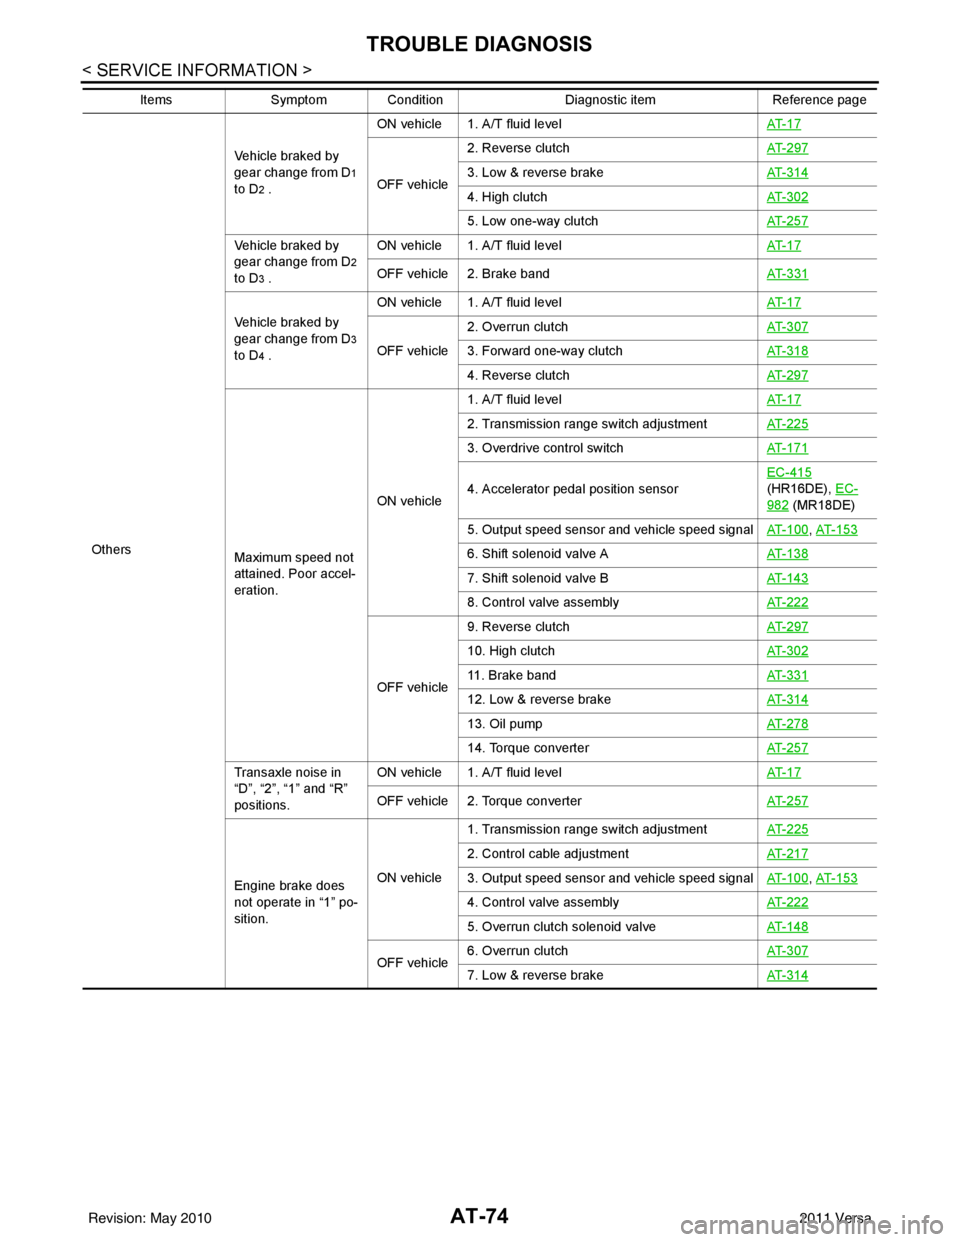
OthersVehicle braked by
gear change from D
1
to D
2 . ON vehicle 1. A/T fluid level
AT- 1 7OFF vehicle2. Reverse clutch
AT- 2 9 73. Low & reverse brakeAT- 3 1 4
4. High clutchAT- 3 0 2
5. Low one-way clutchAT- 2 5 7
Vehicle braked by
gear change from D
2
to D
3 . ON vehicle 1. A/T fluid level
AT- 1 7OFF vehicle 2. Brake bandAT- 3 3 1
Vehicle braked by
gear change from D
3
to D
4 . ON vehicle 1. A/T fluid level
AT- 1 7OFF vehicle2. Overrun clutch
AT- 3 0 73. Forward one-way clutchAT- 3 1 8
4. Reverse clutchAT- 2 9 7
Maximum speed not
attained. Poor accel-
eration.ON vehicle1. A/T fluid level
AT- 1 7
2. Transmission range switch adjustmentAT- 2 2 5
3. Overdrive control switchAT- 1 7 1
4. Accelerator pedal position sensorEC-415
(HR16DE), EC-
982 (MR18DE)
5. Output speed sensor and vehicle speed signal AT- 1 0 0
, AT- 1 5 3
6. Shift solenoid valve A AT- 1 3 8
7. Shift solenoid valve BAT- 1 4 3
8. Control valve assemblyAT- 2 2 2
OFF vehicle9. Reverse clutch
AT- 2 9 7
10. High clutchAT- 3 0 2
11. Brake bandAT- 3 3 1
12. Low & reverse brakeAT- 3 1 4
13. Oil pumpAT- 2 7 8
14. Torque converterAT- 2 5 7
Transaxle noise in
“D”, “2”, “1” and “R”
positions.ON vehicle 1. A/T fluid level
AT- 1 7
OFF vehicle 2. Torque converterAT- 2 5 7
Engine brake does
not operate in “1” po-
sition.ON vehicle1. Transmission range switch adjustment
AT- 2 2 5
2. Control cable adjustmentAT- 2 1 7
3. Output speed sensor and vehicle speed signalAT- 1 0 0, AT- 1 5 3
4. Control valve assembly AT- 2 2 2
5. Overrun clutch solenoid valveAT- 1 4 8
OFF vehicle6. Overrun clutch
AT- 3 0 77. Low & reverse brakeAT- 3 1 4
ItemsSymptom Condition Diagnostic itemReference page
Revision: May 2010 2011 Versa
Page 92 of 3787
TROUBLE DIAGNOSISAT-75
< SERVICE INFORMATION >
DE
F
G H
I
J
K L
M A
B
AT
N
O P
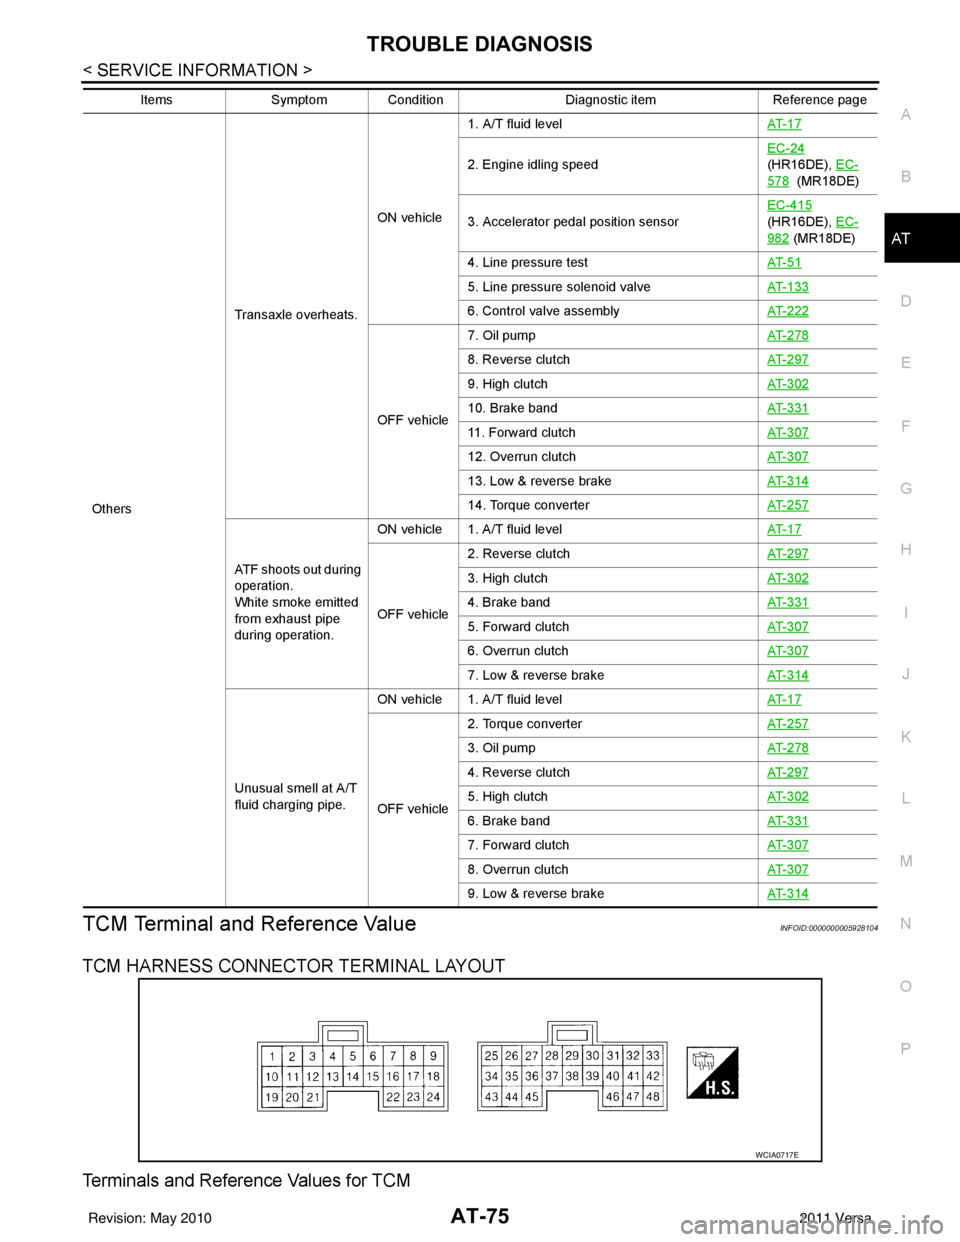
TCM Terminal and Reference ValueINFOID:0000000005928104
TCM HARNESS CONNECTOR TERMINAL LAYOUT
Terminals and Reference Values for TCM
Others Transaxle overheats.
ON vehicle
1. A/T fluid level
AT- 1 7
2. Engine idling speedEC-24
(HR16DE), EC-
578 (MR18DE)
3. Accelerator pedal position sensor EC-415
(HR16DE), EC-
982 (MR18DE)
4. Line pressure test AT- 5 1
5. Line pressure solenoid valveAT- 1 3 3
6. Control valve assemblyAT- 2 2 2
OFF vehicle7. Oil pump
AT- 2 7 8
8. Reverse clutchAT- 2 9 7
9. High clutchAT- 3 0 2
10. Brake bandAT- 3 3 1
11. Forward clutchAT- 3 0 7
12. Overrun clutchAT- 3 0 7
13. Low & reverse brakeAT- 3 1 4
14. Torque converterAT- 2 5 7
ATF shoots out during
operation.
White smoke emitted
from exhaust pipe
during operation.ON vehicle 1. A/T fluid level
AT- 1 7
OFF vehicle2. Reverse clutch
AT- 2 9 7
3. High clutchAT- 3 0 2
4. Brake bandAT- 3 3 1
5. Forward clutchAT- 3 0 7
6. Overrun clutchAT- 3 0 7
7. Low & reverse brakeAT- 3 1 4
Unusual smell at A/T
fluid charging pipe.ON vehicle 1. A/T fluid level
AT- 1 7
OFF vehicle2. Torque converter
AT- 2 5 7
3. Oil pumpAT- 2 7 8
4. Reverse clutchAT- 2 9 7
5. High clutchAT- 3 0 2
6. Brake bandAT- 3 3 1
7. Forward clutchAT- 3 0 7
8. Overrun clutchAT- 3 0 7
9. Low & reverse brakeAT- 3 1 4
ItemsSymptom Condition Diagnostic itemReference page
WCIA0717E
Revision: May 2010 2011 Versa
Page 200 of 3787
TROUBLE DIAGNOSIS FOR SYMPTOMSAT-183
< SERVICE INFORMATION >
DE
F
G H
I
J
K L
M A
B
AT
N
O P
NG >> 1. Check transmission range switch (Refer to test group 1.) again after adjusting transmission
range switch (Refer to AT-225
).
- If OK, INSPECTION END
- If NG, repair or replace transmission range switch. Refer to AT-225, "
Transmission Range
Switch" .
3.CHECK STARTING SYSTEM
Check starting system. Refer to SC-9
.
OK or NG
OK >> INSPECTION END
NG >> Repair or replace damaged parts.
In "P" Position, Vehicle Moves Forward or Backward When PushedINFOID:0000000005928249
SYMPTOM:
Vehicle moves when it is pushed forward or backward with selector lever in “P” position.
DIAGNOSTIC PROCEDURE
1.CHECK A/T POSITION
Check A/T position. Refer to AT-217, "
Checking of A/T Position" .
OK or NG
OK >> GO TO 2.
NG >> Adjust A/T position. Refer to AT-217, "
Adjustment of A/T Position" .
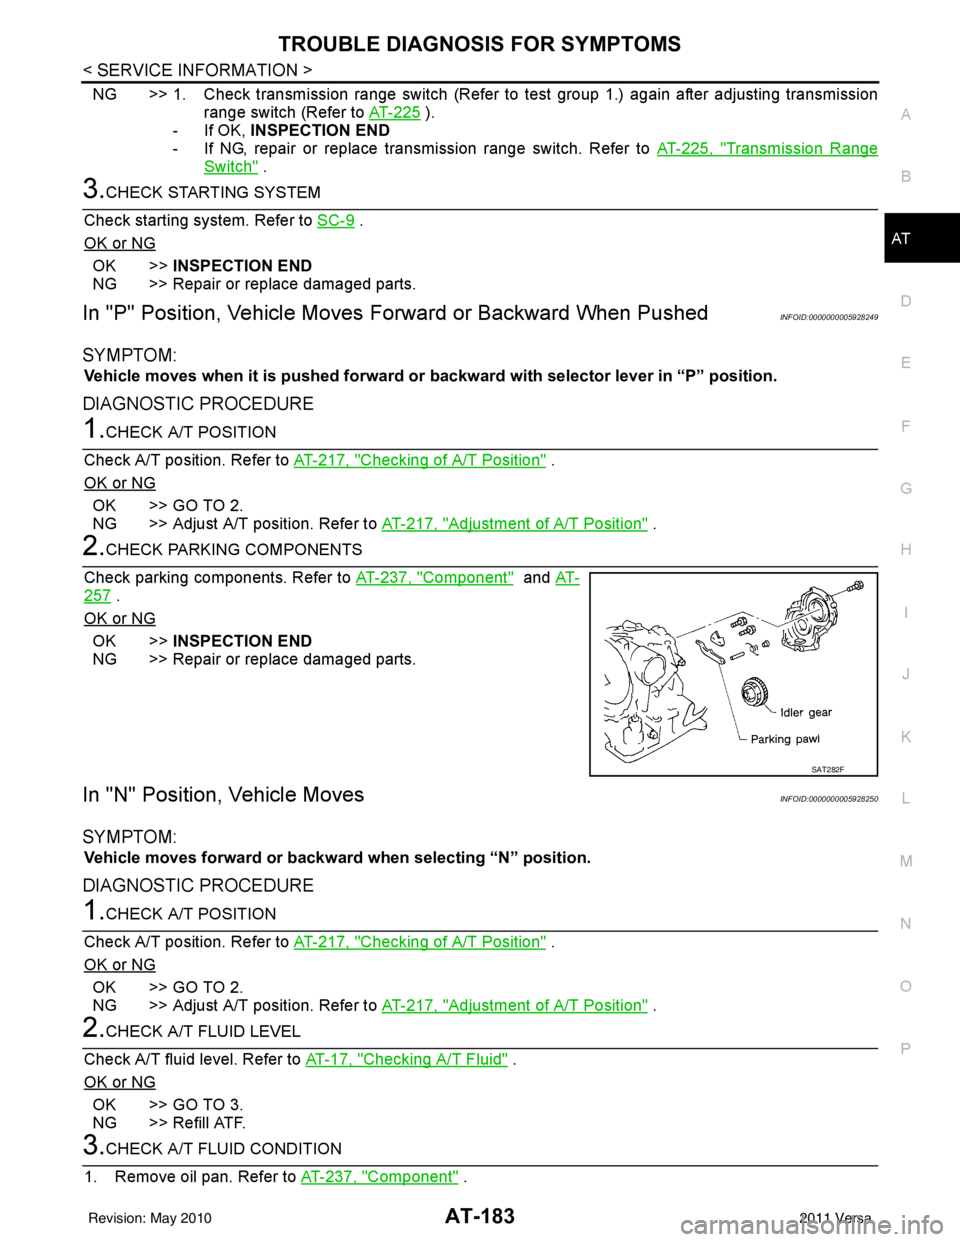
2.CHECK PARKING COMPONENTS
Check parking components. Refer to AT-237, "
Component" and AT-
257 .
OK or NG
OK >> INSPECTION END
NG >> Repair or replace damaged parts.
In "N" Position, Vehicle MovesINFOID:0000000005928250
SYMPTOM:
Vehicle moves forward or backwar d when selecting “N” position.
DIAGNOSTIC PROCEDURE
1.CHECK A/T POSITION
Check A/T position. Refer to AT-217, "
Checking of A/T Position" .
OK or NG
OK >> GO TO 2.
NG >> Adjust A/T position. Refer to AT-217, "
Adjustment of A/T Position" .
2.CHECK A/T FLUID LEVEL
Check A/T fluid level. Refer to AT-17, "
Checking A/T Fluid" .
OK or NG
OK >> GO TO 3.
NG >> Refill ATF.
3.CHECK A/T FLUID CONDITION
1. Remove oil pan. Refer to AT-237, "
Component" .
SAT282F
Revision: May 2010 2011 Versa
Page 202 of 3787
TROUBLE DIAGNOSIS FOR SYMPTOMSAT-185
< SERVICE INFORMATION >
DE
F
G H
I
J
K L
M A
B
AT
N
O P
OK >> GO TO 4.
NG >> Repair or replace damaged parts.
4.CHECK SYMPTOM
Check again. Refer to AT-56, "
Check at Idle" .
OK or NG
OK >> INSPECTION END
NG >> GO TO 5.
5.CHECK TCM
1. Check TCM input/output signals. Refer to AT-75, "
TCM Terminal and Reference Value" .
2. If NG, recheck TCM pin terminals for dam age or loose connection with harness connector.
OK or NG
OK >> INSPECTION END
NG >> Repair or replace damaged parts.
Vehicle Does Not Creep Backward in "R" PositionINFOID:0000000005928252
SYMPTOM:
Vehicle does not creep backwar d when selecting “R” position.
DIAGNOSTIC PROCEDURE
1.CHECK A/T FLUID LEVEL
Check A/T fluid level. Refer to AT-17, "
Checking A/T Fluid" .
OK or NG
OK >> GO TO 2.
NG >> Refill ATF.
2.CHECK LINE PRESSURE
Check line pressure at idle with selector lever in “R” position. Refer to AT-51, "
Inspections Before Trouble
Diagnosis" .
OK or NG
OK >> GO TO 4.
NG >> GO TO 3.
3.DETECT MALFUNCTIONING ITEM
1. Remove control valve assembly. Refer to AT-222, "
Control Valve Assembly and Accumulators" .
2. Check the following items:
- Valves to control line pressure (Pressure regulator valv e, pressure modifier valve, pilot valve and pilot fil-
ter)
- Line pressure solenoid valve
3. Disassemble A/T. Refer to AT-257, "
Disassembly" .
4. Check the following item:
- Oil pump assembly. Refer to AT-278, "
Oil Pump" .
OK or NG
OK >> GO TO 4.
NG >> Repair or replace damaged parts.
4.CHECK STALL REVOLUTION
Check stall revolution with selector lever in “1” and “R” positions. Refer to AT-51, "
Inspections Before Trouble
Diagnosis" .
OK or NG
OK >> GO TO 6.
OK in “1” position, NG in “R” position>>GO TO 5.
NG in both “1” and “R” positions>>GO TO 7.
5.DETECT MALFUNCTIONING ITEM
Revision: May 2010 2011 Versa
Page 203 of 3787
AT-186
< SERVICE INFORMATION >
TROUBLE DIAGNOSIS FOR SYMPTOMS
1. Disassemble A/T. Refer to AT-257, "Disassembly" .
2. Check the following items:
- Low & reverse brake assembly. Refer to AT-314, "
Low & Reverse Brake" .
- Reverse clutch assembly. Refer to AT-297, "
Reverse Clutch" .
OK or NG
OK >> GO TO 6.
NG >> Repair or replace damaged parts.
6.CHECK A/T FLUID CONDITION
1. Remove oil pan. Refer to AT-237, "
Component" .
2. Check A/T fluid condition. Refer to AT-51, "
Inspections Before Trouble Diagnosis" .
OK or NG
OK >> GO TO 8.
NG >> GO TO 7.
7.DETECT MALFUNCTIONING ITEM
1. Disassemble A/T. Refer to AT-257, "
Disassembly" .
2. Check the following items:
- Reverse clutch assembly. Refer to AT-297, "
Reverse Clutch" .
- High clutch assembly. Refer to AT-302, "
High Clutch" .
- Low & reverse brake assembly. Refer to AT-314, "
Low & Reverse Brake" .
- Forward clutch assembly. Refer to AT-307, "
Forward and Overrun Clutches" .
- Overrun clutch assembly. Refer to AT-307, "
Forward and Overrun Clutches" .
OK or NG
OK >> GO TO 8.
NG >> Repair or replace damaged parts.
8.CHECK SYMPTOM
Check again. Refer to AT-56, "
Check at Idle" .
OK or NG
OK >> INSPECTION END
NG >> GO TO 9.
9.CHECK TCM
1. Check TCM input/output signals. Refer to AT-75, "
TCM Terminal and Reference Value" .
2. If NG, recheck TCM pin terminals for damage or loose connection with harness connector.
OK or NG
OK >> INSPECTION END
NG >> Repair or replace damaged parts.
Vehicle Does Not Creep Forward in "D", "2" or "1" PositionINFOID:0000000005928253
SYMPTOM:
Vehicle does not creep forward when selecting “D”, “2” or “1” position.
DIAGNOSTIC PROCEDURE
1.CHECK A/T FLUID LEVEL
Check A/T fluid level. Refer to AT-17, "
Checking A/T Fluid" .
OK or NG
OK >> GO TO 2.
NG >> Refill ATF.
2.CHECK LINE PRESSURE
Check line pressure at idle with selector lever in “D” position. Refer to AT-51, "
Inspections Before Trouble
Diagnosis" .
OK or NG
OK >> GO TO 4.
Revision: May 2010 2011 Versa
Page 242 of 3787
ON-VEHICLE SERVICEAT-225
< SERVICE INFORMATION >
DE
F
G H
I
J
K L
M A
B
AT
N
O P
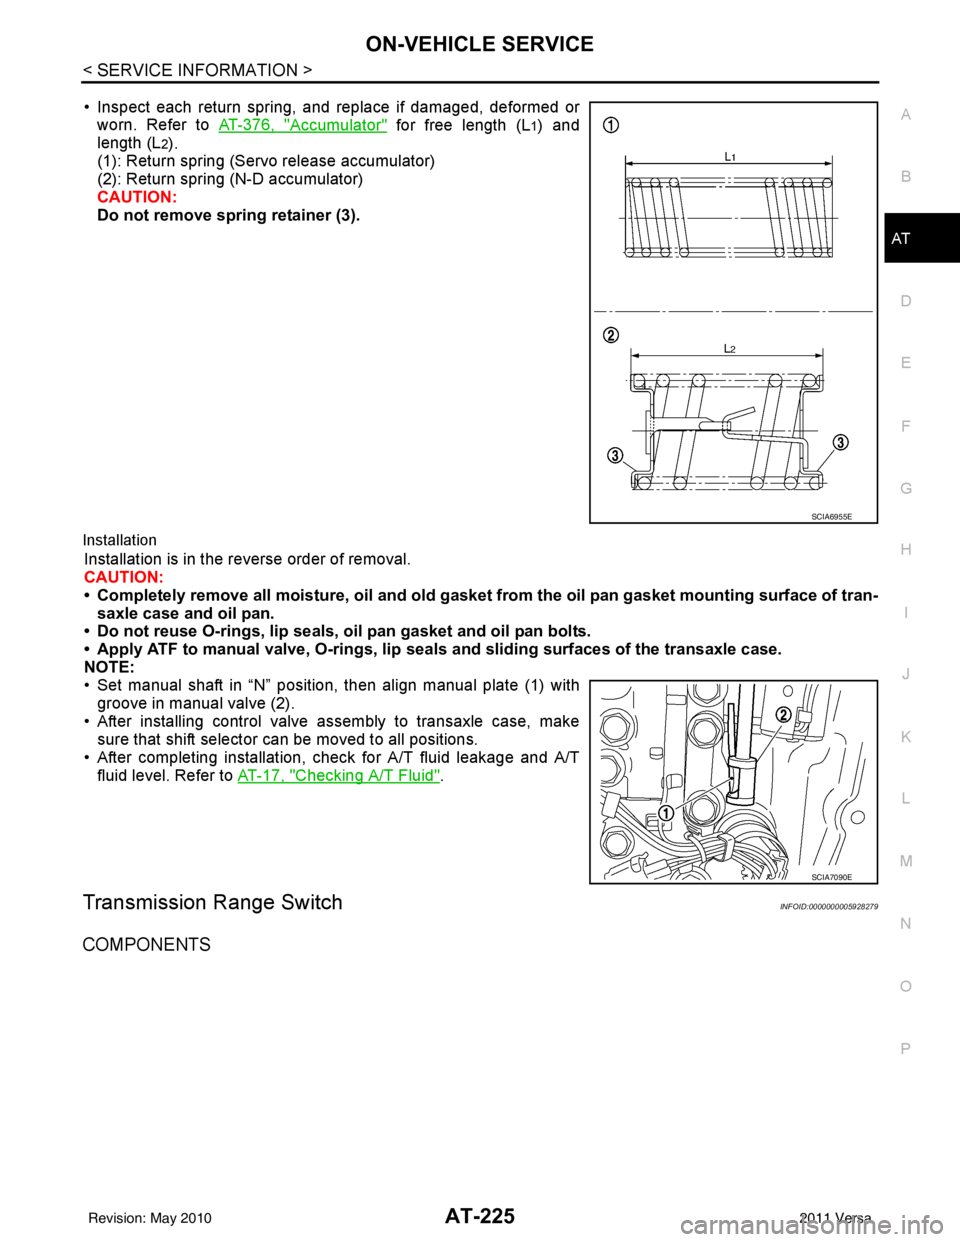
• Inspect each return spring, and replace if damaged, deformed or worn. Refer to AT-376, "
Accumulator" for free length (L1) and
length (L
2).
(1): Return spring (Servo release accumulator)
(2): Return spring (N-D accumulator)
CAUTION:
Do not remove spring retainer (3).
Installation
Installation is in the reverse order of removal.
CAUTION:
• Completely remove all moisture, oil and old gasket from the oil pan gasket mounting surface of tran-
saxle case and oil pan.
• Do not reuse O-rings, lip seals, oil pan gasket and oil pan bolts.
• Apply ATF to manual valve, O-rings, lip seals and sliding surfaces of the transaxle case.
NOTE:
• Set manual shaft in “N” position, then align manual plate (1) with groove in manual valve (2).
• After installing control valve assembly to transaxle case, make sure that shift selector can be moved to all positions.
• After completing installation, check for A/T fluid leakage and A/T fluid level. Refer to AT-17, "
Checking A/T Fluid".
Transmission Range SwitchINFOID:0000000005928279
COMPONENTS
SCIA6955E
SCIA7090E
Revision: May 2010 2011 Versa
Page 248 of 3787

ON-VEHICLE SERVICEAT-231
< SERVICE INFORMATION >
DE
F
G H
I
J
K L
M A
B
AT
N
O P
• After installing differential side oil seal, check A/T fluid leakage and A/T fluid level. Refer to AT-17, "Checking
A/T Fluid".
Revision: May 2010 2011 Versa
Page 418 of 3787
![NISSAN TIIDA 2011 Service Repair Manual AUDIOAV-21
< SERVICE INFORMATION > [AUDIO WITHOUT NAVIGATION]
C
D
E
F
G H
I
J
L
M A
B
AV
N
O P
NOTE:
Noise resulting from variations in field strength, such as fading noise and multi-path noise, or e NISSAN TIIDA 2011 Service Repair Manual AUDIOAV-21
< SERVICE INFORMATION > [AUDIO WITHOUT NAVIGATION]
C
D
E
F
G H
I
J
L
M A
B
AV
N
O P
NOTE:
Noise resulting from variations in field strength, such as fading noise and multi-path noise, or e](/manual-img/5/57396/w960_57396-417.png)
AUDIOAV-21
< SERVICE INFORMATION > [AUDIO WITHOUT NAVIGATION]
C
D
E
F
G H
I
J
L
M A
B
AV
N
O P
NOTE:
Noise resulting from variations in field strength, such as fading noise and multi-path noise, or external noise
from trains and other sources. It is not a malfunction.
• Fading noise: This noise occurs because of variations in the field strength in a narrow range due to moun-
tains or buildings blocking the signal.
• Multi-path noise: This noise results from the waves sent directly from the broadcast station arriving at the antenna at a different time from the waves t hat reflect off of mountains or buildings.
Noise InspectionINFOID:0000000005931285
The vehicle itself can be a source of noise if noise prevention parts or electrical equipment is malfunctioning.
Check if noise is caused and/or changed by engine speed, ignition switch turned to each position, and opera-
tion of each piece of electrical equipment, and determine the cause.
NOTE:
The source of the noise can be found easily by listening to the noise while removing the fuses of electrical
components, one by one.
TYPE OF NOISE AND POSSIBLE CAUSE
No sound can be heard from one or several speakers. • Open or short in audio signal circuit between audio unit and front
speaker. Refer to AV- 2 4 , "
Sound Is Not Heard from Front Door
Speaker (Base System)" or AV- 2 6 , "Sound Is Not Heard from
Front Door Speaker or Tweeter (Premium System)" .
• Front speaker. Refer to AV- 2 4 , "
Sound Is Not Heard from Front
Door Speaker (Base System)" or AV- 2 6 , "Sound Is Not Heard
from Front Door Speaker or Tweeter (Premium System)" .
• Open or short in audio signal circuit between audio unit and rear
speaker. Refer to AV- 2 5 , "
Sound Is Not Heard from Rear Door
Speaker (Base System)" or AV- 2 7 , "Sound Is Not Heard from
Rear Door Speaker (Premium System)" .
• Rear speaker. Refer to AV- 2 5 , "
Sound Is Not Heard from Rear
Door Speaker (Base System)" or AV- 2 7 , "Sound Is Not Heard
from Rear Door Speaker (Premium System)" .
• Tweeter (mid level and premium system) AV- 2 6 , "
Sound Is Not
Heard from Front Door Speaker or Tweeter (Premium System)"
or AV- 2 7 , "
Sound Is Not Heard from Rear Door Speaker (Premi-
um System)" .
• Audio unit. Refer to AV- 2 9 , "
Removal and Installation" .
No sound can be heard from radio or noise is heard. • Antenna feeder. Refer to
AV- 3 3 , "
Location of Antenna" .
• Antenna. Refer to AV- 3 3 , "
Location of Antenna" .
• Audio unit. Refer to AV- 2 9 , "
Removal and Installation" .
Symptom
Check item
Occurrence condition Possible cause
Occurs only when engine is ON. A continuous growling noise occurs. The speed of
the noise varies with changes in the engine speed.
Ignition components
A whistling noise occurs while the engine speed is
high. A booming noise occurs while the engine is
running and the lighting switch is ON. Generator
Noise only occurs when various
electrical components are oper-
ating. A cracking or snapping sound occurs with the op-
eration of various switches.
Relay malfunction, radio malfunction
The noise occurs when various motors are operat-
ing. • Motor case ground
•Motor
The noise occurs constantly, not just under certain conditions. • Rear defogger coil malfunction
• Open circuit in printed heater
A cracking or snapping sound occurs while the vehicle is being driven, especially when
it is vibrating excessively. • Ground wire of body parts.
• Ground due to improper part installation
• Wiring connections or a short circuit
Revision: May 2010
2011 Versa