2011 NISSAN TIIDA BR-1
[x] Cancel search: BR-1Page 864 of 3787
BRAKE MASTER CYLINDERBR-17
< SERVICE INFORMATION >
C
DE
G H
I
J
K L
M A
B
BR
N
O P
DISASSEMBLY
CAUTION:
While working, cover primary piston rod wi th cloth to prevent it from being damaged.
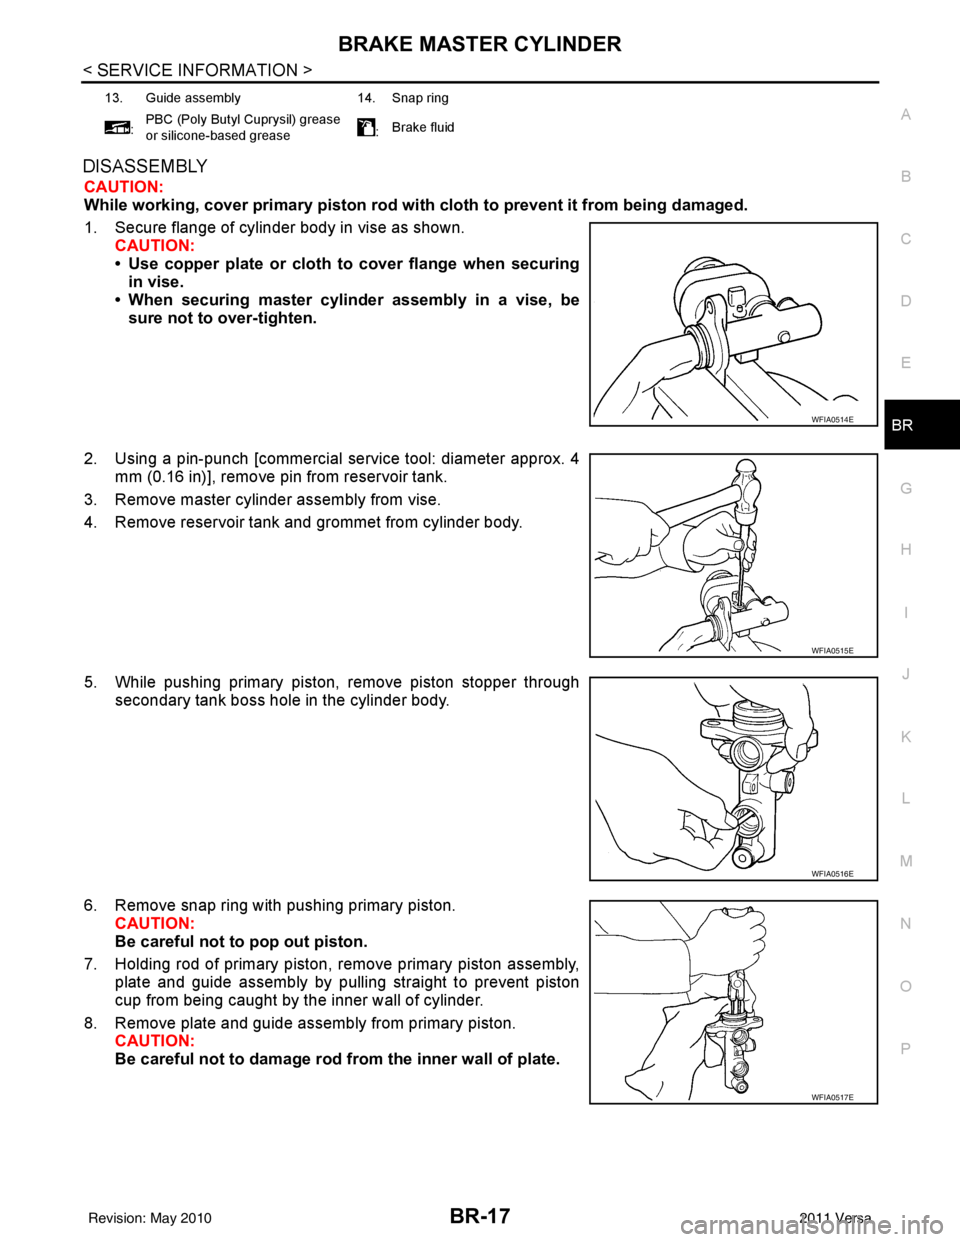
1. Secure flange of cylinder body in vise as shown. CAUTION:
• Use copper plate or cloth to cover flange when securingin vise.
• When securing master cylinder assembly in a vise, be
sure not to over-tighten.
2. Using a pin-punch [commercial service tool: diameter approx. 4 mm (0.16 in)], remove pin from reservoir tank.
3. Remove master cylinder assembly from vise.
4. Remove reservoir tank and grommet from cylinder body.
5. While pushing primary piston, remove piston stopper through secondary tank boss hole in the cylinder body.
6. Remove snap ring with pushing primary piston. CAUTION:
Be careful not to pop out piston.
7. Holding rod of primary piston, remove primary piston assembly, plate and guide assembly by pulling straight to prevent piston
cup from being caught by the inner wall of cylinder.
8. Remove plate and guide assembly from primary piston. CAUTION:
Be careful not to damage rod from the inner wall of plate.
13. Guide assembly 14. Snap ring
: PBC (Poly Butyl Cuprysil) grease
or silicone-based grease
:Brake fluid
WFIA0514E
WFIA0515E
WFIA0516E
BRA0561DWFIA0517E
Revision: May 2010
2011 Versa
Page 865 of 3787
BR-18
< SERVICE INFORMATION >
BRAKE MASTER CYLINDER
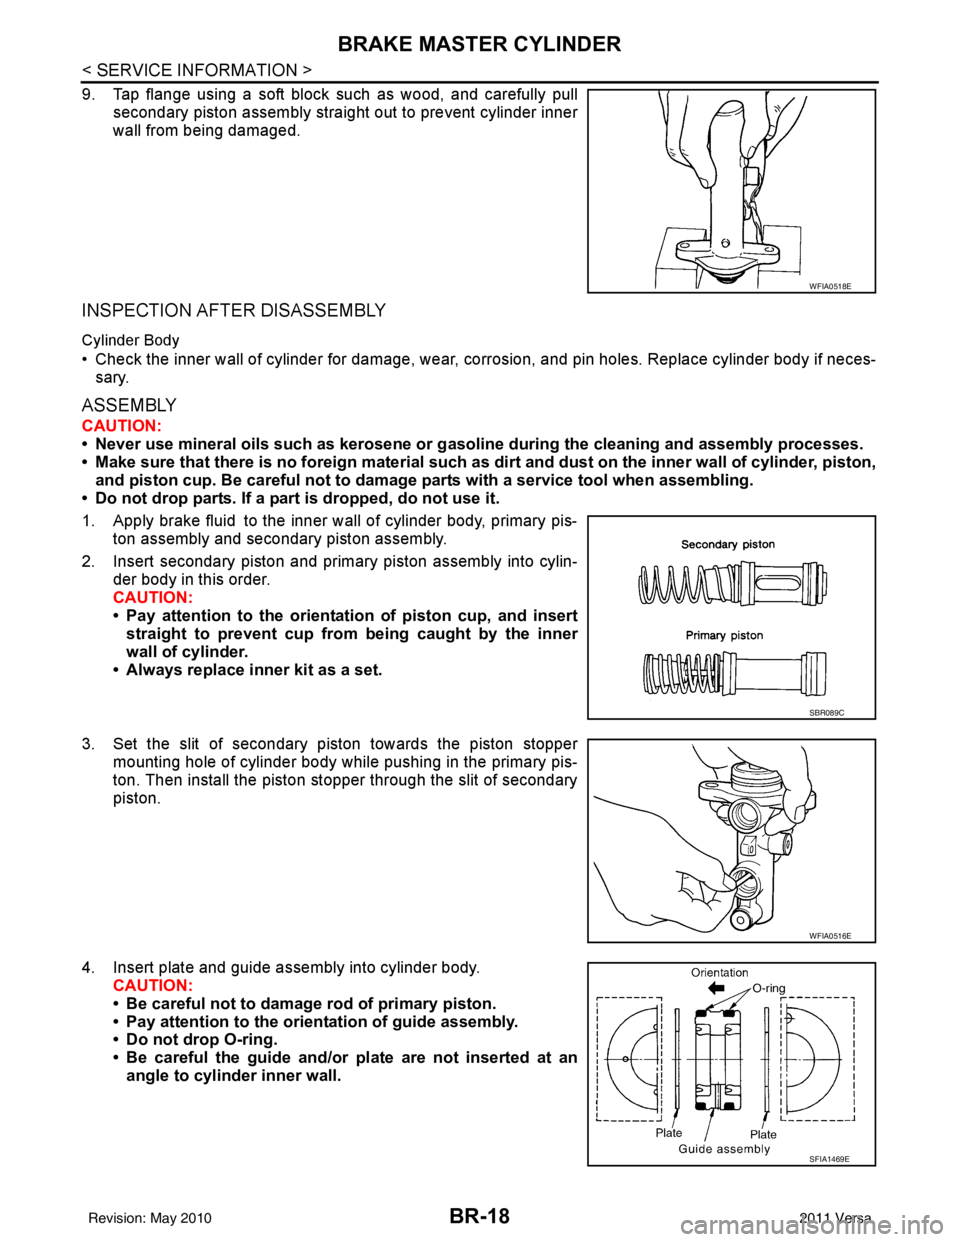
9. Tap flange using a soft block such as wood, and carefully pullsecondary piston assembly straight out to prevent cylinder inner
wall from being damaged.
INSPECTION AFTER DISASSEMBLY
Cylinder Body
• Check the inner wall of cylinder for damage, wear, corrosion, and pin holes. Replace cylinder body if neces-sary.
ASSEMBLY
CAUTION:
• Never use mineral oils such as kerosene or g asoline during the cleaning and assembly processes.
• Make sure that there is no foreign material such as dirt and dust on the inner wall of cylinder, piston,
and piston cup. Be careful not to damage parts with a service tool when assembling.
• Do not drop parts. If a part is dropped, do not use it.
1. Apply brake fluid to the inner wall of cylinder body, primary pis- ton assembly and secondary piston assembly.
2. Insert secondary piston and primary piston assembly into cylin- der body in this order.
CAUTION:
• Pay attention to the orientation of piston cup, and insert
straight to prevent cup from being caught by the inner
wall of cylinder.
• Always replace inner kit as a set.
3. Set the slit of secondary piston towards the piston stopper mounting hole of cylinder body while pushing in the primary pis-
ton. Then install the piston stopper through the slit of secondary
piston.
4. Insert plate and guide assembly into cylinder body. CAUTION:
• Be careful not to damage rod of primary piston.
• Pay attention to the orientation of guide assembly.
• Do not drop O-ring.
• Be careful the guide and/or plate are not inserted at an
angle to cylinder inner wall.
WFIA0518E
SBR089C
WFIA0516E
SFIA1469E
Revision: May 2010 2011 Versa
Page 866 of 3787
BRAKE MASTER CYLINDERBR-19
< SERVICE INFORMATION >
C
DE
G H
I
J
K L
M A
B
BR
N
O P
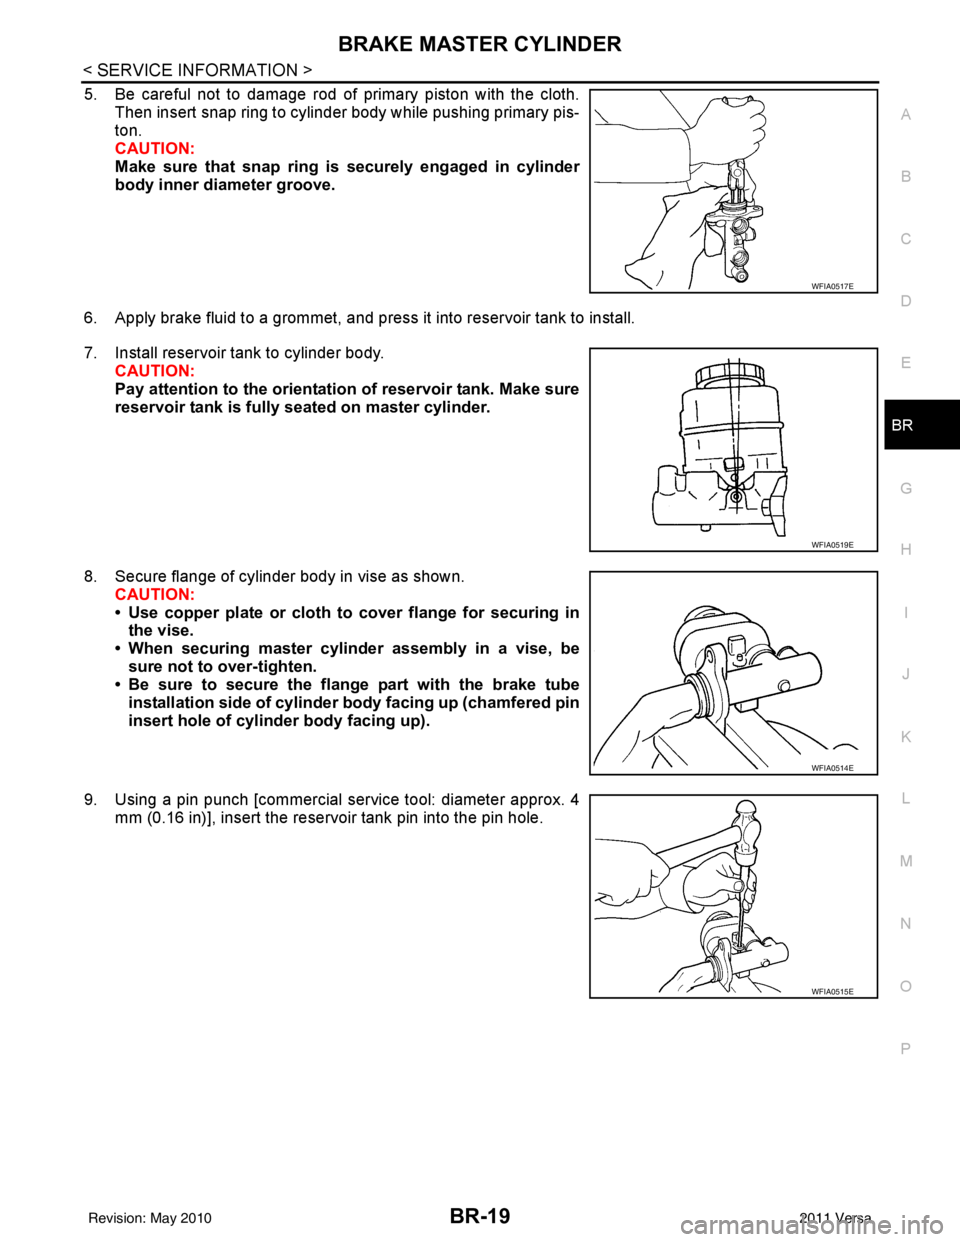
5. Be careful not to damage rod of primary piston with the cloth. Then insert snap ring to cylinder body while pushing primary pis-
ton.
CAUTION:
Make sure that snap ring is securely engaged in cylinder
body inner diameter groove.
6. Apply brake fluid to a grommet, and press it into reservoir tank to install.
7. Install reservoir tank to cylinder body. CAUTION:
Pay attention to the orientation of reservoir tank. Make sure
reservoir tank is fully seated on master cylinder.
8. Secure flange of cylinder body in vise as shown. CAUTION:
• Use copper plate or cloth to cover flange for securing in
the vise.
• When securing master cylinder assembly in a vise, be sure not to over-tighten.
• Be sure to secure the flange part with the brake tube
installation side of cylinder body facing up (chamfered pin
insert hole of cylinder body facing up).
9. Using a pin punch [commercial service tool: diameter approx. 4 mm (0.16 in)], insert the reservoir tank pin into the pin hole.
WFIA0517E
WFIA0519E
WFIA0514E
WFIA0515E
Revision: May 2010 2011 Versa
Page 868 of 3787
BRAKE BOOSTERBR-21
< SERVICE INFORMATION >
C
DE
G H
I
J
K L
M A
B
BR
N
O P
Removal and InstallationINFOID:0000000005928406
REMOVAL
CAUTION:
• Be careful not to splash brake fluid on painted areas such as body. It may cause paint damage. If brake fluid is splashed on painte d surfaces of body, wipe them with cloth immediately and then wash
it away with water.
• Be careful not to deform or bend brake tub es while removing and installing brake booster.
• Replace clevis pin if it is damaged.
• Be careful not to damage brake booster stud bolt thr eads. If brake booster is tilted or inclined during
installation, dash panel may damage the threads.
1. Remove vacuum hose from brake booster.
2. Remove master cylinder assembly. Refer to BR-15, "
Removal and Installation".
3. Remove the instrument lower finisher. Refer to IP-11, "
Component Parts".
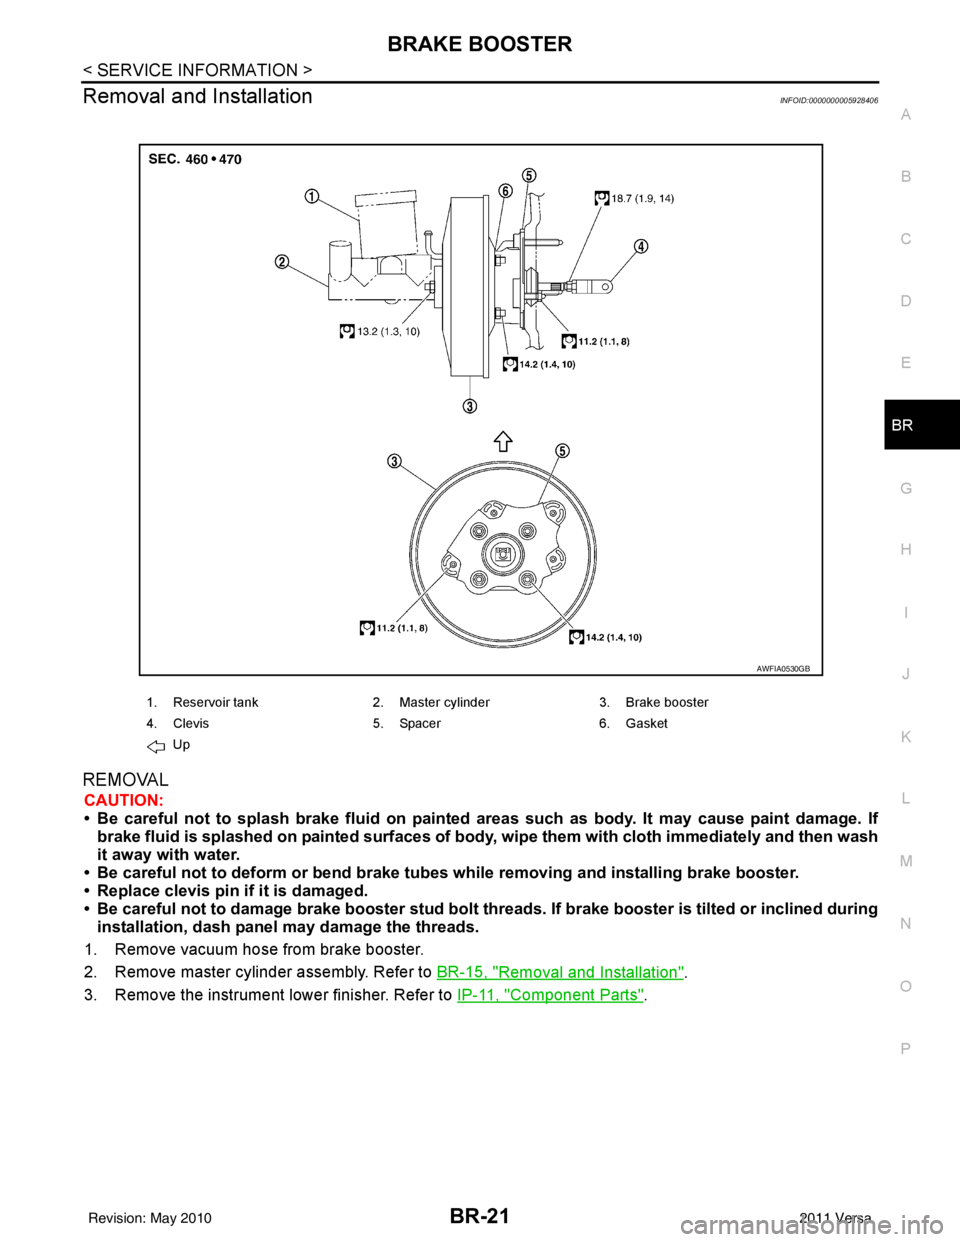
1. Reservoir tank2. Master cylinder 3. Brake booster
4. Clevis 5. Spacer 6. Gasket
Up
AWFIA0530GB
Revision: May 2010 2011 Versa
Page 869 of 3787
BR-22
< SERVICE INFORMATION >
BRAKE BOOSTER
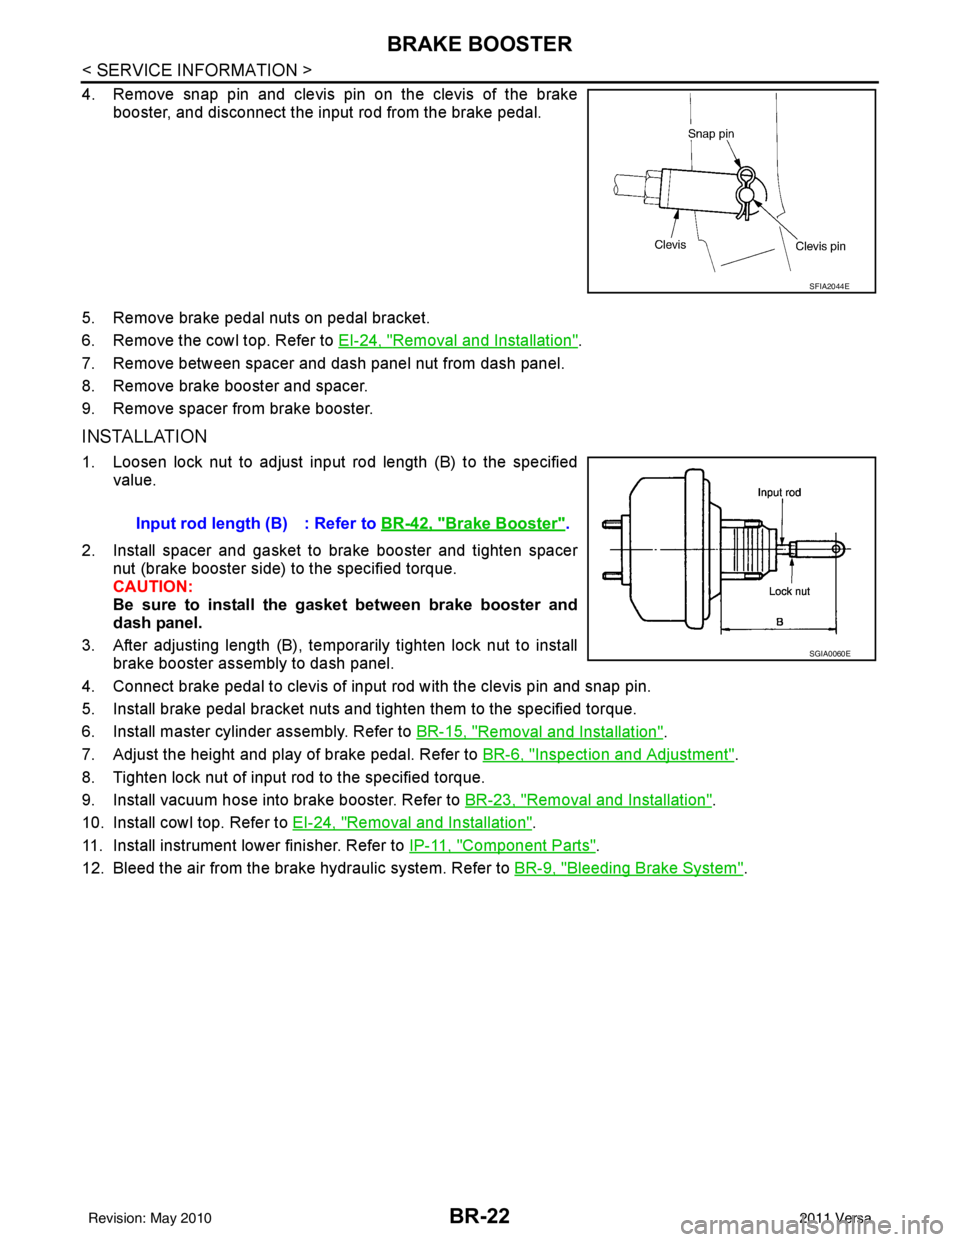
4. Remove snap pin and clevis pin on the clevis of the brakebooster, and disconnect the input rod from the brake pedal.
5. Remove brake pedal nuts on pedal bracket.
6. Remove the cowl top. Refer to EI-24, "
Removal and Installation".
7. Remove between spacer and dash panel nut from dash panel.
8. Remove brake booster and spacer.
9. Remove spacer from brake booster.
INSTALLATION
1. Loosen lock nut to adjust input rod length (B) to the specified value.
2. Install spacer and gasket to brake booster and tighten spacer nut (brake booster side) to the specified torque.
CAUTION:
Be sure to install the gasket between brake booster and
dash panel.
3. After adjusting length (B), temporarily tighten lock nut to install brake booster assembly to dash panel.
4. Connect brake pedal to clevis of input rod with the clevis pin and snap pin.
5. Install brake pedal bracket nuts and tighten them to the specified torque.
6. Install master cylinder assembly. Refer to BR-15, "
Removal and Installation".
7. Adjust the height and play of brake pedal. Refer to BR-6, "
Inspection and Adjustment".
8. Tighten lock nut of input rod to the specified torque.
9. Install vacuum hose into brake booster. Refer to BR-23, "
Removal and Installation".
10. Install cowl top. Refer to EI-24, "
Removal and Installation".
11. Install instrument lower finisher. Refer to IP-11, "
Component Parts".
12. Bleed the air from the brake hydraulic system. Refer to BR-9, "
Bleeding Brake System".
SFIA2044E
Input rod length (B) : Refer to BR-42, "Brake Booster".
SGIA0060E
Revision: May 2010 2011 Versa
Page 878 of 3787
FRONT DISC BRAKEBR-31
< SERVICE INFORMATION >
C
DE
G H
I
J
K L
M A
B
BR
N
O P
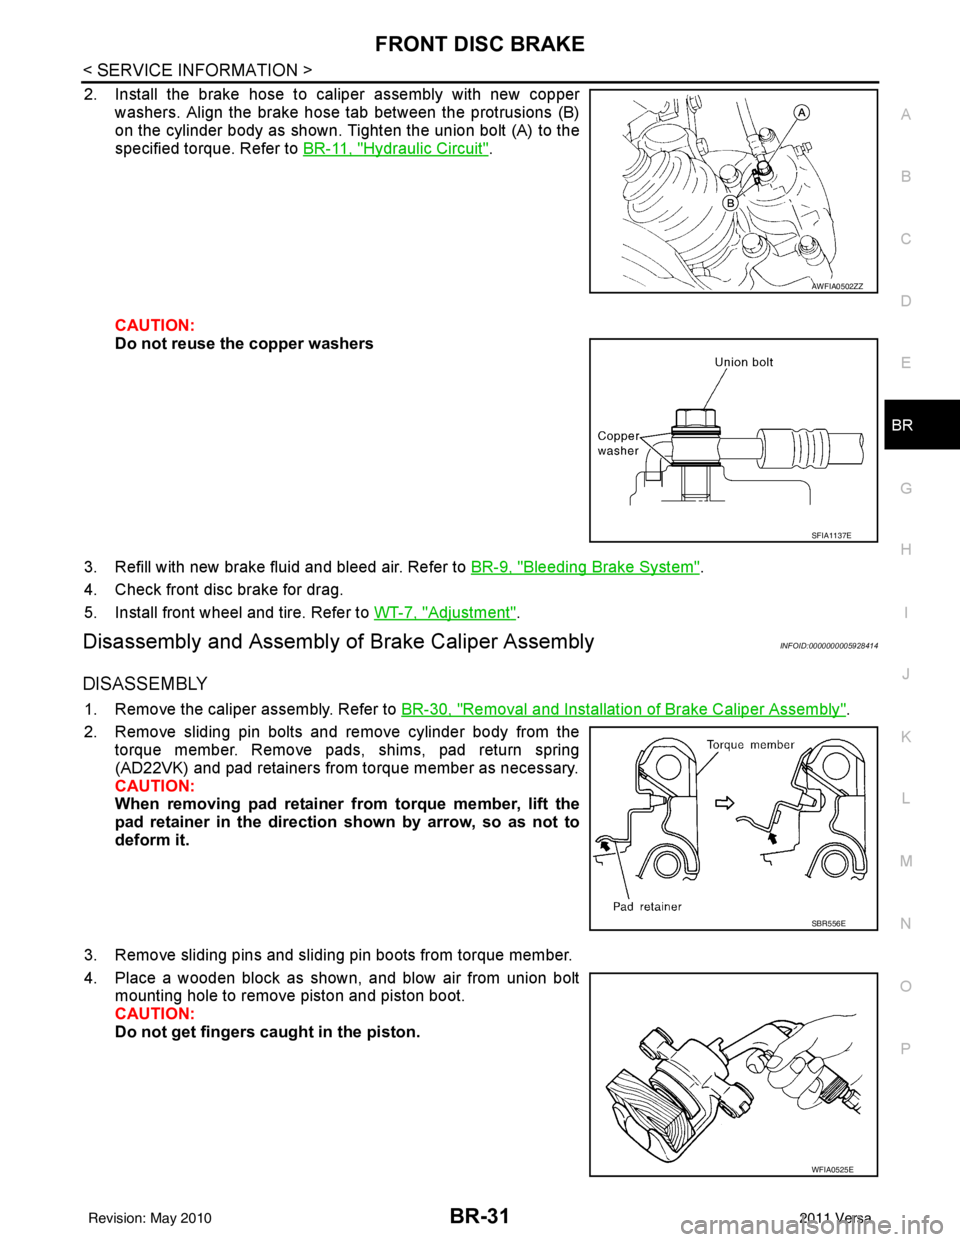
2. Install the brake hose to caliper assembly with new copper washers. Align the brake hose tab between the protrusions (B)
on the cylinder body as shown. Tighten the union bolt (A) to the
specified torque. Refer to BR-11, "
Hydraulic Circuit".
CAUTION:
Do not reuse the copper washers
3. Refill with new brake fluid and bleed air. Refer to BR-9, "
Bleeding Brake System".
4. Check front disc brake for drag.
5. Install front wheel and tire. Refer to WT-7, "
Adjustment".
Disassembly and Assembly of Brake Caliper AssemblyINFOID:0000000005928414
DISASSEMBLY
1. Remove the caliper assembly. Refer to BR-30, "Removal and Installation of Brake Caliper Assembly".
2. Remove sliding pin bolts and remove cylinder body from the torque member. Remove pads, shims, pad return spring
(AD22VK) and pad retainers from torque member as necessary.
CAUTION:
When removing pad retainer from torque member, lift the
pad retainer in the direction shown by arrow, so as not to
deform it.
3. Remove sliding pins and sliding pin boots from torque member.
4. Place a wooden block as shown, and blow air from union bolt mounting hole to remove piston and piston boot.
CAUTION:
Do not get fingers caught in the piston.
AWFIA0502ZZ
SFIA1137E
SBR556E
WFIA0525E
Revision: May 2010 2011 Versa
Page 925 of 3787
![NISSAN TIIDA 2011 Service Repair Manual BRC-36
< SERVICE INFORMATION >[ABS]
ACTUATOR AND ELECTRIC UNIT (ASSEMBLY)
ACTUATOR AND ELECTRIC UNIT (ASSEMBLY)
Removal and InstallationINFOID:0000000005928459
CAUTION:
• Before servicing, disconnec NISSAN TIIDA 2011 Service Repair Manual BRC-36
< SERVICE INFORMATION >[ABS]
ACTUATOR AND ELECTRIC UNIT (ASSEMBLY)
ACTUATOR AND ELECTRIC UNIT (ASSEMBLY)
Removal and InstallationINFOID:0000000005928459
CAUTION:
• Before servicing, disconnec](/manual-img/5/57396/w960_57396-924.png)
BRC-36
< SERVICE INFORMATION >[ABS]
ACTUATOR AND ELECTRIC UNIT (ASSEMBLY)
ACTUATOR AND ELECTRIC UNIT (ASSEMBLY)
Removal and InstallationINFOID:0000000005928459
CAUTION:
• Before servicing, disconnect battery negative terminal.
• To remove brake tube, use flare nut wrench to pr
event flare nuts and brake tube from being dam-
aged. To install, use flare nut torque wrench, tighten flare nut to the specified torque. Refer to BR-11,
"Hydraulic Circuit".
• Do not apply excessive impact to ABS actuator and electric unit (control unit), such as dropping it.
• Do not remove and install actuator by holding harness.
• After work is completed, bleed the ai r from the brake hydraulic system. Refer to BR-9, "
Bleeding
Brake System".
REMOVAL
1. Disconnect the battery negative terminal.
2. Remove the cowl top. Refer to EI-24, "
Removal and Installation".
3. Disconnect ABS actuator and electric unit (control unit) connector.
4. Loosen brake tube flare nuts, then remove brake tubes from ABS actuator and electric unit (control unit).
5. Remove brake booster hose from engine. Refer to BR-23, "
Removal and Installation".
6. Remove ABS actuator and electric unit (control unit) bracket bolts.
7. Remove ABS actuator and electric unit (control unit).
1. To front right caliper 2. To rear left wheel cylinder 3. To rear right wheel cylinder
4. To front left caliper 5. From master cylinder primary side 6. From master cylinder secondary side
7. ABS actuator and electric unit (control unit) 8. Harness connector
Front
AWFIA0532GB
Revision: May 2010 2011 Versa
Page 978 of 3787
![NISSAN TIIDA 2011 Service Repair Manual ACTUATOR AND ELECTRIC UNIT (ASSEMBLY)BRC-89
< SERVICE INFORMATION > [VDC/TCS/ABS]
C
D
E
G H
I
J
K L
M A
B
BRC
N
O P
ACTUATOR AND ELECTRIC UNIT (ASSEMBLY)
Removal and InstallationINFOID:000000000592850 NISSAN TIIDA 2011 Service Repair Manual ACTUATOR AND ELECTRIC UNIT (ASSEMBLY)BRC-89
< SERVICE INFORMATION > [VDC/TCS/ABS]
C
D
E
G H
I
J
K L
M A
B
BRC
N
O P
ACTUATOR AND ELECTRIC UNIT (ASSEMBLY)
Removal and InstallationINFOID:000000000592850](/manual-img/5/57396/w960_57396-977.png)
ACTUATOR AND ELECTRIC UNIT (ASSEMBLY)BRC-89
< SERVICE INFORMATION > [VDC/TCS/ABS]
C
D
E
G H
I
J
K L
M A
B
BRC
N
O P
ACTUATOR AND ELECTRIC UNIT (ASSEMBLY)
Removal and InstallationINFOID:0000000005928509
CAUTION:
• Before servicing, disconnect battery negative terminal.
• To remove brake tube, use flare nut wrench to pr event flare nuts and brake tube from being dam-
aged. To install, use flare nut torque wrench, ti ghten flare nut to the specified torque. Refer to BR-11,
"Hydraulic Circuit".
• Do not apply excessive impact to ABS actuator and elect ric unit (control unit), such as dropping it.
• Do not remove and install actuator by holding harness.
• After work is completed, bleed the air from the brake hydraulic system. Refer to BR-9, "
Bleeding
Brake System".
REMOVAL
1. Disconnect the battery negative terminal.
2. Remove the cowl top. Refer to EI-24, "
Removal and Installation".
3. Disconnect ABS actuator and electric unit (control unit) connector.
4. Loosen brake tube flare nuts, then remove brake tubes from ABS actuator and electric unit (control unit).
5. Remove brake booster hose from engine. Refer to BR-23, "
Removal and Installation".
6. Remove ABS actuator and electric unit (control unit) bracket bolts.
7. Remove ABS actuator and electric unit (control unit).
1. To front right caliper 2. To rear left wheel cylinder 3. To rear right wheel cylinder
4. To front left caliper 5. From master cylinder primary side 6. From master cylinder secondary side
7. ABS actuator and electric unit (control unit) 8. Harness connector
Front
AWFIA0532GB
Revision: May 2010 2011 Versa