2011 NISSAN NOTE lock
[x] Cancel search: lockPage 80 of 235
there is a 10 second time slot to start the engine
after the ignition is turned off. See your NISSAN
dealer for NATS service as soon as possible.
A.LHD models
B.RHD models
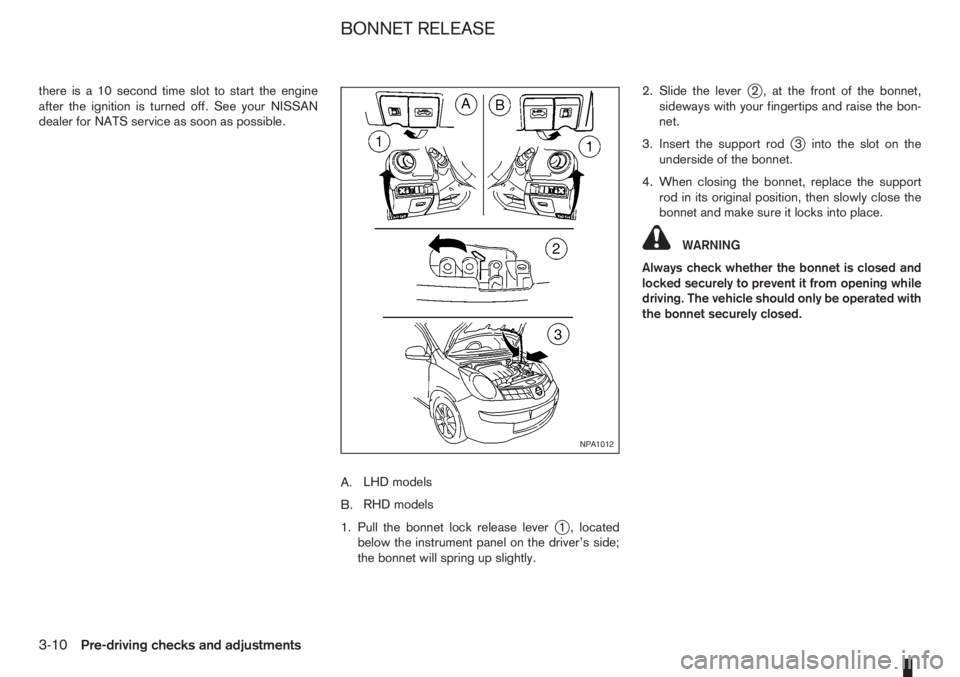
1. Pull the bonnet lock release lever
j1 , located
below the instrument panel on the driver’s side;
the bonnet will spring up slightly.2. Slide the lever
j2 , at the front of the bonnet,
sideways with your fingertips and raise the bon-
net.
3. Insert the support rod
j3 into the slot on the
underside of the bonnet.
4. When closing the bonnet, replace the support
rod in its original position, then slowly close the
bonnet and make sure it locks into place.
WARNING
Always check whether the bonnet is closed and
locked securely to prevent it from opening while
driving. The vehicle should only be operated with
the bonnet securely closed.
NPA1012
BONNET RELEASE
3-10Pre-driving checks and adjustments
Page 81 of 235
FUEL FILLER LID OPENER LEVER
A.LHD models
B.RHD models
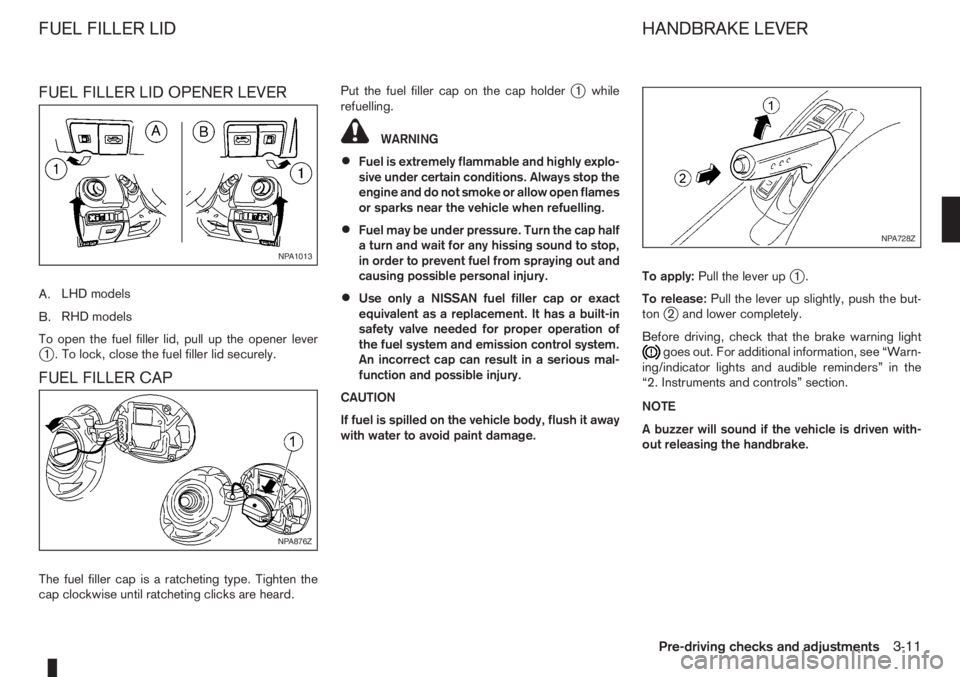
To open the fuel filler lid, pull up the opener lever
j1 . To lock, close the fuel filler lid securely.
FUEL FILLER CAP
The fuel filler cap is a ratcheting type. Tighten the
cap clockwise until ratcheting clicks are heard.Put the fuel filler cap on the cap holder
j1 while
refuelling.
WARNING
•Fuel is extremely flammable and highly explo-
sive under certain conditions. Always stop the
engine and do not smoke or allow open flames
or sparks near the vehicle when refuelling.
•Fuel may be under pressure. Turn the cap half
a turn and wait for any hissing sound to stop,
in order to prevent fuel from spraying out and
causing possible personal injury.
•Use only a NISSAN fuel filler cap or exact
equivalent as a replacement. It has a built-in
safety valve needed for proper operation of
the fuel system and emission control system.
An incorrect cap can result in a serious mal-
function and possible injury.
CAUTION
If fuel is spilled on the vehicle body, flush it away
with water to avoid paint damage.To apply:Pull the lever up
j1.
To release:Pull the lever up slightly, push the but-
ton
j2 and lower completely.
Before driving, check that the brake warning light
goes out. For additional information, see “Warn-
ing/indicator lights and audible reminders” in the
“2. Instruments and controls” section.
NOTE
A buzzer will sound if the vehicle is driven with-
out releasing the handbrake.
NPA1013
NPA876Z
NPA728Z
FUEL FILLER LID HANDBRAKE LEVER
Pre-driving checks and adjustments3-11
Page 82 of 235
WARNING
Do not adjust the steering wheel while driving.
You could lose control of your vehicle and cause
an accident.
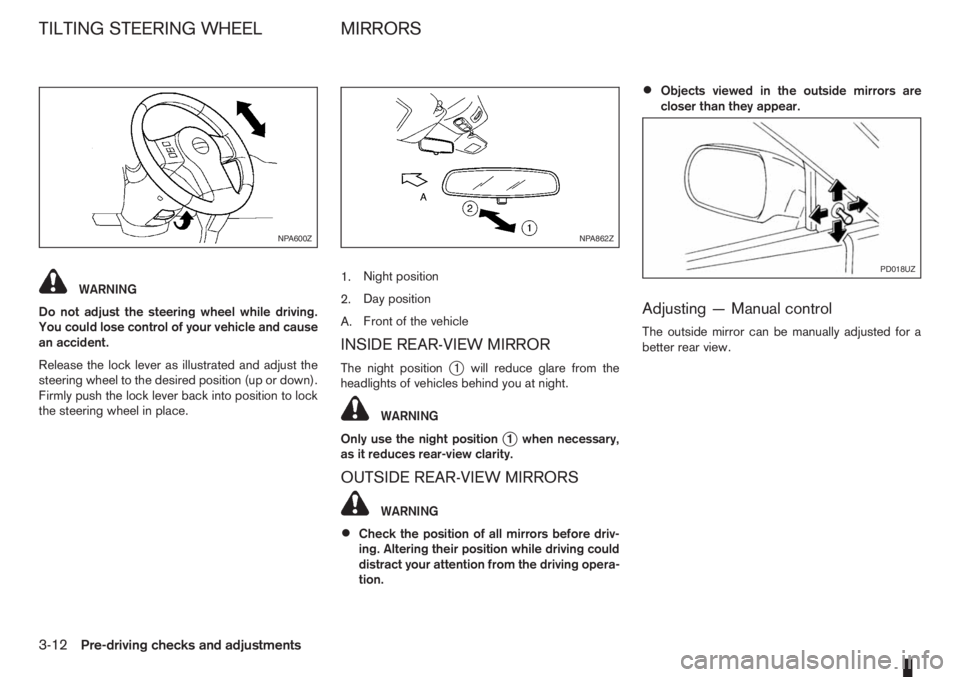
Release the lock lever as illustrated and adjust the
steering wheel to the desired position (up or down).
Firmly push the lock lever back into position to lock
the steering wheel in place.1.Night position
2.Day position
A.Front of the vehicle
INSIDE REAR-VIEW MIRROR
The night positionj1 will reduce glare from the
headlights of vehicles behind you at night.
WARNING
Only use the night position
j1 when necessary,
as it reduces rear-view clarity.
OUTSIDE REAR-VIEW MIRRORS
WARNING
•Check the position of all mirrors before driv-
ing. Altering their position while driving could
distract your attention from the driving opera-
tion.
•Objects viewed in the outside mirrors are
closer than they appear.
Adjusting — Manual control
The outside mirror can be manually adjusted for a
better rear view.
NPA600ZNPA862Z
PD018UZ
TILTING STEERING WHEEL MIRRORS
3-12Pre-driving checks and adjustments
Page 87 of 235

MANUAL AIR CONDITIONER
1.Air flow control dial
2.Air intake lever
3.Temperature control dial
4.Air conditioner ON/OFF button (where fitted)
5.Fan speed control dial
Controls
Fan speed control dialm:
To switch the fan on or off and to control the fan
speed, turn the fan speed control dial clockwise to
increase the fan speed. To decrease the fan speed,
turn the fan speed control dial anticlockwise.
Temperature control dial:
Turn the temperature control dial to set the desired
air temperature from the vents and floor outlets.Air flow control dial:
Use this dial to manually select the air flow from the
air outlets as described below.
: Air flows from centre and side vents.
: Air flows from centre, side vents and floor
outlets.
: Air flows mainly from floor outlets.
: Air flows from the defogger outlets and floor
outlets.
: Air flows mainly from defogger outlets.
Air recirculation mode
m:
Move the air intake lever to the
position. To
recirculate interior air in the passenger compartment
in situations such as: driving on a dust raised road,
avoiding traffic fumes or having maximum cooling
from the air conditioner.Outside air mode
m:
Move the air intake lever to the
position to
draw outside air into the passenger compartment
for normal heating, ventilation or air conditioner op-
eration.
Heater operation
The heating function operates only after engine
warm-up.
Heating:
This mode is used to direct hot air from the floor out-
lets.
1. Move the air intake lever to the
position for
normal heating.
2. Turn the air flow control dial to the
position.
3. Turn the fan speed control dial to the desired fan
speed.
4. Turn the temperature control dial to the desired
position between the middle and the maximum
“HOT” (right) position.
For quick heating, select the air recirculation mode
position (
). Be sure to return to the outside air
mode position () for normal heating to avoid
window fog and stale interior air.
Ventilation:
This mode directs outside air from the side and
centre vents.
1. Move the air intake lever to the
position.
NAA1032Z
Manual air conditioner
Heater and air conditioner, and audio system4-3
Page 100 of 235

ANTENNA
Removing the antenna
To remove the antenna, hold the lower part of the
antenna and turn it anticlockwise.
CAUTION
Make sure to remove the antenna before the ve-
hicle enters a garage with a low ceiling or an
automatic car wash otherwise the antenna can
be damaged.1.Power ON/OFF button
2.Traffic announcement (TA) button
3.CD slot
4.Eject button
5.Audio set-up mode (MOD) button
6.Radio mode: Manual (up/down) tuning Audio
selection mode
7.Radio mode: Seek up/down
CD mode: Track up/down or Fast forward/
Fast reverse
8.NEWS button
9.Preset station button
10.Radio mode: Preset station button
CD mode: Mix mode button
11.Display
12.Radio mode: Preset station button
CD mode: Repeat (RPT) mode button13.Preset station buttons
14.LW, MW or FM Band selection/FM Travel
store button
15.Source (SRC) select button
16.Volume control button
This unit is an electronic LW-MW-FM radio with CD
player, an anti-theft system and traffic announce-
ment function.
ANTI-THEFT SYSTEM
By using a 4-digit radio code known only to the
vehicle owner, the possibility of the audio unit being
stolen is effectively reduced because without the
code, the audio unit cannot be activated. When used
normally, the audio unit is unlocked and accessible
in the usual way.
If force is used to try and remove the audio unit, the
Anti-Theft system activates and the audio unit locks.
NAA1031Z
NAA1021Z
LW-MW-FM RADIO WITH CD PLAYER (where fitted)
4-16Heater and air conditioner, and audio system
Page 101 of 235
The only way to unlock the audio unit is by entering
the radio code number. This code number is shown
on an identification card.
NOTE
•The 4 digit radio code is listed on a card that
you received with your vehicle documenta-
tion.
•Record the radio code shown on the card on
the “Security information” page at the end of
this manual and keep the radio code informa-
tion in a safe, not in the vehicle.
•Contact a NISSAN dealer if you lose the fixed
number card of your audio unit.
Unlocking the unit
If the battery supply to the vehicle is interrupted, the
unit will lock.
When the power is restored and the unit switched
on, the display will show CODE for 3 seconds then
afterwards
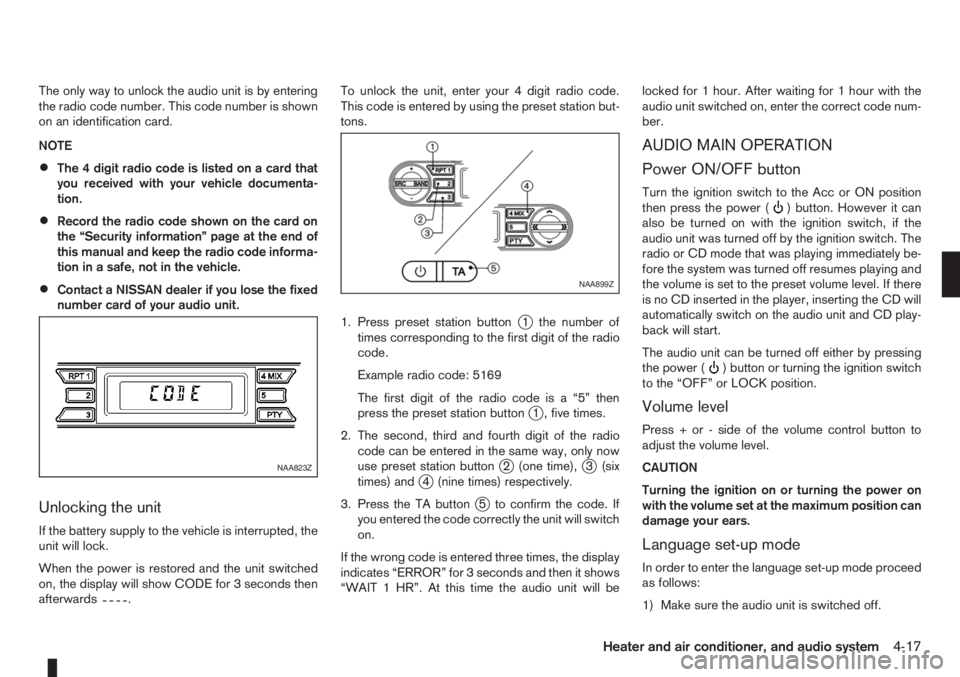
.To unlock the unit, enter your 4 digit radio code.
This code is entered by using the preset station but-
tons.
1. Press preset station button
j1 the number of
times corresponding to the first digit of the radio
code.
Example radio code: 5169
The first digit of the radio code is a “5” then
press the preset station button
j1 , five times.
2. The second, third and fourth digit of the radio
code can be entered in the same way, only now
use preset station button
j2 (one time),j3 (six
times) andj4 (nine times) respectively.
3. Press the TA button
j5 to confirm the code. If
you entered the code correctly the unit will switch
on.
If the wrong code is entered three times, the display
indicates “ERROR” for 3 seconds and then it shows
“WAIT 1 HR”. At this time the audio unit will belocked for 1 hour. After waiting for 1 hour with the
audio unit switched on, enter the correct code num-
ber.
AUDIO MAIN OPERATION
Power ON/OFF button
Turn the ignition switch to the Acc or ON position
then press the power () button. However it can
also be turned on with the ignition switch, if the
audio unit was turned off by the ignition switch. The
radio or CD mode that was playing immediately be-
fore the system was turned off resumes playing and
the volume is set to the preset volume level. If there
is no CD inserted in the player, inserting the CD will
automatically switch on the audio unit and CD play-
back will start.
The audio unit can be turned off either by pressing
the power (
) button or turning the ignition switch
to the “OFF” or LOCK position.
Volume level
Press + or - side of the volume control button to
adjust the volume level.
CAUTION
Turning the ignition on or turning the power on
with the volume set at the maximum position can
damage your ears.
Language set-up mode
In order to enter the language set-up mode proceed
as follows:
1) Make sure the audio unit is switched off.
NAA823Z
NAA899Z
Heater and air conditioner, and audio system4-17
Page 106 of 235
COMPACT DISC (CD) PLAYER
OPERATION
Turn the ignition switch to the Acc or ON position,
and insert the CD into the slot with the label side
facing up. The CD will be guided automatically into
the slot and will start playing.
After loading the CD and the track number will ap-
pear on the display.
If the radio is already operating, it will automatically
turn off and the CD player will start playing.
CAUTION
•Do not force the compact disc into the slot.
This could damage the player.
•Do not use 8 cm (3.1 in) discs.
REW (Rewind), FF
(Fast Forward)
When the(rewind) or(fast forward)
button is pressed for more than 0.5 seconds, while
the CD is being played, the CD will play while fast
forwarding or rewinding. When the button is re-
leased, the CD will return to normal playing speed.
Track up/down
When thebutton is pressed, the track being
played returns to its beginning. Press several times
to skip back through tracks. The CD will go back
the number of times the button is pressed.
When the
button is pressed while the CD is
being played, the track next to the present one willstart to play from its beginning. Press several times
to skip through tracks. The CD will advance the
number of times the button is pressed. (When the
last track on the CD is skipped through, the first
track will be played.)
RPT (Repeat track) ON/OFF
To repeat the currently playing track, press the RPT
button and RPT TRCK is displayed for 3 seconds
while the RPT indicator remains on. To cancel this
mode, press again the RPT button.
mMIX ON/OFF
To play all the tracks in a random order, press the
MIX button and MIX DISC is displayed for 3 sec-
onds while the MIX indicator remains on. To cancel
this mode, press the MIX button again.
CD eject button
Press the eject button () to eject the compact
disc.
If the CD comes out and is not removed within 10
seconds it will be pulled back into the slot to protect
it from damage.
When the ignition switch is in either the “OFF” or
LOCK position or the audio unit is off, it is possible
to eject the CD. However the audio unit will not be
activated.
If the following message appears on the display,
press the EJECT button:“CD ERROR” and “EJECT CD” appear alternately
– Eject the disc, and insert another CD or check
whether the CD is inserted upside-down.
4-22Heater and air conditioner, and audio system
Page 107 of 235
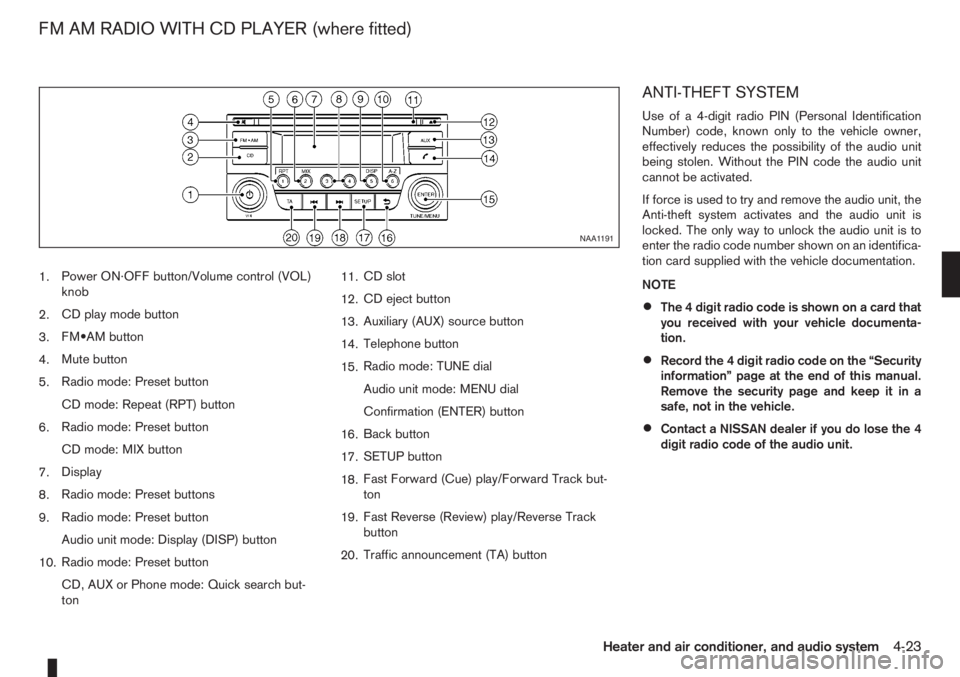
1.Power ON·OFF button/Volume control (VOL)
knob
2.CD play mode button
3.FM•AM button
4.Mute button
5.Radio mode: Preset button
CD mode: Repeat (RPT) button
6.Radio mode: Preset button
CD mode: MIX button
7.Display
8.Radio mode: Preset buttons
9.Radio mode: Preset button
Audio unit mode: Display (DISP) button
10.Radio mode: Preset button
CD, AUX or Phone mode: Quick search but-
ton11.CD slot
12.CD eject button
13.Auxiliary (AUX) source button
14.Telephone button
15.Radio mode: TUNE dial
Audio unit mode: MENU dial
Confirmation (ENTER) button
16.Back button
17.SETUP button
18.Fast Forward (Cue) play/Forward Track but-
ton
19.Fast Reverse (Review) play/Reverse Track
button
20.Traffic announcement (TA) button
ANTI-THEFT SYSTEM
Use of a 4-digit radio PIN (Personal Identification
Number) code, known only to the vehicle owner,
effectively reduces the possibility of the audio unit
being stolen. Without the PIN code the audio unit
cannot be activated.
If force is used to try and remove the audio unit, the
Anti-theft system activates and the audio unit is
locked. The only way to unlock the audio unit is to
enter the radio code number shown on an identifica-
tion card supplied with the vehicle documentation.
NOTE
•The 4 digit radio code is shown on a card that
you received with your vehicle documenta-
tion.
•Record the 4 digit radio code on the “Security
information” page at the end of this manual.
Remove the security page and keep it in a
safe, not in the vehicle.
•Contact a NISSAN dealer if you do lose the 4
digit radio code of the audio unit.
NAA1191
FM AM RADIO WITH CD PLAYER (where fitted)
Heater and air conditioner, and audio system4-23