2011 NISSAN NOTE lock
[x] Cancel search: lockPage 55 of 235
when you leave the vehicle. See “Headlight and turn
signal switch” later in this section for further details
on the lighting operation.
Key reminder chime
The chime will sound if the driver’s side door is
opened while the key is left in the ignition switch and
an attempt is made to set the power door lock switch
to the LOCK position.
The chime will sound if the driver’s door is opened
while the Intelligent Key (where fitted) is left inside
the vehicle and the ignition knob is not in the LOCK
position.
Remove the key or Intelligent Key and take it with
you when leaving the vehicle.
Handbrake reminder buzzer
(where fitted)
The buzzer will sound if the vehicle is driven and the
handbrake has not previously been released.
First release the handbrake, then start driving.
See “Handbrake lever” in the “3. Pre-driving checks
and adjustments” section for further operating infor-
mation.
Trailer direction indicator buzzer
The electrical system of the vehicle will detect an
additional electrical load of the trailer lighting when
towing a trailer and the turn signal switch is used.
As a result, the direction indicator tone will be differ-
entFor additional information, see “Trailer towing” in
the “5. Starting and driving” section.
WINDSCREEN WIPER AND WASHER
SWITCH
WARNING
In freezing temperatures the washer fluid may
freeze on the windscreen and obscure your vi-
sion. Warm the windscreen with the defroster
before you wash it.
CAUTION
•Do not open/release the bonnet when the
front wiper arms are raised from their original
position.
•Do not operate the washer continuously for
more than 15 seconds.
•Do not operate the washer if the reservoir
tank is empty or frozen.
NIC1054Z
WIPER AND WASHER SWITCH
Instruments and controls2-13
Page 56 of 235

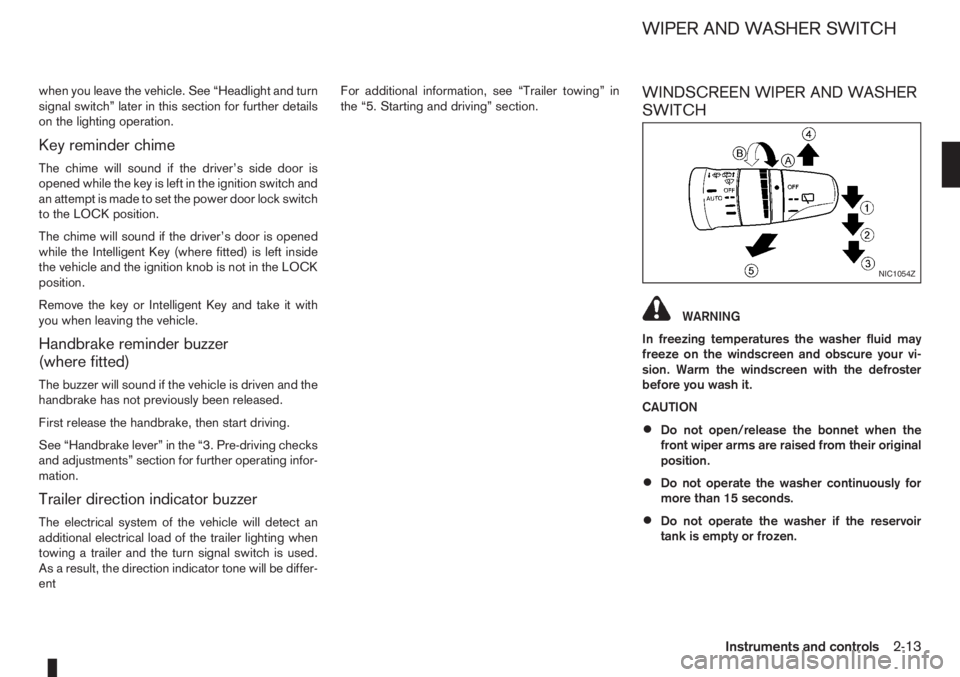
Wiper operation
The windscreen wiper and washer can be operated
when the ignition switch is in the ON position.
Push the lever down to operate the wiper at the fol-
lowing speeds:
j1Intermittent()
— the intermittent operation speed can be
adjusted by rotating the ring towards
jA
(slower) orjB (faster).
j2Low() – continuous low speed opera-
tion
j3High() – continuous high speed
operation
To stop the wiper operation, move the lever
up to the “OFF” position.
j4Single sweep() — push the lever up for
a single sweep operation of the wiper.
Washer operation
j
5 To operate the washer, pull the lever
towards you
j5 until the desired amount of
washer fluid is spread on the windscreen.
The wiper will automatically operate several
times.
The headlight cleaner (where fitted) will also
operate with operation of the windscreen
washer.
Headlight cleaner (where fitted)
The headlight washing system is only activated
when:
– the ignition switch is in the ON position.
– the headlight switch is in the
position.
– pulling the lever once towards you
j5.
NOTE
After the first operation, the headlight cleaner
operates once every fifth operation of the
windscreen washer.
CAUTION
Do not operate the headlight cleaner if the win-
dow washer fluid reservoir is empty.
Rain sensor (where fitted)
The rain sensor is activated when the intermittent
positionj1 (AUTO) of the wiper switch is selected.
The wiper will start to operate automatically at a suit-
able speed when rain is detected on the windscreen.
NOTE
The rain sensor is only intended for use during
rain or precipitation. During other weather condi-
tions no harm will come to the rain sensor sys-
tem if left active (wiper switch set to intermit-
tent), although occasional unexpected activation
of the wipers may occur.
REAR WINDOW
The rear window wiper and washer can be oper-
ated when the ignition switch is in the ON position.
Turn the switch clockwise to the intermittent (
,j1 ) position or continuous (,j2 ) position to
operate the wiper.
To operate the rear window washer, push the switch
towards the front of the vehicle
j3 . The rear win-
dow wiper will also operate.
CAUTION
•Do not operate the washer continuously for
more than 15 seconds.
•Do not operate the washer if the reservoir
tank is empty or frozen.
NIC1055Z
2-14Instruments and controls
Page 58 of 235
NISSAN recommends you to consult the local regu-
lations concerning the use of lights.
HEADLIGHT SWITCH
Lighting
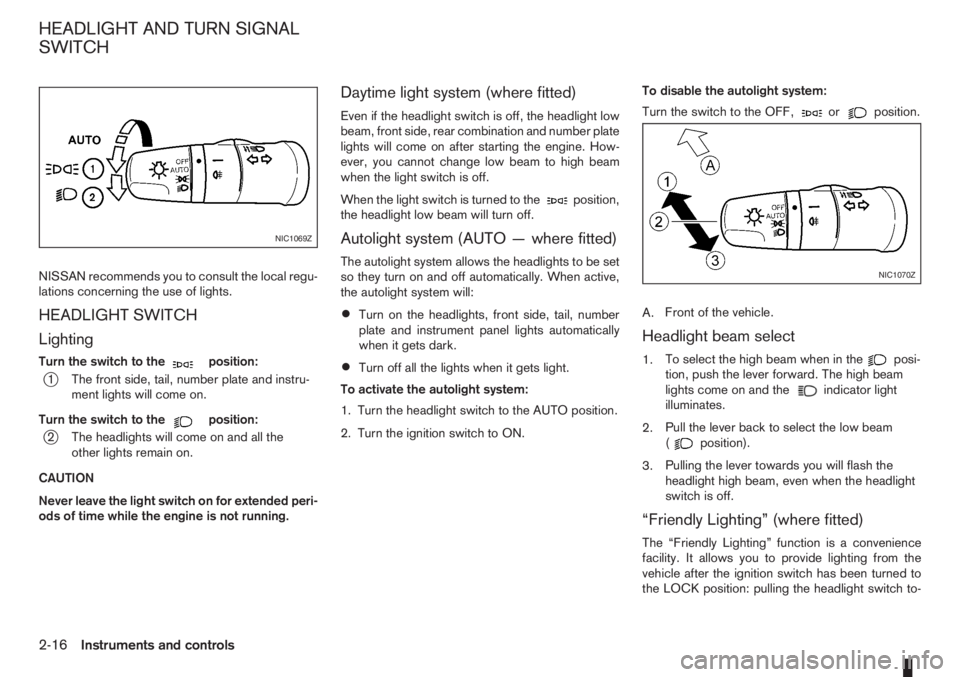
Turn the switch to themposition:
j1 The front side, tail, number plate and instru-
ment lights will come on.
Turn the switch to the
mposition:
j2 The headlights will come on and all the
other lights remain on.
CAUTION
Never leave the light switch on for extended peri-
ods of time while the engine is not running.
Daytime light system (where fitted)
Even if the headlight switch is off, the headlight low
beam, front side, rear combination and number plate
lights will come on after starting the engine. How-
ever, you cannot change low beam to high beam
when the light switch is off.
When the light switch is turned to the
position,
the headlight low beam will turn off.
Autolight system (AUTO — where fitted)
The autolight system allows the headlights to be set
so they turn on and off automatically. When active,
the autolight system will:
•Turn on the headlights, front side, tail, number
plate and instrument panel lights automatically
when it gets dark.
•Turn off all the lights when it gets light.
To activate the autolight system:
1. Turn the headlight switch to the AUTO position.
2. Turn the ignition switch to ON.To disable the autolight system:
Turn the switch to the OFF,
orposition.
A.Front of the vehicle.
Headlight beam select
1.To select the high beam when in theposi-
tion, push the lever forward. The high beam
lights come on and the
indicator light
illuminates.
2.Pull the lever back to select the low beam
(
position).
3.Pulling the lever towards you will flash the
headlight high beam, even when the headlight
switch is off.
“Friendly Lighting” (where fitted)
The “Friendly Lighting” function is a convenience
facility. It allows you to provide lighting from the
vehicle after the ignition switch has been turned to
the LOCK position: pulling the headlight switch to-
NIC1069Z
NIC1070Z
HEADLIGHT AND TURN SIGNAL
SWITCH
2-16Instruments and controls
Page 59 of 235
ward you once will activate the headlight for ap-
proximately 30 seconds. After that period of time, it
will automatically switch off.
It is possible to pull the headlight switch up to four
times to increase the lighting period up to 2 minutes.
NOTE
The “Friendly Lighting” function can be cancelled
by switching the ignition switch to the Acc or ON
position again.
Battery save function
The battery save feature prevents your vehicle from
discharging the battery after you have left the exter-
nal lights, map lamps or room lamps on (combina-
tion switch in the
orposition) when exiting
the vehicle. This occurs when the ignition switch or
ignition knob is in the “OFF” or LOCK position.
NOTE
The next time the engine is started the external
lights, map lamps or room lamp will come on
again
Battery save function for external lights:
If the ignition switch is turned to the “OFF” position
but the external lights are accidentally left on, the
external lights will automatically be switched off as
soon as the driver’s door is opened.
It is possible to leave the external lights on perma-
nently by switching them back on using the head-
light switch while the ignition switch is still in theLOCK or “OFF” position. In this case, the light re-
minder chime will sound when the driver’s door is
opened.
Battery save function for interior light:
The interior light will automatically be switched off
after approximately 15 minutes if it has been acci-
dentally left on.
TURN SIGNAL SWITCH
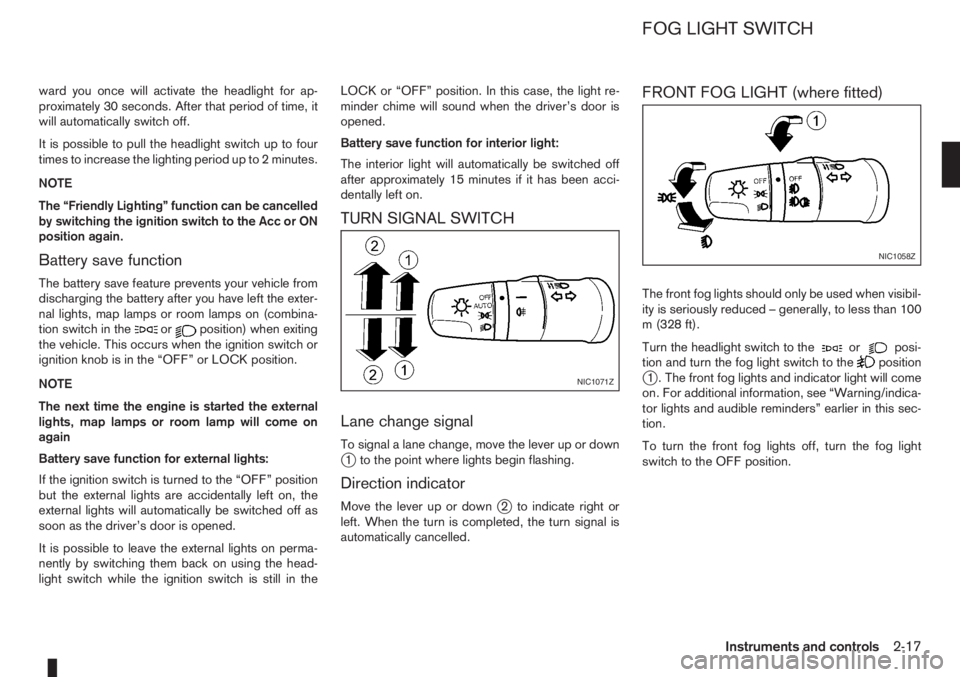
Lane change signal
To signal a lane change, move the lever up or downj1 to the point where lights begin flashing.
Direction indicator
Move the lever up or downj2 to indicate right or
left. When the turn is completed, the turn signal is
automatically cancelled.
FRONT FOG LIGHT (where fitted)
The front fog lights should only be used when visibil-
ity is seriously reduced – generally, to less than 100
m (328 ft).
Turn the headlight switch to the
orposi-
tion and turn the fog light switch to thepositionj1 . The front fog lights and indicator light will come
on. For additional information, see “Warning/indica-
tor lights and audible reminders” earlier in this sec-
tion.
To turn the front fog lights off, turn the fog light
switch to the OFF position.NIC1071Z
NIC1058Z
FOG LIGHT SWITCH
Instruments and controls2-17
Page 63 of 235

•Before inserting or disconnecting a plug, be
sure to turn off the power switch of the elec-
trical accessory being used or the Acc power
of the vehicle.
•Fully push the plug in. If insufficient contact is
made, the plug may overheat or the respec-
tive fuse may blow.
WARNING
Take care as the power outlet and plug may be
hot during or immediately after use.
GLOVE BOX
WARNING
•The glove box storage should not be used
while driving so that full attention may be given
to the driving operation.
•Keep the glove box lid closed while driving to
prevent injury in an accident or a sudden stop.
The under side storage pocket
jA provides an eas-
ily accessible storage space. To access the glove
box, press the lock release button
j1.
Glove box air flow control dial
(where fitted)
CAUTION
•Do not put any objects that can melt in the
glove box compartment as it may damage the
compartment inner side.
•Do not leave any plastic objects in the glove
box compartment. They may be deformed.
•Do not put jewellery such as rings, earrings,
etc. in the glove box compartment, as the heat
may deform them.
The glove box compartment provides an adjustable
air flow control dial in order to keep beverages
chilled or warm. Turn the vent anticlockwise
j2to
provide full heating/cooling and turn clockwisej1
to close the outlet. The heating/cooling function set-
ting is monitored by the heater and air conditioning
control panel. See “Heater and air conditioner
operation” in the “4. Heater and air conditioner, and
audio system” section for further details on passen-
ger compartment air control setting.
NIC1066Z
NIC1072Z
Glove box compartment
STORAGE
Instruments and controls2-21
Page 68 of 235
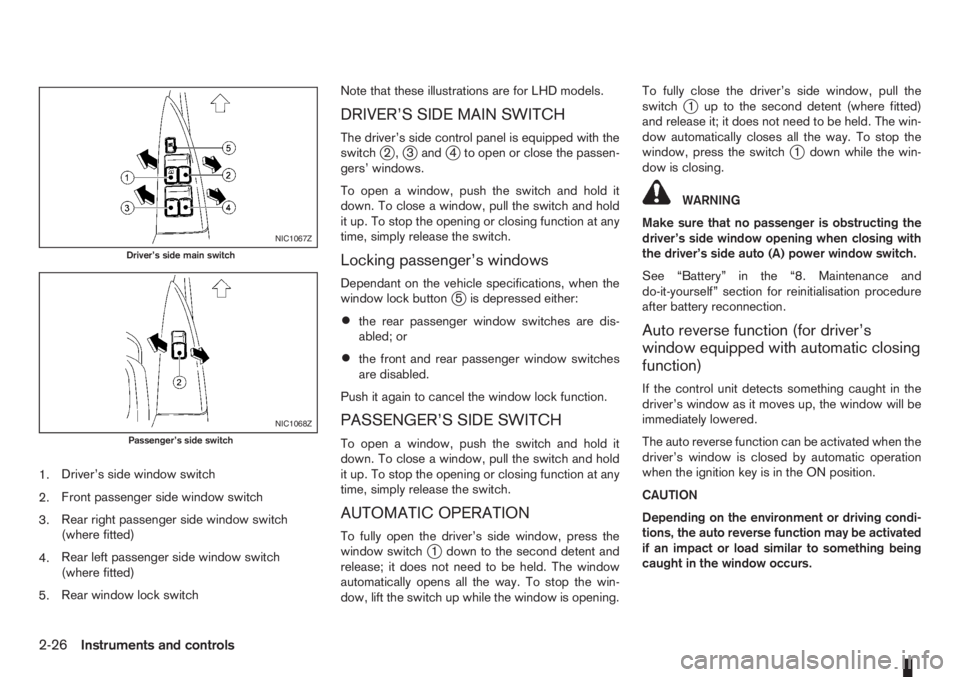
1.Driver’s side window switch
2.Front passenger side window switch
3.Rear right passenger side window switch
(where fitted)
4.Rear left passenger side window switch
(where fitted)
5.Rear window lock switchNote that these illustrations are for LHD models.
DRIVER’S SIDE MAIN SWITCH
The driver’s side control panel is equipped with the
switchj2,j3andj4 to open or close the passen-
gers’ windows.
To open a window, push the switch and hold it
down. To close a window, pull the switch and hold
it up. To stop the opening or closing function at any
time, simply release the switch.
Locking passenger’s windows
Dependant on the vehicle specifications, when the
window lock buttonj5 is depressed either:
•the rear passenger window switches are dis-
abled; or
•the front and rear passenger window switches
are disabled.
Push it again to cancel the window lock function.
PASSENGER’S SIDE SWITCH
To open a window, push the switch and hold it
down. To close a window, pull the switch and hold
it up. To stop the opening or closing function at any
time, simply release the switch.
AUTOMATIC OPERATION
To fully open the driver’s side window, press the
window switchj1 down to the second detent and
release; it does not need to be held. The window
automatically opens all the way. To stop the win-
dow, lift the switch up while the window is opening.To fully close the driver’s side window, pull the
switch
j1 up to the second detent (where fitted)
and release it; it does not need to be held. The win-
dow automatically closes all the way. To stop the
window, press the switch
j1 down while the win-
dow is closing.
WARNING
Make sure that no passenger is obstructing the
driver’s side window opening when closing with
the driver’s side auto (A) power window switch.
See “Battery” in the “8. Maintenance and
do-it-yourself” section for reinitialisation procedure
after battery reconnection.
Auto reverse function (for driver’s
window equipped with automatic closing
function)
If the control unit detects something caught in the
driver’s window as it moves up, the window will be
immediately lowered.
The auto reverse function can be activated when the
driver’s window is closed by automatic operation
when the ignition key is in the ON position.
CAUTION
Depending on the environment or driving condi-
tions, the auto reverse function may be activated
if an impact or load similar to something being
caught in the window occurs.
NIC1067Z
Driver’s side main switch
NIC1068Z
Passenger’s side switch
2-26Instruments and controls
Page 70 of 235
Room light timer
The room light will stay on for approximately 30 sec-
onds when:
•The ignition is switched off.
•The doors are unlocked.
•Any door (except back door) is opened and then
closed.
The timer is cancelled, and the interior light will turn
off when:
•The doors are locked.
•The ignition switch is turned to the ON position.
MAP LIGHT (where fitted)j2
To switch on the map light, press eitherorof
the switchesj2.
LUGGAGE COMPARTMENT LIGHT
The light comes on when the back door is opened.
2-28Instruments and controls
Page 71 of 235

3Pre-driving checks and adjustmentsPre-driving checks and adjustments
Keys ........................................................................ 3-2
Integrated keyfob/remote control system .................. 3-3
Using the remote keyless entry system ................ 3-3
Locking the doors ............................................... 3-3
Unlocking the doors – convenience mode ........... 3-4
Unlocking the doors – anti-hijack mode ............... 3-4
Switching from convenience mode to
anti-hijack mode.................................................. 3-4
Keyfob operation failure ...................................... 3-4
Intelligent Key system (where fitted) ......................... 3-5
Locking/unlocking .............................................. 3-5
Starting the engine with the Intelligent Key .......... 3-6
Door locks ............................................................... 3-6
Super Lock System (Right-hand drive models) .... 3-6
Vehicle dead battery – left-hand side door
handle ................................................................ 3-7
Locking with power door lock switch .................. 3-7Child safety rear door lock .................................. 3-8
Back door lock ................................................... 3-8
Security system ....................................................... 3-9
NISSAN Anti-Theft System (NATS)..................... 3-9
Bonnet release ........................................................ 3-10
Fuel filler lid ............................................................. 3-11
Fuel filler lid opener lever .................................... 3-11
Fuel filler cap ...................................................... 3-11
Handbrake lever ...................................................... 3-11
Tilting steering wheel ............................................... 3-12
Mirrors..................................................................... 3-12
Inside rear-view mirror ........................................ 3-12
Outside rear-view mirrors.................................... 3-12
Vanity mirror ....................................................... 3-13
Rear parcel shelf...................................................... 3-14
Rear parcel shelf removal.................................... 3-14
Rear parcel shelf installation................................ 3-14