2011 NISSAN NOTE lock
[x] Cancel search: lockPage 26 of 235
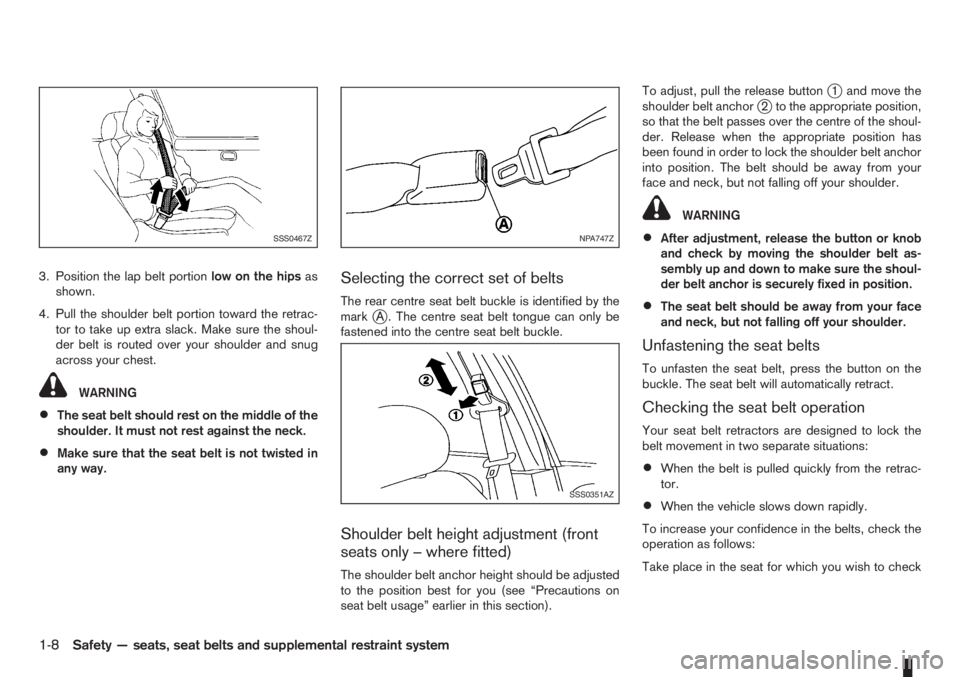
3. Position the lap belt portionlow on the hipsas
shown.
4. Pull the shoulder belt portion toward the retrac-
tor to take up extra slack. Make sure the shoul-
der belt is routed over your shoulder and snug
across your chest.
WARNING
•The seat belt should rest on the middle of the
shoulder. It must not rest against the neck.
•Make sure that the seat belt is not twisted in
any way.
Selecting the correct set of belts
The rear centre seat belt buckle is identified by the
markjA . The centre seat belt tongue can only be
fastened into the centre seat belt buckle.
Shoulder belt height adjustment (front
seats only – where fitted)
The shoulder belt anchor height should be adjusted
to the position best for you (see “Precautions on
seat belt usage” earlier in this section).To adjust, pull the release button
j1 and move the
shoulder belt anchorj2 to the appropriate position,
so that the belt passes over the centre of the shoul-
der. Release when the appropriate position has
been found in order to lock the shoulder belt anchor
into position. The belt should be away from your
face and neck, but not falling off your shoulder.
WARNING
•After adjustment, release the button or knob
and check by moving the shoulder belt as-
sembly up and down to make sure the shoul-
der belt anchor is securely fixed in position.
•The seat belt should be away from your face
and neck, but not falling off your shoulder.
Unfastening the seat belts
To unfasten the seat belt, press the button on the
buckle. The seat belt will automatically retract.
Checking the seat belt operation
Your seat belt retractors are designed to lock the
belt movement in two separate situations:
•When the belt is pulled quickly from the retrac-
tor.
•When the vehicle slows down rapidly.
To increase your confidence in the belts, check the
operation as follows:
Take place in the seat for which you wish to check
SSS0467ZNPA747Z
SSS0351AZ
1-8Safety — seats, seat belts and supplemental restraint system
Page 27 of 235
the belt operation. Grasp the shoulder belt and pull
quickly forward. The retractor should lock and re-
strict further belt movement.
If the retractor does not lock during these checks or
if you have any questions about the seat belt opera-
tion see a NISSAN dealer or qualified workshop.
SEAT BELT MAINTENANCE
•To clean the seat belt webbings,apply a mild
soap solution or any solution recommended for
cleaning upholstery or carpets. Then brush it,
wipe with a cloth and allow it to dry in the shade.
Do not allow the seat belts to retract until they
are completely dry.
•If dirt builds up in the shoulder belt guide of the
seat belt anchors, the seat belts may retract
slowly. Wipe the shoulder belt guide with a clean,
dry cloth.
•Periodically check to see whether the seat
belt and the metal componentssuch as buck-
les, tongues, retractors, flexible wires and an-
chors work properly. If loose parts, deteriora-
tion, cuts or other damage to the webbing is
found, the entire belt assembly should be re-
placed.
WARNING
•The pre-tensioner seat belt cannot be reused
after activation. It must be replaced together
with the retractor as a unit.
•If the vehicle is involved in a frontal collision
but the pre-tensioner is not activated, be sure
to have the pre-tensioner system checked
and, if necessary, replaced by a NISSAN
dealer or qualified workshop.
•No unauthorised changes should be made to
any components or wiring of the pre-tensioner
seat belt system. This is to prevent accidental
activation of the pre-tensioner seat belt or
damage to the pre-tensioner seat belt opera-
tion. Tampering with the pre-tensioner seat
belt system may result in serious personal in-
jury.
•Work on and around the pre-tensioner system
should be done by an authorised NISSAN
dealer or qualified workshop. Installation of
electrical equipment should also be done by a
NISSAN dealer or qualified workshop. Unau-
thorised electrical test equipment and prob-
ing devices should not be used on the pre-
tensioner seat belt system.
•If you need to dispose of the pre-tensioner or
scrap the vehicle, contact a NISSAN dealer or
qualified workshop. Correct pre-tensioner
disposal procedures are set forth in the ap-propriate NISSAN Service Manual. Incorrect
disposal procedures could cause personal in-
jury.
The front seat pre-tensioner seat belt system is acti-
vated in conjunction with the front air bag system. It
helps tighten the seat belt when the vehicle is in-
volved in certain types of collisions by restraining
the seat occupants via the seat belt retractor.
The pre-tensioner is encased with the seat belt’s
retractor. These seat belts are used in the same way
as conventional seat belts.
Additionally, the driver’s side pre-tensioner seat belt
system is also equipped with a lap pre-tensioner.
Both the retractor pre-tensioner and lap pre-ten-
sioner provide significant protection against injury in
an accident and increase the safety performance of
your vehicle.
When the pre-tensioner seat belt system activates,
smoke is released and a loud noise may be heard.
The smoke is harmless, but care should be taken
not to inhale it as it may cause irritation and choking.
When the ignition switch is in the ON or START
position, the Supplemental Restraint System (SRS)
air bag warning light will illuminate. The SRS air bag
warning light will turn off after approximately 7 sec-
onds if the system is operational. If any of the follow-
ing conditions occur, the air bag and/or pre-ten-
sioner seat belt need servicing and your vehicle must
be taken to the nearest NISSAN dealer or qualified
workshop.
PRE-TENSIONER SEAT BELT
SYSTEM
Safety — seats, seat belts and supplemental restraint system1-9
Page 32 of 235

monitored by the SRS air bag warning light are: all
sensors, air bag modules and all related wiring, and
the pre-tensioner seat belt.
After turning the ignition switch to the ON or
START position, the supplemental air bag warn-
ing light illuminates. The air bag warning light will
turn off after approximately 7 seconds if the sys-
tem is operational.
If any of the following conditions occurs, the front air
bag, side and curtain air bag systems (where fitted)
and pre-tensioner seat belt need servicing and
should be taken to the nearest NISSAN dealer or
qualified workshop:
•The SRS air bag warning light remains on after
approximately 7 seconds.
•The SRS air bag warning light flashes intermit-
tently.
•The SRS air bag warning light does not come on
at all.
Under these conditions, the front air bags, side and
curtain air bags (where fitted) and/or pre-tensioner
seat belt will not operate properly. They must be
checked and repaired.
Repair and replacement procedure
The front air bags, side air bags (where fitted), cur-
tain air bags (where fitted) and pre-tensioner seat
belt are designed to activate on a one-time-only ba-
sis. As a reminder, unless it is damaged, the air bag
warning light will remain illuminated after inflationhas occurred. Repair and replacement of the air bag
system should be done only by a NISSAN dealer or
qualified workshop.
When maintenance work is required on the vehicle,
the air bag systems, related parts and pre-tensioner
seat belt should be pointed out to the person con-
ducting the maintenance. The ignition switch should
always be in the LOCK position when working un-
der the bonnet or inside the vehicle.
WARNING
•Once the air bag has inflated or the pre-ten-
sioner seat belt has been activated, the air
bag module and pre-tensioner seat belt will
not function again and must be replaced. The
air bag module should be replaced by a
NISSAN dealer or qualified workshop. The air
bag module cannot be repaired.
•All air bag systems should be inspected by a
NISSAN dealer or qualified workshop if there
is any damage to the front end portion of the
vehicle.
•When selling your vehicle, we request that you
inform the buyer about the air bag system and
guide the buyer to the appropriate sections in
this Owner’s Manual.
•If you need to dispose of an air bag or scrap
the vehicle, contact a NISSAN dealer or quali-
fied workshop. Correct air bag disposal pro-
cedures are set forth in the appropriate
NISSAN Service Manual. Incorrect disposal
procedures could cause personal injury.Note that the above illustration is for LHD models.
FRONT PASSENGER AIR BAG
INDICATOR LIGHT
WARNING
•Since your vehicle is equipped with a front
passenger air bag, it is not permitted to install
a rear facing child restraint on the front pas-
senger seat unless the front passenger air bag
has been previously deactivated.
•Do not fit a rear facing child seat on the front
passenger seat if the air bag activation/deac-
tivation system is malfunctioning. Your ve-
hicle must be immediately taken to a NISSAN
dealer or qualified workshop in such situa-
tion.
The front passenger air bag indicator light
lo-
cated on the centre console illuminates for approxi-
mately 7 seconds and then goes off. This means the
system is operational.
NPA732Z
1-14Safety — seats, seat belts and supplemental restraint system
Page 33 of 235
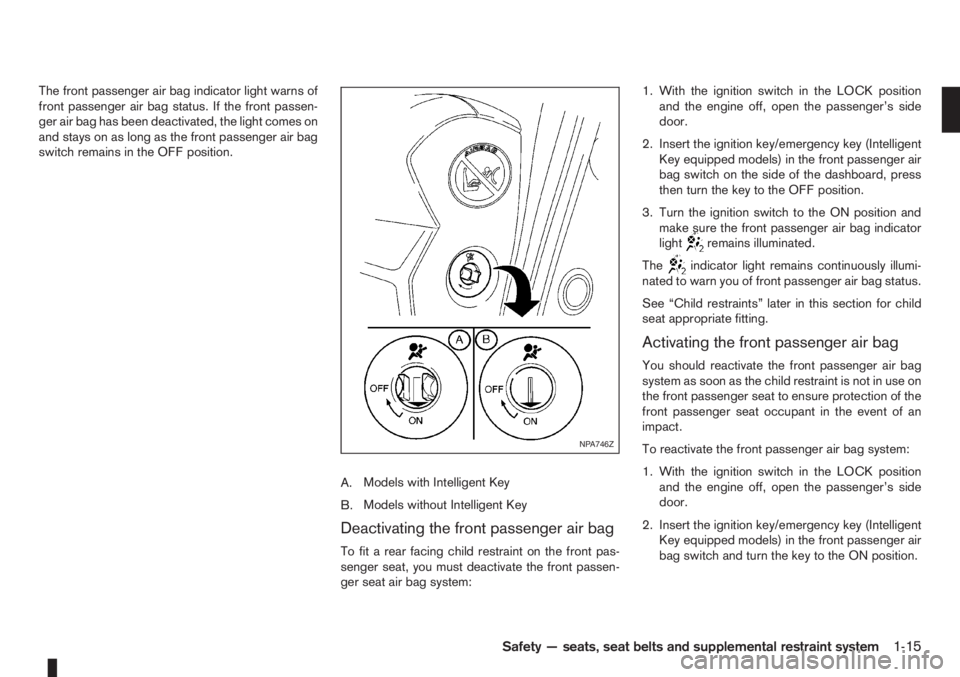
The front passenger air bag indicator light warns of
front passenger air bag status. If the front passen-
ger air bag has been deactivated, the light comes on
and stays on as long as the front passenger air bag
switch remains in the OFF position.
A.Models with Intelligent Key
B.Models without Intelligent Key
Deactivating the front passenger air bag
To fit a rear facing child restraint on the front pas-
senger seat, you must deactivate the front passen-
ger seat air bag system:1. With the ignition switch in the LOCK position
and the engine off, open the passenger’s side
door.
2. Insert the ignition key/emergency key (Intelligent
Key equipped models) in the front passenger air
bag switch on the side of the dashboard, press
then turn the key to the OFF position.
3. Turn the ignition switch to the ON position and
make sure the front passenger air bag indicator
light
remains illuminated.
The
indicator light remains continuously illumi-
nated to warn you of front passenger air bag status.
See “Child restraints” later in this section for child
seat appropriate fitting.
Activating the front passenger air bag
You should reactivate the front passenger air bag
system as soon as the child restraint is not in use on
the front passenger seat to ensure protection of the
front passenger seat occupant in the event of an
impact.
To reactivate the front passenger air bag system:
1. With the ignition switch in the LOCK position
and the engine off, open the passenger’s side
door.
2. Insert the ignition key/emergency key (Intelligent
Key equipped models) in the front passenger air
bag switch and turn the key to the ON position.
NPA746Z
Safety — seats, seat belts and supplemental restraint system1-15
Page 35 of 235
propriate child restraint should be chosen and
purchased according to the child and the ve-
hicle as it may not be possible to properly
install some types of child restraints in your
vehicle.
•Improper use of a child restraint can increase
injuries for both the infant or child and other
occupants in the vehicle.
•When your child restraint is not in use, keep it
secured with a seat belt to prevent it from
being thrown forward in case of a sudden stop
or accident.
•Remember that a child restraint left in a closed
vehicle can become very hot. Check the seat-
ing surface and buckles before placing your
child in the child restraint.
•After attaching a child restraint, test the seat
before you place the child in it. Tilt it from side
to side. Try to tug it forward and check
whether the belt holds it in place. If the re-
straint is not secure, tighten the belt as nec-
essary, or put the restraint in another seat
and test it again.
•If the child restraint is not anchored properly,
the risk of a child being injured in a collision
or a sudden stop greatly increases.
•The front passenger seat and adjustable rear
bench seat should be positioned to fit the
child seat appropriately. See “Installation of a
child restraint system on the front passengerseat” later in this section and “Installation of a
child restraint system on rear seats” later in
this section.
•For a front facing child restraint, installed on a
three-point type lap/shoulder belt, make sure
the shoulder belt does not go in front of the
child’s face or neck. If it does, put the shoul-
der belt behind the child restraint.
•If the child restraint is equipped with a locking
clip, ensure that the clip is securely fastened
to the vehicle seat belt. If the locking clip is
not used, injuries could result from the child
restraint tipping over during normal vehicle
braking or cornering.
Safety — seats, seat belts and supplemental restraint system1-17
Page 37 of 235
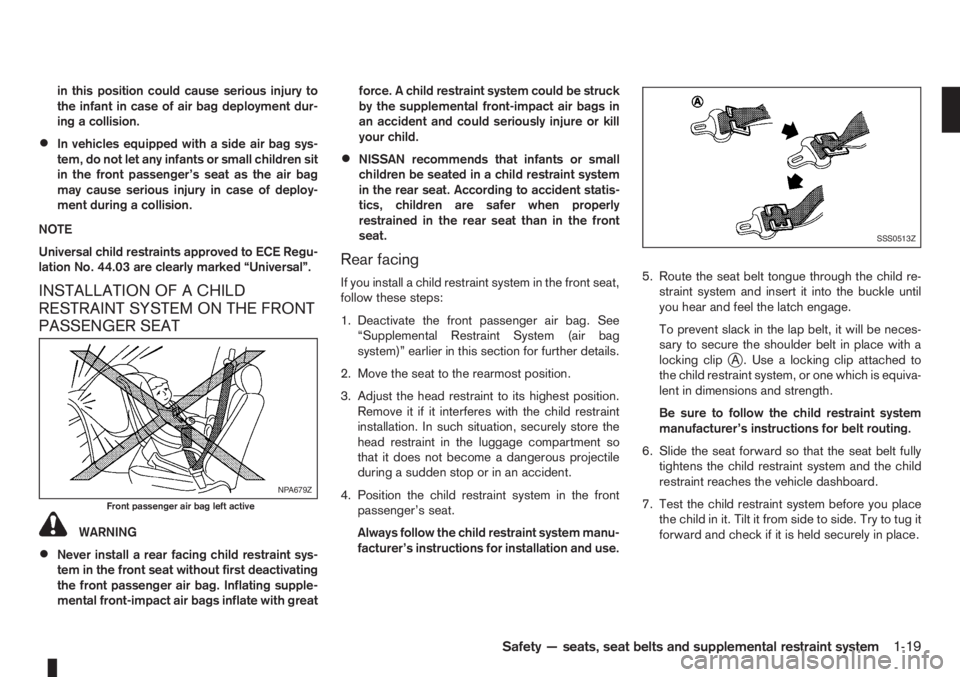
in this position could cause serious injury to
the infant in case of air bag deployment dur-
ing a collision.
•In vehicles equipped with a side air bag sys-
tem, do not let any infants or small children sit
in the front passenger’s seat as the air bag
may cause serious injury in case of deploy-
ment during a collision.
NOTE
Universal child restraints approved to ECE Regu-
lation No. 44.03 are clearly marked “Universal”.
INSTALLATION OF A CHILD
RESTRAINT SYSTEM ON THE FRONT
PASSENGER SEAT
WARNING
•Never install a rear facing child restraint sys-
tem in the front seat without first deactivating
the front passenger air bag. Inflating supple-
mental front-impact air bags inflate with greatforce. A child restraint system could be struck
by the supplemental front-impact air bags in
an accident and could seriously injure or kill
your child.
•NISSAN recommends that infants or small
children be seated in a child restraint system
in the rear seat. According to accident statis-
tics, children are safer when properly
restrained in the rear seat than in the front
seat.
Rear facing
If you install a child restraint system in the front seat,
follow these steps:
1. Deactivate the front passenger air bag. See
“Supplemental Restraint System (air bag
system)” earlier in this section for further details.
2. Move the seat to the rearmost position.
3. Adjust the head restraint to its highest position.
Remove it if it interferes with the child restraint
installation. In such situation, securely store the
head restraint in the luggage compartment so
that it does not become a dangerous projectile
during a sudden stop or in an accident.
4. Position the child restraint system in the front
passenger’s seat.
Always follow the child restraint system manu-
facturer’s instructions for installation and use.5. Route the seat belt tongue through the child re-
straint system and insert it into the buckle until
you hear and feel the latch engage.
To prevent slack in the lap belt, it will be neces-
sary to secure the shoulder belt in place with a
locking clip
jA . Use a locking clip attached to
the child restraint system, or one which is equiva-
lent in dimensions and strength.
Be sure to follow the child restraint system
manufacturer’s instructions for belt routing.
6. Slide the seat forward so that the seat belt fully
tightens the child restraint system and the child
restraint reaches the vehicle dashboard.
7. Test the child restraint system before you place
the child in it. Tilt it from side to side. Try to tug it
forward and check if it is held securely in place.
NPA679Z
Front passenger air bag left active
SSS0513Z
Safety — seats, seat belts and supplemental restraint system1-19
Page 38 of 235
INSTALLATION OF A CHILD
RESTRAINT SYSTEM ON REAR
SEATS
WARNING
•NISSAN recommends that infants or small
children be seated in a child restraint system.
According to accident statistics, children are
safer when properly restrained in the rear seat
than in the front seat.
•The direction of the child restraint system de-
pends on the type of the child restraint sys-
tem and the size of the child.
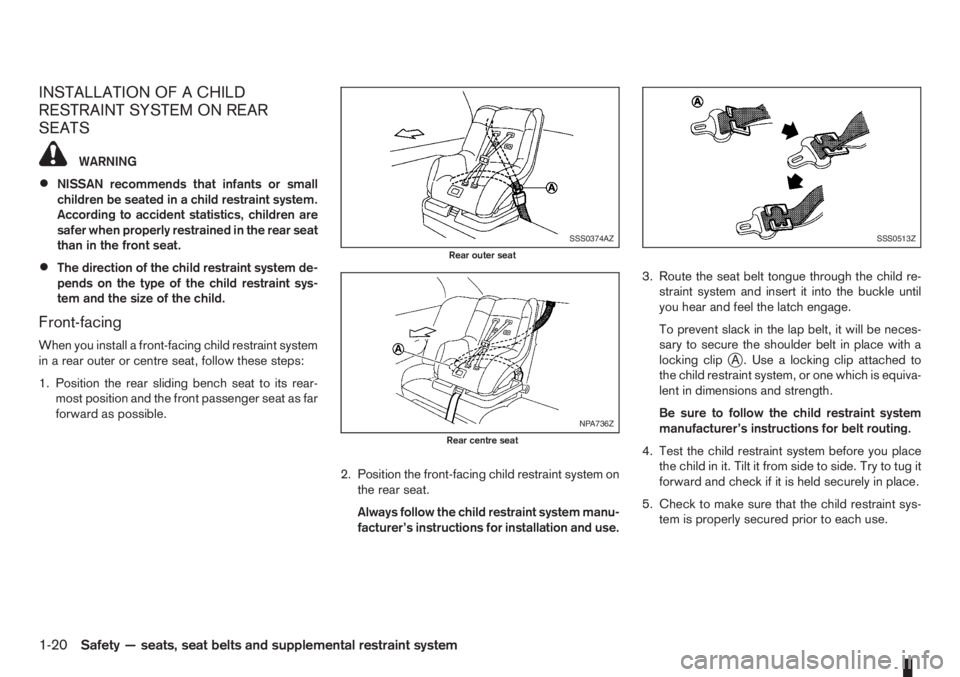
Front-facing
When you install a front-facing child restraint system
in a rear outer or centre seat, follow these steps:
1. Position the rear sliding bench seat to its rear-
most position and the front passenger seat as far
forward as possible.
2. Position the front-facing child restraint system on
the rear seat.
Always follow the child restraint system manu-
facturer’s instructions for installation and use.3. Route the seat belt tongue through the child re-
straint system and insert it into the buckle until
you hear and feel the latch engage.
To prevent slack in the lap belt, it will be neces-
sary to secure the shoulder belt in place with a
locking clipjA . Use a locking clip attached to
the child restraint system, or one which is equiva-
lent in dimensions and strength.
Be sure to follow the child restraint system
manufacturer’s instructions for belt routing.
4. Test the child restraint system before you place
the child in it. Tilt it from side to side. Try to tug it
forward and check if it is held securely in place.
5. Check to make sure that the child restraint sys-
tem is properly secured prior to each use.
SSS0374AZ
Rear outer seat
NPA736Z
Rear centre seat
SSS0513Z
1-20Safety — seats, seat belts and supplemental restraint system
Page 39 of 235
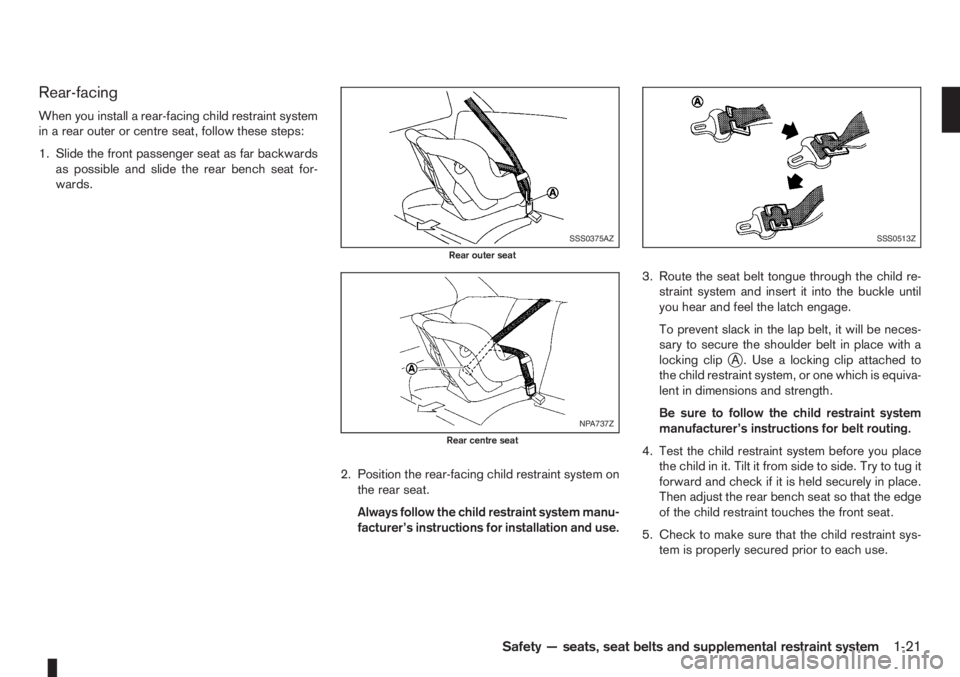
Rear-facing
When you install a rear-facing child restraint system
in a rear outer or centre seat, follow these steps:
1. Slide the front passenger seat as far backwards
as possible and slide the rear bench seat for-
wards.
2. Position the rear-facing child restraint system on
the rear seat.
Always follow the child restraint system manu-
facturer’s instructions for installation and use.3. Route the seat belt tongue through the child re-
straint system and insert it into the buckle until
you hear and feel the latch engage.
To prevent slack in the lap belt, it will be neces-
sary to secure the shoulder belt in place with a
locking clip
jA . Use a locking clip attached to
the child restraint system, or one which is equiva-
lent in dimensions and strength.
Be sure to follow the child restraint system
manufacturer’s instructions for belt routing.
4. Test the child restraint system before you place
the child in it. Tilt it from side to side. Try to tug it
forward and check if it is held securely in place.
Then adjust the rear bench seat so that the edge
of the child restraint touches the front seat.
5. Check to make sure that the child restraint sys-
tem is properly secured prior to each use.
SSS0375AZ
Rear outer seat
NPA737Z
Rear centre seat
SSS0513Z
Safety — seats, seat belts and supplemental restraint system1-21