2011 NISSAN MURANO automatic transmission
[x] Cancel search: automatic transmissionPage 23 of 433

Black plate (21,1)
Model "Z51-D" EDITED: 2010/ 7/ 23
SSS0821
To return the seatbacks:
Manual operation:
Lift up each seatback and push it to the upright
position until it is latched.
Power operation (if so equipped):
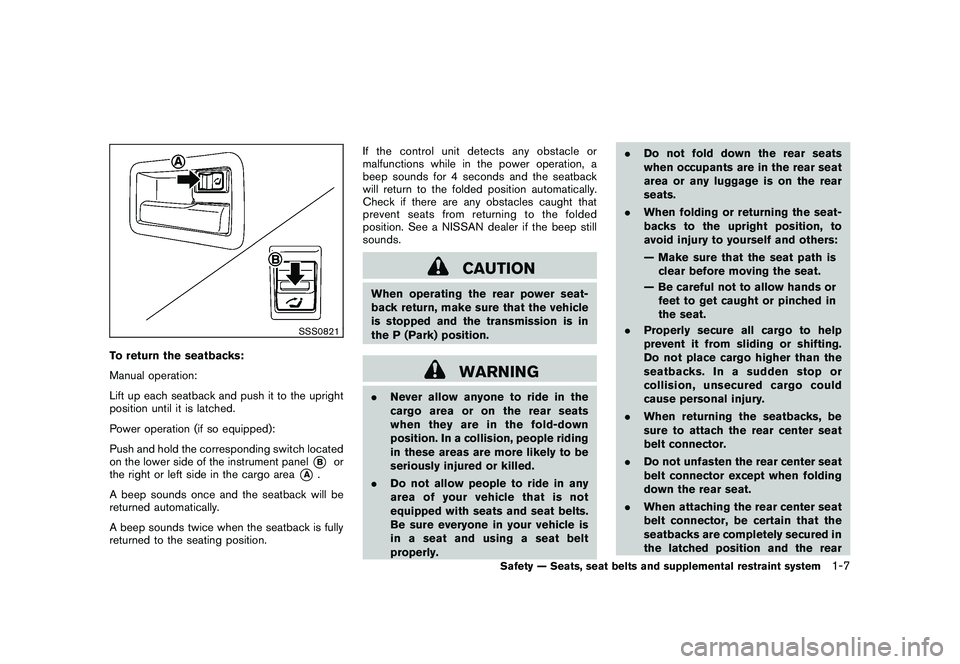
Push and hold the corresponding switch located
on the lower side of the instrument panel
*B
or
the right or left side in the cargo area
*A
.
A beep sounds once and the seatback will be
returned automatically.
A beep sounds twice when the seatback is fully
returned to the seating position. If the control unit detects any obstacle or
malfunctions while in the power operation, a
beep sounds for 4 seconds and the seatback
will return to the folded position automatically.
Check if there are any obstacles caught that
prevent seats from returning to the folded
position. See a NISSAN dealer if the beep still
sounds.
CAUTION
When operating the rear power seat-
back return, make sure that the vehicle
is stopped and the transmission is in
the P (Park) position.
WARNING
.
Never allow anyone to ride in the
cargo area or on the rear seats
when they are in the fold-down
position. In a collision, people riding
in these areas are more likely to be
seriously injured or killed.
. Do not allow people to ride in any
area of your vehicle that is not
equipped with seats and seat belts.
Be sure everyone in your vehicle is
in a seat and using a seat belt
properly. .
Do not fold down the rear seats
when occupants are in the rear seat
area or any luggage is on the rear
seats.
. When folding or returning the seat-
backs to the upright position, to
avoid injury to yourself and others:
— Make sure that the seat path is
clear before moving the seat.
— Be careful not to allow hands or feet to get caught or pinched in
the seat.
. Properly secure all cargo to help
prevent it from sliding or shifting.
Do not place cargo higher than the
seatbacks. In a sudden stop or
collision, unsecured cargo could
cause personal injury.
. When returning the seatbacks, be
sure to attach the rear center seat
belt connector.
. Do not unfasten the rear center seat
belt connector except when folding
down the rear seat.
. When attaching the rear center seat
belt connector, be certain that the
seatbacks are completely secured in
the latched position and the rear
Safety — Seats, seat belts and supplemental restraint system
1-7
Page 89 of 433

Black plate (87,1)
Model "Z51-D" EDITED: 2010/ 7/ 23
dealer as soon as possible.INDICATOR LIGHTS
All-Wheel Drive (AWD) LOCK
indicator light (AWD models)
This light illuminates when the ignition switch is
placed in the ON position, and turns off within 1
second.
When selecting the LOCK mode while the
engine is running, this light will illuminate. (See
“ALL-WHEEL DRIVE (AWD)” in the “5. Starting
and driving” section.)
Continuously Variable Transmis-
sion (CVT) position indicator light
When the ignition switch is pushed to the ON
position, the indicator shows the automatic
selector shift position. (See “CONTINUOUSLY
VARIABLE TRANSMISSION (CVT)” in the “5.
Starting and driving” section.)
Cruise indicator light
Cruise main switch indicator:
This light illuminates when the cruise control
main switch is pushed. The light turns off whenthe main switch is pushed again. When the
cruise main switch indicator light illuminates, the
cruise control system is operational. (See
“CRUISE CONTROL” in the “5. Starting and
driving” section.)
Cruise malfunction:
If the cruise indicator light blinks while the
engine is running, it may indicate the cruise
control system is not functioning properly. Have
the system checked by a NISSAN dealer. (See
“CRUISE CONTROL” in the “5. Starting and
driving” section.)
Front passenger air bag status
light
The front passenger air bag status lightwill be lit and the passenger front air bag will be
OFF depending on how the front passenger
seat is being used.
For front passenger air bag status light opera-
tion,see“NISSANADVANCEDAIRBAG
SYSTEM (front seats)” in the “1. Safety —
Seats, seat belts and supplemental restraint
system” section of this manual.
High beam indicator light
This light comes on when the headlight high
beam is on and goes out when the low beam isselected.
Low beam indicator light
The light comes on when the front park, side
marker, tail and license plate lights are on.
Malfunction Indicator Light (MIL)
If the malfunction indicator light comes on
steady or blinks while the engine is running, it
may indicate a potential emission control and/or
Continuously Variable Transmission (CVT) mal-
function.
The malfunction indicator light may also come on
steady if the fuel-filler cap is loose or missing, or
if the vehicle runs out of fuel. Check to make
sure the fuel-filler cap is installed and closed
tightly, and that the vehicle has at least 3 US
gallons (11.4 liters) of fuel in the fuel tank.
After a few driving trips, the
light should
turn off if no other potential emission control
system malfunction exists.
If this indicator light remains on for 20 seconds
and then blinks for 10 seconds when the engine
is not running, it indicates that the vehicle is not
ready for an emission control system inspection/
maintenance test. (See “READINESS FOR
INSPECTION/MAINTENANCE (I/M) TEST” in
the “9. Technical and consumer information”
Instruments and controls
2-15
Page 275 of 433

Black plate (273,1)
Model "Z51-D" EDITED: 2010/ 7/ 23
to the list again. Once the user chooses to
delete a phone or all phones, the system
asks the user to confirm.
NOTE:
When the user deletes a phone, the
associated phone book for that phone will
also be deleted.
. Replace Phone
Use the Replace Phone command to
change the priority level of the active phone.
The priority level determines which phone is
active when more than one paired Blue-
tooth
®phone is in the vehicle.
The system states the priority level of the
active phone and asks for a new priority level
(1, 2, 3, 4, 5) .
If the new priority level is already being used
for another phone, the two phones will swap
priority levels.
For example, if the current priority levels are: Priority Level 1 = Phone A
Priority Level 2 = Phone B
Priority Level 3 = Phone C
and you change the priority level of Phone C to
Level 1, then: Priority Level 1 = Phone C Priority Level 2 = Phone B
Priority Level 3 = Phone A
. Bluetooth On/Off
Use the Bluetooth On/Off command to turn
on/off Bluetooth
®Hands-Free Phone Sys-
tem.
. Help
The system announces the available com-
mands.
VOICE ADAPTATION MODEThe Voice Adaptation mode allows up to two
users with different dialects to train the system
to improve recognition accuracy. By repeating a
number of commands, the users can create a
voice model of their own voice that is stored in
the system. The system is capable of storing a
different voice adaptation model for each con-
nected phone.Training procedure1. Position the vehicle in a reasonably quiet
outdoor location.
2. Sit in the driver’s seat with the engine running, the parking brake on, and the
transmission in Park.
3. Press the
button.
4. Speak: “Help”. The system acknowledges the command and announces the next set of
available commands.
5. Speak: "Voice Adaptation". The system acknowledges the command and displays
the voice adaptation mode screen.
6. Voice memory A or memory B is selected automatically. If both memory locations are
already in use, the system will prompt you to
overwrite one. Follow the instructions pro-
vided by the system.
7. When preparation is complete and you are ready to begin, press the
button.
8. The voice adaptation mode will be ex- plained. Follow the instructions provided by
the system.
9. When training is finished, the system will tell you an adequate number of phrases have
been recorded.
10. The system will ask you to say your name. Follow the instructions to register your
name.
11. The system will announce that voice adapta- tion has been completed and the system is
ready.
The voice adaptation mode will stop if:
. The
button is pressed in voice
adaptation mode.
Center display, heater, air conditioner, audio, phone and voice recognition systems
4-105
Page 316 of 433

Black plate (314,1)
Model "Z51-D" EDITED: 2010/ 7/ 23
the enginewith your foot off the
accelerator pedal by depressing the
brake pedal and pushing the push-
button ignition switch to start the engine.
If the engine starts, but fails to run,
repeat the above procedure.
CAUTION
Do not operate the starter for more
than 15 seconds at a time. If the engine
does not start, push the ignition switch
to OFF and wait 10 seconds before
cranking again, otherwise the starter
could be damaged.
4. Warm-up
Allow the engine to idle for at least 30
seconds after starting. Do not race the
engine while warming it up. Drive at
moderate speed for a short distance first,
especially in cold weather. In cold weather,
keep the engine running for a minimum of 2 -
3 minutes before shutting it off. Starting and
stopping the engine over a short period of
time may make the vehicle more difficult to
start.
5. To stop the engine, shift the selector lever to the P (Park) position and push the ignition
switch to the OFF position.
CONTINUOUSLY VARIABLE TRANS-
MISSION (CVT)The Continuously Variable Transmission (CVT)
in your vehicle is electronically controlled to
produce maximum power and smooth operation.
The recommended operating procedures for this
transmission are shown on the following pages.
Follow these procedures for maximum vehicle
performance and driving enjoyment.
Engine power may be automatically re-
duced to protect the CVT if the engine
speed increases quickly when driving on
slippery roads or while being tested on
some dynamometers.Starting the vehicle1. After starting the engine, fully depress thefoot brake pedal before moving the selector
lever out of the P (Park) position.
This CVT is designed so that the foot
brake pedal must be depressed before
shifting from P (Park) to any driving
position while the ignition switch is in
the ON position.
The selector lever cannot be moved out
of the P (Park) position and into any of
the other positions if the ignition
switch is pushed to the LOCK, OFF or
ACC position. 2. Keep the foot brake pedal depressed and
move the selector lever to a driving position.
3. Release the parking brake and foot brake pedal, and then gradually start the vehicle in
motion.
WARNING
.Do not depress the accelerator
pedal while shifting from P (Park)
or N (Neutral) to R (Reverse) , D
(Drive) or L (Low) position. Always
depress the brake pedal until shift-
ing is completed. Failure to do so
could cause you to lose control and
have an accident.
. Cold engine idle speed is high, so
use caution when shifting into a
forward or reverse gear before the
engine has warmed up.
. Never shift to P (Park) or R (Re-
verse) while vehicle is moving. Fail-
ure to do so could cause you to lose
control and have an accident.
DRIVING THE VEHICLE
5-14
Starting and driving
Page 318 of 433

Black plate (316,1)
Model "Z51-D" EDITED: 2010/ 7/ 23
R (Reverse):
Use this position to back up. Make sure the
vehicle is completely stopped before selecting
the R (Reverse) position.The brake pedal
must be depressed and the selector lever
button pushed in to move the selector
lever from P (Park) , N (Neutral) or any
driving position to R (Reverse) .
N (Neutral):
Neither forward nor reverse gear is engaged.
The engine can be started in this position. You
may shift to N (Neutral) and restart a stalled
engine while the vehicle is moving.
D (Drive):
Use this position for all normal forward driving.
L (Low):
Use this position for maximum engine braking on
steep downhill gradients/climbing steep slopes
and whenever approaching sharp bends. Do not
use the L position in any other circumstances.
SSD0692
Overdrive (O/D) OFF switchWhen the O/D OFF switch is pushed with the
selector lever in the D (Drive) position, theindicator light in the instrument panel illuminates.
Use the overdrive off mode when you need
improved engine braking.
To turn off the overdrive off mode, push the O/D
OFF switch again. The
indicator light will
turn off.
Each time the engine is started, or when the
selector lever is shifted to any position other
than the D (Drive) position, the overdrive off
mode will be automatically turned off.
Accelerator downshift
— In D position —For passing or hill climbing, fully depress the
accelerator pedal to the floor. This shifts the
transmission down into a lower gear, depending
on the vehicle speed.High fluid temperature protection modeThis transmission has a high fluid temperature
protection mode. If the fluid temperature be-
comes too high (for example, when climbing
steep grades in high temperature with heavy
loads, such as when towing a trailer) , engine
power and, under some conditions, vehicle
speed will be decreased automatically to reduce
the chance of transmission damage. Vehicle
speed can be controlled with the accelerator
pedal, but the engine and vehicle speed may be
limited.Fail-safeIf the vehicle is driven under extreme
conditions, such as excessive wheel spin-
ning and subsequent hard braking, the
fail-safe system may be activated. The MIL
may illuminate to indicate the fail-safe
mode is activated. (See “Malfunction In-
dicator Light (MIL)” in the “2. Instruments
and controls” section.) This will occur even
if all electrical circuits are functioning
properly. In this case, place the ignition
switch in the OFF position and wait for 10
5-16
Starting and driving
Page 412 of 433

Black plate (414,1)
Model "Z51-D" EDITED: 2010/ 7/ 23
for proper towing.MAXIMUM LOAD LIMITS
Maximum trailer loadsNever allow the total trailer load to exceed the
value specified in the “Towing Load/Specifica-
tion” chart. The total trailer load equals trailer
weight plus its cargo weight.
.When towing a trailer load of 1,000 lbs
(454 kg) or more, trailers with a brake
system MUST be used.
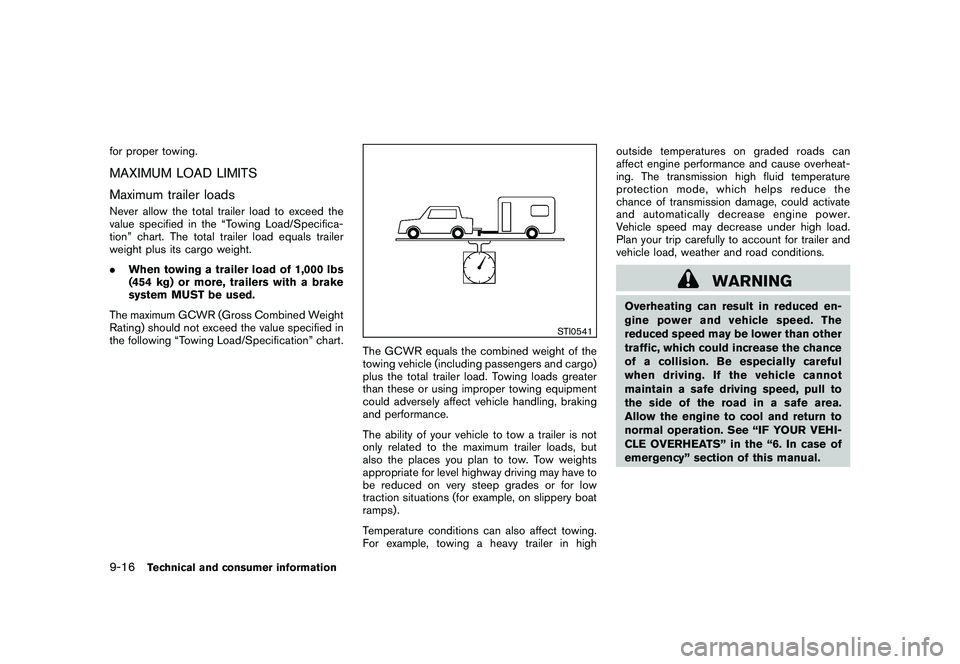
The maximum GCWR (Gross Combined Weight
Rating) should not exceed the value specified in
the following “Towing Load/Specification” chart.
STI0541
The GCWR equals the combined weight of the
towing vehicle (including passengers and cargo)
plus the total trailer load. Towing loads greater
than these or using improper towing equipment
could adversely affect vehicle handling, braking
and performance.
The ability of your vehicle to tow a trailer is not
only related to the maximum trailer loads, but
also the places you plan to tow. Tow weights
appropriate for level highway driving may have to
be reduced on very steep grades or for low
traction situations (for example, on slippery boat
ramps) .
Temperature conditions can also affect towing.
For example, towing a heavy trailer in high outside temperatures on graded roads can
affect engine performance and cause overheat-
ing. The transmission high fluid temperature
protection mode, which helps reduce the
chance of transmission damage, could activate
and automatically decrease engine power.
Vehicle speed may decrease under high load.
Plan your trip carefully to account for trailer and
vehicle load, weather and road conditions.
WARNING
Overheating can result in reduced en-
gine power and vehicle speed. The
reduced speed may be lower than other
traffic, which could increase the chance
of a collision. Be especially careful
when driving. If the vehicle cannot
maintain a safe driving speed, pull to
the side of the road in a safe area.
Allow the engine to cool and return to
normal operation. See “IF YOUR VEHI-
CLE OVERHEATS” in the “6. In case of
emergency” section of this manual.
9-16
Technical and consumer information
Page 426 of 433

Black plate (2,1)
10-2Cold weather driving.............................. 5-29
Compact Disc (CD) changer
(See audio system) ................................ 4-48
Compact Disc (CD) player
(See audio system) ................................ 4-54
Compass ............................................. 2-7
Console box ........................................ 2-45
Continuously Variable Transmission (CVT)
fluid ................................................. 8-11
Coolant Capacities and recommended
fuel/luricants ...................................... 9-2
Changing engine coolant ........................ 8-8
Checking engine coolant level .................. 8-7
Corrosion protection ................................. 7-5
Cover, Cargo cover ................................ 2-47
Cruise control ...................................... 5-18
Cup holders ........................................ 2-43
CVT, Driving with CVT
(Continuously Variable Transmission) ............. 5-14
D
Daytime running light system ..................... 2-35
Defroster switch, Rear window and outside
mirror defroster switch ............................ 2-32
Dimensions and weights ............................ 9-8
Display controls
(See center multi-function control panel) .......... 4-2
Door/lift gate open warning ....................... 2-20
Dot matrix liquid crystal display ................... 2-17
Drive belt ........................................... 8-15
Drive positioner .................................... 3-31
Driving All-wheel drive (AWD) ......................... 5-21
Cold weather driving .......................... 5-29 Driving with CVT
(Continuously Variable Transmission)
......... 5-14
On-pavement and off-road driving ............. 5-6
Precautions when starting and driving ......... 5-2
Safety precautions ............................... 5-7
DVD player operation .............................. 4-55
E
Economy, Fuel ..................................... 5-21
Elapsed time ....................................... 2-23
Emission control information label ................ 9-10
Emission control system warranty ................ 9-25
Engine Before starting the engine .................... 5-13
Break-in schedule .............................. 5-20
Capacities and recommended
fuel/lubricants .................................... 9-2
Changing engine coolant ........................ 8-8
Changing engine oil and filter ................... 8-8
Checking engine coolant level .................. 8-7
Checking engine oil level ........................ 8-8
Coolant temperature gauge ..................... 2-6
Emergency engine shut off .................... 5-12
Engine block heater ........................... 5-30
Engine compartment check locations .......... 8-6
Engine cooling system .......................... 8-7
Engine oil ......................................... 8-8
Engine oil and oil filter recommendation ....... 9-5
Engine oil replacement indicator .............. 2-21
Engine oil viscosity .............................. 9-5
Engine serial number ............................ 9-9
Engine specifications ............................ 9-7
Engine start operation indicator .............. 2-18
If your vehicle overheats ....................... 6-11 Starting the engine
............................ 5-13
Entry/exit function, Automatic drive positioner . . . 3-31
Event Data Recorders (EDR) ..................... 9-27
Exhaust gas (carbon monoxide) .................... 5-2
F
F.M.V.S.S./C.M.V.S.S. certification label. ........... 9-9
Filter Air cleaner housing filter ...................... 8-16
Changing engine oil and filter ................... 8-8
Flashers (See hazard warning flasher switch) . . . 2-37
Flat tire ................................................ 6-2
Flat towing .......................................... 9-23
Floor mat cleaning ................................... 7-4
Fluid Brake fluid ...................................... 8-12
Capacities and recommended
fuel/lubricants .................................... 9-2
Continuously Variable Transmission (CVT)
fluid ............................................. 8-11
Engine coolant ................................... 8-7
Engine oil ......................................... 8-8
Power steering fluid ........................... 8-11
Window washer fluid .......................... 8-12
FM-AM radio with Compact Disc (CD)
changer ............................................. 4-46
FM-AM-SAT radio with Compact Disc (CD)
player ............................................... 4-51
Fog light switch .................................... 2-36
Front manual seat adjustment. ...................... 1-3
Front passenger air bag and status light ........ 1-50
Front power seat adjustment ....................... 1-4
Front seat, Front seat adjustment .................. 1-3
Front-seat active head restraint ................... 1-11
Model "Z51-D" EDITED: 2010/ 7/ 23