2011 NISSAN MURANO 5 -13
[x] Cancel search: 5 -13Page 15 of 433
Black plate (11,1)
Model "Z51-D" EDITED: 2010/ 7/ 23
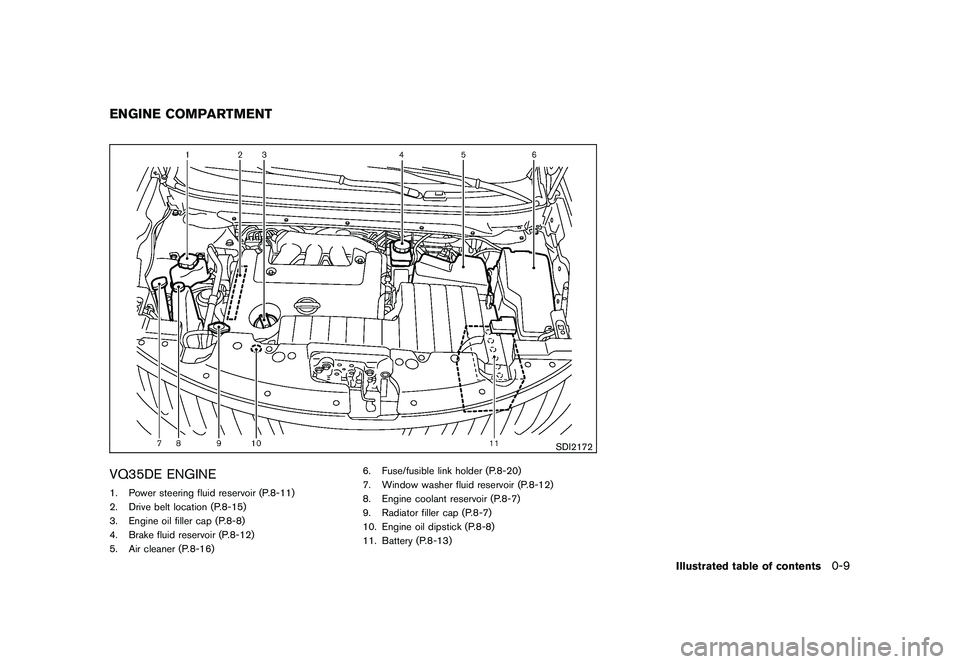
SDI2172
VQ35DE ENGINE1. Power steering fluid reservoir (P.8-11)
2. Drive belt location (P.8-15)
3. Engine oil filler cap (P.8-8)
4. Brake fluid reservoir (P.8-12)
5. Air cleaner (P.8-16)6. Fuse/fusible link holder (P.8-20)
7. Window washer fluid reservoir (P.8-12)
8. Engine coolant reservoir (P.8-7)
9. Radiator filler cap (P.8-7)
10. Engine oil dipstick (P.8-8)
11. Battery (P.8-13)ENGINE COMPARTMENT
Illustrated table of contents
0-9
Page 29 of 433
Black plate (27,1)
Model "Z51-D" EDITED: 2010/ 7/ 23
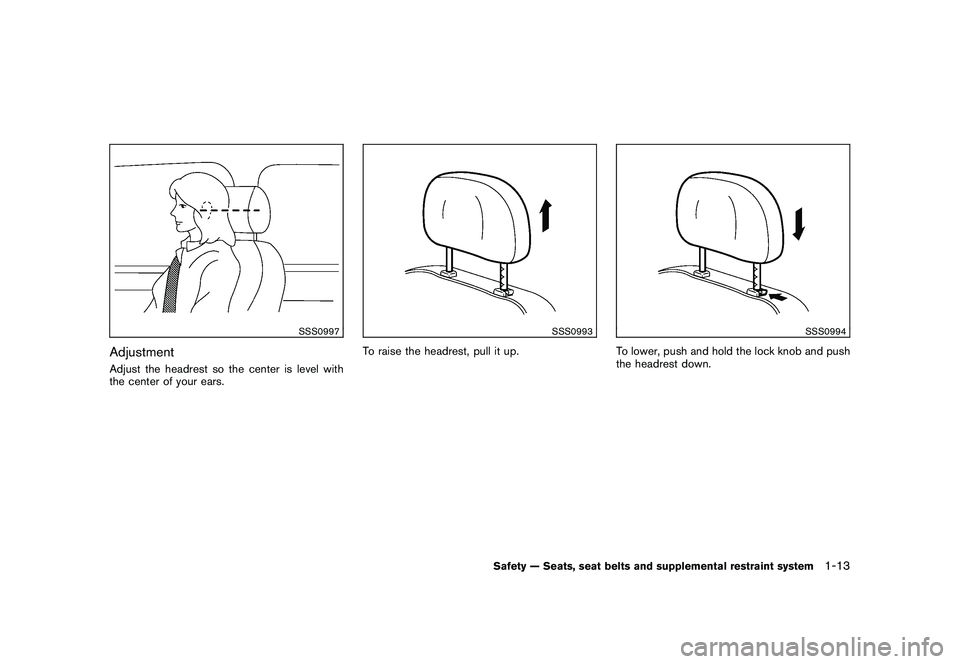
SSS0997
AdjustmentAdjust the headrest so the center is level with
the center of your ears.
SSS0993
To raise the headrest, pull it up.
SSS0994
To lower, push and hold the lock knob and push
the headrest down.
Safety — Seats, seat belts and supplemental restraint system
1-13
Page 87 of 433

Black plate (85,1)
Model "Z51-D" EDITED: 2010/ 7/ 23
Low tire pressure warning:
If the vehicle is being driven with low tire
pressure, the warning light will illuminate. A
CHECK TIRE PRESSURE warning also appears
on the dot matrix liquid crystal display.
When the low tire pressure warning light
illuminates, you should stop and adjust the tire
pressure to the recommended COLD tire
pressure shown on the Tire and Loading
Information label. The low tire pressure warning
light does not automatically turn off when the tire
pressure is adjusted. After the tire is inflated to
the recommended pressure, the vehicle must be
driven at speeds above 16 MPH (25 km/h) to
activate the TPMS and turn off the low tire
pressure warning light. Use a tire pressure
gauge to check the tire pressure.
The CHECK TIRE PRESSURE warning is active
as long as the low tire pressure warning light
remains illuminated.
For additional information, see “TIRE PRES-
SURE MONITORING SYSTEM (TPMS)” in the
“5. Starting and driving” section and “TIRE
PRESSURE MONITORING SYSTEM (TPMS)”
in the “6. In case of emergency” section.
TPMS malfunction:
If the TPMS is not functioning properly, the low
tire pressure warning light will flash for approxi-
mately 1 minute when the ignition switch ispushed ON. The light will remain on after the 1
minute. Have the system checked by a NISSAN
dealer. The CHECK TIRE PRESSURE warning
does not appear if the low tire pressure warning
light illuminates to indicate a TPMS malfunction.
For additional information, see “TIRE PRES-
SURE MONITORING SYSTEM (TPMS)” in the
“5. Starting and driving” section. For the
CHECK TIRE PRESSURE warning, see “DOT
MATRIX LIQUID CRYSTAL DISPLAY” later in
this section.
WARNING
.
If the light does not illuminate with
the ignition switch pushed ON, have
the vehicle checked by a NISSAN
dealer as soon as possible.
. If the light illuminates while driving,
avoid sudden steering maneuvers or
abrupt braking, reduce vehicle
speed, pull off the road to a safe
location and stop the vehicle as
soon as possible. Driving with un-
der-inflated tires may permanently
damage the tires and increase the
likelihood of tire failure. Serious
vehicle damage could occur and
may lead to an accident and could
result in serious personal injury. Check the tire pressure for all four
tires. Adjust the tire pressure to the
recommended COLD tire pressure
shownontheTireandLoading
Information label to turn the low
tire pressure warning light OFF. If
the light stays on after adjusting the
tire pressure and driving over 16
MPH (25 km/h) , have the system
checked by a NISSAN dealer. If you
have a flat tire, replace it with a
spare tire as soon as possible.
. When a spare tire is mounted or a
wheel is replaced, the TPMS will not
function and the low tire pressure
warning light will flash for approxi-
mately 1 minute. The light will
remain on after 1 minute. Contact
your NISSAN dealer as soon as
possible for tire replacement and/
or system resetting.
. Replacing tires with those not ori-
ginally specified by NISSAN could
affect the proper operation of the
TPMS.
Instruments and controls
2-13
Page 137 of 433
Black plate (10,1)
3 Pre-driving checks and adjustments
Model "Z51-D" EDITED: 2010/ 7/ 23
Keys ............................................................... 3-2NISSAN Vehicle Immobilizer System keys ............ 3-2
Intelligent Key system ...................................... 3-3
Mechanical key .............................................. 3-4
Valet hand-off ................................................ 3-4
Doors .............................................................. 3-4
Locking with mechanical key ............................. 3-5
Opening and closing windows with the
mechanical key .............................................. 3-5
Locking with inside lock knob ........................... 3-5
Locking with power door lock switch .................. 3-6
Automatic door locks ...................................... 3-6
Child safety rear door lock ............................... 3-7
Intelligent Key system .......................................... 3-7
Intelligent Key operating range .......................... 3-9
Door locks/unlocks precaution .......................... 3-9
Intelligent Key operation ................................. 3-10
Battery saver system ..................................... 3-13
Warning signals ........................................... 3-13
Troubleshooting guide ................................... 3-14
Remote keyless entry system .............................. 3-15
How to use remote keyless entry system ........... 3-16Hood
............................................................ 3-19
Lift gate ......................................................... 3-19
Operating manual lift gate .............................. 3-20
Operating power lift gate (if so equipped) .......... 3-20
Auto closure ............................................... 3-23
Lift gate release ........................................... 3-24
Fuel-filler door ................................................. 3-24
Opening fuel-filler door .................................. 3-24
Fuel-filler cap .............................................. 3-24
Tilt/telescopic steering ...................................... 3-26
Manual operation ......................................... 3-26
Electric operation ......................................... 3-27
Sun visors ...................................................... 3-27
Mirrors ........................................................... 3-28
Inside mirror ................................................ 3-28
Outside mirrors ............................................ 3-30
Vanity mirror ................................................ 3-31
Automatic drive positioner (if so equipped) ............. 3-31
Entry/exit function ......................................... 3-31
Memory storage ........................................... 3-32
System operation ......................................... 3-33
Page 149 of 433
Black plate (147,1)
Model "Z51-D" EDITED: 2010/ 7/ 23
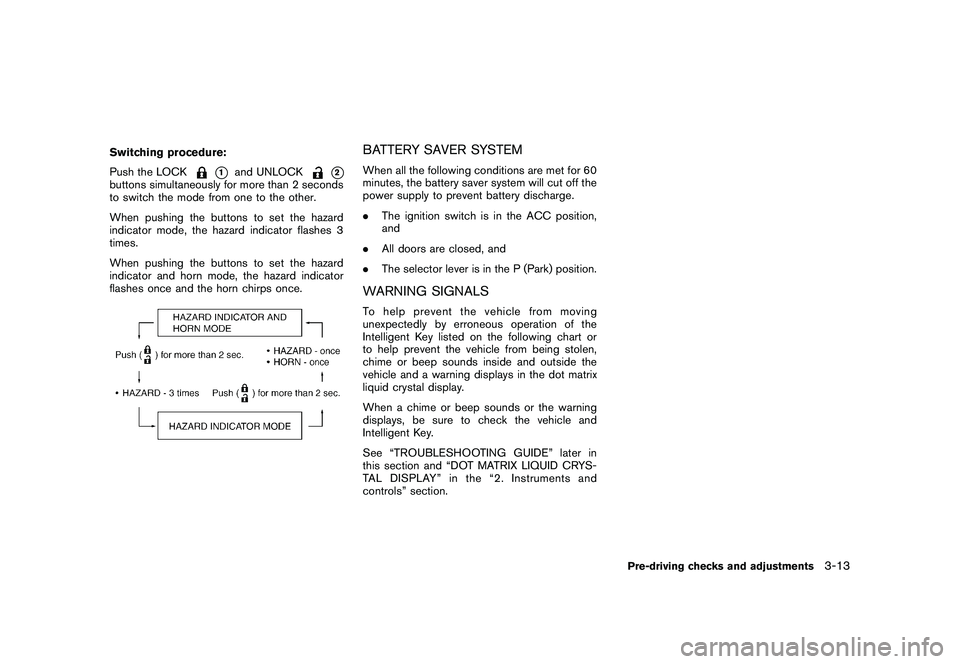
Switching procedure:
Push the LOCK
*1
and UNLOCK
*2
buttons simultaneously for more than 2 seconds
to switch the mode from one to the other.
When pushing the buttons to set the hazard
indicator mode, the hazard indicator flashes 3
times.
When pushing the buttons to set the hazard
indicator and horn mode, the hazard indicator
flashes once and the horn chirps once.
BATTERY SAVER SYSTEMWhen all the following conditions are met for 60
minutes, the battery saver system will cut off the
power supply to prevent battery discharge.
.The ignition switch is in the ACC position,
and
. All doors are closed, and
. The selector lever is in the P (Park) position.WARNING SIGNALSTo help prevent the vehicle from moving
unexpectedly by erroneous operation of the
Intelligent Key listed on the following chart or
to help prevent the vehicle from being stolen,
chime or beep sounds inside and outside the
vehicle and a warning displays in the dot matrix
liquid crystal display.
When a chime or beep sounds or the warning
displays, be sure to check the vehicle and
Intelligent Key.
See “TROUBLESHOOTING GUIDE” later in
this section and “DOT MATRIX LIQUID CRYS-
TAL DISPLAY” in the “2. Instruments and
controls” section.
Pre-driving checks and adjustments
3-13
Page 171 of 433

Black plate (14,1)
Model "Z51-D" EDITED: 2010/ 7/ 23
Vehicle phonebook....................................... 4-85
Making a call ............................................... 4-88
Receiving a call ........................................... 4-89
During a call ............................................... 4-90
Phone setting .............................................. 4-90
Troubleshooting guide ................................... 4-92
Bluetooth
®Hands-Free Phone System (models
without navigation system) (if so equipped) ............ 4-93
Regulatory information ................................... 4-94
Control buttons ........................................... 4-94
Voice Recognition System .............................. 4-94
Pairing procedure ......................................... 4-99
Phonebook registration ................................ 4-100 Making a call
............................................. 4-100
Receiving a call ......................................... 4-101
During a call ............................................. 4-101
Phone settings .......................................... 4-102
Voice adaptation mode ................................ 4-105
NISSAN Voice Recognition System
(models with navigation system) ........................ 4-106
NISSAN voice recognition Standard Mode ....... 4-106
Using the system ....................................... 4-109
NISSAN voice recognition Alternate Command
Mode ...................................................... 4-119
Using the system ....................................... 4-125
Troubleshooting guide ................................. 4-130
Page 183 of 433
Black plate (181,1)
Model "Z51-D" EDITED: 2010/ 7/ 23
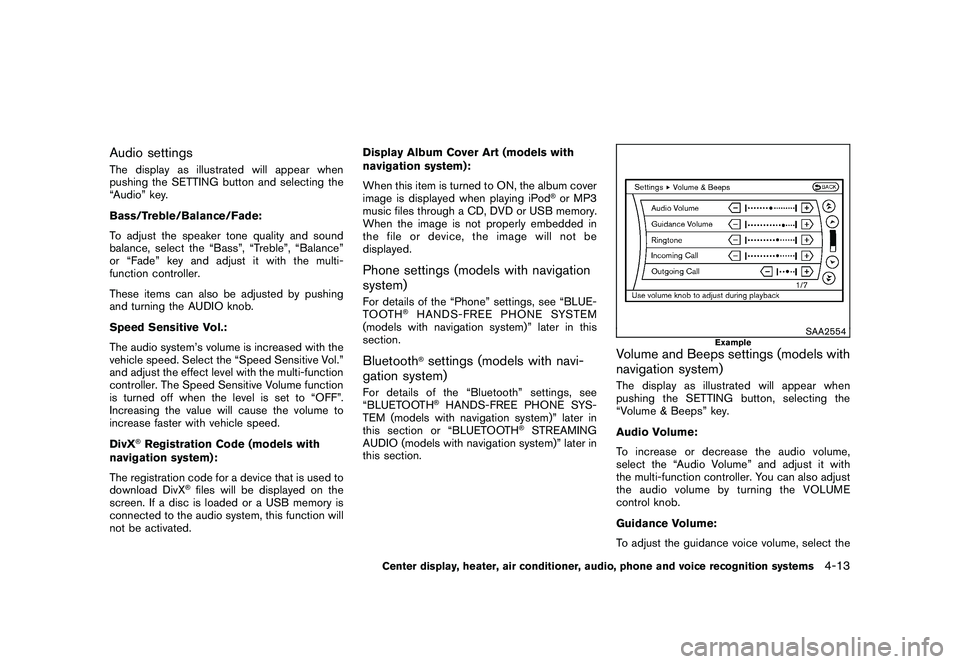
Audio settingsThe display as illustrated will appear when
pushing the SETTING button and selecting the
“Audio” key.
Bass/Treble/Balance/Fade:
To adjust the speaker tone quality and sound
balance, select the “Bass”, “Treble”, “Balance”
or “Fade” key and adjust it with the multi-
function controller.
These items can also be adjusted by pushing
and turning the AUDIO knob.
Speed Sensitive Vol.:
The audio system’s volume is increased with the
vehicle speed. Select the “Speed Sensitive Vol.”
and adjust the effect level with the multi-function
controller. The Speed Sensitive Volume function
is turned off when the level is set to “OFF”.
Increasing the value will cause the volume to
increase faster with vehicle speed.
DivX
®Registration Code (models with
navigation system):
The registration code for a device that is used to
download DivX
®files will be displayed on the
screen. If a disc is loaded or a USB memory is
connected to the audio system, this function will
not be activated. Display Album Cover Art (models with
navigation system):
When this item is turned to ON, the album cover
image is displayed when playing iPod
®or MP3
music files through a CD, DVD or USB memory.
When the image is not properly embedded in
the file or device, the image will not be
displayed.
Phone settings (models with navigation
system)For details of the “Phone” settings, see “BLUE-
TOOTH
®HANDS-FREE PHONE SYSTEM
(models with navigation system)” later in this
section.
Bluetooth
®settings (models with navi-
gation system)
For details of the “Bluetooth” settings, see
“BLUETOOTH
®HANDS-FREE PHONE SYS-
TEM (models with navigation system)” later in
this section or “BLUETOOTH
®STREAMING
AUDIO (models with navigation system)” later in
this section.
SAA2554
Example
Volume and Beeps settings (models with
navigation system)The display as illustrated will appear when
pushing the SETTING button, selecting the
“Volume & Beeps” key.
Audio Volume:
To increase or decrease the audio volume,
select the “Audio Volume” and adjust it with
the multi-function controller. You can also adjust
the audio volume by turning the VOLUME
control knob.
Guidance Volume:
To adjust the guidance voice volume, select the
Center display, heater, air conditioner, audio, phone and voice recognition systems
4-13
Page 300 of 433
Black plate (298,1)
Model "Z51-D" EDITED: 2010/ 7/ 23
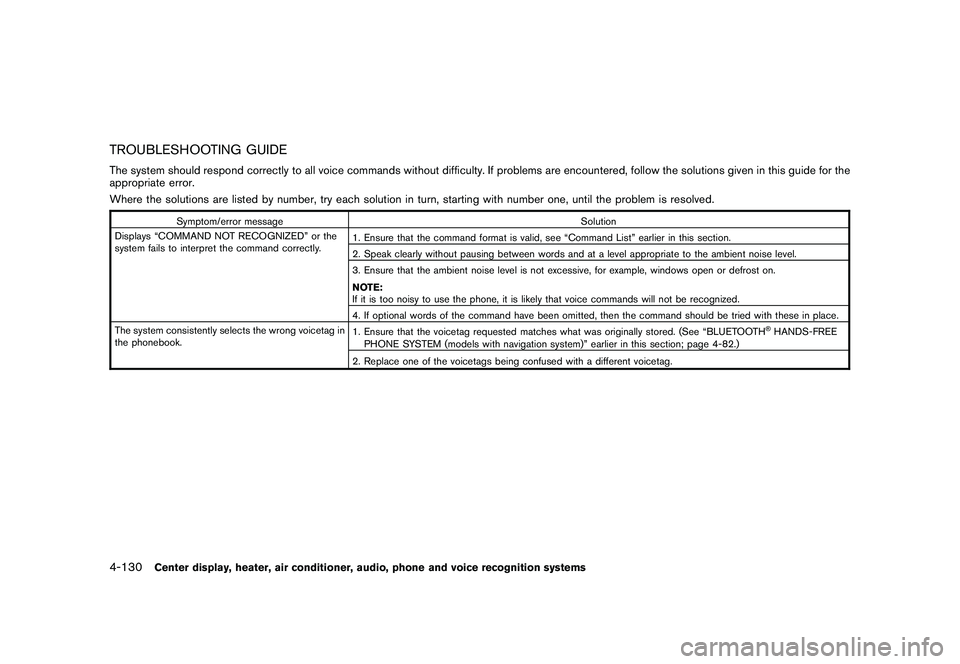
TROUBLESHOOTING GUIDEThe system should respond correctly to all voice commands without difficulty. If problems are encountered, follow the solutions given in this guide for the
appropriate error.
Where the solutions are listed by number, try each solution in turn, starting with number one, until the problem is resolved.
Symptom/error messageSolution
Displays “COMMAND NOT RECOGNIZED” or the
system fails to interpret the command correctly. 1. Ensure that the command format is valid, see “Command List” earlier in this section.
2. Speak clearly without pausing between words and at a level appropriate to the ambient noise level.
3. Ensure that the ambient noise level is not excessive, for example, windows open or defrost on.
NOTE:
If it is too noisy to use the phone, it is likely that voice commands will not be recognized.
4. If optional words of the command have been omitted, then the command should be tried with these in place.
The system consistently selects the wrong voicetag in
the phonebook. 1. Ensure that the voicetag requested matches what was originally stored. (See “BLUETOOTH
®HANDS-FREE
PHONE SYSTEM (models with navigation system)” earlier in this section; page 4-82.)
2. Replace one of the voicetags being confused with a different voicetag.
4-130
Center display, heater, air conditioner, audio, phone and voice recognition systems