2011 NISSAN MURANO instrument panel
[x] Cancel search: instrument panelPage 108 of 433

Black plate (106,1)
Model "Z51-D" EDITED: 2010/ 7/ 23
SIC3669
Autolight system (if so equipped)The autolight system allows the headlights to be
set so they turn on and off automatically.
To set the autolight system:
1. Make sure the headlight switch is in theAUTO position
*1.
2. Push the ignition switch to the ON position.
3. The autolight system automatically turns the headlights on and off.
To turn the autolight system off, turn the switch
to the OFF,
or
position. The autolight system can turn on the headlights
automatically when it is dark and turn off the
headlights when it is light.
If the ignition switch is pushed to the OFF
position and one of the doors is opened and this
condition is continued, the headlights remain on
for 5 minutes.
Automatic headlights off delay:
You can keep the headlights on for up to 180
seconds after you push the ignition switch to
OFF and open any door then close all the doors.
You can adjust the period of the automatic
headlights off delay from 0 seconds (OFF) to
180 seconds. The factory default setting is 45
seconds.
For automatic headlights off delay setting, see
“Light Off Delay” in the “4. Center display,
heater, air conditioner, audio, phone and voice
recognition systems” section.
SAA0642A
Be sure not to put anything on top of the
photo sensor
*A
located on the top of the
instrument panel. The photo sensor con-
trols the autolight; if it is covered, the
photo sensor reacts as if it is dark and the
headlights will illuminate.
2-34
Instruments and controls
Page 110 of 433
Black plate (108,1)
Model "Z51-D" EDITED: 2010/ 7/ 23
SIC3585
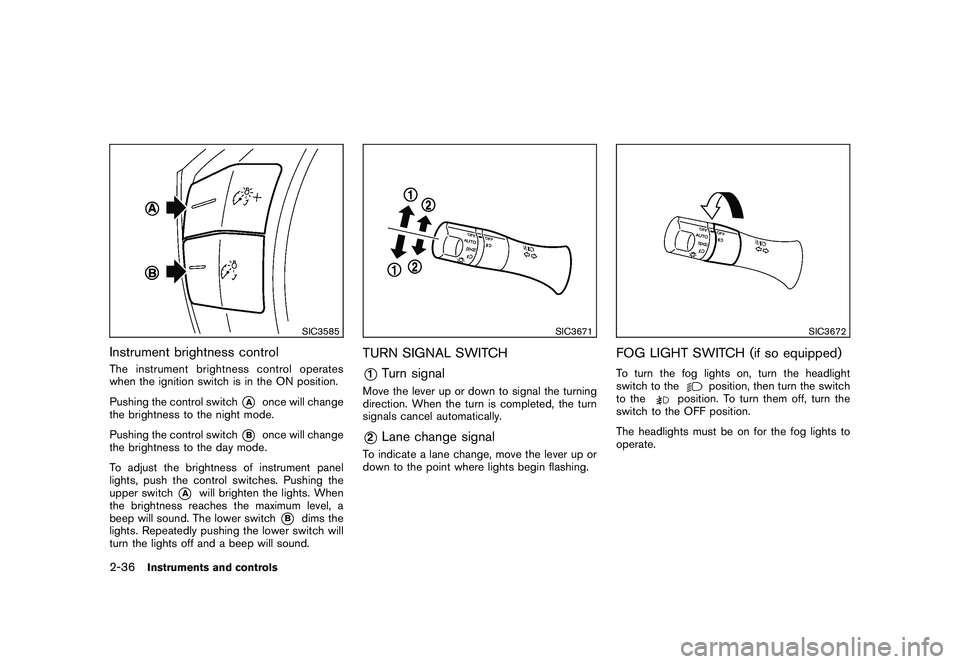
Instrument brightness controlThe instrument brightness control operates
when the ignition switch is in the ON position.
Pushing the control switch
*A
once will change
the brightness to the night mode.
Pushing the control switch
*B
once will change
the brightness to the day mode.
To adjust the brightness of instrument panel
lights, push the control switches. Pushing the
upper switch
*A
will brighten the lights. When
the brightness reaches the maximum level, a
beep will sound. The lower switch
*B
dims the
lights. Repeatedly pushing the lower switch will
turn the lights off and a beep will sound.
SIC3671
TURN SIGNAL SWITCH*1
Turn signal
Move the lever up or down to signal the turning
direction. When the turn is completed, the turn
signals cancel automatically.*2
Lane change signal
To indicate a lane change, move the lever up or
down to the point where lights begin flashing.
SIC3672
FOG LIGHT SWITCH (if so equipped)To turn the fog lights on, turn the headlight
switch to the
position, then turn the switch
to the
position. To turn them off, turn the
switch to the OFF position.
The headlights must be on for the fog lights to
operate.
2-36
Instruments and controls
Page 114 of 433
Black plate (112,1)
Model "Z51-D" EDITED: 2010/ 7/ 23
MODELS WITH COLOR DISPLAYTo adjust the clock on the front color display, use
the SETTING button on the center multi-
function control panel. See “HOW TO USE
SETTING BUTTON” in the “4. Center display,
heater, air conditioner, audio, phone and voice
recognition systems” section.
The clock settings display cannot be operated
while driving. Stop the vehicle in a safe place
and apply the parking brake before setting the
clock.
SIC3802
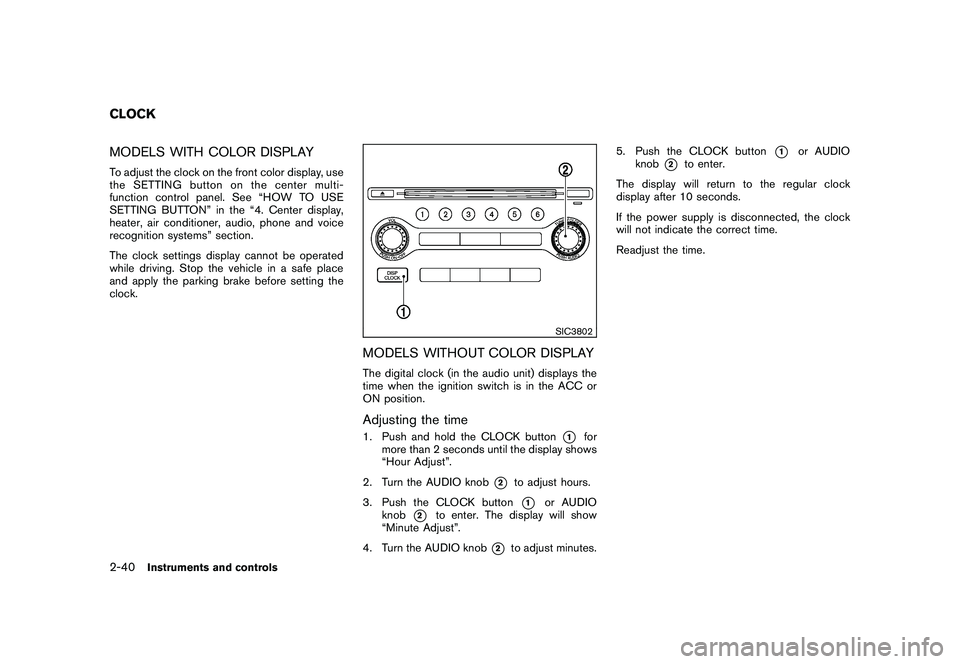
MODELS WITHOUT COLOR DISPLAYThe digital clock (in the audio unit) displays the
time when the ignition switch is in the ACC or
ON position.Adjusting the time1. Push and hold the CLOCK button
*1
for
more than 2 seconds until the display shows
“Hour Adjust”.
2. Turn the AUDIO knob
*2
to adjust hours.
3. Push the CLOCK button*1
or AUDIO
knob
*2
to enter. The display will show
“Minute Adjust”.
4. Turn the AUDIO knob
*2
to adjust minutes. 5. Push the CLOCK button
*1
or AUDIO
knob
*2
to enter.
The display will return to the regular clock
display after 10 seconds.
If the power supply is disconnected, the clock
will not indicate the correct time.
Readjust the time.
CLOCK2-40
Instruments and controls
Page 130 of 433
Black plate (128,1)
Model "Z51-D" EDITED: 2010/ 7/ 23
— remain on for about 15 seconds.
. doors are unlocked by pushing the UN-
LOCK button on the Intelligent Key or door
handle request switch with the ignition
switch in the LOCK position
— remain on for about 15 seconds.
. any door is opened and then closed with the
ignition switch in the LOCK position
— remain on for about 15 seconds.
. any door is opened with the ignition switch
in the ACC or ON position
— remain on while the door is opened. When the door is closed, the lights go off.
The lights will also turn off after 15
minutes when the lights remain illumi-
nated after the ignition switch has been
pushed to the OFF or LOCK position to
prevent the battery from becoming dis-
charged.
When the auto interior illumination is set to the
OFF position (see “VEHICLE INFORMATION
AND SETTINGS” in the “4. Center display,
heater, air conditioner, audio, phone and voice
recognition systems” section) , the lights will
illuminate under the following condition:
. any door is opened with the ignition switch
in any position — remain on while the door is opened.
When the door is closed, the lights go off.
OFF positionWhen the switch is in the OFF position
*3, the
lights will not illuminate, regardless of the
condition.
CAUTION
Do not use for extended periods of time
with the engine stopped. This could
result in a discharged battery.
SIC3599
Map lights
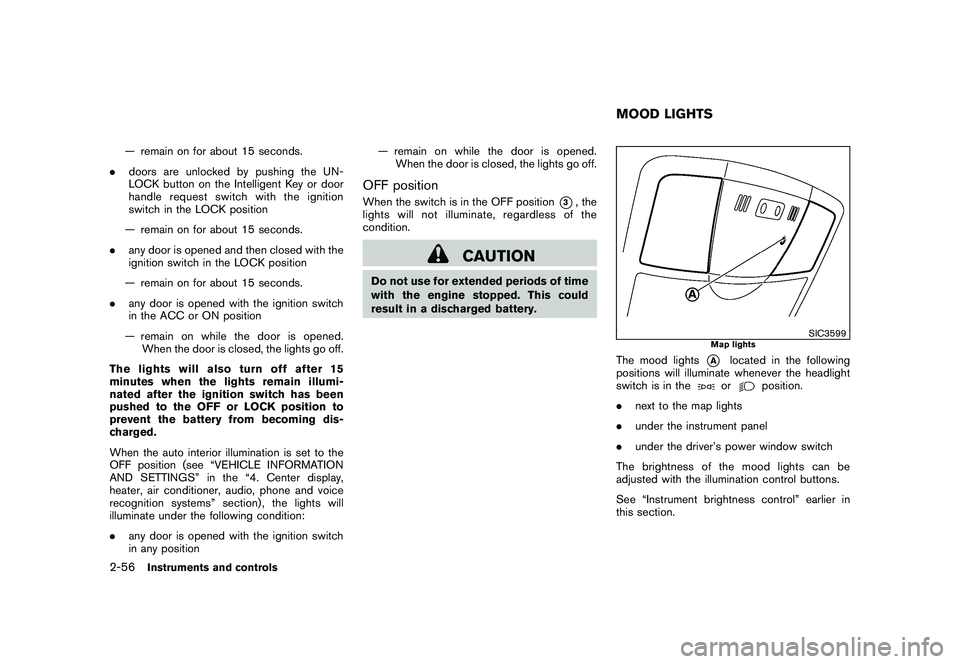
The mood lights
*A
located in the following
positions will illuminate whenever the headlight
switch is in theor
position.
. next to the map lights
. under the instrument panel
. under the driver’s power window switch
The brightness of the mood lights can be
adjusted with the illumination control buttons.
See “Instrument brightness control” earlier in
this section.
MOOD LIGHTS
2-56
Instruments and controls
Page 147 of 433
Black plate (145,1)
Model "Z51-D" EDITED: 2010/ 7/ 23
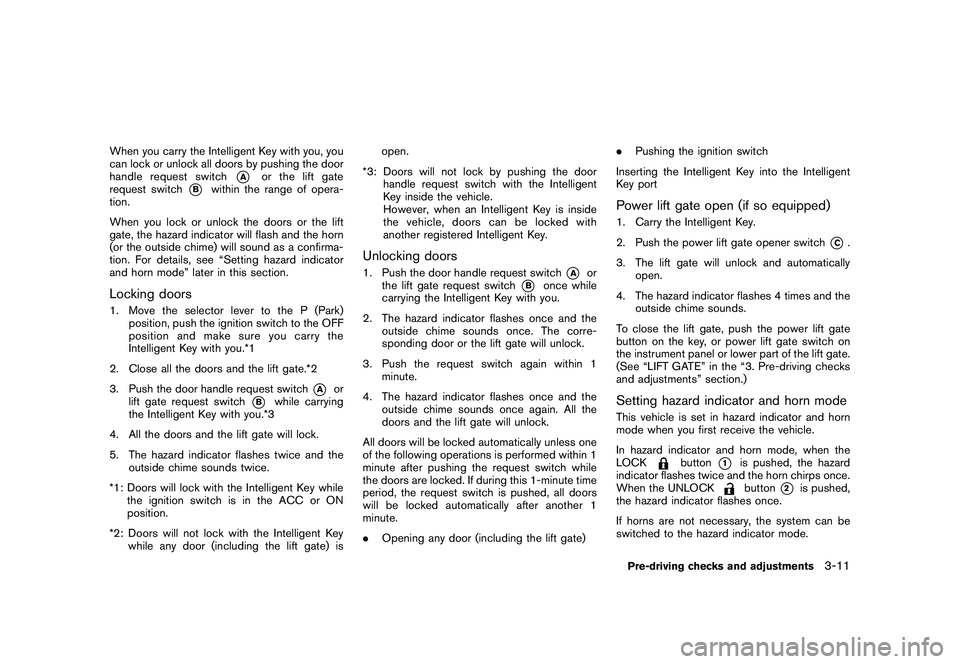
When you carry the Intelligent Key with you, you
can lock or unlock all doors by pushing the door
handle request switch
*A
or the lift gate
request switch
*B
within the range of opera-
tion.
When you lock or unlock the doors or the lift
gate, the hazard indicator will flash and the horn
(or the outside chime) will sound as a confirma-
tion. For details, see “Setting hazard indicator
and horn mode” later in this section.
Locking doors1. Move the selector lever to the P (Park) position, push the ignition switch to the OFF
position and make sure you carry the
Intelligent Key with you.*1
2. Close all the doors and the lift gate.*2
3. Push the door handle request switch
*A
or
lift gate request switch
*B
while carrying
the Intelligent Key with you.*3
4. All the doors and the lift gate will lock.
5. The hazard indicator flashes twice and the outside chime sounds twice.
*1: Doors will lock with the Intelligent Key while the ignition switch is in the ACC or ON
position.
*2: Doors will not lock with the Intelligent Key while any door (including the lift gate) is open.
*3: Doors will not lock by pushing the door handle request switch with the Intelligent
Key inside the vehicle.
However, when an Intelligent Key is inside
the vehicle, doors can be locked with
another registered Intelligent Key.
Unlocking doors1. Push the door handle request switch
*A
or
the lift gate request switch
*B
once while
carrying the Intelligent Key with you.
2. The hazard indicator flashes once and the outside chime sounds once. The corre-
sponding door or the lift gate will unlock.
3. Push the request switch again within 1 minute.
4. The hazard indicator flashes once and the outside chime sounds once again. All the
doors and the lift gate will unlock.
All doors will be locked automatically unless one
of the following operations is performed within 1
minute after pushing the request switch while
the doors are locked. If during this 1-minute time
period, the request switch is pushed, all doors
will be locked automatically after another 1
minute.
. Opening any door (including the lift gate) .
Pushing the ignition switch
Inserting the Intelligent Key into the Intelligent
Key port
Power lift gate open (if so equipped)1. Carry the Intelligent Key.
2. Push the power lift gate opener switch
*C.
3. The lift gate will unlock and automatically open.
4. The hazard indicator flashes 4 times and the outside chime sounds.
To close the lift gate, push the power lift gate
button on the key, or power lift gate switch on
the instrument panel or lower part of the lift gate.
(See “LIFT GATE” in the “3. Pre-driving checks
and adjustments” section.)
Setting hazard indicator and horn modeThis vehicle is set in hazard indicator and horn
mode when you first receive the vehicle.
In hazard indicator and horn mode, when the
LOCK
button
*1
is pushed, the hazard
indicator flashes twice and the horn chirps once.
When the UNLOCKbutton
*2
is pushed,
the hazard indicator flashes once.
If horns are not necessary, the system can be
switched to the hazard indicator mode.
Pre-driving checks and adjustments
3-11
Page 155 of 433

Black plate (153,1)
Model "Z51-D" EDITED: 2010/ 7/ 23
SPA2437
1. Pull the hood lock release handle
*1
located below the instrument panel; the
hood will then spring up slightly.
2. Pull the lever
*2
up at the front of the hood
with your fingertips and raise the hood.
3. When closing the hood, slowly close the hood down and make sure it locks into
place.
WARNING
.Make sure the hood is completely
closed and latched before driving.
Failure to do so could cause the
hood to fly open and result in an
accident.
. If you see steam or smoke coming
from the engine compartment, to
avoid injury do not open the hood.
WARNING
.Always be sure the lift gate has
been closed securely to prevent it
from opening while driving.
. Do not drive with the lift gate open.
This could allow dangerous exhaust
gases to be drawn into the vehicle.
See “EXHAUST GAS (carbon mon-
oxide)” in the “5. Starting and driv-
ing” section of this manual.
. Do not leave children unattended
inside the vehicle. They could un-
knowingly activate switches or con-
trols. Unattended children could
become involved in serious acci-
dents.
. Always be sure that hands and feet
are clear of the door frame to avoid
injury while closing the lift gate.
HOOD LIFT GATE
Pre-driving checks and adjustments
3-19
Page 156 of 433
Black plate (154,1)
Model "Z51-D" EDITED: 2010/ 7/ 23
SPA2438
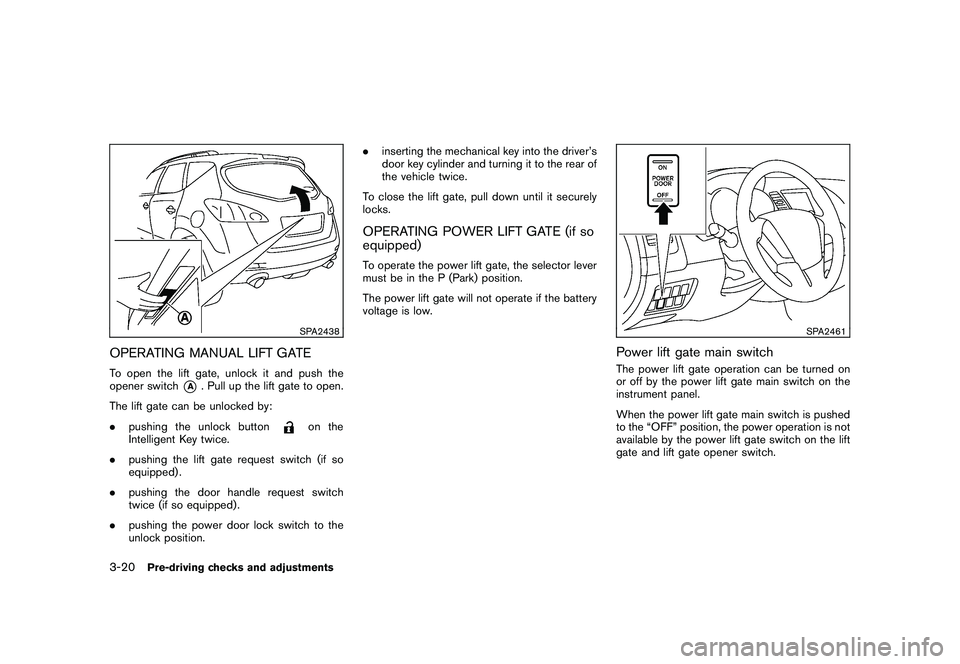
OPERATING MANUAL LIFT GATETo open the lift gate, unlock it and push the
opener switch
*A
. Pull up the lift gate to open.
The lift gate can be unlocked by:
. pushing the unlock button
on the
Intelligent Key twice.
. pushing the lift gate request switch (if so
equipped) .
. pushing the door handle request switch
twice (if so equipped) .
. pushing the power door lock switch to the
unlock position. .
inserting the mechanical key into the driver’s
door key cylinder and turning it to the rear of
the vehicle twice.
To close the lift gate, pull down until it securely
locks.
OPERATING POWER LIFT GATE (if so
equipped)To operate the power lift gate, the selector lever
must be in the P (Park) position.
The power lift gate will not operate if the battery
voltage is low.
SPA2461
Power lift gate main switchThe power lift gate operation can be turned on
or off by the power lift gate main switch on the
instrument panel.
When the power lift gate main switch is pushed
to the “OFF” position, the power operation is not
available by the power lift gate switch on the lift
gate and lift gate opener switch.
3-20
Pre-driving checks and adjustments
Page 157 of 433
Black plate (155,1)
Model "Z51-D" EDITED: 2010/ 7/ 23
SPA2439SPA2462
SPA2463SPA2440
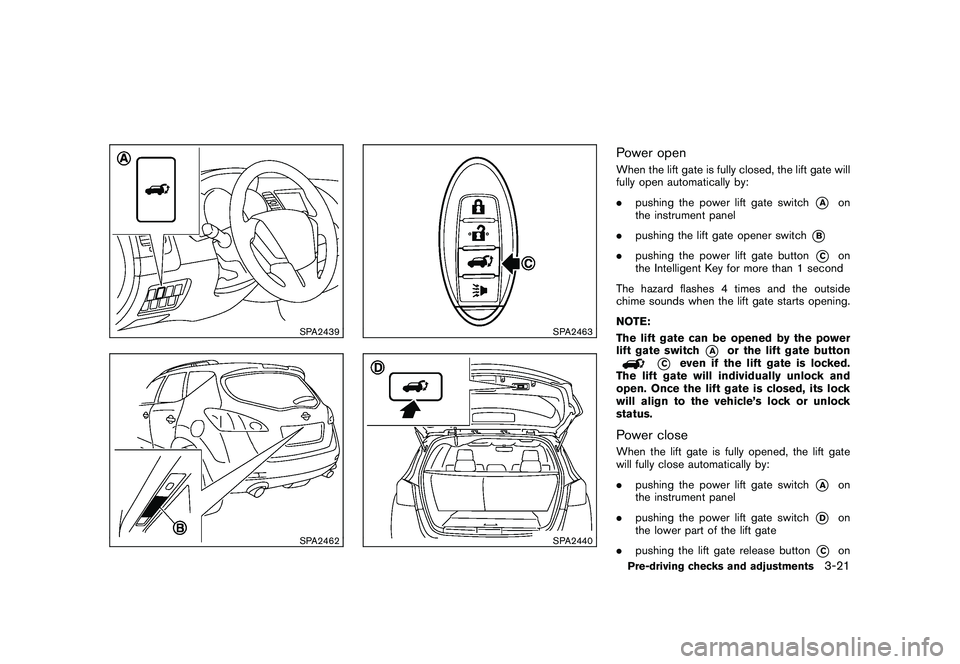
Power openWhen the lift gate is fully closed, the lift gate will
fully open automatically by:
.pushing the power lift gate switch
*A
on
the instrument panel
. pushing the lift gate opener switch
*B
.pushing the power lift gate button
*C
on
the Intelligent Key for more than 1 second
The hazard flashes 4 times and the outside
chime sounds when the lift gate starts opening.
NOTE:
The lift gate can be opened by the power
lift gate switch
*A
or the lift gate button
*C
even if the lift gate is locked.
The lift gate will individually unlock and
open. Once the lift gate is closed, its lock
will align to the vehicle’s lock or unlock
status.
Power closeWhen the lift gate is fully opened, the lift gate
will fully close automatically by:
. pushing the power lift gate switch
*A
on
the instrument panel
. pushing the power lift gate switch
*D
on
the lower part of the lift gate
. pushing the lift gate release button
*C
on
Pre-driving checks and adjustments
3-21