2011 NISSAN MURANO height adjustment
[x] Cancel search: height adjustmentPage 19 of 433
Black plate (17,1)
Model "Z51-D" EDITED: 2010/ 7/ 23
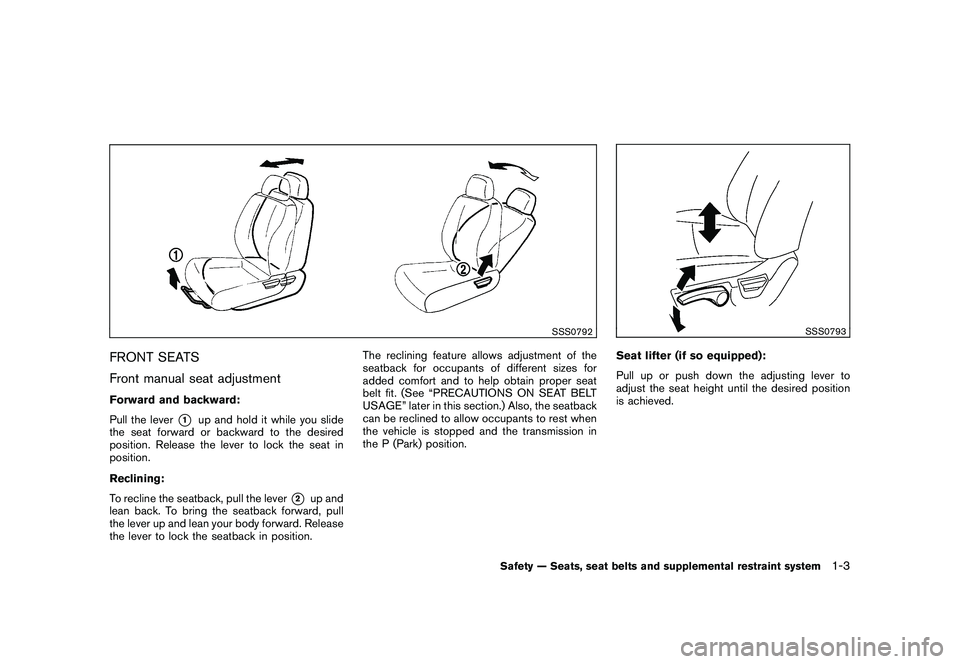
SSS0792
FRONT SEATS
Front manual seat adjustmentForward and backward:
Pull the lever
*1
up and hold it while you slide
the seat forward or backward to the desired
position. Release the lever to lock the seat in
position.
Reclining:
To recline the seatback, pull the lever
*2
up and
lean back. To bring the seatback forward, pull
the lever up and lean your body forward. Release
the lever to lock the seatback in position. The reclining feature allows adjustment of the
seatback for occupants of different sizes for
added comfort and to help obtain proper seat
belt fit. (See “PRECAUTIONS ON SEAT BELT
USAGE” later in this section.) Also, the seatback
can be reclined to allow occupants to rest when
the vehicle is stopped and the transmission in
the P (Park) position.
SSS0793
Seat lifter (if so equipped):
Pull up or push down the adjusting lever to
adjust the seat height until the desired position
is achieved.
Safety — Seats, seat belts and supplemental restraint system
1-3
Page 21 of 433
Black plate (19,1)
Model "Z51-D" EDITED: 2010/ 7/ 23
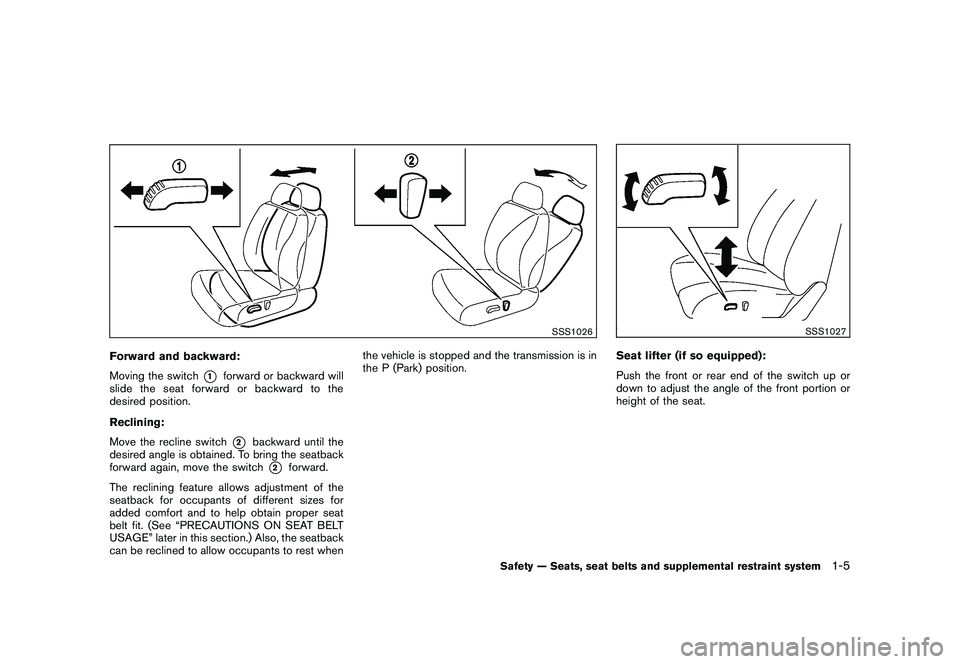
SSS1026
Forward and backward:
Moving the switch
*1
forward or backward will
slide the seat forward or backward to the
desired position.
Reclining:
Move the recline switch*2
backward until the
desired angle is obtained. To bring the seatback
forward again, move the switch
*2
forward.
The reclining feature allows adjustment of the
seatback for occupants of different sizes for
added comfort and to help obtain proper seat
belt fit. (See “PRECAUTIONS ON SEAT BELT
USAGE” later in this section.) Also, the seatback
can be reclined to allow occupants to rest when the vehicle is stopped and the transmission is in
the P (Park) position.
SSS1027
Seat lifter (if so equipped):
Push the front or rear end of the switch up or
down to adjust the angle of the front portion or
height of the seat.
Safety — Seats, seat belts and supplemental restraint system
1-5
Page 36 of 433
Black plate (34,1)
Model "Z51-D" EDITED: 2010/ 7/ 23
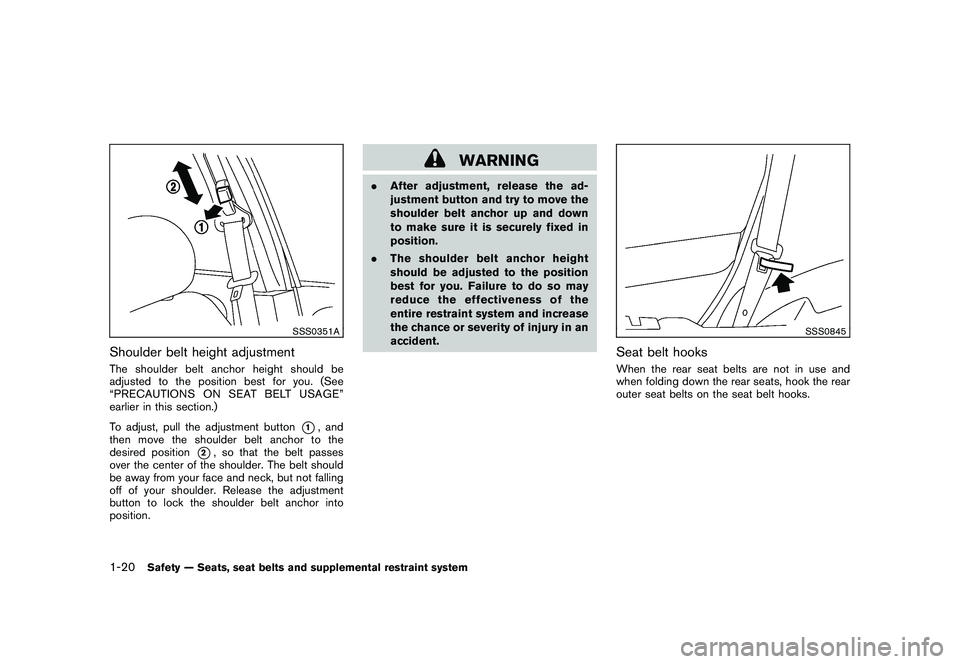
SSS0351A
Shoulder belt height adjustmentThe shoulder belt anchor height should be
adjusted to the position best for you. (See
“PRECAUTIONS ON SEAT BELT USAGE”
earlier in this section.)
To adjust, pull the adjustment button
*1, and
then move the shoulder belt anchor to the
desired position
*2, so that the belt passes
over the center of the shoulder. The belt should
be away from your face and neck, but not falling
off of your shoulder. Release the adjustment
button to lock the shoulder belt anchor into
position.
WARNING
. After adjustment, release the ad-
justment button and try to move the
shoulder belt anchor up and down
to make sure it is securely fixed in
position.
. The shoulder belt anchor height
should be adjusted to the position
best for you. Failure to do so may
reduce the effectiveness of the
entire restraint system and increase
the chance or severity of injury in an
accident.
SSS0845
Seat belt hooksWhen the rear seat belts are not in use and
when folding down the rear seats, hook the rear
outer seat belts on the seat belt hooks.
1-20
Safety — Seats, seat belts and supplemental restraint system
Page 43 of 433
Black plate (41,1)
Model "Z51-D" EDITED: 2010/ 7/ 23
install a forward-facing child
restraint in the front seat, see
“FORWARD-FACING CHILD RE-
STRAINT INSTALLATION USING
THE SEAT BELTS” later in this
section.
— Even with the NISSAN Advanced Air Bag System, never install a
rear-facing child restraint in the
front seat. An inflating air bag
could seriously injure or kill a
child. A rear-facing child re-
straint must only be used in the
rear seat.
—Besuretopurchaseachild restraint that will fit the child
and vehicle. Some child re-
straints may not fit properly in
your vehicle.
— Child restraint anchor points are designed to withstand loads
from child restraints that are
properly fitted.
— Never use the anchor points for adult seat belts or harnesses.
— A child restraint with a top tether strap should not be used in the
front passenger seat.
— Keep seatbacks as upright as possible after fitting the child
restraint.
— Infants and children should al- ways be placed in an appropri-
ate child restraint while in the
vehicle.
. When the child restraint is not in
use, keep it secured with the LATCH
system or a seat belt. In a sudden
stop or collision, loose objects can
injure occupants or damage the
vehicle.
CAUTION
A child restraint in a closed vehicle can
become very hot. Check the seating
surface and buckles before placing a
child in the child restraint.
This vehicle is equipped with a universal child
restraint anchor system, referred to as the
LATCH (Lower Anchors and Tethers for CHil-
dren) system. Some child restraints include rigid
or webbing-mounted attachments that can be
connected to these anchors.
For details, see “Lower Anchors and Tethers for
CHildren (LATCH) System” later in this section. If you do not have a LATCH compatible child
restraint, the vehicle seat belts can be used.
Several manufacturers offer child restraints for
infants and small children of various sizes. When
selecting any child restraint, keep the following
points in mind:
.
Choose only a restraint with a label certifying
that it complies with Federal Motor Vehicle
Safety Standard 213 or Canadian Motor
Vehicle Safety Standard 213.
. Check the child restraint in your vehicle to
be sure it is compatible with the vehicle’s
seat and seat belt system.
. If the child restraint is compatible with your
vehicle, place your child in the child restraint
and check the various adjustments to be
sure the child restraint is compatible with
your child. Choose a child restraint that is
designed for your child’s height and weight.
Always follow all recommended procedures.
All U.S. states and Canadian provinces or
territories require that infants and small
children be restrained in an approved child
restraint at all times while the vehicle is
being operated. Canadian law requires the
top tether strap on forward-facing child
restraints to be secured to the designated
anchor point on the vehicle.
Safety — Seats, seat belts and supplemental restraint system
1-27
Page 164 of 433
Black plate (162,1)
Model "Z51-D" EDITED: 2010/ 7/ 23
CAUTION
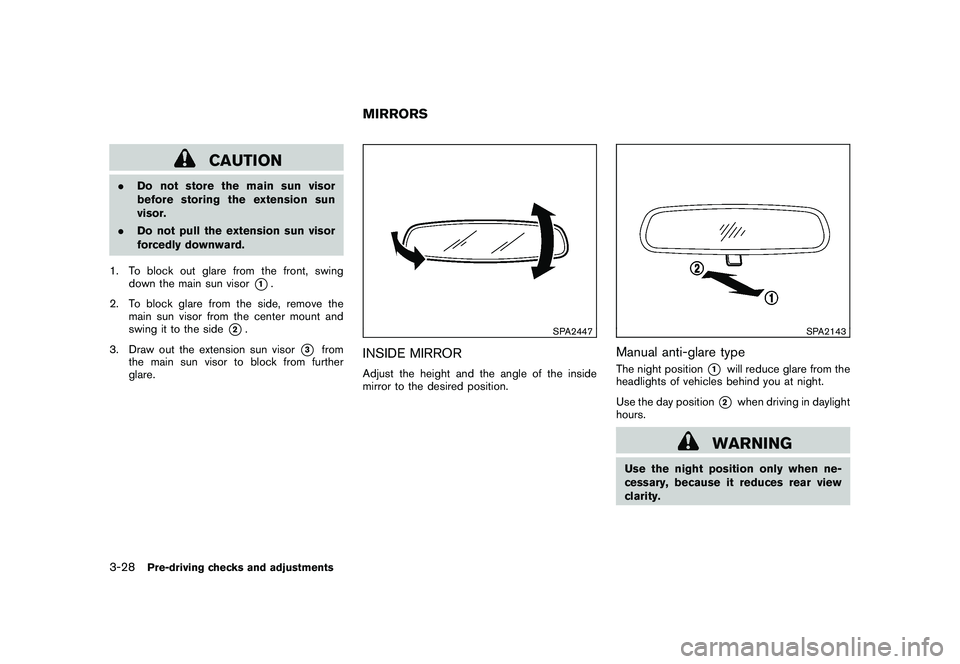
.Do not store the main sun visor
before storing the extension sun
visor.
. Do not pull the extension sun visor
forcedly downward.
1. To block out glare from the front, swing down the main sun visor
*1.
2. To block glare from the side, remove the main sun visor from the center mount and
swing it to the side
*2.
3. Draw out the extension sun visor
*3
from
the main sun visor to block from further
glare.
SPA2447
INSIDE MIRRORAdjust the height and the angle of the inside
mirror to the desired position.
SPA2143
Manual anti-glare typeThe night position
*1
will reduce glare from the
headlights of vehicles behind you at night.
Use the day position*2
when driving in daylight
hours.
WARNING
Use the night position only when ne-
cessary, because it reduces rear view
clarity.
MIRRORS
3-28
Pre-driving checks and adjustments
Page 429 of 433
Black plate (5,1)
PowerFront seat adjustment ........................... 1-4
Power door lock ................................. 3-4
Power outlet .................................... 2-41
Power steering fluid ........................... 8-11
Power steering system ........................ 5-25
Power windows ................................ 2-50
Precautions Audio operation ................................ 4-33
Braking precautions ........................... 5-25
Child restraints ................................. 1-26
Cruise control .................................. 5-18
Driving safety ..................................... 5-7
Maintenance ...................................... 8-5
On-pavement and off-road driving ............. 5-6
Seat belt usage ................................ 1-15
Supplemental restraint system ................ 1-43
When starting and driving ....................... 5-2
Push starting ....................................... 6-11
Push-button ignition switch .................. 5-9, 5-11
R
Radio ............................................... 4-33
Car phone or CB radio ........................ 4-82
FM-AM radio with Compact Disc (CD)
changer ......................................... 4-46
FM-AM-SAT radio with Compact Disc
(CD) player ..................................... 4-51
Rain-sensing auto wiper system .................. 2-30
Rapid air pressure loss .............................. 5-6
Readiness for inspection/maintenance (I/M)
test .................................................. 9-26
Rear center seat belt .............................. 1-21
Rear door lock, Child safety rear door lock ........ 3-7Rear seats
............................................ 1-6
Rear window and outside mirror defroster
switch ............................................... 2-32
Rear window wiper and washer switch .......... 2-31
Rearview monitor .................................. 4-21
Recorders, Event data ............................. 9-27
Registering your vehicle in another country ........ 9-8
Remote keyless entry system ..................... 3-15
Reporting safety defects (US only) ............... 9-25
Rollover ............................................... 5-5
Roof, Roof rack .................................... 2-49
S
Safety Child seat belts ................................ 1-25
Reporting safety defects (US only) ........... 9-25
Towing safety .................................. 9-20
Satellite radio operation ........................... 4-52
Seat adjustment Front manual seat adjustment. .................. 1-3
Front power seat adjustment ................... 1-4
Front seats ....................................... 1-3
Seat belt(s) Child safety ..................................... 1-25
Infants ........................................... 1-25
Injured persons ................................. 1-17
Larger children ................................. 1-25
Precautions on seat belt usage ............... 1-15
Pregnant women ............................... 1-17
Rear center seat belt .......................... 1-21
Seat belt cleaning ............................... 7-5
Seat belt extenders ............................ 1-24
Seat belt hooks ................................ 1-20
Seat belt maintenance ......................... 1-24 Seat belt warning light
........................ 2-14
Seat belts ...................................... 1-15
Seat belts with pretensioners ................. 1-55
Shoulder belt height adjustment .............. 1-20
Small children .................................. 1-25
Three-point type ............................... 1-17
Seat(s) Driver-side memory ............................ 3-31
Heated seats ................................... 2-38
Seats .............................................. 1-2
Security system, Vehicle security system ........ 2-26
Security system
(NISSAN Vehicle Immobilizer System) ,
Engine start ........................................ 2-27
Selector lever Shift lock release .............................. 5-17
Servicing air conditioner ........................... 4-32
SETTING button ................................... 4-12
SHIFT “P” warning ................................. 2-19
Shift lock release, Transmission .................. 5-17
Shifting, CVT
(Continuously Variable Transmission) ............. 5-14
Shoulder belt height adjustment .................. 1-20
SOURCE select switch ........................... 4-80
Spare tire ...................................... 8-39, 9-7
Spark plugs ........................................ 8-16
Speedometer ......................................... 2-5
Starting Before starting the engine .................... 5-13
Jump starting ..................................... 6-9
Precautions when starting and driving ......... 5-2
Push starting ................................... 6-11
Starting the engine ............................ 5-13
STATUS button ...................................... 4-7
Status light, Front passenger air bag ............ 1-50
10-5
Model "Z51-D" EDITED: 2010/ 7/ 23