2011 NISSAN MURANO AUX
[x] Cancel search: AUXPage 11 of 433
Black plate (7,1)
Model "Z51-D" EDITED: 2010/ 7/ 23
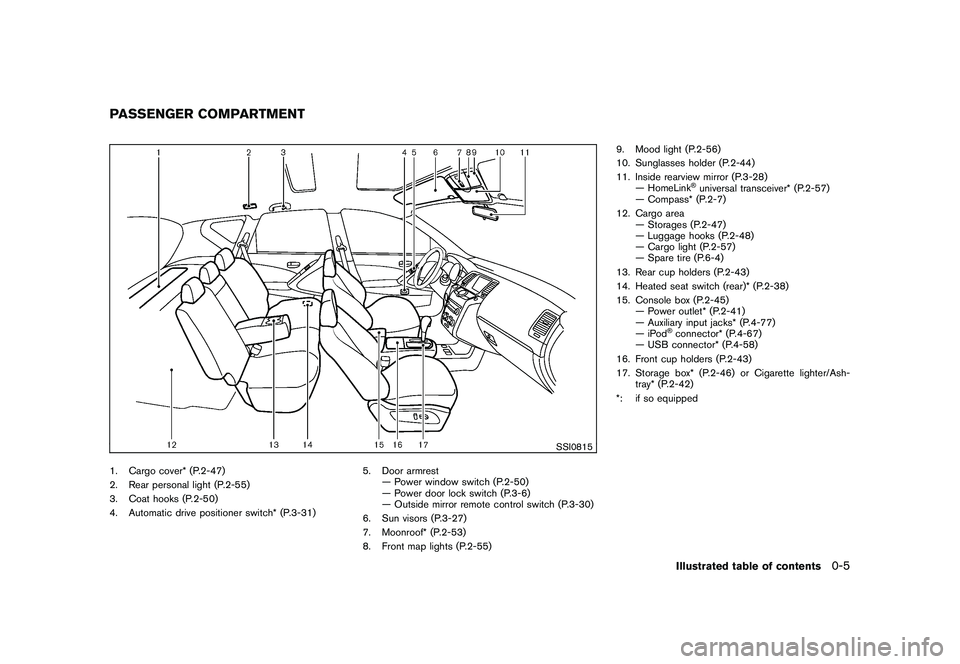
SSI0815
1. Cargo cover* (P.2-47)
2. Rear personal light (P.2-55)
3. Coat hooks (P.2-50)
4. Automatic drive positioner switch* (P.3-31)5. Door armrest
— Power window switch (P.2-50)
— Power door lock switch (P.3-6)
— Outside mirror remote control switch (P.3-30)
6. Sun visors (P.3-27)
7. Moonroof* (P.2-53)
8. Front map lights (P.2-55) 9. Mood light (P.2-56)
10. Sunglasses holder (P.2-44)
11. Inside rearview mirror (P.3-28)
— HomeLink
®universal transceiver* (P.2-57)
— Compass* (P.2-7)
12. Cargo area — Storages (P.2-47)
— Luggage hooks (P.2-48)
— Cargo light (P.2-57)
— Spare tire (P.6-4)
13. Rear cup holders (P.2-43)
14. Heated seat switch (rear)* (P.2-38)
15. Console box (P.2-45) — Power outlet* (P.2-41)
— Auxiliary input jacks* (P.4-77)
—iPod
®connector* (P.4-67)
— USB connector* (P.4-58)
16. Front cup holders (P.2-43)
17. Storage box* (P.2-46) or Cigarette lighter/Ash- tray* (P.2-42)
*: if so equipped
PASSENGER COMPARTMENT
Illustrated table of contents
0-5
Page 170 of 433

Black plate (13,1)
4
Center display, heater, air conditioner,
audio, phone and voice recognition systems
Model "Z51-D" EDITED: 2010/ 7/ 23
Safety note....................................................... 4-2
Center multi-function control panel
(models with color display screen) ......................... 4-2
How to use multi-function controller ................... 4-4
How to use touch screen
(models with navigation system) ........................ 4-4
Menu options (models with navigation system) ...... 4-6
How to select menus on the screen ................... 4-7
Vehicle information and settings (if so equipped) ....... 4-7
How to use STATUS button .............................. 4-7
How to use brightness control and display ON/
OFF button ................................................... 4-7
How to use INFO button. ................................. 4-7
How to use SETTING button .......................... 4-12
RearView monitor (if so equipped) ....................... 4-21
How to read the displayed lines ....................... 4-22
How to park with predicted course lines ............ 4-22
Difference between predicted and actual
distances ................................................... 4-24
How to adjust the screen ............................... 4-26
Operating tips ............................................. 4-26
Ventilators ...................................................... 4-27
Heater and air conditioner .................................. 4-28
Automatic operation ...................................... 4-30
Manual operation ......................................... 4-31
To turn the system ON/OFF ........................... 4-32
Operating tips ............................................. 4-32 In-cabin microfilter
........................................ 4-32
Servicing air conditioner ................................ 4-32
Audio system .................................................. 4-33
Audio operation precautions ........................... 4-33
FM-AM radio with Compact Disc (CD)
changer ..................................................... 4-46
FM-AM-SAT radio with Compact Disc (CD)
player ........................................................ 4-51
DVD (Digital Versatile Disc) player operation
(models with navigation system) ...................... 4-55
USB memory operation (if so equipped) ............ 4-58
Bluetooth
®streaming audio
(models with navigation system) ...................... 4-62
iPod
®player operation (if so equipped) .............. 4-67
Music Box
®(if so equipped) ........................... 4-69
Auxiliary input jacks (if so equipped) ................. 4-77
CD/DVD/USB memory care and cleaning .......... 4-78
Steering-wheel-mounted controls for audio ........ 4-79
Antenna ..................................................... 4-81
Car phone or CB radio ...................................... 4-82
Bluetooth
®Hands-Free Phone System
(models with navigation system) .......................... 4-82
Regulatory information ................................... 4-83
Voice commands. ......................................... 4-84
Control buttons ........................................... 4-84
Connecting procedure ................................... 4-85
Phone selection ........................................... 4-85
Page 172 of 433
Black plate (170,1)
Model "Z51-D" EDITED: 2010/ 7/ 23
WARNING
.Do not disassemble or modify this
system. If you do, it may result in
accidents, fire, or electric shock.
. Do not use this system if you notice
any abnormality, such as a frozen
screen or lack of sound. Continued
use of the system may result in
accident, fire or electric shock.
. In case you notice any foreign
object in the system hardware, spill
liquid on it, or notice smoke or smell
coming from it, stop using the
system immediately and contact
your nearest NISSAN dealer. Ignor-
ing such conditions may lead to
accidents, fire, or electric shock.
. Park the vehicle in a safe location
and apply the parking brake to view
the images on the front center dis-
play screen using devices connected
to the auxiliary input jacks.
Do not attempt to operate the system in
extreme temperature conditions [below
� 48F( �208 C) and above 158 8F(70 8C)].
Operating this system under these condi-
tions may result in system malfunctions.
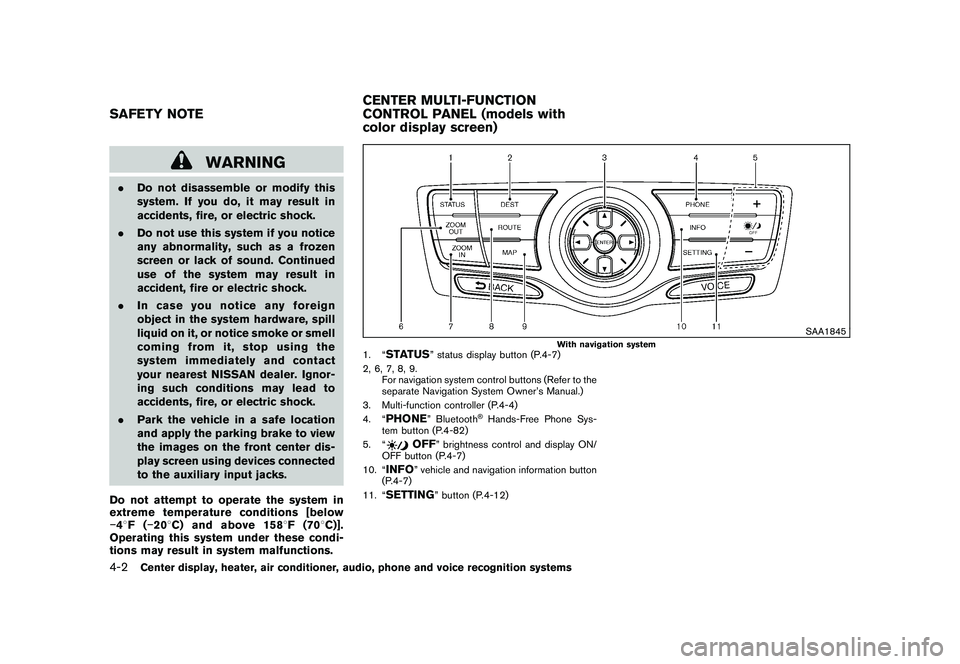
SAA1845
With navigation system
1. “
STATUS
” status display button (P.4-7)
2, 6, 7, 8, 9. For navigation system control buttons (Refer to the
separate Navigation System Owner’s Manual.)
3. Multi-function controller (P.4-4)
4. “
PHONE
” Bluetooth
®Hands-Free Phone Sys-
tem button (P.4-82)
5. “
OFF
” brightness control and display ON/
OFF button (P.4-7)
10. “
INFO
” vehicle and navigation information button
(P.4-7)
11. “
SETTING
” button (P.4-12)
SAFETY NOTE CENTER MULTI-FUNCTION
CONTROL PANEL (models with
color display screen)4-2
Center display, heater, air conditioner, audio, phone and voice recognition systems
Page 216 of 433
Black plate (214,1)
Model "Z51-D" EDITED: 2010/ 7/ 23
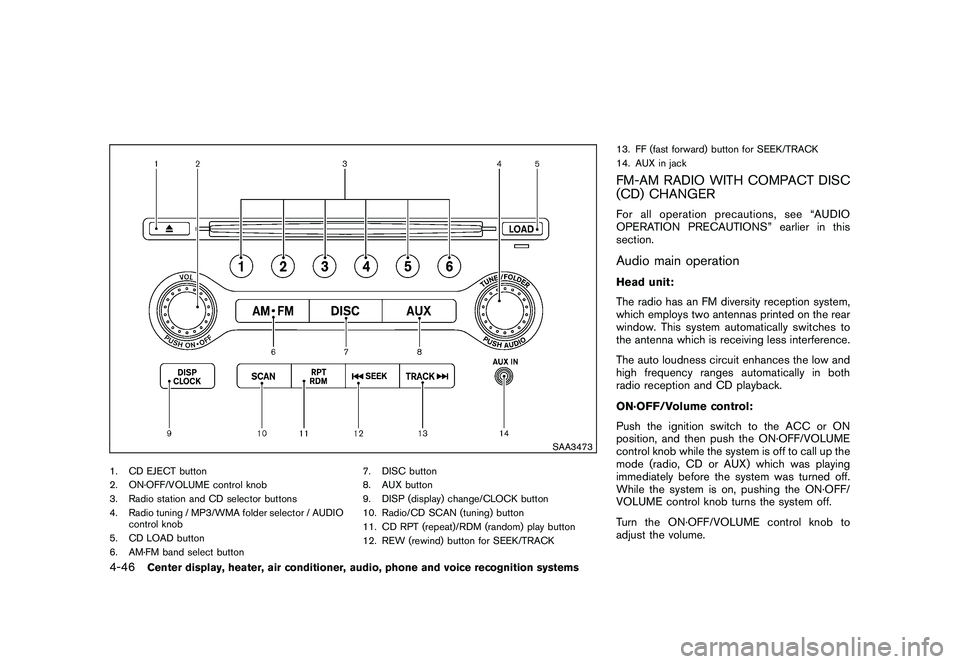
SAA3473
1. CD EJECT button
2. ON·OFF/VOLUME control knob
3. Radio station and CD selector buttons
4. Radio tuning / MP3/WMA folder selector / AUDIOcontrol knob
5. CD LOAD button
6. AM·FM band select button 7. DISC button
8. AUX button
9. DISP (display) change/CLOCK button
10. Radio/CD SCAN (tuning) button
11. CD RPT (repeat)/RDM (random) play button
12. REW (rewind) button for SEEK/TRACK13. FF (fast forward) button for SEEK/TRACK
14. AUX in jack
FM-AM RADIO WITH COMPACT DISC
(CD) CHANGERFor all operation precautions, see “AUDIO
OPERATION PRECAUTIONS” earlier in this
section.Audio main operationHead unit:
The radio has an FM diversity reception system,
which employs two antennas printed on the rear
window. This system automatically switches to
the antenna which is receiving less interference.
The auto loudness circuit enhances the low and
high frequency ranges automatically in both
radio reception and CD playback.
ON·OFF/Volume control:
Push the ignition switch to the ACC or ON
position, and then push the ON·OFF/VOLUME
control knob while the system is off to call up the
mode (radio, CD or AUX) which was playing
immediately before the system was turned off.
While the system is on, pushing the ON·OFF/
VOLUME control knob turns the system off.
Turn the ON·OFF/VOLUME control knob to
adjust the volume.
4-46
Center display, heater, air conditioner, audio, phone and voice recognition systems
Page 219 of 433

Black plate (217,1)
Model "Z51-D" EDITED: 2010/ 7/ 23
REPEAT (RPT) , RANDOM (RDM):
When the RPT button is pushed while the
compact disc is played, the play pattern can be
changed as follows:
(CD)
(CD with MP3 or WMA)
CD EJECT:
When the CD EJECT button is pushed with the
compact disc loaded, the compact disc will be
ejected.
To eject the discs selected by the CD select
button, push the EJECT button for less than 1.5
seconds.
To eject all the discs, push the EJECT button for
more than 1.5 seconds.
When this button is pushed while the compact
disc is being played, the compact disc will come
out and the system will turn off. If the compact disc comes out and is not
removed, it will be pulled back into the slot
to protect it.
SCAN tuning:
When the SCAN tuning button is pushed for
less than 1.5 seconds while the CD is being
played, the beginning of all the tracks of CDs will
be played for 10 seconds in sequence.
When the SCAN tuning button is pushed for
more than 1.5 seconds while the CD is being
played, the first program in all the CDs will be
played for 10 seconds.
Pushing the button again during this 10 second
period will stop SCAN tuning.
If the SCAN tuning button is not pushed within
10 seconds, SCAN tuning moves to the next
disc program.
AUX (Auxiliary) input
AUX (Auxiliary) button:
The AUX IN jack is located on the audio unit.
The AUX IN audio input jack accepts any
standard analog audio input such as from a
portable cassette tape/CD player, MP3 player or
laptop computers.
Push the AUX button to play a compatible
device when it is plugged into the AUX IN jack. NISSAN strongly recommend using a stereo
mini plug cable when connecting your music
device to the audio system. Music may not be
played properly when you use a monaural cable.
Center display, heater, air conditioner, audio, phone and voice recognition systems
4-49
Page 220 of 433
Black plate (218,1)
Model "Z51-D" EDITED: 2010/ 7/ 23
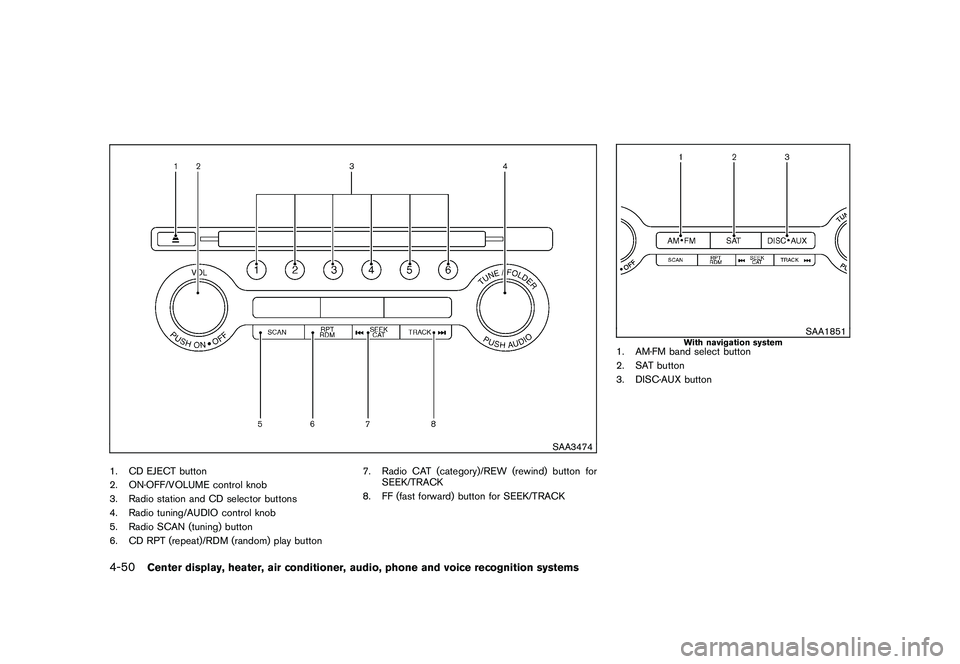
SAA3474
1. CD EJECT button
2. ON·OFF/VOLUME control knob
3. Radio station and CD selector buttons
4. Radio tuning/AUDIO control knob
5. Radio SCAN (tuning) button
6. CD RPT (repeat)/RDM (random) play button7. Radio CAT (category)/REW (rewind) button for
SEEK/TRACK
8. FF (fast forward) button for SEEK/TRACK
SAA1851
With navigation system
1. AM·FM band select button
2. SAT button
3. DISC·AUX button
4-50
Center display, heater, air conditioner, audio, phone and voice recognition systems
Page 221 of 433
Black plate (219,1)
Model "Z51-D" EDITED: 2010/ 7/ 23
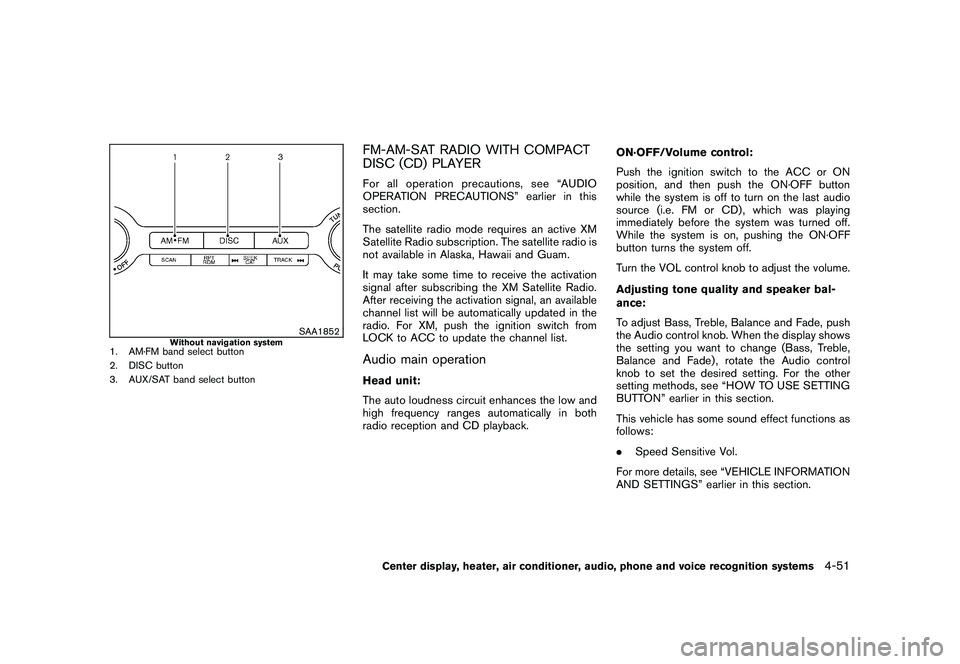
SAA1852
Without navigation system
1. AM·FM band select button
2. DISC button
3. AUX/SAT band select button
FM-AM-SAT RADIO WITH COMPACT
DISC (CD) PLAYERFor all operation precautions, see “AUDIO
OPERATION PRECAUTIONS” earlier in this
section.
The satellite radio mode requires an active XM
Satellite Radio subscription. The satellite radio is
not available in Alaska, Hawaii and Guam.
It may take some time to receive the activation
signal after subscribing the XM Satellite Radio.
After receiving the activation signal, an available
channel list will be automatically updated in the
radio. For XM, push the ignition switch from
LOCK to ACC to update the channel list.Audio main operationHead unit:
The auto loudness circuit enhances the low and
high frequency ranges automatically in both
radio reception and CD playback.ON·OFF/Volume control:
Push the ignition switch to the ACC or ON
position, and then push the ON·OFF button
while the system is off to turn on the last audio
source (i.e. FM or CD) , which was playing
immediately before the system was turned off.
While the system is on, pushing the ON·OFF
button turns the system off.
Turn the VOL control knob to adjust the volume.
Adjusting tone quality and speaker bal-
ance:
To adjust Bass, Treble, Balance and Fade, push
the Audio control knob. When the display shows
the setting you want to change (Bass, Treble,
Balance and Fade) , rotate the Audio control
knob to set the desired setting. For the other
setting methods, see “HOW TO USE SETTING
BUTTON” earlier in this section.
This vehicle has some sound effect functions as
follows:
.
Speed Sensitive Vol.
For more details, see “VEHICLE INFORMATION
AND SETTINGS” earlier in this section.
Center display, heater, air conditioner, audio, phone and voice recognition systems
4-51
Page 222 of 433
Black plate (220,1)
Model "Z51-D" EDITED: 2010/ 7/ 23
Switching the display:
.Models with navigation system
Pushing the DISC·AUX button will switch the
displays as follows:
iPod
®/USB ?CD/DVD ?Music Box
®?
Bluetooth
®Audio ?AUX ?iPod
®/USB
. Models without navigation system
Pushing the DISC button will switch the display
as follows:
CD ?Music Box
®?CD
Pushing the AUX button will switch the display
as follows:
USB/iPod
®? XM1 ?XM2 ?XM3 ?USB/
iPod
®
FM-AM-SAT radio operation
radio (FM/AM) band select:
Pushing the radio band select button will
change the band as follows:
AM ?FM1 ?FM2 ?AM
radio (SAT) band select (models with
navigation system):
Pushing the radio band select button will
change the band as follows:
XM1 ?XM2 ?XM3 ?XM1
When the radio band select button is pushed
while the ignition switch is in the ACC or ON
position, the radio will come on at the channel
last played.
The last channel played will also come on when
the ON·OFF button is pushed to ON.
The satellite radio is not available in Alaska,
Hawaii and Guam.
If another audio source is playing when the radio
band select button is turned to ON, the audio
source will automatically be turned off and the
last radio channel played will come on.
When the stereo broadcast signal is weak, the
radio will automatically change from stereo to
monaural reception.radio (SAT) band select (models
without navigation system):
Push the satellite band select button to select
the satellite radio mode XM1, XM2 or XM3. TUNE (Tuning):
.
For AM and FM radio
Turn the radio TUNE knob for manual tuning.
. For XM Satellite Radio
Turn the radio TUNE knob to seek channels
from all of the categories when any category
is not selected.
SEEK tuning/CATEGORY
(CAT):
. For AM and FM radio
Push the SEEK button
or
to tune
from low to high or high to low frequencies
and to stop at the next broadcasting station.
. For XM Satellite Radio
Push the SEEK button
or
to tune
to the first channel of the next or previous
category.
During satellite radio reception, the following
notices will be displayed under certain condi-
tions.
. NO SIGNAL (No signal is received while the
SAT tuner is connected.)
. OFF AIR (Broadcasting signed off)
4-52
Center display, heater, air conditioner, audio, phone and voice recognition systems