2011 NISSAN LATIO glove box
[x] Cancel search: glove boxPage 2835 of 3787
IP-14
< ON-VEHICLE REPAIR >
INSTRUMENT PANEL ASSEMBLY
10. Remove steering lock escutcheon.
11. Remove the steering column cover screws, then disengage pawls and remove the steering column cov-
ers.
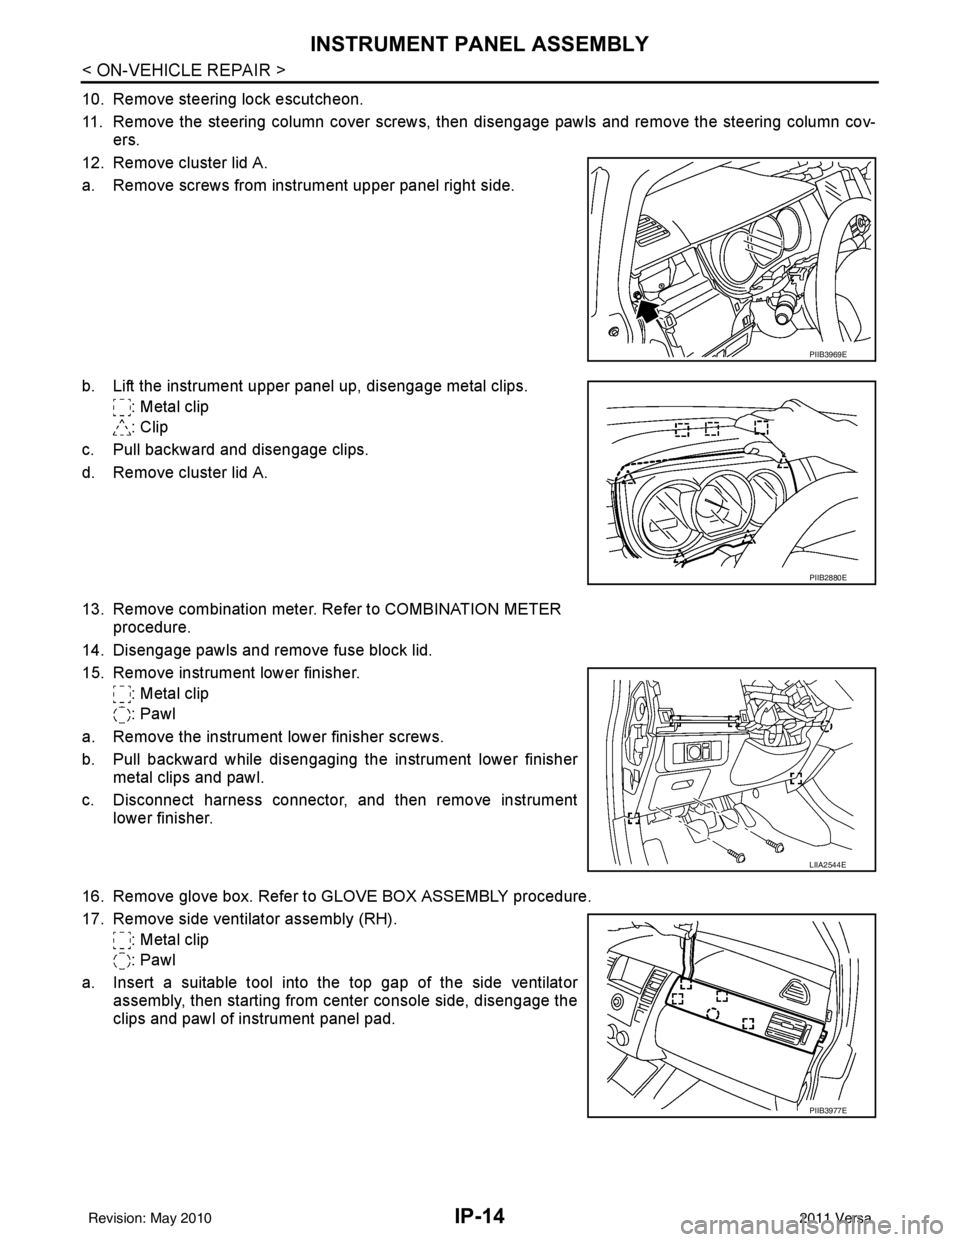
12. Remove cluster lid A.
a. Remove screws from instrument upper panel right side.
b. Lift the instrument upper panel up, disengage metal clips. : Metal clip
: Clip
c. Pull backward and disengage clips.
d. Remove cluster lid A.
13. Remove combination meter. Refer to COMBINATION METER procedure.
14. Disengage pawls and remove fuse block lid.
15. Remove instrument lower finisher. : Metal clip
: Pawl
a. Remove the instrument lower finisher screws.
b. Pull backward while disengaging the instrument lower finisher metal clips and pawl.
c. Disconnect harness connector, and then remove instrument lower finisher.
16. Remove glove box. Refer to GLOVE BOX ASSEMBLY procedure.
17. Remove side ventilator assembly (RH). : Metal clip
: Pawl
a. Insert a suitable tool into the top gap of the side ventilator assembly, then starting from center console side, disengage the
clips and pawl of instrument panel pad.
PIIB3969E
PIIB2880E
LIIA2544E
PIIB3977E
Revision: May 2010 2011 Versa
Page 2836 of 3787
INSTRUMENT PANEL ASSEMBLYIP-15
< ON-VEHICLE REPAIR >
C
DE
F
G H
J
K L
M A
B
IP
N
O P
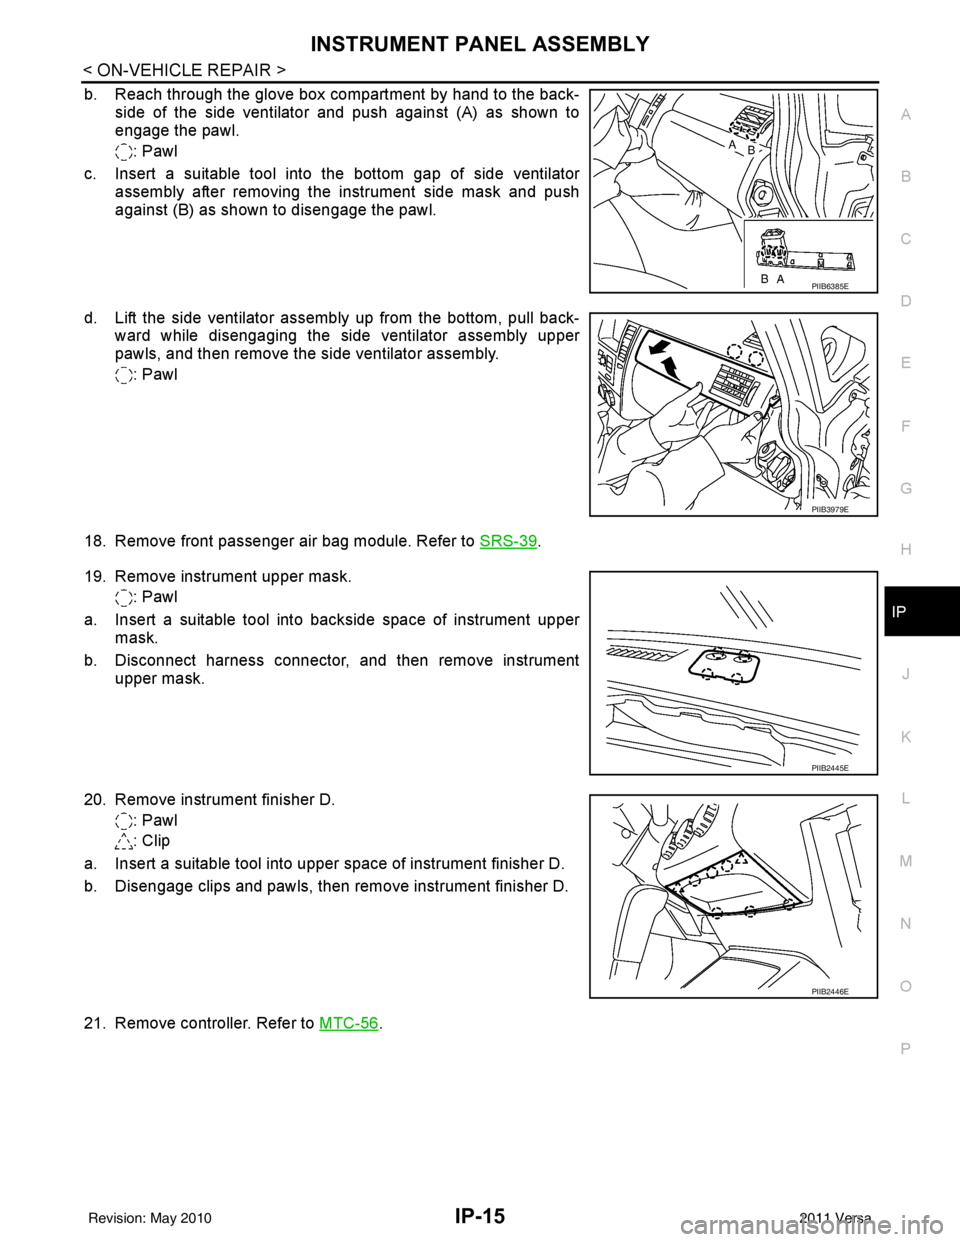
b. Reach through the glove box compartment by hand to the back- side of the side ventilator and push against (A) as shown to
engage the pawl.
: Pawl
c. Insert a suitable tool into the bottom gap of side ventilator assembly after removing the instrument side mask and push
against (B) as shown to disengage the pawl.
d. Lift the side ventilator assembly up from the bottom, pull back- ward while disengaging the side ventilator assembly upper
pawls, and then remove the side ventilator assembly.
: Pawl
18. Remove front passenger air bag module. Refer to SRS-39
.
19. Remove instrument upper mask. : Pawl
a. Insert a suitable tool into backside space of instrument upper mask.
b. Disconnect harness connector, and then remove instrument upper mask.
20. Remove instrument finisher D. : Pawl
: Clip
a. Insert a suitable tool into upper space of instrument finisher D.
b. Disengage clips and pawls, then remove instrument finisher D.
21. Remove controller. Refer to MTC-56
.
PIIB6385E
PIIB3979E
PIIB2445E
PIIB2446E
Revision: May 2010 2011 Versa
Page 2842 of 3787
INSTRUMENT PANEL ASSEMBLYIP-21
< ON-VEHICLE REPAIR >
C
DE
F
G H
J
K L
M A
B
IP
N
O P
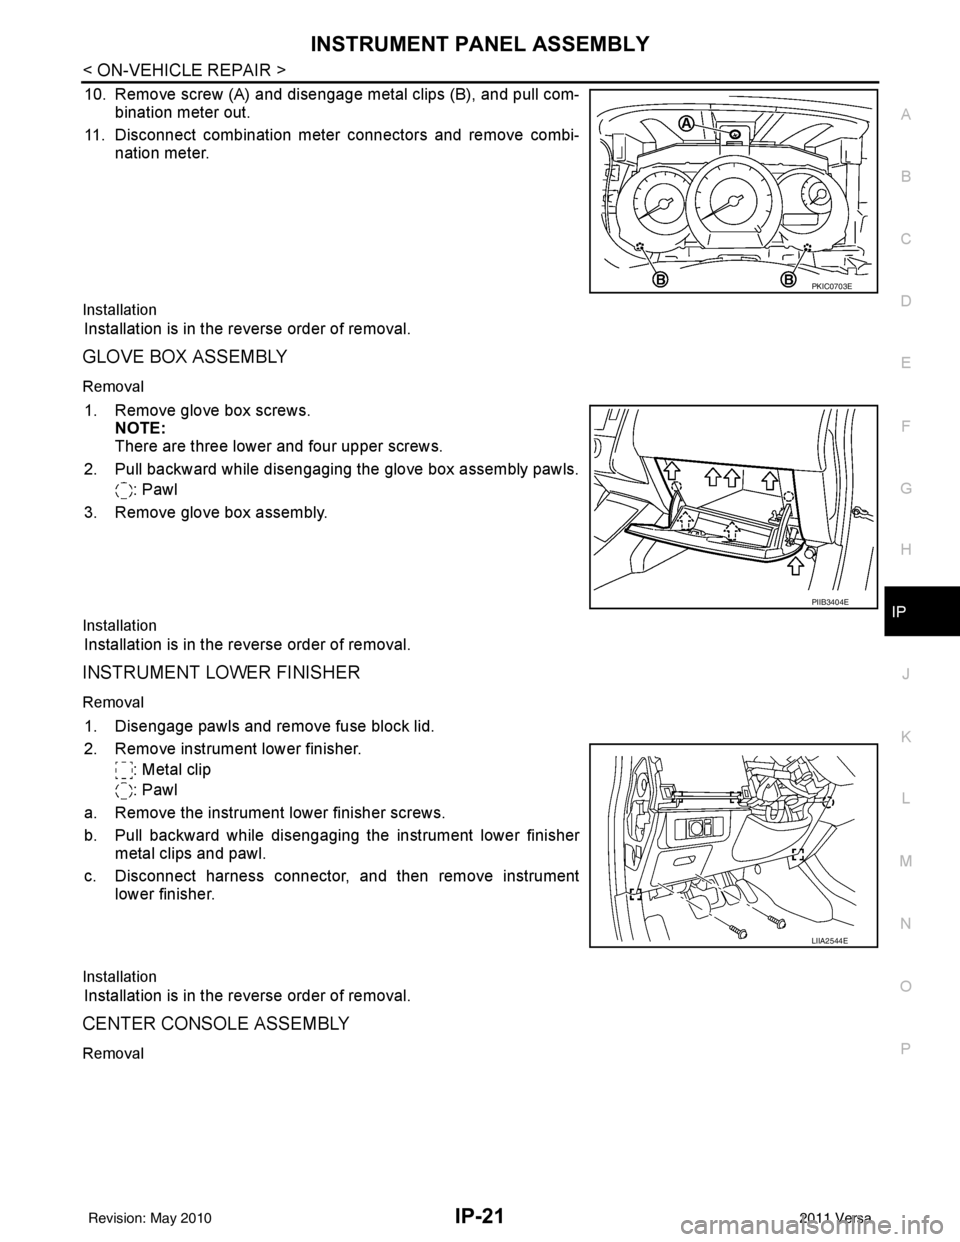
10. Remove screw (A) and disengage metal clips (B), and pull com- bination meter out.
11. Disconnect combination meter connectors and remove combi- nation meter.
Installation
Installation is in the reverse order of removal.
GLOVE BOX ASSEMBLY
Removal
1. Remove glove box screws.NOTE:
There are three lower and four upper screws.
2. Pull backward while disengaging the glove box assembly pawls. : Pawl
3. Remove glove box assembly.
Installation
Installation is in the reverse order of removal.
INSTRUMENT LOWER FINISHER
Removal
1. Disengage pawls and remove fuse block lid.
2. Remove instrument lower finisher. : Metal clip
: Pawl
a. Remove the instrument lower finisher screws.
b. Pull backward while disengaging the instrument lower finisher metal clips and pawl.
c. Disconnect harness connector, and then remove instrument lower finisher.
Installation
Installation is in the reverse order of removal.
CENTER CONSOLE ASSEMBLY
Removal
PKIC0703E
PIIB3404E
LIIA2544E
Revision: May 2010 2011 Versa
Page 2844 of 3787
INSTRUMENT PANEL ASSEMBLYIP-23
< ON-VEHICLE REPAIR >
C
DE
F
G H
J
K L
M A
B
IP
N
O P
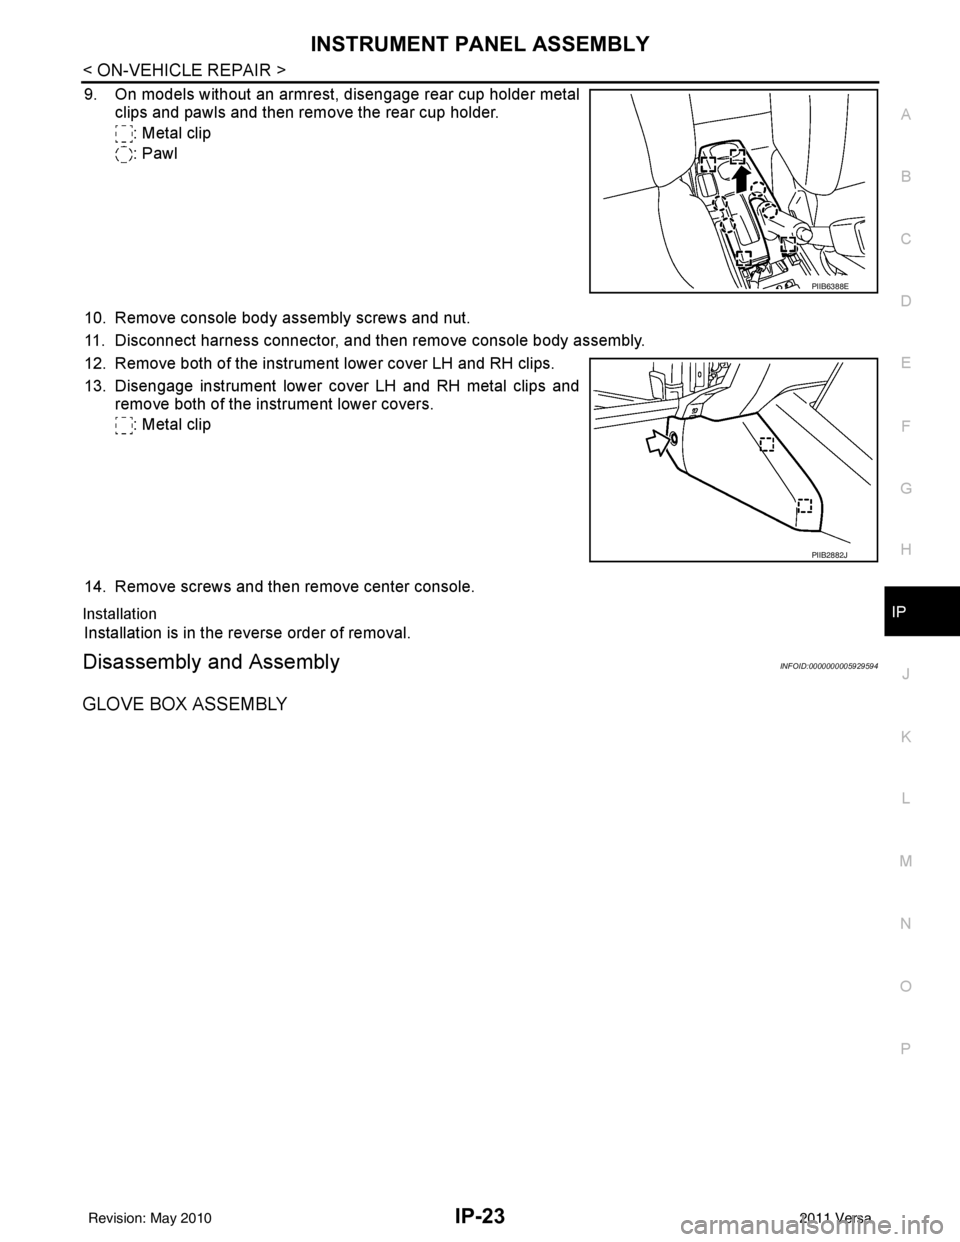
9. On models without an armrest, disengage rear cup holder metal
clips and pawls and then remove the rear cup holder.
: Metal clip
: Pawl
10. Remove console body assembly screws and nut.
11. Disconnect harness connector, and then remove console body assembly.
12. Remove both of the instrument lower cover LH and RH clips.
13. Disengage instrument lower cover LH and RH metal clips and remove both of the instrument lower covers.
: Metal clip
14. Remove screws and then remove center console.
Installation
Installation is in the reverse order of removal.
Disassembly and AssemblyINFOID:0000000005929594
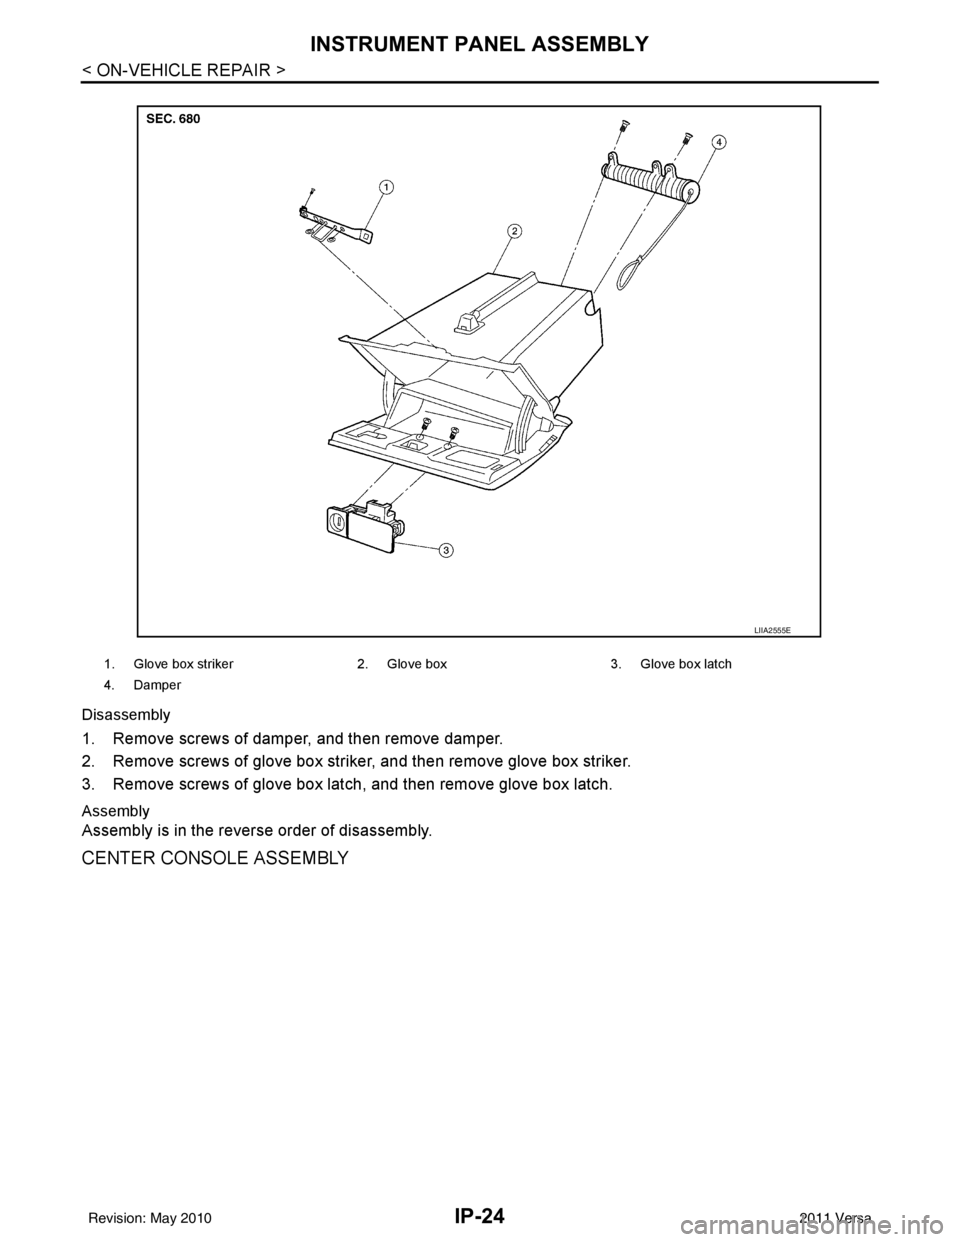
GLOVE BOX ASSEMBLY
PIIB6388E
PIIB2882J
Revision: May 2010 2011 Versa
Page 2845 of 3787
IP-24
< ON-VEHICLE REPAIR >
INSTRUMENT PANEL ASSEMBLY
Disassembly
1. Remove screws of damper, and then remove damper.
2. Remove screws of glove box striker, and then remove glove box striker.
3. Remove screws of glove box latch, and then remove glove box latch.
Assembly
Assembly is in the reverse order of disassembly.
CENTER CONSOLE ASSEMBLY
1. Glove box striker2. Glove box 3. Glove box latch
4. Damper
LIIA2555E
Revision: May 2010 2011 Versa
Page 3037 of 3787
HEADLAMP (FOR USA)LT-5
< SERVICE INFORMATION >
C
DE
F
G H
I
J
L
M A
B
LT
N
O P
HEADLAMP (FOR USA)
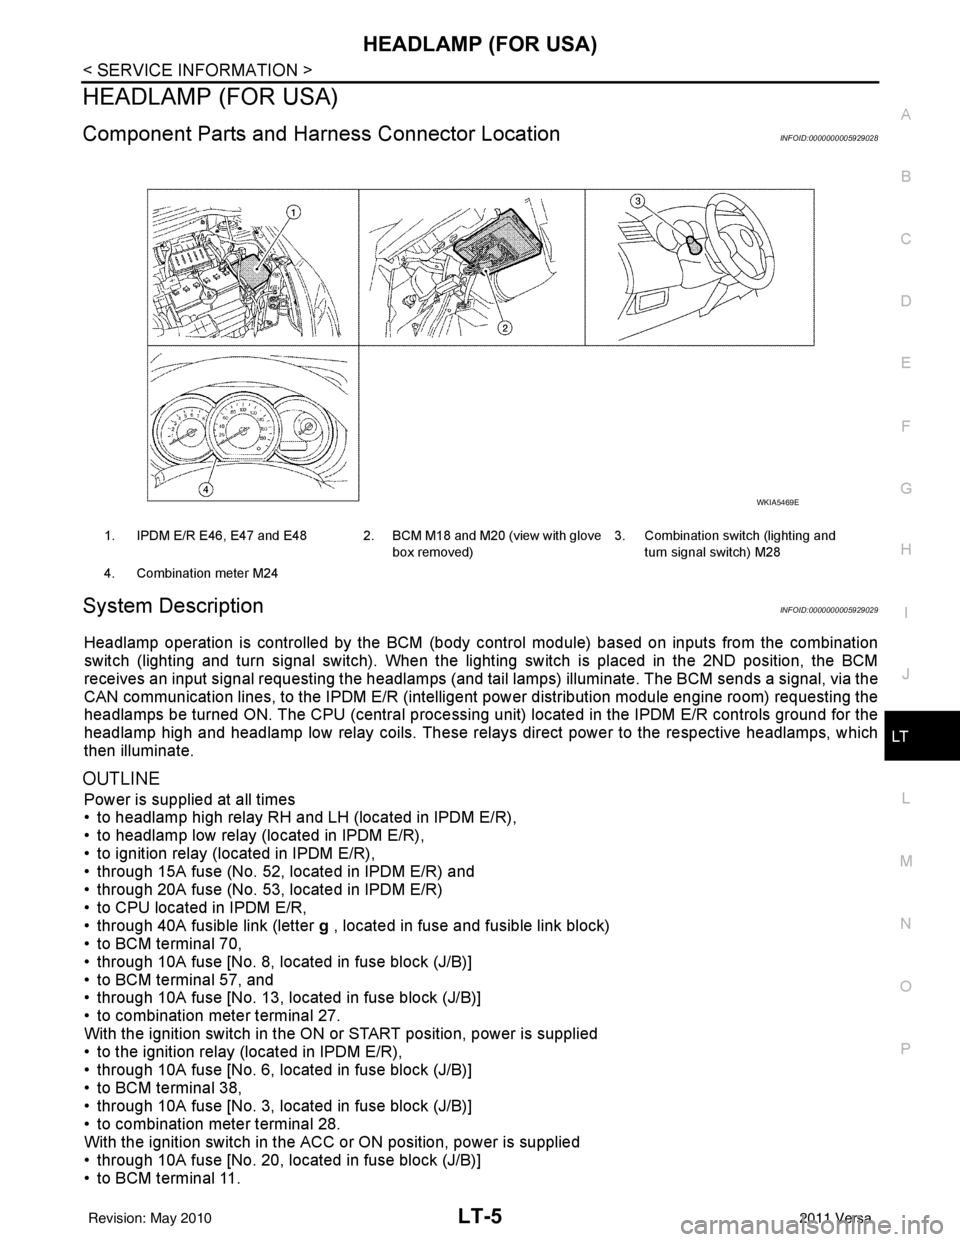
Component Parts and Har ness Connector LocationINFOID:0000000005929028
System DescriptionINFOID:0000000005929029
Headlamp operation is controlled by the BCM (body c ontrol module) based on inputs from the combination
switch (lighting and turn signal switch). When the light ing switch is placed in the 2ND position, the BCM
receives an input signal requesting the headlamps (and tail lamps) illuminate. The BCM sends a signal, via the
CAN communication lines, to the IPDM E/R (intelligent power distribution module engine room) requesting the
headlamps be turned ON. The CPU (centra l processing unit) located in the IPDM E/R controls ground for the
headlamp high and headlamp low relay coils. These relays direct power to the respective headlamps, which
then illuminate.
OUTLINE
Power is supplied at all times
• to headlamp high relay RH and LH (located in IPDM E/R),
• to headlamp low relay (located in IPDM E/R),
• to ignition relay (located in IPDM E/R),
• through 15A fuse (No. 52, located in IPDM E/R) and
• through 20A fuse (No. 53, located in IPDM E/R)
• to CPU located in IPDM E/R,
• through 40A fusible link (letter g , located in fuse and fusible link block)
• to BCM terminal 70,
• through 10A fuse [No. 8, located in fuse block (J/B)]
• to BCM terminal 57, and
• through 10A fuse [No. 13, located in fuse block (J/B)]
• to combination meter terminal 27.
With the ignition switch in the ON or START position, power is supplied
• to the ignition relay (located in IPDM E/R),
• through 10A fuse [No. 6, located in fuse block (J/B)]
• to BCM terminal 38,
• through 10A fuse [No. 3, located in fuse block (J/B)]
• to combination meter terminal 28.
With the ignition switch in the ACC or ON position, power is supplied
• through 10A fuse [No. 20, located in fuse block (J/B)]
• to BCM terminal 11.
1. IPDM E/R E46, E47 and E48 2. BCM M18 and M20 (view with glove
box removed)3. Combination switch (lighting and
turn signal switch) M28
4. Combination meter M24
WKIA5469E
Revision: May 2010 2011 Versa
Page 3059 of 3787
HEADLAMP (FOR CANADA) - DAYTIME LIGHT SYSTEM -
LT-27
< SERVICE INFORMATION >
C
D E
F
G H
I
J
L
M A
B
LT
N
O P
HEADLAMP (FOR CANADA) - DAYTIME LIGHT SYSTEM -
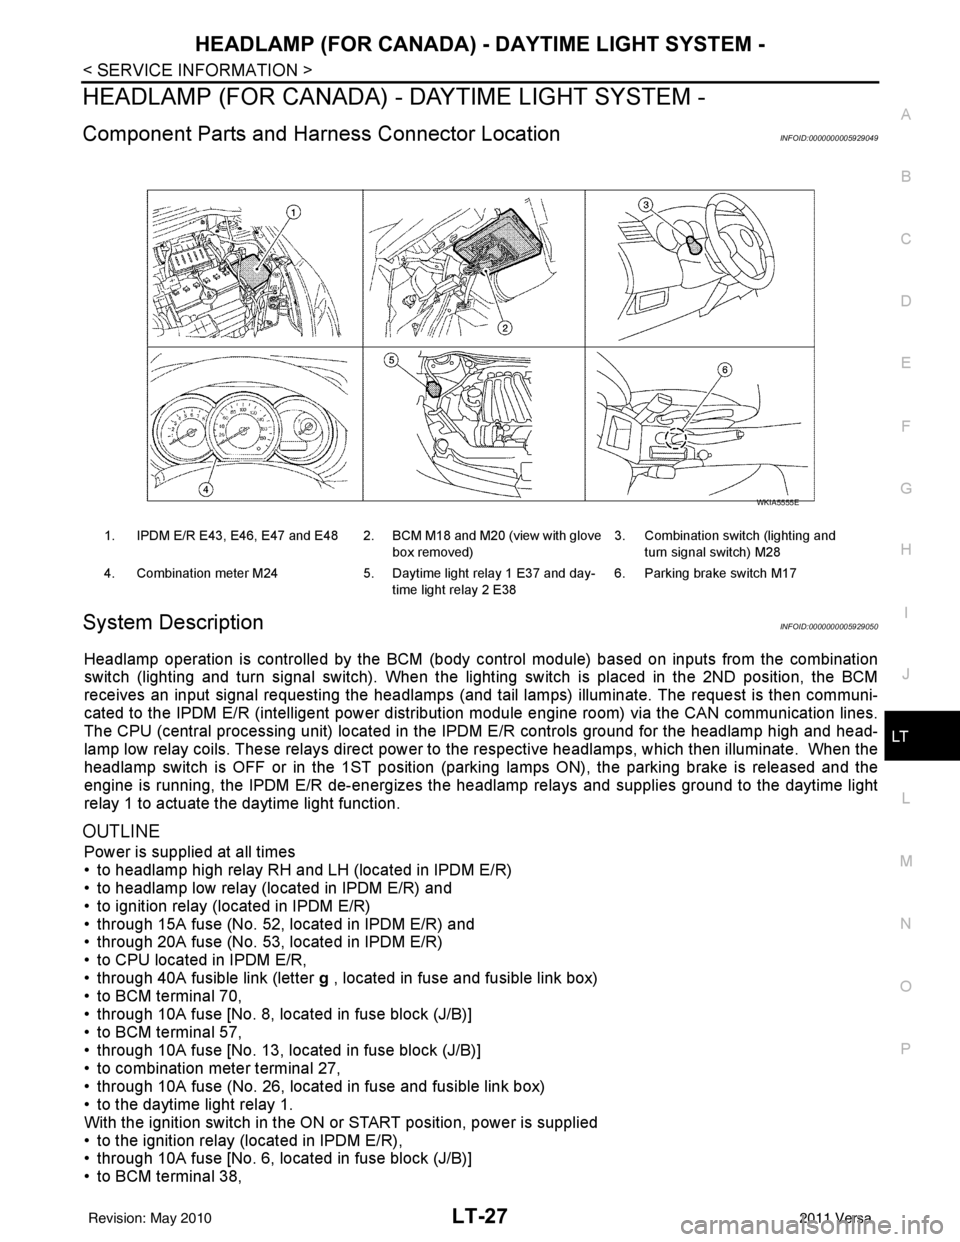
Component Parts and Harness Connector LocationINFOID:0000000005929049
System DescriptionINFOID:0000000005929050
Headlamp operation is controlled by the BCM (body c ontrol module) based on inputs from the combination
switch (lighting and turn signal switch). When the light ing switch is placed in the 2ND position, the BCM
receives an input signal requesting the headlamps (and ta il lamps) illuminate. The request is then communi-
cated to the IPDM E/R (intelligent power distribution module engine room) via the CAN communication lines.
The CPU (central processing unit) located in t he IPDM E/R controls ground for the headlamp high and head-
lamp low relay coils. These relays direct power to the respective headlamps, which then illuminate. When the
headlamp switch is OFF or in the 1ST position (parking lamps ON), the parking brake is released and the
engine is running, the IPDM E/R de-energizes the headlamp relays and supplies ground to the daytime light
relay 1 to actuate the daytime light function.
OUTLINE
Power is supplied at all times
• to headlamp high relay RH and LH (located in IPDM E/R)
• to headlamp low relay (located in IPDM E/R) and
• to ignition relay (located in IPDM E/R)
• through 15A fuse (No. 52, located in IPDM E/R) and
• through 20A fuse (No. 53, located in IPDM E/R)
• to CPU located in IPDM E/R,
• through 40A fusible link (letter g , located in fuse and fusible link box)
• to BCM terminal 70,
• through 10A fuse [No. 8, located in fuse block (J/B)]
• to BCM terminal 57,
• through 10A fuse [No. 13, located in fuse block (J/B)]
• to combination meter terminal 27,
• through 10A fuse (No. 26, located in fuse and fusible link box)
• to the daytime light relay 1.
With the ignition switch in the ON or START position, power is supplied
• to the ignition relay (located in IPDM E/R),
• through 10A fuse [No. 6, located in fuse block (J/B)]
• to BCM terminal 38,
1. IPDM E/R E43, E46, E47 and E48 2. BCM M18 and M20 (view with glove
box removed)3. Combination switch (lighting and
turn signal switch) M28
4. Combination meter M24 5. Daytime light relay 1 E37 and day-
time light relay 2 E38 6. Parking brake switch M17
WKIA5555E
Revision: May 2010
2011 Versa
Page 3073 of 3787
FRONT FOG LAMPLT-41
< SERVICE INFORMATION >
C
DE
F
G H
I
J
L
M A
B
LT
N
O P
FRONT FOG LAMP
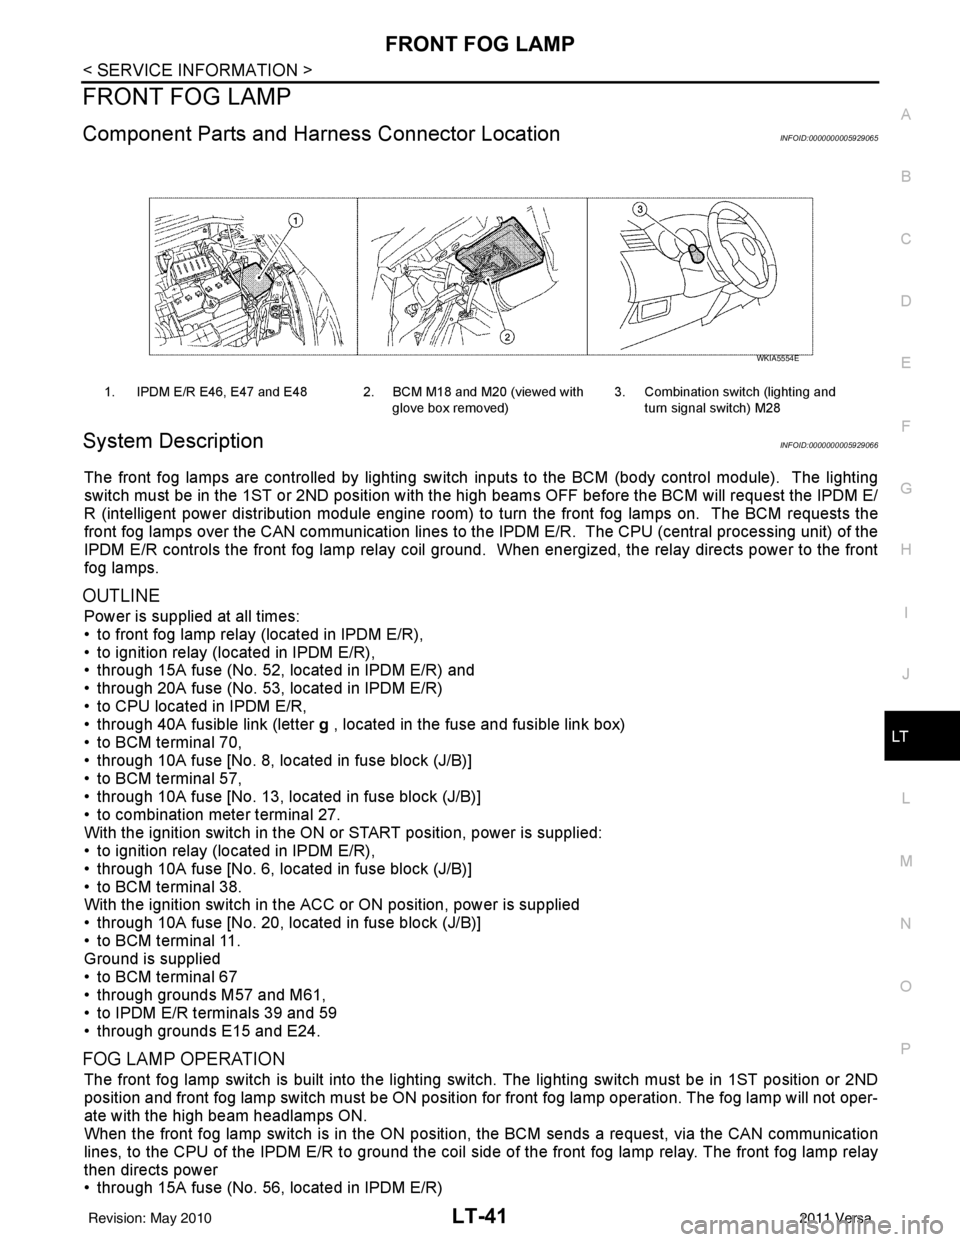
Component Parts and Har ness Connector LocationINFOID:0000000005929065
System DescriptionINFOID:0000000005929066
The front fog lamps are controlled by lighting switch inputs to the BCM (body control module). The lighting
switch must be in the 1ST or 2ND position with the high beams OFF before the BCM will request the IPDM E/
R (intelligent power distribution module engine room) to turn the front fog lamps on. The BCM requests the
front fog lamps over the CAN communication lines to the IPDM E/R. The CPU (central processing unit) of the
IPDM E/R controls the front fog lamp relay coil ground. When energized, the relay directs power to the front
fog lamps.
OUTLINE
Power is supplied at all times:
• to front fog lamp relay (located in IPDM E/R),
• to ignition relay (located in IPDM E/R),
• through 15A fuse (No. 52, located in IPDM E/R) and
• through 20A fuse (No. 53, located in IPDM E/R)
• to CPU located in IPDM E/R,
• through 40A fusible link (letter g , located in the fuse and fusible link box)
• to BCM terminal 70,
• through 10A fuse [No. 8, located in fuse block (J/B)]
• to BCM terminal 57,
• through 10A fuse [No. 13, located in fuse block (J/B)]
• to combination meter terminal 27.
With the ignition switch in the ON or START position, power is supplied:
• to ignition relay (located in IPDM E/R),
• through 10A fuse [No. 6, located in fuse block (J/B)]
• to BCM terminal 38.
With the ignition switch in the ACC or ON position, power is supplied
• through 10A fuse [No. 20, located in fuse block (J/B)]
• to BCM terminal 11.
Ground is supplied
• to BCM terminal 67
• through grounds M57 and M61,
• to IPDM E/R terminals 39 and 59
• through grounds E15 and E24.
FOG LAMP OPERATION
The front fog lamp switch is built into the lighting switch. The lighting switch must be in 1ST position or 2ND
position and front fog lamp switch must be ON position for front fog lamp operation. The fog lamp will not oper-
ate with the high beam headlamps ON.
When the front fog lamp switch is in the ON positi on, the BCM sends a request, via the CAN communication
lines, to the CPU of the IPDM E/R to ground the coil side of the front fog lamp relay. The front fog lamp relay
then directs power
• through 15A fuse (No. 56, located in IPDM E/R)
1. IPDM E/R E46, E47 and E48 2. BCM M18 and M20 (viewed with
glove box removed)3. Combination switch (lighting and
turn signal switch) M28
WKIA5554E
Revision: May 2010 2011 Versa