Page 868 of 3787
BRAKE BOOSTERBR-21
< SERVICE INFORMATION >
C
DE
G H
I
J
K L
M A
B
BR
N
O P
Removal and InstallationINFOID:0000000005928406
REMOVAL
CAUTION:
• Be careful not to splash brake fluid on painted areas such as body. It may cause paint damage. If brake fluid is splashed on painte d surfaces of body, wipe them with cloth immediately and then wash
it away with water.
• Be careful not to deform or bend brake tub es while removing and installing brake booster.
• Replace clevis pin if it is damaged.
• Be careful not to damage brake booster stud bolt thr eads. If brake booster is tilted or inclined during
installation, dash panel may damage the threads.
1. Remove vacuum hose from brake booster.
2. Remove master cylinder assembly. Refer to BR-15, "
Removal and Installation".
3. Remove the instrument lower finisher. Refer to IP-11, "
Component Parts".
1. Reservoir tank2. Master cylinder 3. Brake booster
4. Clevis 5. Spacer 6. Gasket
Up
AWFIA0530GB
Revision: May 2010 2011 Versa
Page 869 of 3787
BR-22
< SERVICE INFORMATION >
BRAKE BOOSTER
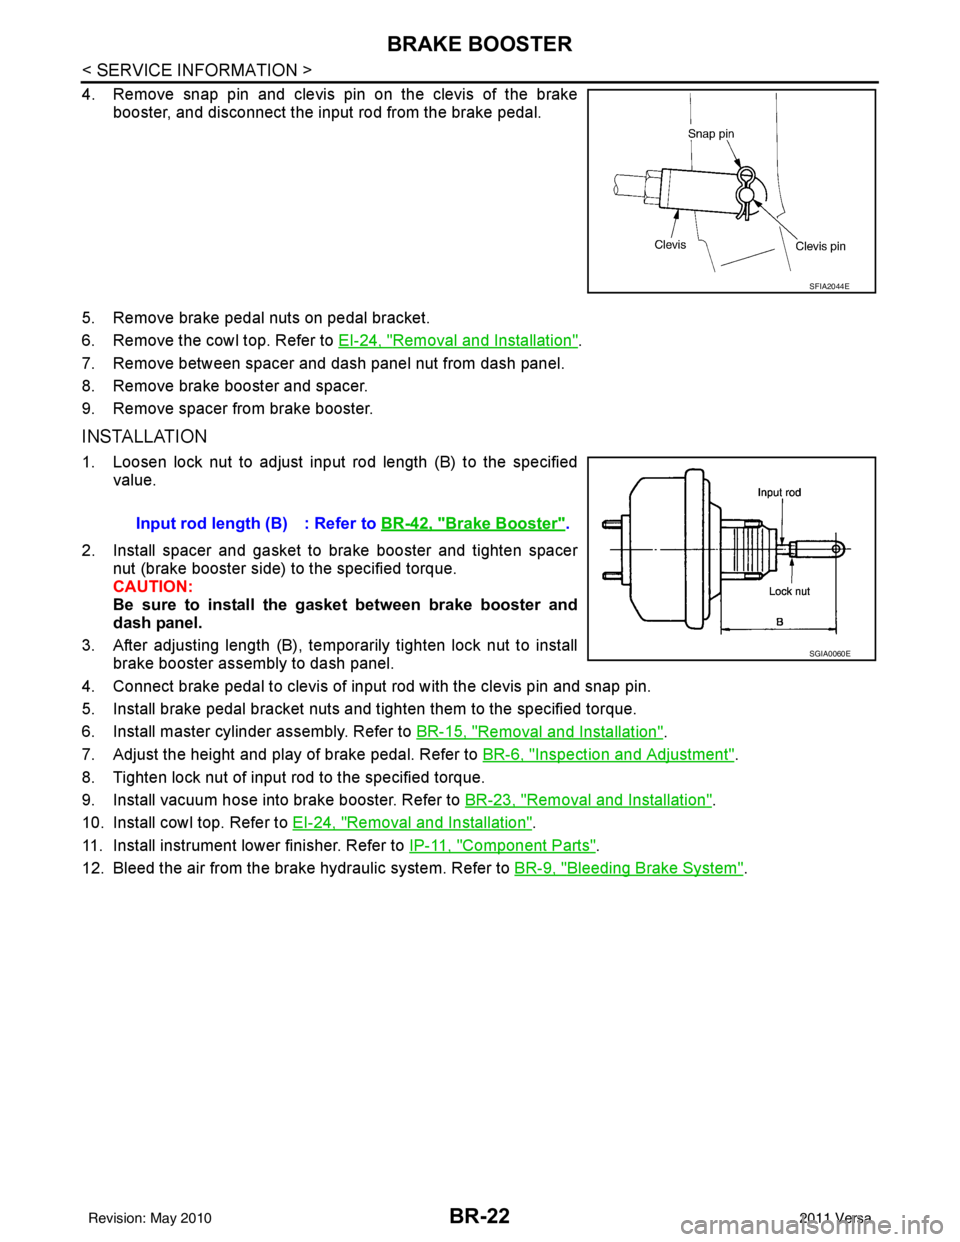
4. Remove snap pin and clevis pin on the clevis of the brakebooster, and disconnect the input rod from the brake pedal.
5. Remove brake pedal nuts on pedal bracket.
6. Remove the cowl top. Refer to EI-24, "
Removal and Installation".
7. Remove between spacer and dash panel nut from dash panel.
8. Remove brake booster and spacer.
9. Remove spacer from brake booster.
INSTALLATION
1. Loosen lock nut to adjust input rod length (B) to the specified value.
2. Install spacer and gasket to brake booster and tighten spacer nut (brake booster side) to the specified torque.
CAUTION:
Be sure to install the gasket between brake booster and
dash panel.
3. After adjusting length (B), temporarily tighten lock nut to install brake booster assembly to dash panel.
4. Connect brake pedal to clevis of input rod with the clevis pin and snap pin.
5. Install brake pedal bracket nuts and tighten them to the specified torque.
6. Install master cylinder assembly. Refer to BR-15, "
Removal and Installation".
7. Adjust the height and play of brake pedal. Refer to BR-6, "
Inspection and Adjustment".
8. Tighten lock nut of input rod to the specified torque.
9. Install vacuum hose into brake booster. Refer to BR-23, "
Removal and Installation".
10. Install cowl top. Refer to EI-24, "
Removal and Installation".
11. Install instrument lower finisher. Refer to IP-11, "
Component Parts".
12. Bleed the air from the brake hydraulic system. Refer to BR-9, "
Bleeding Brake System".
SFIA2044E
Input rod length (B) : Refer to BR-42, "Brake Booster".
SGIA0060E
Revision: May 2010 2011 Versa
Page 870 of 3787
VACUUM LINESBR-23
< SERVICE INFORMATION >
C
DE
G H
I
J
K L
M A
B
BR
N
O P
VACUUM LINES
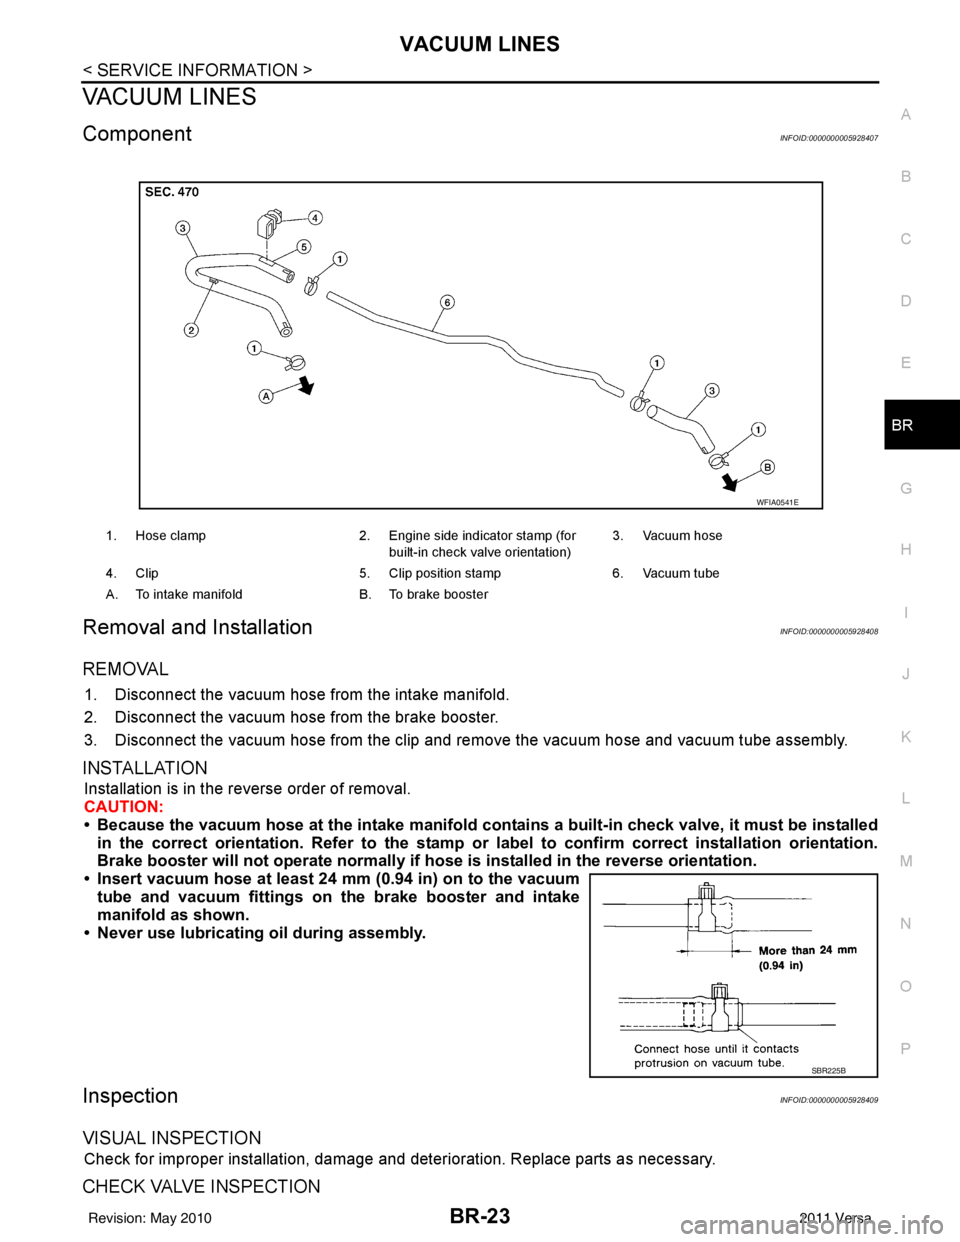
ComponentINFOID:0000000005928407
Removal and InstallationINFOID:0000000005928408
REMOVAL
1. Disconnect the vacuum hose from the intake manifold.
2. Disconnect the vacuum hose from the brake booster.
3. Disconnect the vacuum hose from the clip and re move the vacuum hose and vacuum tube assembly.
INSTALLATION
Installation is in the reverse order of removal.
CAUTION:
• Because the vacuum hose at the intake manifold contains a built-in check valve, it must be installed
in the correct orientation. Refer to the stamp or label to confirm correct installation orientation.
Brake booster will not operate normally if ho se is installed in the reverse orientation.
• Insert vacuum hose at least 24 mm (0.94 in) on to the vacuum tube and vacuum fittings on the brake booster and intake
manifold as shown.
• Never use lubricating oil during assembly.
InspectionINFOID:0000000005928409
VISUAL INSPECTION
Check for improper installation, damage and deterioration. Replace parts as necessary.
CHECK VALVE INSPECTION
1. Hose clamp 2. Engine side indicator stamp (for
built-in check valve orientation) 3. Vacuum hose
4. Clip 5. Clip position stamp6. Vacuum tube
A. To intake manifold B. To brake booster
WFIA0541E
SBR225B
Revision: May 2010 2011 Versa
Page 872 of 3787
FRONT DISC BRAKEBR-25
< SERVICE INFORMATION >
C
DE
G H
I
J
K L
M A
B
BR
N
O P
FRONT DISC BRAKE
On Board InspectionINFOID:0000000005928410
PAD WEAR INSPECTION
• Check pad thickness from check hole on cylinder body.
ComponentINFOID:0000000005928411
AD22VK
Standard thickness : Refer to BR-42, "Front
Disc Brake".
Repair limit thickness : Refer to BR-42, "
Front
Disc Brake".
BRA0010D
AWFIA0640GB
1. Union bolt2. Brake hose 3. Copper washer
4. Cap 5. Bleed valve 6. Sliding pin bolt
7. Cylinder body 8. Piston seal 9. Piston
10. Piston boot 11. Inner shim 12. Inner pad
13. Pad return spring 14. Pad retainer 15. Outer pad
16. Outer shim 17. Sliding pin 18. Sliding pin boot
19. Bushing 20. Torque member bolt 21. Torque member
22. Pad wear sensor : Front: Brake fluid
1:Molykote 7439 grease 2: Rubber grease 3: Molykote AS-880N grease
Revision: May 2010 2011 Versa
Page 873 of 3787
BR-26
< SERVICE INFORMATION >
FRONT DISC BRAKE
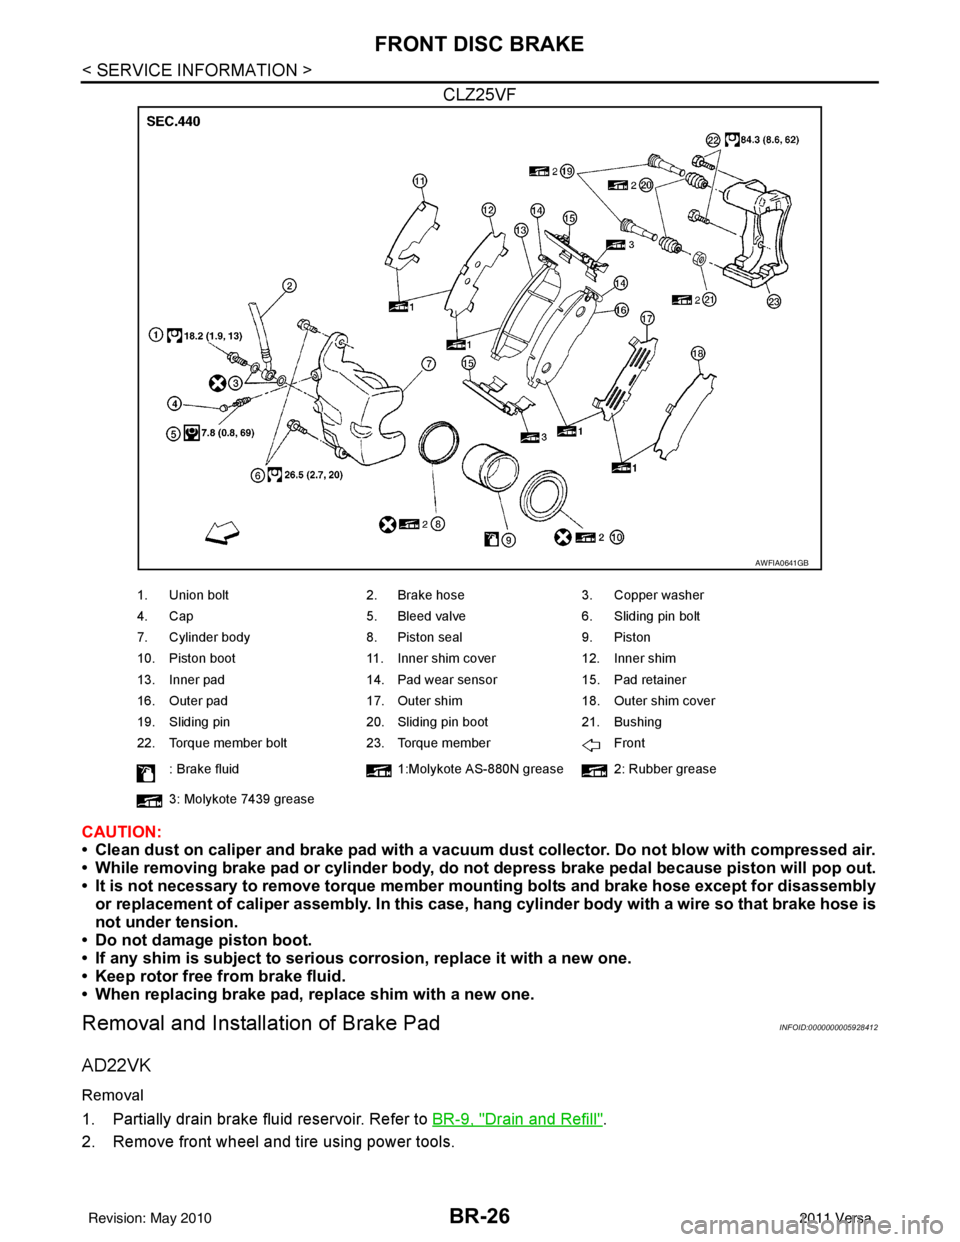
CLZ25VF
CAUTION:
• Clean dust on caliper and brake pad with a vacuum dust collector. Do not blow with compressed air.
• While removing brake pad or cylinder body, do not depress brake pedal because piston will pop out.
• It is not necessary to remove torque member mounting bolts and brake hose except for disassembly
or replacement of caliper assembly. In this case, hang cylinder body with a wire so that brake hose is
not under tension.
• Do not damage piston boot.
• If any shim is subject to serious corrosion, replace it with a new one.
• Keep rotor free from brake fluid.
• When replacing brake pad, replace shim with a new one.
Removal and Installation of Brake PadINFOID:0000000005928412
AD22VK
Removal
1. Partially drain brake fluid reservoir. Refer to BR-9, "Drain and Refill".
2. Remove front wheel and tire using power tools.
AWFIA0641GB
1. Union bolt 2. Brake hose3. Copper washer
4. Cap 5. Bleed valve6. Sliding pin bolt
7. Cylinder body 8. Piston seal9. Piston
10. Piston boot 11. Inner shim cover12. Inner shim
13. Inner pad 14. Pad wear sensor15. Pad retainer
16. Outer pad 17. Outer shim18. Outer shim cover
19. Sliding pin 20. Sliding pin boot21. Bushing
22. Torque member bolt 23. Torque member Front
: Brake fluid 1:Molykote AS-880N grease 2: Rubber grease
3: Molykote 7439 grease
Revision: May 2010 2011 Versa
Page 874 of 3787
FRONT DISC BRAKEBR-27
< SERVICE INFORMATION >
C
DE
G H
I
J
K L
M A
B
BR
N
O P
3. Remove sliding pin bolt (lower side).
4. Hang cylinder body with a wire, and remove pad return spring, pads, shims and pad retainers from torque member.
CAUTION:
When removing pad retainer from torque member, lift pad
retainer in the direction shown by arrow, so as not to
deform it.
Installation
1. Apply Molykote AS-880N grease to the shims. Install shims to pads.CAUTION:
Securely install shims according to mounting direction of pads.
2. Apply Molykote 7439 grease as shown (A).
3. Install pad retainers, pad return spring, shims and pads to the torque member. CAUTION:
SBR976B
SBR932C
SBR556E
AWFIA0039ZZ
Revision: May 2010 2011 Versa
Page 875 of 3787
BR-28
< SERVICE INFORMATION >
FRONT DISC BRAKE
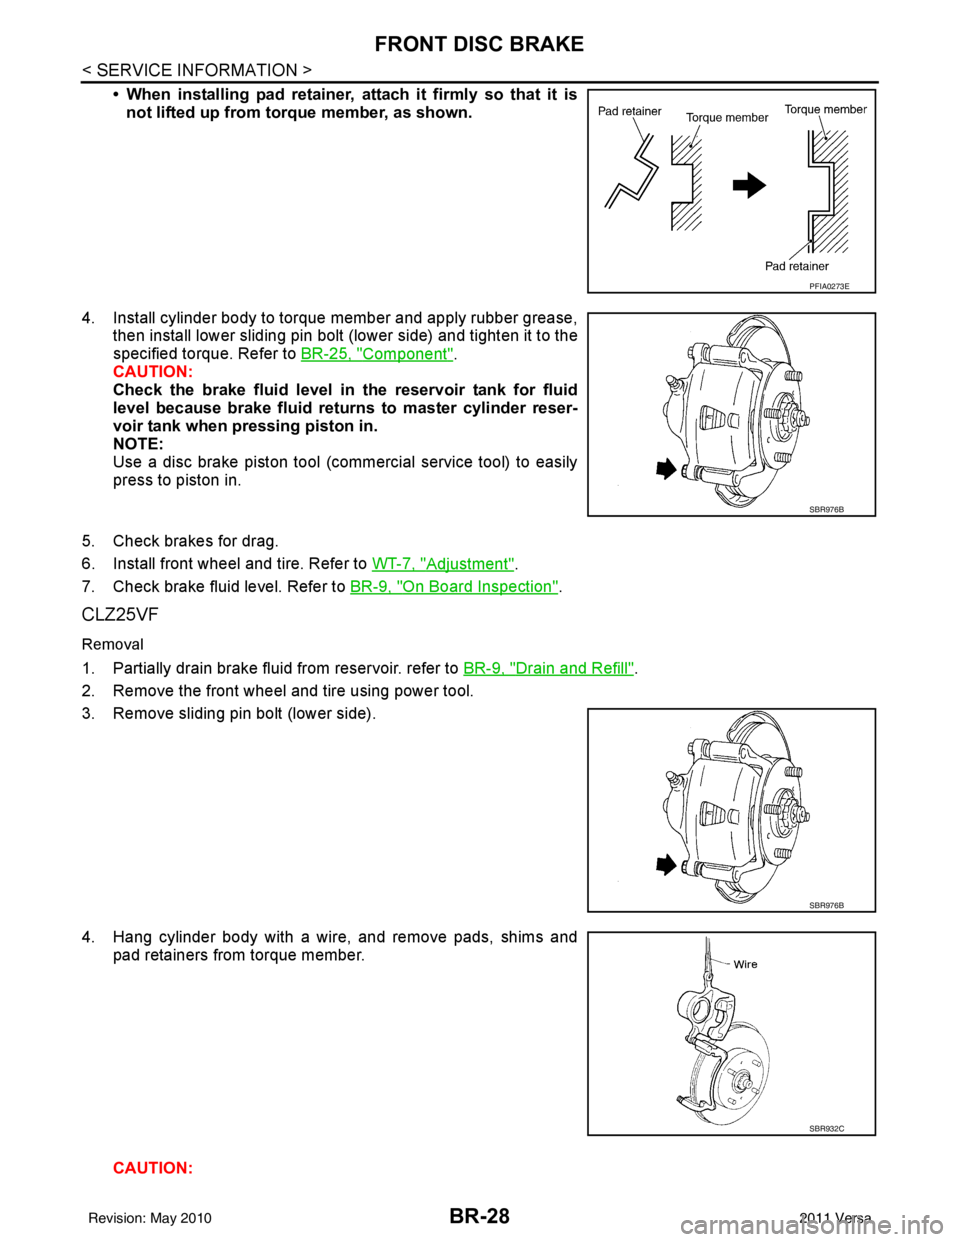
• When installing pad retainer, attach it firmly so that it isnot lifted up from torque member, as shown.
4. Install cylinder body to torque member and apply rubber grease, then install lower sliding pin bolt (lower side) and tighten it to the
specified torque. Refer to BR-25, "
Component".
CAUTION:
Check the brake fluid level in the reservoir tank for fluid
level because brake fluid returns to master cylinder reser-
voir tank when pressing piston in.
NOTE:
Use a disc brake piston tool (commercial service tool) to easily
press to piston in.
5. Check brakes for drag.
6. Install front wheel and tire. Refer to WT-7, "
Adjustment".
7. Check brake fluid level. Refer to BR-9, "
On Board Inspection".
CLZ25VF
Removal
1. Partially drain brake fluid from reservoir. refer to BR-9, "Drain and Refill".
2. Remove the front wheel and tire using power tool.
3. Remove sliding pin bolt (lower side).
4. Hang cylinder body with a wire, and remove pads, shims and pad retainers from torque member.
CAUTION:
PFIA0273E
SBR976B
SBR976B
SBR932C
Revision: May 2010 2011 Versa
Page 876 of 3787
FRONT DISC BRAKEBR-29
< SERVICE INFORMATION >
C
DE
G H
I
J
K L
M A
B
BR
N
O P
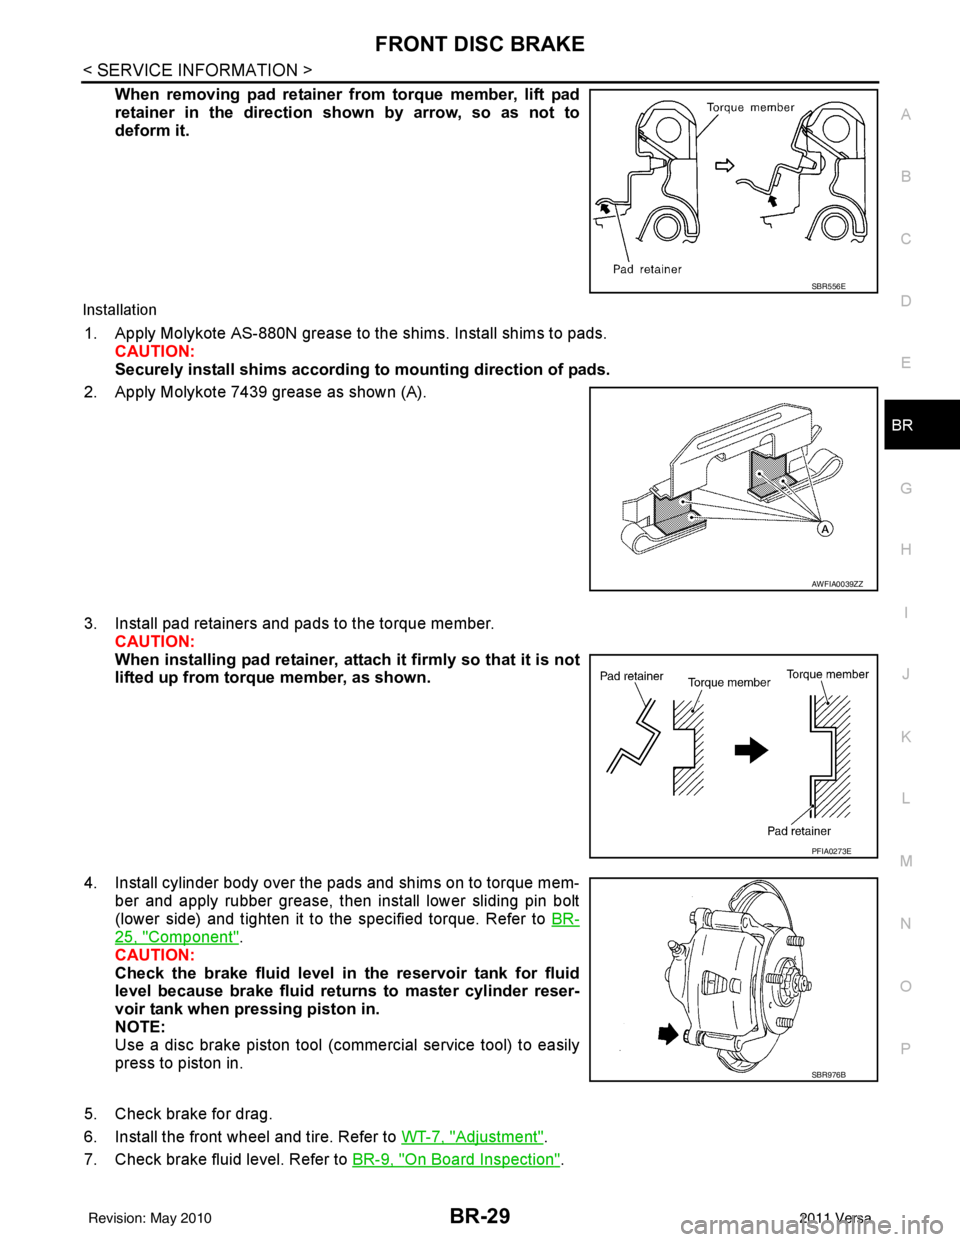
When removing pad retainer from torque member, lift pad
retainer in the direction shown by arrow, so as not to
deform it.
Installation
1. Apply Molykote AS-880N grease to the shims. Install shims to pads. CAUTION:
Securely install shims according to mounting direction of pads.
2. Apply Molykote 7439 grease as shown (A).
3. Install pad retainers and pads to the torque member. CAUTION:
When installing pad retainer, att ach it firmly so that it is not
lifted up from torque member, as shown.
4. Install cylinder body over the pads and shims on to torque mem- ber and apply rubber grease, then install lower sliding pin bolt
(lower side) and tighten it to the specified torque. Refer to BR-
25, "Component".
CAUTION:
Check the brake fluid level in th e reservoir tank for fluid
level because brake fluid returns to master cylinder reser-
voir tank when pressing piston in.
NOTE:
Use a disc brake piston tool (commercial service tool) to easily
press to piston in.
5. Check brake for drag.
6. Install the front wheel and tire. Refer to WT-7, "
Adjustment".
7. Check brake fluid level. Refer to BR-9, "
On Board Inspection".
SBR556E
AWFIA0039ZZ
PFIA0273E
SBR976B
Revision: May 2010 2011 Versa