2011 NISSAN LATIO sensor
[x] Cancel search: sensorPage 3661 of 3787
![NISSAN LATIO 2011 Service Repair Manual TROUBLE DIAGNOSISSRS-27
< SYMPTOM DIAGNOSIS >
C
DE
F
G
I
J
K L
M A
B
SRS
N
O P
PRE-TEN FRONT LH [OPEN]
[B1086] The circuit for front LH seat belt pre-tensioner is open. 1. Visually check the wiring h NISSAN LATIO 2011 Service Repair Manual TROUBLE DIAGNOSISSRS-27
< SYMPTOM DIAGNOSIS >
C
DE
F
G
I
J
K L
M A
B
SRS
N
O P
PRE-TEN FRONT LH [OPEN]
[B1086] The circuit for front LH seat belt pre-tensioner is open. 1. Visually check the wiring h](/manual-img/5/57357/w960_57357-3660.png)
TROUBLE DIAGNOSISSRS-27
< SYMPTOM DIAGNOSIS >
C
DE
F
G
I
J
K L
M A
B
SRS
N
O P
PRE-TEN FRONT LH [OPEN]
[B1086] The circuit for front LH seat belt pre-tensioner is open. 1. Visually check the wiring harness
connections.
2. Replace the harness if it has visi- ble damage.
3. Replace front LH seat belt pre- tensioner.
4. Replace the air bag diagnosis
sensor unit.
5. Replace the related harness.
PRE-TEN FRONT LH
[VB-SHORT]
[B1087] The circuit for front LH seat belt pre-tensioner is shorted to
some power supply circuit.
PRE-TEN FRONT LH [GND-SHORT] [B1088] The circuit for front LH seat belt pre-tensioner is shorted to
ground.
PRE-TEN FRONT LH [SHORT][B1089] The circuits for the front LH seat belt pre-tensioner are shorted
to each other.
PRE-TEN FRONT RH [OPEN]
[B1081] The circuit for front RH seat belt pre-tensioner is open. 1. Visually check the wiring harness
connections.
2. Replace the harness if it has visi- ble damage.
3. Replace front RH seat belt pre-
tensioner.
4. Replace the air bag diagnosis sensor unit.
5. Replace the related harness.
PRE-TEN FRONT RH
[VB-SHORT][B1082] The circuit for front RH seat belt pre-tensioner is shorted to
some power supply circuit.
PRE-TEN FRONT RH [GND-SHORT][B1083] The circuit for front RH seat belt pre-tensioner is shorted to
ground.
PRE-TEN FRONT RH [SHORT]
[B1084] The circuits for the front RH seat belt pre-tensioner are short-
ed to each other.
CURTAIN MODULE LH [OPEN][B1150] The LH side curtain air bag module circuit is open.
1. Visually check the wiring harness
connection.
2. Replace the harness if it has visi-
ble damage.
3. Replace LH side curtain air bag module.
4. Replace the air bag diagnosis sensor unit.
5. Replace the related harness.
CURTAIN MODULE LH
[VB-SHORT][B1151] The LH side curtain air bag module circuit is shorted to some
power supply circuits.
CURTAIN MODULE LH [GND-SHORT]
[B1152] The LH side curtain air bag module circuit is shorted to
ground.
CURTAIN MODULE LH [SHORT][B1153] The circuits for the LH side curtain air bag module are shorted
to each other.
CURTAIN MODULE RH [OPEN]
[B1145] The RH side curtain air bag module circuit is open.
1. Visually check the wiring harness
connection.
2. Replace the harness if it has visi- ble damage.
3. Replace RH side curtain air bag
module.
4. Replace the air bag diagnosis sensor unit.
5. Replace the related harness.
CURTAIN MODULE RH
[VB-SHORT][B1146] The RH side curtain air bag module circuit is shorted to some
power supply circuits.
CURTAIN MODULE RH [GND-SHORT][B1147] The RH side curtain air bag module circuit is shorted to
g
rou
nd.
CURTAIN MODULE RH [SHORT]
[B1148] The circuits for the RH side curtain air bag module are shorted
to each other.
CONTROL UNIT [B1XXX] Air bag diagnosis sensor unit is malfunctioning.
1. Visually check the wiring harness
connection.
2. Replace the air bag diagnosis
sensor unit.
OCCUPANT SENS C/U [UNIT FAIL]
[B1017] or [B1021] The OCS control unit is malfunctioning.
1. Replace RH front seat cushion/
occupant classification system
control unit assembly.
Diagnostic item
Explanation Repair order
Recheck SRS at each replacement
Revision: May 2010 2011 Versa
Page 3662 of 3787

SRS-28
< SYMPTOM DIAGNOSIS >
TROUBLE DIAGNOSIS
NOTE:
Follow the procedures in numerical order when performing repairs. Confirm whether the repair has been suc-
cessful using air bag warning lamp or CONSULT-III after each repair. If malfunction is still observed, proceed
to the next step. When malfunction has been elimi nated, further repair work is not required.
Trouble Diagnosis without CONSULT-IIIINFOID:0000000006211124
DIAGNOSTIC PROCEDURE 6
Inspect SRS Malfunction Using "AIR BAG" Warning Lamp—Diagnosis Mode
NOTE:
SRS will not enter Diagnosis mode if no malfunction is detected in User mode.
1. Turn ignition switch ON.
OCCUPANT SENS C/U [UNIT FAIL]
[B1020] The OCS control unit is malfunctioning.
1. Replace the harness if it has visi-
ble damage.
2. Replace the RH front seat cush- ion assembly. Do not disassem-
ble the seat cushion assembly.
3. Replace the RH front seat belt as- sembly.
OCCUPANT SENS C/U [COMM FAIL]
[B1022] Communication between the OCS control unit and air bag di-
agnosis sensor unit is interrupted.
1. Visually check the wiring harness
connection.
2. Replace the harness if it has visi- ble damage.
3. Replace the RH front seat cush- ion assembly. Do not disassem-
ble the seat cushion assembly.
4. Replace the air bag diagnosis sensor unit.
5. Replace the related harness.
OCCUPANT SENS [UNIT FAIL][B1018] OCS sensor is malfunctioning.
1. Visually check the wiring harness
connection to the OCS sensor.
2. Replace the RH front seat cush- ion assembly. Do not disassem-
ble the seat cushion assembly.
BELT TENSION SENS [UNIT FAIL][B1019] Belt tension sensor is malfunctioning.
1. Visually check the wiring harness
connection.
2. Replace the harness if it has visi-
ble damage.
3. Replace the RH front seat belt as- sembly.
4. Replace the RH front seat cush- ion assembly. Do not disassem-
ble the seat cushion assembly.
5. Replace the related harness.
PASS A/B INDCTR CKT [B1023] Front passenger air bag off indicator is malfunctioning. 1. Visually check the wiring harness
connection.
2. Replace the harness if it has visi-
ble damage.
3. Replace front passenger air bag off indicator.
4. Replace the air bag diagnosis sensor unit.
5. Replace the related harness.
FRONTAL COLLISION DETECTION
[B1209] Driver and front passenger air bag modules are deployed. Refer to
SRS-48, "
For Frontal Colli-
sion".
SIDE COLLISION DETECTION [B1210] Side or curtain air bag modules are deployed.
Refer to SRS-50, "
For Side and Roll-
over Collision".
Diagnostic item
Explanation Repair order
Recheck SRS at each replacement
Revision: May 2010 2011 Versa
Page 3666 of 3787
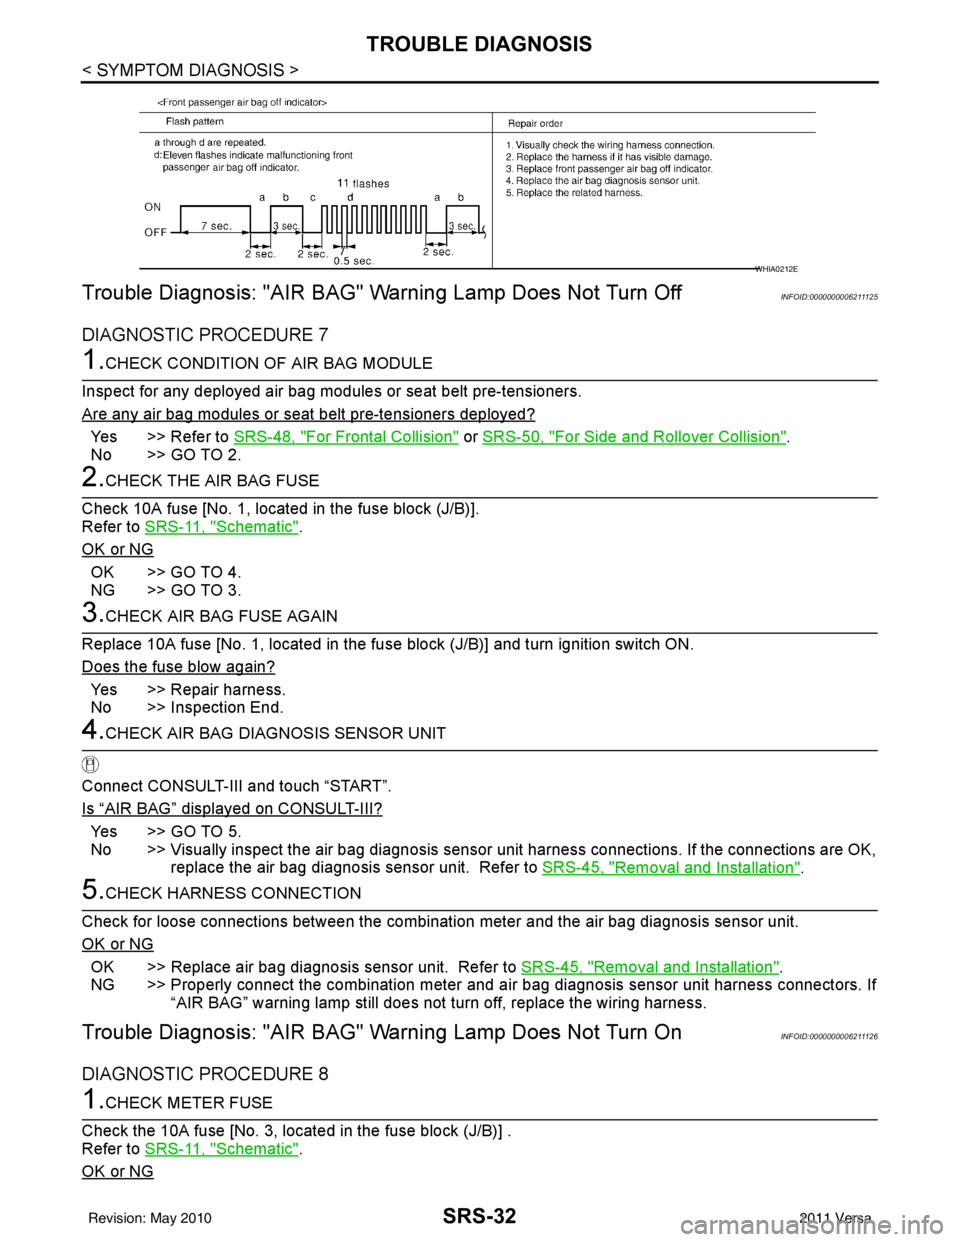
SRS-32
< SYMPTOM DIAGNOSIS >
TROUBLE DIAGNOSIS
Trouble Diagnosis: "AIR BAG" Warning Lamp Does Not Turn Off
INFOID:0000000006211125
DIAGNOSTIC PROCEDURE 7
1.CHECK CONDITION OF AIR BAG MODULE
Inspect for any deployed air bag modules or seat belt pre-tensioners.
Are any air bag modules or s eat belt pre-tensioners deployed?
Yes >> Refer to SRS-48, "For Frontal Collision" or SRS-50, "For Side and Rollover Collision".
No >> GO TO 2.
2.CHECK THE AIR BAG FUSE
Check 10A fuse [No. 1, locat ed in the fuse block (J/B)].
Refer to SRS-11, "
Schematic".
OK or NG
OK >> GO TO 4.
NG >> GO TO 3.
3.CHECK AIR BAG FUSE AGAIN
Replace 10A fuse [No. 1, located in the fu se block (J/B)] and turn ignition switch ON.
Does the fuse blow again?
Yes >> Repair harness.
No >> Inspection End.
4.CHECK AIR BAG DIAGNOSIS SENSOR UNIT
Connect CONSULT-III and touch “START”.
Is
“AIR BAG” displayed on CONSULT-III?
Ye s > > G O T O 5 .
No >> Visually inspect the air bag diagnosis sensor unit harness connections. If the connections are OK,
replace the air bag diagnosis sensor unit. Refer to SRS-45, "
Removal and Installation".
5.CHECK HARNESS CONNECTION
Check for loose connections between the combination meter and the air bag diagnosis sensor unit.
OK or NG
OK >> Replace air bag diagnosis sensor unit. Refer to SRS-45, "Removal and Installation".
NG >> Properly connect the combination meter and ai r bag diagnosis sensor unit harness connectors. If
“AIR BAG” warning lamp still does not turn off, replace the wiring harness.
Trouble Diagnosis: "AIR BAG" Warning Lamp Does Not Turn OnINFOID:0000000006211126
DIAGNOSTIC PROCEDURE 8
1.CHECK METER FUSE
Check the 10A fuse [No. 3, located in the fuse block (J/B)] .
Refer to SRS-11, "
Schematic".
OK or NG
WHIA0212E
Revision: May 2010 2011 Versa
Page 3667 of 3787
TROUBLE DIAGNOSISSRS-33
< SYMPTOM DIAGNOSIS >
C
DE
F
G
I
J
K L
M A
B
SRS
N
O P
OK >> GO TO 3.
NG >> GO TO 2.
2.REPLACE METER FUSE AND CHECK AGAIN
Replace 10A fuse [No. 3, located in the fuse block (J/B)] and turn ignition switch ON.
Does the fuse blow again?
Yes >> Replace harness.
No >> Inspection End.
3.CHECK HARNESS CONNECTIONS BETWEEN AIR BAG DIAGNOSIS SENSOR UNIT AND COMBINA-
TION METER
Inspect the harness and connectors between the air bag diagnosis sensor unit and the combination meter.
Do the harness or connectors have any visible damage?
Yes >> Replace harness.
No >> GO TO 4.
4.CHECK COMBINATION METER
Disconnect the air bag diagnosis sensor unit harnes s connectors and turn ignition switch ON.
Does
“AIR BAG” warning lamp turn on?
Yes >> Replace the air bag diagnosis sensor unit. Refer to SRS-45, "Removal and Installation".
No >> Replace the combination meter. Refer to DI-20, "
Removal and Installation".
Revision: May 2010 2011 Versa
Page 3676 of 3787
SRS-42
< ON-VEHICLE REPAIR >
CRASH ZONE SENSOR
CRASH ZONE SENSOR
Removal and InstallationINFOID:0000000005931216
REMOVAL
CAUTION:
• Before servicing the SRS, turn ignition switch OFF, disconnect both battery terminals and wait at
least three minutes.
• Do not disassemble the crash zone sensor.
• Do not use old nuts after removal; replace with new nuts.
• Replace the crash zone sensor if it has been dropped or sus- tained an impact.
• Check crash zone sensor to make sure it is free of deformi-
ties, dents, cracks or rust. If it shows any visible signs of dam-
age, replace it with a new one.
1. Disconnect both the negative and positive battery terminals, then wait at least three minutes.
2. Remove air intake duct. Refer to EM-25, "
Exploded View" (HR16DE), EM-135, "Component" (MR18DE).
3. Remove upper radiator cover and front grille, refer to EI-23
.
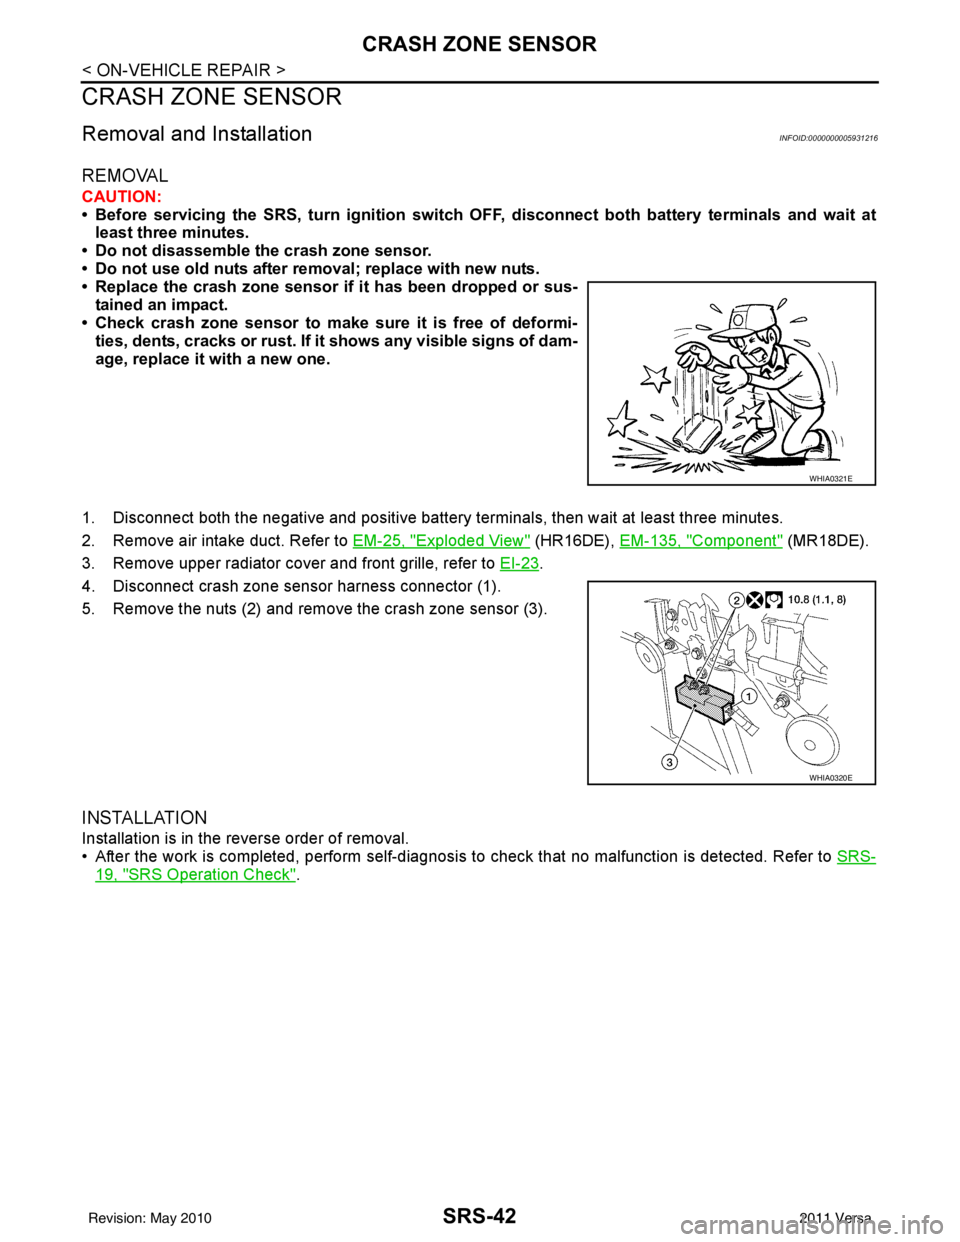
4. Disconnect crash zone sensor harness connector (1).
5. Remove the nuts (2) and remove the crash zone sensor (3).
INSTALLATION
Installation is in the reverse order of removal.
• After the work is completed, perform self-diagnosis to check that no malfunction is detected. Refer to SRS-
19, "SRS Operation Check".
WHIA0321E
WHIA0320E
Revision: May 2010 2011 Versa
Page 3677 of 3787
SIDE AIR BAG (SATELLITE) SENSORSRS-43
< ON-VEHICLE REPAIR >
C
DE
F
G
I
J
K L
M A
B
SRS
N
O P
SIDE AIR BAG (S ATELLITE) SENSOR
Removal and InstallationINFOID:0000000005931217
REMOVAL
WARNING:
Do not reuse center pillar upper garnish if removed.
CAUTION:
• Before servicing the SRS, turn ignition switch OFF, disconnect both battery terminals and wait at
least three minutes.
• Do not disassemble the side air bag (satellite) sensor.
• Do not use old nuts after removal; replace with new nuts.
• Replace the side air bag (satellite) sensor if it has been dropped or sustained an impact.
• Check side air bag (satellite) sensor to make sure it is free of deformities, dents, cracks or rust . If it shows any visible signs
of damage, replace it with a new one.
1. Disconnect both the negative and positive battery te rminals, then wait at least three minutes.
2. Remove the body side welt, kicking plate, and center pillar lower garnish. Refer to EI-41, "
Component".
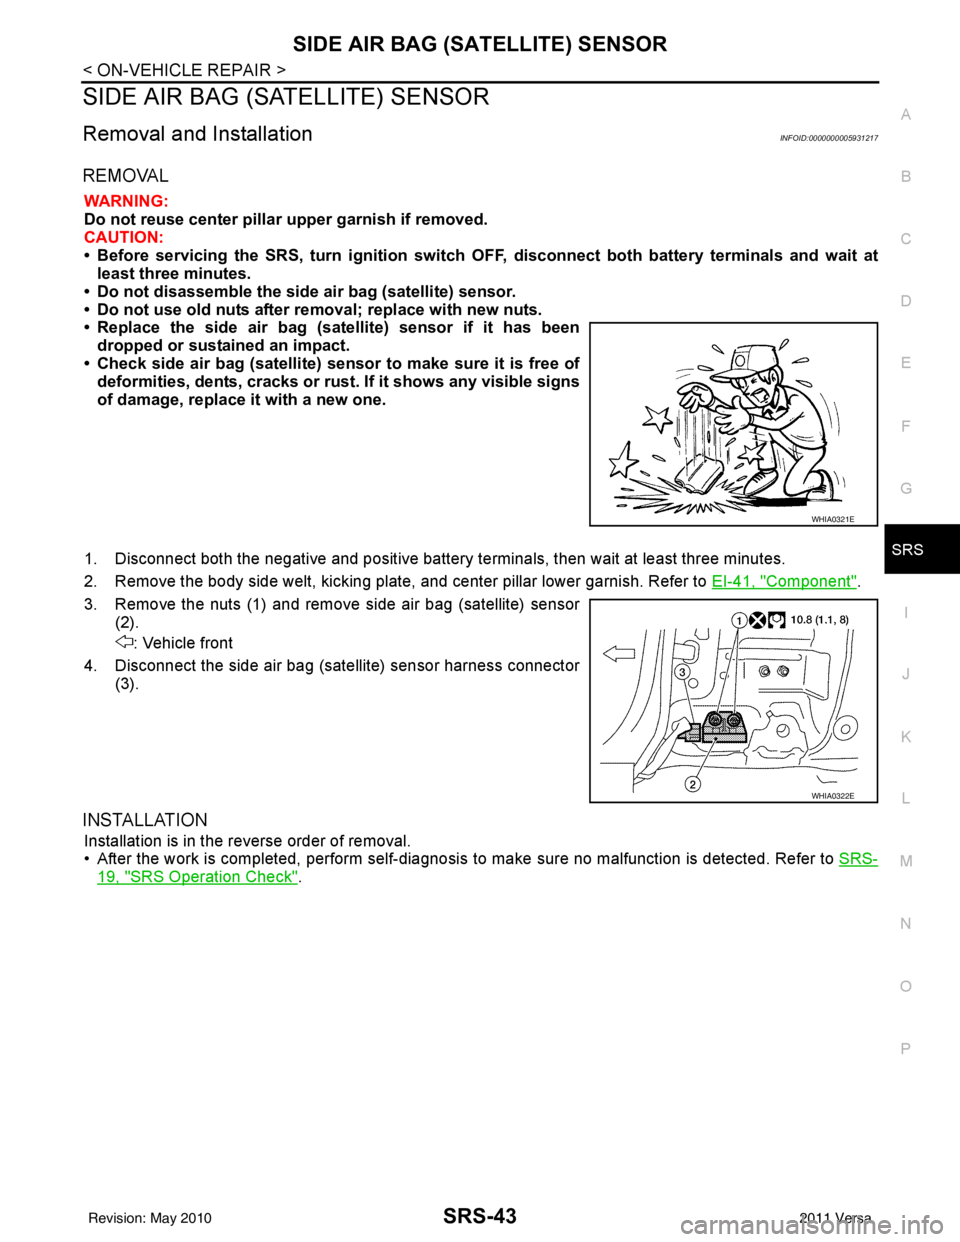
3. Remove the nuts (1) and remove side air bag (satellite) sensor (2).
: Vehicle front
4. Disconnect the side air bag (satellite) sensor harness connector (3).
INSTALLATION
Installation is in the reverse order of removal.
• After the work is completed, perform self-diagnosis to make sure no malfunction is detected. Refer to SRS-
19, "SRS Operation Check".
WHIA0321E
WHIA0322E
Revision: May 2010 2011 Versa
Page 3679 of 3787
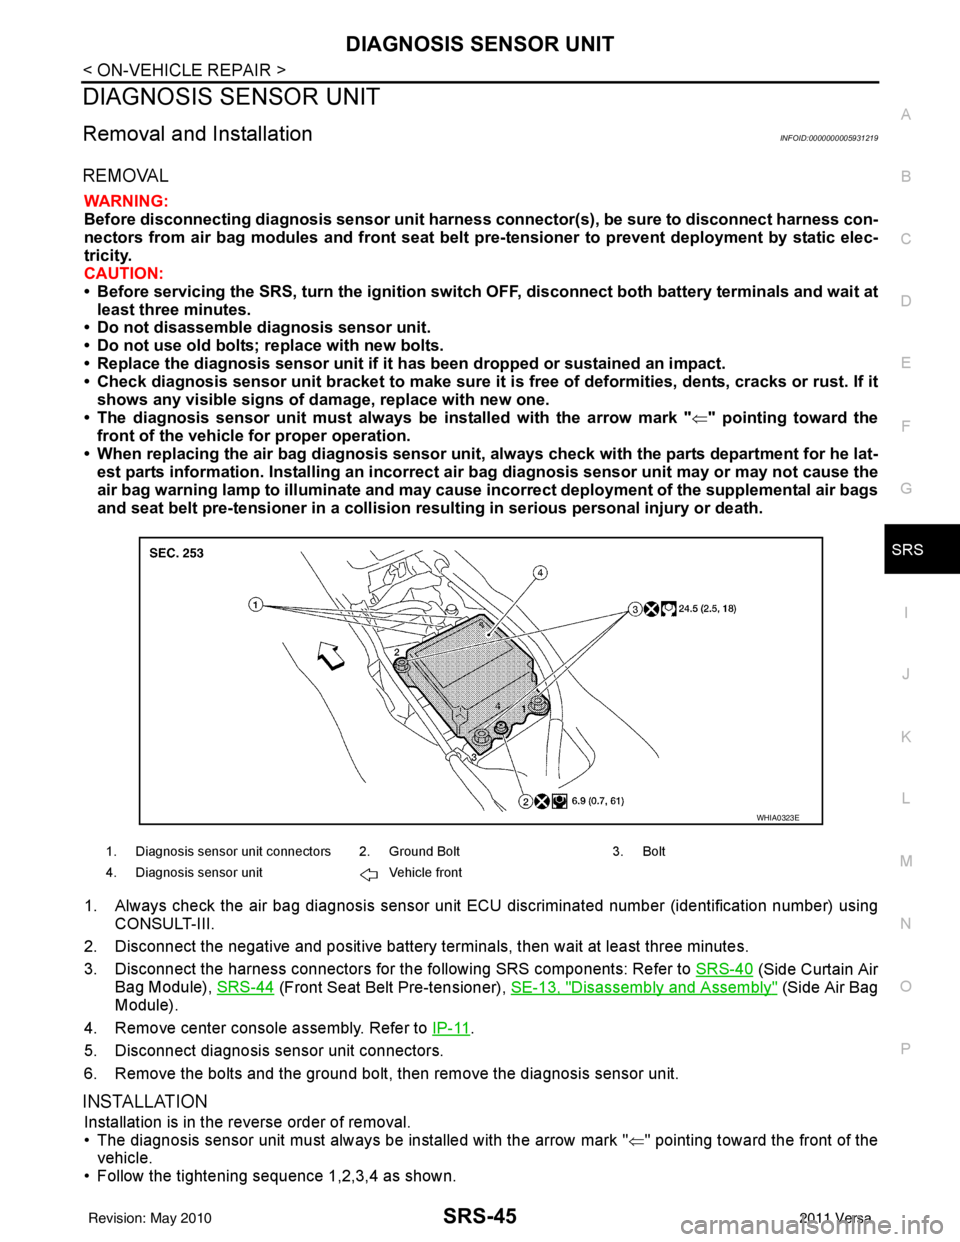
DIAGNOSIS SENSOR UNITSRS-45
< ON-VEHICLE REPAIR >
C
DE
F
G
I
J
K L
M A
B
SRS
N
O P
DIAGNOSIS SENSOR UNIT
Removal and InstallationINFOID:0000000005931219
REMOVAL
WARNING:
Before disconnecting diagnosis sensor unit harness connector(s), be sure to disconnect harness con-
nectors from air bag modules and front seat belt pre-tensioner to prevent deployment by static elec-
tricity.
CAUTION:
• Before servicing the SRS, turn th e ignition switch OFF, disconnect both battery terminals and wait at
least three minutes.
• Do not disassemble diagnosis sensor unit.
• Do not use old bolts; replace with new bolts.
• Replace the diagnosis sensor unit if it has been dropped or sustained an impact.
• Check diagnosis sensor unit bracket to make sure it is free of deformities, dents, cracks or rust. If it
shows any visible signs of da mage, replace with new one.
• The diagnosis sensor unit must always be installed with the arrow mark " ⇐" pointing toward the
front of the vehicle for proper operation.
• When replacing the air bag diagno sis sensor unit, always check with the parts department for he lat-
est parts information. Installing an incorrect air bag diagnosis sensor unit may or may not cause the
air bag warning lamp to illuminate and may cause incorrect deployment of the supplemental air bags
and seat belt pre-tensioner in a collision r esulting in serious personal injury or death.
1. Always check the air bag diagnosis sensor unit E CU discriminated number (identification number) using
CONSULT-III.
2. Disconnect the negative and positive battery term inals, then wait at least three minutes.
3. Disconnect the harness connectors for the following SRS components: Refer to SRS-40
(Side Curtain Air
Bag Module), SRS-44
(Front Seat Belt Pre-tensioner), SE-13, "Disassembly and Assembly" (Side Air Bag
Module).
4. Remove center console assembly. Refer to IP-11
.
5. Disconnect diagnosis sensor unit connectors.
6. Remove the bolts and the ground bolt, then remove the diagnosis sensor unit.
INSTALLATION
Installation is in the reverse order of removal.
• The diagnosis sensor unit must always be installed with the arrow mark " ⇐" pointing toward the front of the
vehicle.
• Follow the tightening sequence 1,2,3,4 as shown.
1. Diagnosis sensor unit connectors 2. Ground Bolt 3. Bolt
4. Diagnosis sensor unit Vehicle front
WHIA0323E
Revision: May 2010 2011 Versa
Page 3680 of 3787

SRS-46
< ON-VEHICLE REPAIR >
DIAGNOSIS SENSOR UNIT
• After the work is completed, perform self-diagnosis to check that no malfunction is detected. Refer to SRS-
19, "SRS Operation Check".
CAUTION:
After replacing the air bag diagno sis sensor unit, confirm using CONSULT-III that the ECU discrimi-
nated number (identification number) of the new replacement air bag diagnosis sensor unit matches
the ECU discriminated number (ident ification number) of the replaced (old) air bag diagnosis sensor
unit.
NOTE:
If the ECU discriminated number of the new replacement air bag diagnosis sensor unit differs from the ECU
discriminated number of the replaced air bag diagnosis sensor unit, reconfirm the parts information and verify
that the correct air bag diagnosis sensor unit was installed.
Revision: May 2010 2011 Versa