Page 131 of 489

WARNING
●The front sonar system is a convenience
but it is not a substitute for proper
driving.
● The rear sonar system is a convenience
but it is not a substitute for proper back-
ing. Always turn and check that it is safe
to do so before backing up. Always
back up slowly. The front sonar system:
● is active when the ignition is in the ON
position and the shift selector is in a forward
gear position.
● a beeping tone is emitted when the sensors
detect obstacles within 3 ft (1.0 m) of the
front bumper.
The rear sonar system: ● is active when the ignition is in the ON
position and the shift selector is in R (Re-
verse) .
● a beeping tone is emitted when the sensors
detect obstacles within 5.9 ft (1.8 m) of the
rear bumper.
The front and rear sonar system can be disabled
by pushing the OFF switch. When the system is
disabled, the indicator light on the switch will
illuminate. Push the switch again to enable the
system. The indicator light will go off.
The system will automatically reset the next time
the ignition switch is placed in the ON position.
See “Front sonar system” in the “Starting and
driving” section. Tow mode should be used when pulling a heavy
trailer or hauling a heavy load. Driving the vehicle
in the tow mode with no trailer/load or light
trailer/light load will not cause any damage. How-
ever, fuel economy may be reduced, and the
transmission/engine driving characteristics may
feel unusual.
Press the tow mode switch to activate tow mode.
The indicator light on the tow mode switch illumi-
nates when tow mode is selected. Press the tow
mode switch again to turn tow mode OFF.
Tow mode is automatically canceled when the
ignition switch is placed in the OFF position.
Page 150 of 489

●The driver’s door is opened and then closed
while the key is removed from the ignition
switch.
● The key is removed from the ignition switch
while all doors are closed.
The lights will turn off while the timer is activated
when: ● The driver’s door is locked by the keyfob, a
key, or the power door lock switch.
● The ignition switch is placed in the ON po-
sition.
When the switch is in the OFF position
�3, the
interior lights do not illuminate, regardless of door
position. The puddle lights (if so equipped) come
on when any front or rear passenger door is
opened.
The lights will turn off automatically after a period
of time while doors are open to prevent the bat-
tery from becoming discharged. NOTE:
The footwell lights (if so equipped) and
door step lights illuminate when the driver
and passenger doors are open regardless
of the interior light switch position. These
lights will turn off automatically after a
period of time while doors are open to
prevent the battery from becoming dis-
charged.
Page 151 of 489
The personal lights on the overhead console can
be swiveled 360 degrees. To turn on the light,
press the button. Press the button again to turn
off the light.To turn the map lights on, press the switches. To
turn them off, press the switches again.
Page 152 of 489
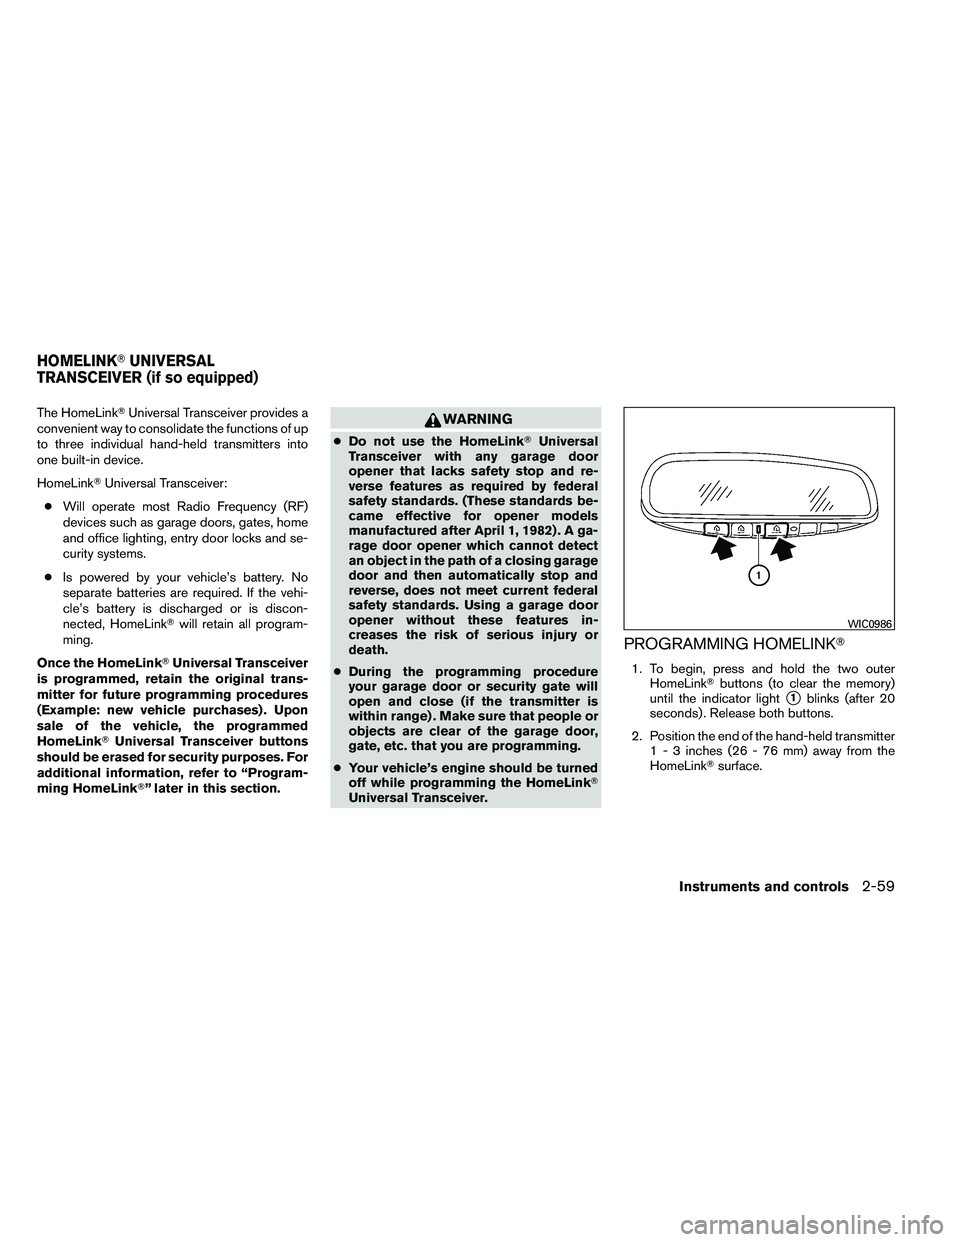
The HomeLink�Universal Transceiver provides a
convenient way to consolidate the functions of up
to three individual hand-held transmitters into
one built-in device.
HomeLink� Universal Transceiver:
● Will operate most Radio Frequency (RF)
devices such as garage doors, gates, home
and office lighting, entry door locks and se-
curity systems.
● Is powered by your vehicle’s battery. No
separate batteries are required. If the vehi-
cle’s battery is discharged or is discon-
nected, HomeLink� will retain all program-
ming.
Once the HomeLink� Universal Transceiver
is programmed, retain the original trans-
mitter for future programming procedures
(Example: new vehicle purchases) . Upon
sale of the vehicle, the programmed
HomeLink� Universal Transceiver buttons
should be erased for security purposes. For
additional information, refer to “Program-
ming HomeLink�” later in this section.
Page 153 of 489

3. Using both hands, simultaneously press andhold both the HomeLink� button you want to
program and the hand-held transmitter but-
ton.
DO NOT release the buttons until step 4 has
been completed.
4. Hold down both buttons until the indicator light on the HomeLink� flashes, changing
from a “slow blink” to a “rapidly flashing
blink”. This could take up to 90 seconds.
When the indicator light flashes rapidly, both
buttons may be released. The rapidly flash-
ing light indicates successful programming.
To activate the garage door or other pro- grammed device, press and hold the pro-
grammed HomeLink�
button — releasing
when the device begins to activate.
5. If the indicator light on the HomeLink� blinks
rapidly for 2 seconds and then turns solid,
HomeLink� has picked up a “rolling code”
garage door opener signal. You will need to
proceed with the next steps to train the
HomeLink� to complete the programming
which may require a ladder and another per-
son for convenience.
6. Press and release the “smart” or “learn” pro- gram button located on the garage door
opener’s motor to activate the “training
mode”. This button is usually located near
the antenna wire that hangs down from the
motor. If the wire originates from under a
light lens, you will need to remove the lens to
access the program button.
NOTE:
Once you have pressed and released the
program button on the garage door open-
er’s motor and the “training light” is lit, you
have 30 seconds in which to perform step 7.
Use the help of a second person for conve-
nience to assist when performing this step. 7. Within 30 seconds of pressing and releas- ing the garage door opener’s program but- ton, quickly and firmly press and release the
HomeLink�
button you’ve just programmed.
Press and release the HomeLink� button up
to 3 times to complete the training.
8. Your HomeLink� button should now be pro-
grammed. (To program the remaining
HomeLink� buttons for additional door or
gate openers, follow steps 2-4 only.)
NOTE:
Do not repeat step 1 unless you want to
“clear” all previously programmed
HomeLink� buttons.
If you have any questions or are having difficulty
programming your HomeLink� buttons, refer to
the HomeLink� web site at: www.homelink.com
or call 1-800-355-3515.
PROGRAMMING HOMELINK� FOR
CANADIAN CUSTOMERS
Prior to 1992, D.O.C. regulations required hand-
held transmitters to stop transmitting after 2 sec-
onds. To program your hand-held transmitter to
HomeLink�, continue to press and hold the
HomeLink� button (see steps2-4under “Pro-
gramming HomeLink�”) while you press and re-
press (“cycle”) your hand-held transmitters every
2 seconds until the indicator light flashes rapidly
(indicating successful programming) .
Page 154 of 489

NOTE:
When programming a garage door opener,
etc., it is advised to unplug the device dur-
ing the “cycling” process to prevent pos-
sible damage to the garage door opener
components.
OPERATING THE HOMELINK�
UNIVERSAL TRANSCEIVER
The HomeLink�Universal Transceiver (once pro-
grammed) may now be used to activate the ga-
rage door, etc. To operate, simply press the ap-
propriate programmed HomeLink� Universal
Transceiver button. The amber indicator light will
illuminate while the signal is being transmitted.
PROGRAMMING TROUBLE-
DIAGNOSIS
If the HomeLink� does not quickly learn the hand-
held transmitter information:
● replace the hand-held transmitter batteries
with new batteries.
● position the hand-held transmitter with its
battery area facing away from the
HomeLink� surface.
● press and hold both the HomeLink� and
hand-held transmitter buttons without inter-
ruption. ●
position the hand-held transmitter1-3
inches (26 - 76 mm) away from the
HomeLink� surface. Hold the transmitter in
that position for up to 15 seconds. If
HomeLink� is not programmed within that
time, try holding the transmitter in another
position – keeping the indicator light in view
at all times.
If you continue to have programming difficulties,
please contact the NISSAN Consumer Affairs
Department. The phone numbers are located in
the Foreword of this manual.
CLEARING THE PROGRAMMED
INFORMATION
Individual buttons cannot be cleared. However,
to clear all programming, press and hold the two
outside buttons and release when the indicator
light begins to flash (approximately 20 seconds) .
REPROGRAMMING A SINGLE
HOMELINK� BUTTON
To reprogram a HomeLink� Universal Transceiver
button, complete the following.
1. Press and hold the desired HomeLink� but-
ton. Do not release the button until step 4
has been completed. 2. When the indicator light begins to flash
slowly (after 20 seconds) , position the
hand-held transmitter1-3inches (26 - 76
mm) away from the HomeLink� surface.
3. Press and hold the hand-held transmitter button.
4. The HomeLink� indicator light will flash, first
slowly and then rapidly. When the indicator
light begins to flash rapidly, release both
buttons.
The HomeLink� Universal Transceiver button has
now been reprogrammed. The new device can
be activated by pushing the HomeLink� button
that was just programmed. This procedure will
not affect any other programmed HomeLink�
buttons.
IF YOUR VEHICLE IS STOLEN
If your vehicle is stolen, you should change the
codes of any non-rolling code device that has
been programmed into HomeLink�. Consult the
Owner’s Manual of each device or call the manu-
facturer or dealer of those devices for additional
information.
When your vehicle is recovered, you will
need to reprogram the HomeLink� Univer-
sal Transceiver with your new transmitter
information.
Instruments and controls2-61
Page 166 of 489
Using the interior lights
Press the
Page 167 of 489
WARNING
●Radio waves could adversely affect
electric medical equipment. Those who
use a pacemaker should contact the
electric medical equipment manufac-
turer for the possible influences before
use.
● The Intelligent Key transmits radio
waves when the buttons are pressed.
The FAA advises the radio waves may
affect aircraft navigation and communi-
cation systems. Do not operate the In-
telligent Key while on an airplane. Make
sure the buttons are not operated unin-
tentionally when the unit is stored for a
flight.
The Intelligent Key can operate all the door locks
using the remote controller function or pushing
the request switch on the vehicle without taking
the key out from a pocket or purse. The operating
environment and/or conditions may affect the
Intelligent Key operation.
Be sure to read the following before using the
Intelligent Key.