Page 21 of 489

WARNING
●Do not ride in a moving vehicle when
the seatback is reclined. This can be
dangerous. The shoulder belt will not
be against your body. In an accident,
you could be thrown into it and receive
neck or other serious injuries. You
could also slide under the lap belt and
receive serious internal injuries. ●
For the most effective protection when
the vehicle is in motion, the seat should
be upright. Always sit well back in the
seat with both feet on the floor and
adjust the seat properly. See “Precau-
tions on seat belt usage” later in this
section.
● After adjustment, gently rock in the seat
to make sure it is securely locked.
● Do not leave children unattended inside
the vehicle. They could unknowingly ac-
tivate switches or controls. Unattended
children could become involved in seri-
ous accidents. ●
The seatback should not be reclined
any more than needed for comfort. Seat
belts are most effective when the pas-
senger sits well back and straight up in
the seat. If the seatback is reclined, the
risk of sliding under the lap belt and
being injured is increased.
Page 26 of 489

WARNING
●After adjustment, gently rock in the seat
to make sure it is securely locked.
● Do not ride in a moving vehicle when
the seatback is reclined. This can be
dangerous. The shoulder belt will not
be against your body. In an accident,
you could be thrown into it and receive
neck or other serious injuries. You
could also slide under the lap belt and
receive serious internal injuries.
● For the most effective protection when
the vehicle is in motion, the seat should
be upright. Always sit well back in the
seat and adjust the seat belt properly.
See “Precautions on seat belt usage”
later in this section.
Tip up for easy entry to the 3rd row
The outboard seating positions on the 2nd row
bench seat can be tipped forward for easy entry
or exit from the 3rd row bench seat. To enter the
3rd row
�1, lift up on the seatback latch located
on the upper corner of the seatback on the 2nd
row bench seat and fold the seatback forward at
an angle over the seat base. This will release the
back of the seat so it may be tipped forward. Then
�2lift up on the lower corner of the seat
base and tip the outboard seating position of the
2nd row bench seat forward. To exit the 3rd row
bench seat, lift up on the same seatback latch
and fold the seatback forward onto the seat base.
Then lift up on the seat base and tip it forward.
Page 46 of 489

WARNING
●Always route the shoulder belt over
your shoulder and across your chest.
Never put the belt behind your back,
under your arm or across your neck. The
belt should be away from your face and
neck, but not falling off your shoulder.
● Position the lap belt as low and snug as
possible AROUND THE HIPS, NOT THE
WAIST. A lap belt worn too high could
increase the risk of internal injuries in
an accident. ●
Be sure the seat belt tongue is securely
fastened to the proper buckle.
● Do not wear the seat belt inside out or
twisted. Doing so may reduce its
effectiveness.
● Do not allow more than one person to
use the same seat belt.
● Never carry more people in the vehicle
than there are seat belts.
● If the seat belt warning light glows con-
tinuously while the ignition is turned
ON with all doors closed and all seat
belts fastened, it may indicate a mal-
function in the system. Have the system
checked by a NISSAN dealer.
● No changes should be made to the seat
belt system. For example, do not modify
the seat belt, add material, or install
devices that may change the seat belt
routing or tension. Doing so may affect
the operation of the seat belt system.
Modifying or tampering with the seat
belt system may result in serious per-
sonal injury. ●
Once a seat belt pretensioner has acti-
vated, it cannot be reused and must be
replaced together with the retractor.
See your NISSAN dealer.
● Removal and installation of preten-
sioner system components should be
done by a NISSAN dealer.
● All seat belt assemblies, including re-
tractors and attaching hardware,
should be inspected after any collision
by a NISSAN dealer. NISSAN recom-
mends that all seat belt assemblies in
use during a collision be replaced un-
less the collision was minor and the
belts show no damage and continue to
operate properly. Seat belt assemblies
not in use during a collision should also
be inspected and replaced if either
damage or improper operation is noted.
● All child restraints and attaching hard-
ware should be inspected after any col-
lision. Always follow the restraint
manufacturer’s inspection instructions
and replacement recommendations.
The child restraints should be replaced
if they are damaged.
Page 49 of 489
WARNING
When fastening the seat belts, be certain
that the seatbacks are completely se-
cured in the latched position. If they are
not completely secured, passengers may
be injured in an accident or sudden stop.
Unfastening the seat belts
�1To unfasten the seat belt, press the button on
the buckle. The seat belt automatically re-
tracts.
Checking seat belt operation
Seat belt retractors are designed to lock seat belt
movement by two separate methods:
● When the seat belt is pulled quickly from the
retractor.
● When the vehicle slows down rapidly. To increase your confidence in the seat belts,
check the operation as follows:
● Grasp the shoulder belt and pull forward
quickly. The retractor should lock and re-
strict further belt movement.
If the retractor does not lock during this check or
if you have any questions about seat belt opera-
tion, see a NISSAN dealer.
Page 50 of 489
Center of the 3rd row bench seat
The 3rd row center seat belt has a connector
tongue
�1and a seat belt tongue�2. Both the
connector tongue and the seat belt tongue must
be securely latched for proper seat belt opera-
tion.
Page 51 of 489
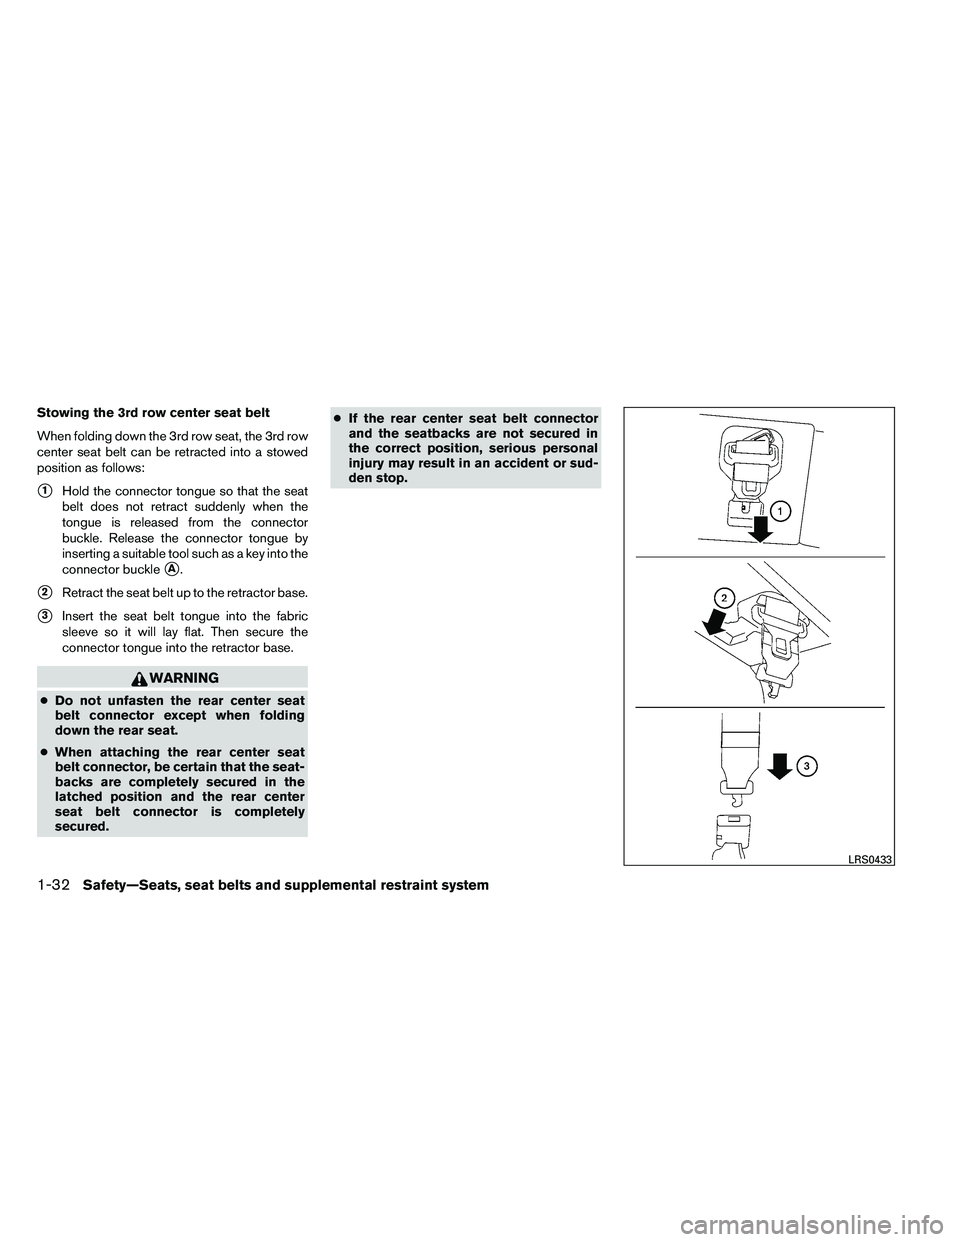
Stowing the 3rd row center seat belt
When folding down the 3rd row seat, the 3rd row
center seat belt can be retracted into a stowed
position as follows:
�1Hold the connector tongue so that the seat
belt does not retract suddenly when the
tongue is released from the connector
buckle. Release the connector tongue by
inserting a suitable tool such as a key into the
connector buckle
�A.
�2Retract the seat belt up to the retractor base.
�3Insert the seat belt tongue into the fabric
sleeve so it will lay flat. Then secure the
connector tongue into the retractor base.
Page 52 of 489
Attaching the 3rd row center seat belt
Always be sure the 3rd row center seat belt
connector tongue and connector buckle are at-
tached. Disconnect only when folding down the
rear seat.
To connect the buckle:
�1Pull out the connector tongue from the re-
tractor base.
�2Pull out the seat belt tongue from the fabric
sleeve.
�3Pull the seat belt and secure the receiver
buckle until it clicks.
The center seat belt connector tongue and re-
ceiver buckle are indicated by the > and < marks.
The center seat belt connector tongue can be
attached only into the rear center seat belt con-
nector buckle.
To fasten the seat belt, see “Fastening the seat
belts” earlier in this section.
Page 53 of 489
WARNING
●After adjustment, release the adjust-
ment button and try to move the shoul-
der belt anchor up and down to make
sure it is securely fixed in position.
● The shoulder belt anchor height should
be adjusted to the position best for you.
Failure to do so may reduce the effec-
tiveness of the entire restraint system
and increase the chance or severity of
injury in an accident.
SEAT BELT EXTENDERS
If, because of body size or driving position, it is
not possible to properly fit the lap/shoulder belt
and fasten it, an extender that is compatible with
the installed seat belts is available that can be
purchased. The extender adds approximately 8 in
(200 mm) of length and may be used for either
the driver or front passenger seating position.
See a NISSAN dealer for assistance with pur-
chasing an extender if an extender is required.