Page 254 of 446
6. The Device Name and Device Address aredisplayed on the screen. Select the “Select”
key to make this device the active
Bluetooth� audio player. Select the “Edit”
key to edit the details of the player, such as
Device Name. Select the “Delete” key to
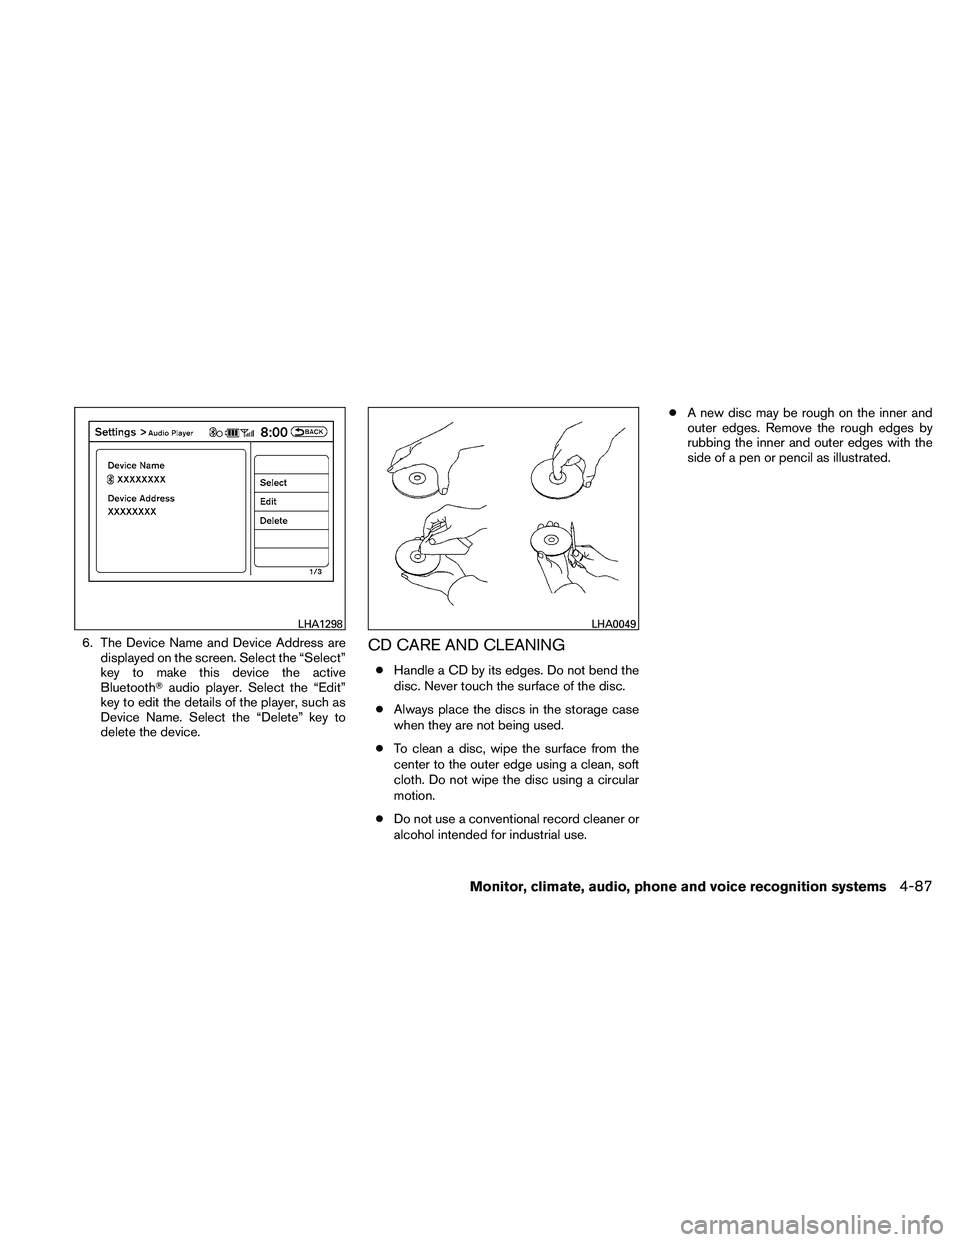
delete the device.CD CARE AND CLEANING
● Handle a CD by its edges. Do not bend the
disc. Never touch the surface of the disc.
● Always place the discs in the storage case
when they are not being used.
● To clean a disc, wipe the surface from the
center to the outer edge using a clean, soft
cloth. Do not wipe the disc using a circular
motion.
● Do not use a conventional record cleaner or
alcohol intended for industrial use. ●
A new disc may be rough on the inner and
outer edges. Remove the rough edges by
rubbing the inner and outer edges with the
side of a pen or pencil as illustrated.
Page 257 of 446
:● Tilt up/down for less than 1.5 seconds to
increase or decrease the preset station.
● Tilt up/down for more than 1.5 seconds to
go to the next or previous category.
● Press")
XM (if so equipped):● Tilt up/down for less than 1.5 seconds to
increase or decrease the preset station.
● Tilt up/down for more than 1.5 seconds to
go to the next or previous category.
● Press the ENTER button to show the XM
Menu.
iPod�: ● Tilt up/down for less than 1.5 seconds to
increase or decrease the track number.
● Press the ENTER button to show the iPod
Menu.
CD: ● Tilt up/down for less than 1.5 seconds to
increase or decrease the track number.
● Tilt up/down for more than 1.5 seconds to
increase or decrease the folder number (if
playing compressed audio files) .
● Press the ENTER button to show the CD
Menu.
DVD: ● Tilt up/down for less than 1.5 seconds to
increase or decrease the track number. ●
Tilt up/down for more than 1.5 seconds to
increase or decrease the title number.
● Press the ENTER button to select an item
from the DVD display.
● When the transparent operation menu ap-
pears, the switch will control the menu.
USB: ● Tilt up/down for less than 1.5 seconds to
increase or decrease the track number.
● Tilt up/down for more than 1.5 seconds to
increase or decrease the folder number.
● Press the ENTER button to show the USB
Menu.
Music Box: ● Tilt up/down for less than 1.5 seconds to
increase or decrease the track number.
● Tilt up/down for more than 1.5 seconds to
increase or decrease the album (folder)
number (if playing compressed audio files) .
● Press the ENTER button to show the Music
Box Menu.
Bluetooth� Audio:
● Tilt up/down for less than 1.5 seconds to
increase or decrease the track number. AUX:
● Press the ENTER button to show the AUX
Menu.
ANTENNA
Window antenna
The antenna pattern is printed inside the rear
window.
Page 274 of 446

phone module when the ignition switch is placed
in the ON position with the connected cellular
phone turned on and carried in the vehicle.
You can register up to 5 different Bluetooth�
cellular phones to the in-vehicle phone module.
However, you can talk on only one cellular phone
at a time.
NISSAN Voice Recognition system supports the
phone commands, so dialing a phone number
using your voice is possible. For more details, see
“NISSAN Voice Recognition System” in this sec-
tion.
Before using the Bluetooth�Hands-Free Phone
System, refer to the following notes.
● Set up the wireless connection between a
cellular phone and the in-vehicle phone
module before using the hands-free phone
system.
● Some Bluetooth� enabled cellular phones
may not be recognized by the in-vehicle
phone module. Please visit
www.nissanusa.com/bluetooth for a recom-
mended phone list and connecting.
● You will not be able to use a hands-free
phone under the following conditions:
– Your vehicle is outside of the cellular ser- vice area. – Your vehicle is in an area where it is
difficult to receive cellular signal; such as
in a tunnel, in an underground parking
garage, near a tall building or in a moun-
tainous area.
– Your cellular phone is locked to prevent it from being dialed.
● When the radio wave condition is not ideal
or ambient sound is too loud, it may be
difficult to hear the other person’s voice dur-
ing a call.
● Immediately after the ignition switch is
placed in the ON position, it may be impos-
sible to receive a call for a short period of
time.
● Do not place the cellular phone in an area
surrounded by metal or far away from the
in-vehicle phone module to prevent tone
quality degradation and wireless connection
disruption.
● While a cellular phone is connected through
the Bluetooth� wireless connection, the bat-
tery power of the cellular phone may dis-
charge quicker than usual. The Bluetooth�
Hands-Free Phone System cannot charge
cellular phones. ●
If the hands-free phone system seems to be
malfunctioning, see “Troubleshooting guide”
in this section. You can also visit
www.nissanusa.com/bluetooth for trouble-
shooting help.
● Some cellular phones or other devices may
cause interference or a buzzing noise to
come from the audio system speakers. Stor-
ing the device in a different location may
reduce or eliminate the noise.
● Refer to the cellular phone owner’s manual
regarding the telephone charges, cellular
phone antenna and body, etc.
● The signal strength display on the monitor
will not coincide with the signal strength
display of some cellular phones.
● If reception between callers is unclear, ad-
justing the incoming or outgoing call volume
may improve the clarity. See “Call volume” in
this section.
Monitor, climate, audio, phone and voice recognition systems4-107
Page 281 of 446
Hold Call:
Put an incoming call on hold.
Reject Call:
Reject an incoming call.
To finish the call, follow one of the procedures
listed below:
a. Select the “Reject Call” key on the display.
b. Press and hold the phone
Page 282 of 446
ENDING A CALL
To finish the call, perform one of the following
procedures:● Select the “Hang up” key on the “Call in
Progress” display.
● Push the
Page 283 of 446

Volume & Ringtone:
Adjust the volume level of the ringtone, incoming
call sound and outgoing call sound. When the
“Automatic Hold” option is turned on, an incom-
ing call will be placed on hold automatically after
several rings. When the “Vehicle Ringtone” op-
tion is turned on, a specific ringtone that is differ-
ent from the cellular phone’s will sound when
receiving a call.
Auto Downloaded:
See “Handset Phonebook” in this section for
information about automatically downloading the
handset phonebook.BLUETOOTH SETTINGS
To set up the Bluetooth�Hands-Free Phone
System to your preferred settings, press the SET-
TING button on the instrument panel and select
the “Bluetooth” key on the display.
Bluetooth:
Turn the Bluetooth� system on or off.
Connect Bluetooth:
See “Connecting procedure” in this section for
more information about connecting a phone.
Connected Devices:
Display a list of the Bluetooth� devices con-
nected to the system. Edit Bluetooth Info:
Check information about the device name, device
address and device PIN.
Replace Connected Phone:
Replace the phone currently connected to the
system. This option allows you to keep any voic-
etags that were recorded using the previous
phone.
Page 284 of 446

CALL VOLUME
Adjusting the incoming or outgoing call volume
may improve clarity if reception between callers is
unclear.● Incoming call — adjusting this setting allows
you to hear a difference in volume.
● Outgoing call — adjusting this setting allows
the person you are talking with to hear a
difference in volume. To access the settings, press the SETTING but-
ton, then select “Volume & Beeps”.
You can also adjust the volume of an incoming
voice during a call by pushing the volume control
switch on the steering wheel or by turning the
volume control knob on the instrument panel.
NISSAN Voice Recognition allows hands-free
operation of the systems equipped on this ve-
hicle, such as phone and vehicle information.
There are two voice recognition modes of opera-
tion available. They are:
● Standard Mode
● Alternate Command Mode
In Standard Mode (the factory default setting) ,
commands that are available are always shown
on the display and announced by the system. You
can complete your desired operation by simply
following the prompts given by the system. Not all
NISSAN Voice Recognition options are available
while in Standard Mode.
For advanced operation, you can change to an
Alternate Command Mode that enables the op-
eration of the display, audio, and climate control
through NISSAN Voice Recognition. When this
mode is active, an expanded list of commands
can be spoken after pushing the TALK
Page 285 of 446

To improve the recognition success rate when
Alternate Command Mode is active, try using the
Speaker Adaptation Function available in that
mode. See “Speaker Adaptation Function” in this
section. Otherwise, it is recommended that Alter-
nate Command Mode be turned off and Standard
Mode be used for the best recognition perfor-
mance.
While using the NISSAN Voice Recognition sys-
tem for certain Phone and Navigation features,
you can switch to using manual controls (touch-
screen, steering wheel controls) and the informa-
tion you have already entered by voice control will
be retained. To switch to manual controls, select
the “Manual Controls” key on the display when it
appears. The system will respond by speaking
“Changing to manual operation. Please use
manual controls to continue.”
For the voice commands for the navigation sys-
tem, refer to the Navigation System Owner’s
Manual of your vehicle.
For vehicles in the U.S., the factory default setting
is the Standard Mode. See “NISSAN Voice Rec-
ognition Standard Mode” in this section. For ve-
hicles in Canada, the factory default setting is the
Alternate Command Mode. See “NISSAN Voice
Recognition Alternate Command Mode” in this
section.NISSAN VOICE RECOGNITION
STANDARD MODE
The Standard Mode enables control of naviga-
tion, phone and vehicle information. With this
setting active, commands that are available are
always shown on the display and announced by
the system.
Displaying user guide
If you use the NISSAN Voice Recognition system
for the first time or you do not know how to
operate it, you can display the User Guide for
confirmation.
You can confirm how to use voice commands by
accessing a simplified User Guide, which con-
tains basic instructions and tutorials for several
voice commands.1. Press the INFO button on the instrument
panel.
2. Select the “Voice Recognition” key.
NOTE:
You can skip steps 1 and 2 by pressing
the