2011 NISSAN 370Z ROADSTER headlight
[x] Cancel search: headlightPage 347 of 419
Black plate (347,1)
Model "Z34-D" EDITED: 2010/ 7/ 27
Lights*:Clean the headlights on a regular basis.
Make sure that the headlights, stop lights, tail
lights, turn signal lights, and other lights are all
operating properly and installed securely. Also
check headlight aim.
Road wheel nuts (lug nuts)*: When checking
the tires, make sure no wheel nuts are missing,
and check for any loose wheel nuts. Tighten if
necessary.
Tire rotation*: Tires cannot be rotated, as the
front tires are a different size from the rear tires
and the direction of wheel rotation is fixed in
each tire.
Tires*: Check the pressure with a gauge often
and always prior to long distance trips. If
necessary, adjust the pressure in all tires,
including the spare, to the pressure specified.
Check carefully for damage, cuts or excessive
wear.
Tire Pressure Monitoring System (TPMS)
transmitter components: Replace the TPMS
transmitter grommet seal, valve core and cap
when the tires are replaced due to wear or age.
Tire, wheel alignment and balance: If the
vehicle should pull to either side while driving on
a straight and level road, or if you detect uneven
or abnormal tire wear, there may be a need for
wheel alignment. If the steering wheel or seat vibrates at normal
highway speeds, wheel balancing may be
needed.
For additional information regarding tires, refer
to “Important Tire Safety Information” (US) or
“Tire Safety Information” (Canada) in the
NISSAN Warranty Information Booklet.
Windshield:
Clean the windshield on a regular
basis. Check the windshield at least every six
months for cracks or other damage. Have a
damaged windshield repaired by a qualified
repair facility.
Windshield wiper blades*: Check for cracks
or wear if they do not wipe properly.
Inside the vehicleThe maintenance items listed here should be
checked on a regular basis, such as when
performing scheduled maintenance, cleaning
the vehicle, etc.
Accelerator pedal: Check the pedal for
smooth operation and make sure the pedal
does not catch or require uneven effort. Keep
the floor mat away from the pedal.
Automatic transmission P (Park) mechan-
ism: On a fairly steep hill, check that your
vehicle is held securely with the selector lever in
the P (Park) position without applying any
brakes. Brake pedal:
Check the pedal for smooth
operation. If the brake pedal suddenly goes
down further than normal, the pedal feels
spongy or the vehicle seems to take longer to
stop, see a NISSAN dealer immediately. Keep
the floor mat away from the pedal.
Brakes: Check that the brakes do not pull the
vehicle to one side when applied.
Parking brake: Check the parking brake
operation regularly. The vehicle should be
securely held on a fairly steep hill with only the
parking brake applied. If the parking brake needs
adjusted, see a NISSAN dealer.
Seat belts: Check that all parts of the seat belt
system (for example, buckles, anchors, adjuster
and retractors) operate properly and smoothly,
and are installed securely. Check the belt
webbing for cuts, fraying, wear or damage.
Seats: Check seat position controls such as
seat adjusters, seatback recliner, etc. to ensure
they operate smoothly and that all latches lock
securely in every position. Check that the head
restraints move up and down smoothly and that
the locks (if so equipped) hold securely in all
latched positions.
Steering wheel: Check for changes in the
steering conditions, such as excessive free play,
hard steering or strange noises.
Maintenance and do-it-yourself
8-3
Page 365 of 419
Black plate (365,1)
Model "Z34-D" EDITED: 2010/ 7/ 27
SDI1479A
ENGINE COMPARTMENT
CAUTION
Never use a fuse of a higher or lower
amperage rating than that specified on
the fuse box cover. This could damage
the electrical system or cause a fire.
If any electrical equipment does not operate,
check for an open fuse.
1. Be sure the ignition switch is pushed to the OFF or LOCK position and the headlight
switch is turned to OFF. 2. Open the engine hood and remove the
cover on the battery and the fuse/fusible link
holder.
3. Remove the fuse/fusible link holder cover.
4. Remove the fuse with the fuse puller located in the passenger compartment fuse box.
SDI1754
5. If the fuse is open
*A
, replace it with a new
fuse
*B. Spare fuses are stored in the
passenger compartment fuse box.
6. If a new fuse also opens, have the electrical system checked and repaired by a NISSAN
dealer.
Fusible linksIf any electrical equipment does not operate and
fuses are in good condition, check the fusible
links. If any of these fusible links are melted,
replace only with genuine NISSAN parts.
FUSES
Maintenance and do-it-yourself
8-21
Page 366 of 419
Black plate (366,1)
Model "Z34-D" EDITED: 2011/ 1/ 21
SDI2361
PASSENGER COMPARTMENT
CAUTION
Never use a fuse of a higher or lower
amperage rating than that specified on
the fuse box cover. This could damage
the electrical system or cause a fire.
If any electrical equipment does not operate,
check for an open fuse.
1. Be sure the ignition switch is pushed to the OFF or LOCK position and the headlight
switch is turned to OFF. 2. Open the fuse box lid.
3. Remove the fuse with the fuse puller
*A
.
4. If the fuse is open, replace it with a new fuse. Spare fuses are stored in the fuse box.
5. If a new fuse also opens, have the electrical system checked and repaired by a NISSAN
dealer.
SDI2704
Extended storage switch (if so equipped)To reduce battery drain, the extended storage
switch comes from the factory switched off.
Prior to delivery of your vehicle, the switch is
pushed in (switched on) and should always
remain on.
If any electrical equipment does not operate,
remove the extended storage switch and check
for an open fuse.
NOTE:
If the extended storage switch malfunc-
tions, or if the fuse is open, it is not
necessary to replace the switch. In this
case, remove the extended storage switch
8-22
Maintenance and do-it-yourself
Page 367 of 419
Black plate (367,1)
Model "Z34-D" EDITED: 2011/ 1/ 21
and replace it with a new fuse of the same
rating.
How to remove the extended storage
switch:
1. To remove the extended storage switch, besure the ignition switch is in the OFF or
LOCK position.
2. Be sure the headlight switch is in the OFF position.
3. Remove the fuse box cover.
4. Pinch the locking tabs
*1
found on each
side of the storage switch.
5. Pull the storage switch straight out from the fuse box
*2.
SDI2451
CAUTION
Be careful not to allow children to
swallow the battery and removed parts. Replace the battery as follows:
1. Remove the mechanical key from the key.
2. Insert a small screwdriver into the slit of the
corner and twist it to separate the upper part
from the lower part. Use a cloth to protect
the casing.
3. Replace the battery with a new one. Recommended battery:
CR2032 or equivalent
.Do not touch the internal circuit and
electric terminals as doing so could
cause a malfunction.
. Hold the battery by the edges. Holding
the battery across the contact points will
seriously deplete the storage capacity.
. Make sure that the +side faces the
bottom case.INTELLIGENT KEY BATTERY
REPLACEMENT
Maintenance and do-it-yourself
8-23
Page 369 of 419
Black plate (369,1)
Model "Z34-D" EDITED: 2010/ 7/ 27
SDI2351
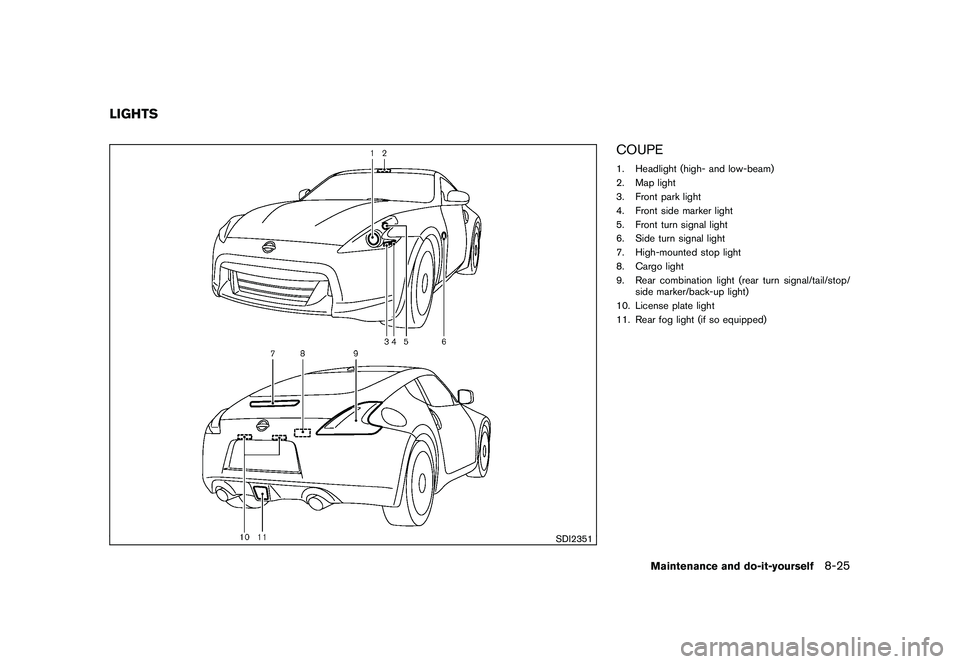
COUPE1. Headlight (high- and low-beam)
2. Map light
3. Front park light
4. Front side marker light
5. Front turn signal light
6. Side turn signal light
7. High-mounted stop light
8. Cargo light
9. Rear combination light (rear turn signal/tail/stop/side marker/back-up light)
10. License plate light
11. Rear fog light (if so equipped)
LIGHTS
Maintenance and do-it-yourself
8-25
Page 370 of 419
Black plate (370,1)
Model "Z34-D" EDITED: 2010/ 7/ 27
SDI2448
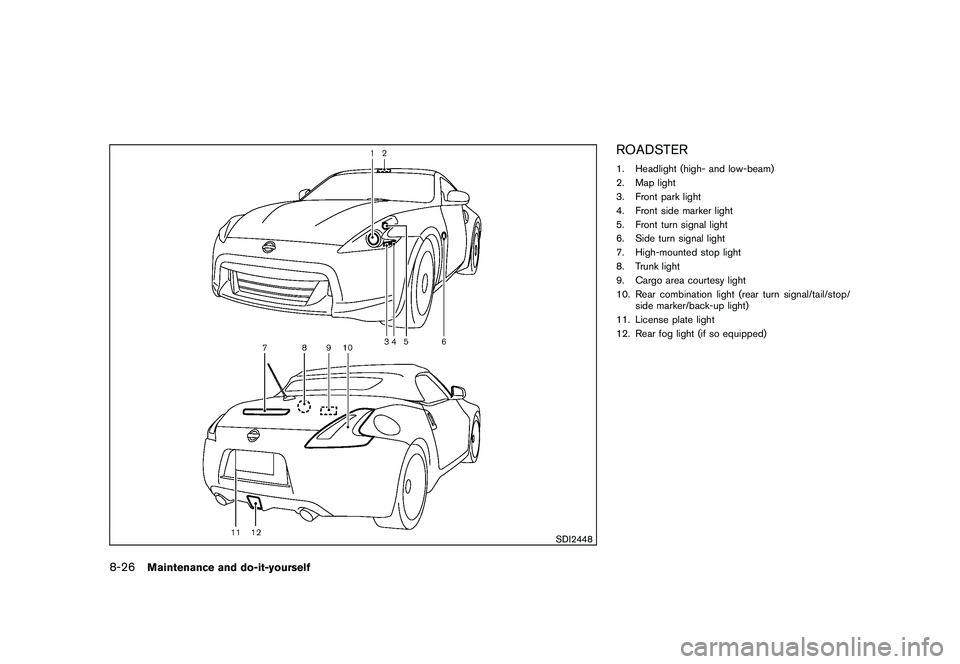
ROADSTER1. Headlight (high- and low-beam)
2. Map light
3. Front park light
4. Front side marker light
5. Front turn signal light
6. Side turn signal light
7. High-mounted stop light
8. Trunk light
9. Cargo area courtesy light
10. Rear combination light (rear turn signal/tail/stop/side marker/back-up light)
11. License plate light
12. Rear fog light (if so equipped)
8-26
Maintenance and do-it-yourself
Page 371 of 419
Black plate (371,1)
Model "Z34-D" EDITED: 2010/ 7/ 27
HEADLIGHTSFog may temporarily form inside the lens of the
exterior lights in the rain or in a car wash. A
temperature difference between the inside and
the outside of the lens causes the fog. This is
not a malfunction. If large drops of water collect
inside the lens, contact a NISSAN dealer.Replacing
WARNINGHIGH VOLTAGE
When xenon headlights are on, they
produce a high voltage. To prevent an
electric shock, never attempt to modify
or disassemble. Always have your xe-
non headlights replaced at a NISSAN
dealer. For additional information, see
“HEADLIGHT AND TURN SIGNAL
SWITCH” in the “2. Instruments and
controls” section.
Use the same number and wattage shown in the
following chart as originally installed.
If replacement is required, see a NISSAN dealer.
EXTERIOR AND INTERIOR LIGHTSItem Wattage (W)Bulb No.
Headlight* High/Low beams (Xenon) 35D2S
Front turn signal light* 28/87444NA
Front park light* 5W5W
Front side marker light* LED—
Side turn signal light* LED—
Rear combination light* back-up 16W16W
turn signal 21WY21W
stop/tail/side marker LED—
Rear fog light (if so equipped)* 21T20
License plate light* 5T10
Map light 8—
Vanity mirror light 2—
Cargo area courtesy light (Roadster)* 5—
Cargo light (Coupe)* 3.4—
Trunk light (Roadster)* 3.4—
High-mounted stop light* LED
—
*: See a NISSAN dealer for replacement.
NOTE: Always check with the Parts Department at a NISSAN dealer for the latest information about parts.
Maintenance and do-it-yourself
8-27
Page 381 of 419
Black plate (381,1)
Model "Z34-D" EDITED: 2010/ 7/ 27
WARNING
.The use of tires other than those
recommended or the mixed use of
tires of different brands, construc-
tion (bias, bias-belted or radial) , or
tread patterns can adversely affect
the ride, braking, handling, ground
clearance, body-to-tire clearance,
tire chain clearance, speedometer
calibration, headlight aim and bum-
per height. Some of these effects
may lead to accidents and could
result in serious personal injury.
. If the wheels are changed for any
reason, always replace with wheels
which have the same off-set dimen-
sion. Wheels of a different off-set
could cause premature tire wear,
degrade vehicle handling character-
istics and/or interference with the
brake discs/drums. Such interfer-
ence can lead to decreased braking
efficiency and/or early brake pad/
shoe wear. See “WHEELS AND
TIRES” in the “9. Technical and
consumer information” section of
this manual for wheel off-set dimen-
sions. .
When a spare tire is mounted or a
wheel is replaced, the TPMS will not
function and the low tire pressure
warning light will flash for approxi-
mately 1 minute. The light will
remain on after 1 minute. Contact
your NISSAN dealer as soon as
possible for tire replacement and/
or system resetting.
. Replacing tires with those not ori-
ginally specified by NISSAN could
affect the proper operation of the
TPMS.
. Do not install a deformed wheel or
tire even if it has been repaired.
Such wheels or tires could have
structural damage and could fail
without warning.
. The use of retread tire is not re-
commended.
. For additional information regard-
ing tires, refer to “Important Tire
Safety Information” (US) or “Tire
Safety Information” (Canada) in the
Warranty Information Booklet.
Wheel balanceUnbalanced wheels may affect vehicle handling
and tire life. Even with regular use, wheels can
get out of balance. Therefore, they should be
balanced as required.
Wheel balance service should be per-
formed with the wheels off the vehicle.
Spin balancing the wheels on the vehicle
could lead to mechanical damage.
For additional information regarding tires, refer
to “Important Tire Safety Information” (US) or
“Tire Safety Information” (Canada) in the
NISSAN Warranty Information Booklet.Care of wheelsSee “CLEANING EXTERIOR” in the “7. Ap-
pearance and care” section for details about
care of the wheels.Spare tire (TEMPORARY USE ONLY (T-
type) spare tire) (if so equipped)Observe the following precautions if the T-type
spare tire must be used, otherwise your vehicle
could be damaged or involved in an accident.
WARNING
.The T-type spare tire should be used
for emergency use. It should be
replaced with the standard tire at
Maintenance and do-it-yourself
8-37