2011 MITSUBISHI TRITON light
[x] Cancel search: lightPage 256 of 369

Digital clock*
E00711700193
The digital clock indicates the
time with the igni-
tion switch in either “ON” or “ACC” position.
To set the time
Set the time by pressing the various buttons as de-
scribed below. 1- To adjust the hour
2- To adjust the minutes
3- To reset the minutes to zero
10:30 - 11:29...... Changes to 11:00
11:30 - 12:29...... Changes to 12:00
NOTE l If the
battery
cables are disconnected during
repairs or for any other reason, reset the
clock to the correct time after they are recon-
nected. Interior lamps
E00712000917 1- Room lamp (Front)*
Personal lamps*
2- Room lamp (Rear)*
3- Door courtesy lamps*
4- Centre console downlight
NOTE l If
you
leave the lamps on without running
the engine, you will run down the battery. Be-
fore you leave the vehicle, make sure that all
the lamps are off. Room lamps
E00712101289
Front*
Rear (Type 1)* For pleasant driving
5-73 5
OCRE12E1
Presented by http://mmc-manuals.ru/ \251
Page 258 of 369

Door courtesy lamps*
E00717500034
Each door courtesy lamp comes
on when the rele-
vant door is opened and goes off when the door is
closed. Centre console downlight
E00733300043
The centre console downlight go on when the lamp
switch is in the “ ” or the “ ” position.
Refer to “Combination headlamps and
dipper
switch” on page 3-30.
Type 1
Type 2 Storage spaces
E00713101404 CAUTION
l
Never leave lighters, cans
of
carbonated
drink, and spectacles in the cabin when
parking the vehicle in hot sunshine. The
cabin will become extremely hot, so light-
ers and other flammable items may catch
fire and unopened drink cans (including
beer cans) may rupture. The heat may al-
so deform or crack plastic spectacle len-
ses and other spectacle parts that are
made of plastic.
l Keep the lids of storage spaces closed
while driving the vehicle. A lid or the con-
tents of a storage space could otherwise
cause injuries.
NOTE l Do
not leave valuables in
any storage space
when leaving the vehicle. For pleasant driving
5-75 5
OCRE12E1
Presented by http://mmc-manuals.ru/ \251
Page 263 of 369

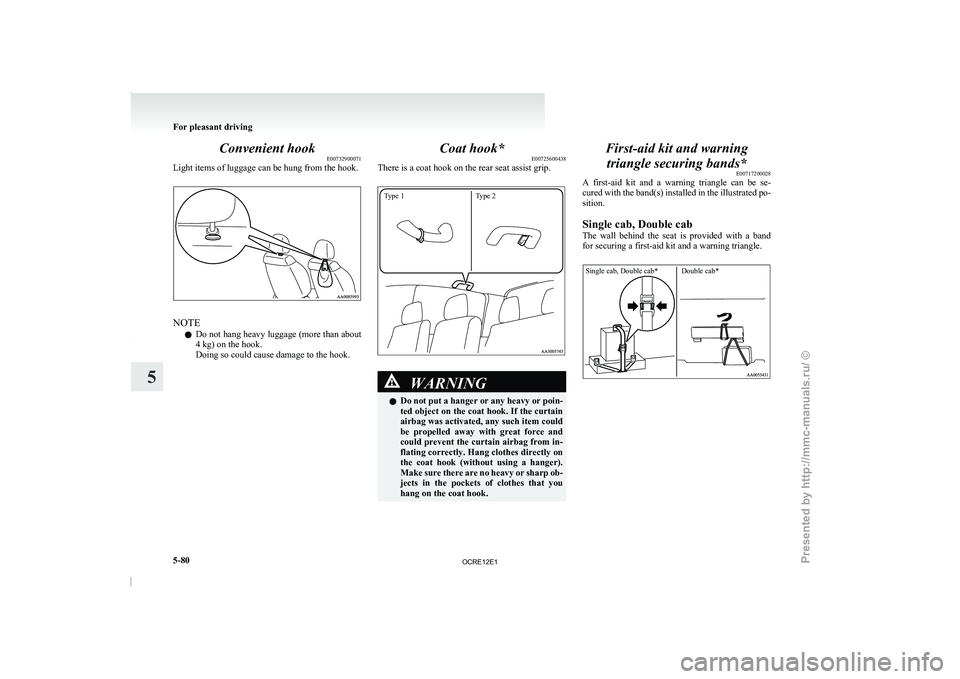
Convenient hook
E00732900071
Light items of luggage can be hung from the hook. NOTE
l Do
not hang heavy luggage
(more than about
4 kg) on the hook.
Doing so could cause damage to the hook. Coat hook*
E00725600438
There is a coat hook on the rear seat assist grip.
Type 1 Type 2 WARNING
l Do not put a
hanger
or any heavy or poin-
ted object on the coat hook. If the curtain
airbag was activated, any such item could
be propelled away with great force and
could prevent the curtain airbag from in-
flating correctly. Hang clothes directly on
the coat hook (without using a hanger).
Make sure there are no heavy or sharp ob-
jects in the pockets of clothes that you
hang on the coat hook. First-aid kit and warning
triangle securing bands* E00717200028
A first-aid kit and a
warning triangle can be se-
cured with the band(s) installed in the illustrated po-
sition.
Single cab, Double cab
The wall behind the seat is provided with a band
for securing a first-aid kit and a warning triangle.
Single cab, Double cab* Double cab* For pleasant driving
5-80
5
OCRE12E1
Presented by http://mmc-manuals.ru/ \251
Page 283 of 369

WARNING
l Be sure to apply chocks or blocks to the
correct tyre when jacking up the vehicle.
If the vehicle moves while jacked up, the
jack could slip out of position, leading to
an accident.
NOTE l The
chocks shown in the
illustration do not
come with your vehicle. It is recommended
that you keep one in the vehicle for use if nee-
ded.
l If chocks are not available, use stones or any
other objects that are large enough to hold
the wheel in position.
6. Get the spare wheel, jack, jack handle and wheel nut wrench ready. NOTE
l Put
the spare wheel under
the vehicle body
near the flat tyre. This makes it safer if the
jack slips out of position. 7. Loosen
the wheel nuts with the wheel nut
wrench. Do not remove the wheel nuts yet.
Five wheel nuts
Six wheel nuts 8. Find the closest jacking point to the flat tyre
(refer to “Jacking up
the vehicle” on page
6-13). Then position the jack and raise the ve-
hicle until the tyre is slightly off the ground.
9. Remove the wheel nuts with the wheel nut wrench, then take the wheel off. CAUTION
l
Handle the wheel carefully when
chang-
ing the tyre, to avoid scratching the wheel
surface.
10. Clean out any mud, etc. on the hub surface
(C), hub
bolts (D)
or in the installation holes
(E) in the wheel, and then mount the spare
wheel. WARNING
l Mount the spare wheel with
the valve
stem (F) facing outboard. If you cannot
see the valve stem (F), you have installed
the wheel backwards.
Operating the vehicle with the spare
wheel installed backwards can cause vehi-
cle damage and result in an accident. For emergencies
6-18
6
OCRE12E1
Presented by http://mmc-manuals.ru/ \251
Page 284 of 369

11. Finger-tighten the wheel nuts.
(Turn them
clockwise.)
Vehicles with steel wheels
Tighten the wheel nuts (tapered nuts) until
the tapered parts of the wheel nuts make
light contact with the seats of the wheel
holes and the wheel is not loose.
With a spare wheel, tighten the wheel nuts in
the same way. Vehicles with aluminium wheels Tighten the wheel nuts (flange nuts) until the
flanges of the wheel nuts
touch the wheel
and the wheel is not loose.
Normal wheels and spare wheel
(aluminium wheels) With a spare wheel, tighten the wheel nuts un-
til the tapered parts
of
the wheel nuts make
light contact with the seats of the wheel
holes and the wheel is not loose.
Spare wheel (steel wheels) CAUTION
l
Never apply oil to either
the wheel bolts
or the nuts, or they will tighten too much.
NOTE l Flange
nuts can be temporarily
used on the
spare wheel, but return to the original wheel
and tyre as soon as possible.
l If all four aluminium wheels are changed to
steel wheels, use tapered nuts.
12. Lower the vehicle slowly and then tighten the nuts crisscross in 2 or 3 steps until each
nut has been tightened securely.
Tightening torqueSteel wheel: 137 to 157 Nm
Aluminium wheel: 118 to 137 Nm
(Achieved by applying a force at the end
of the wheel nut wrench supplied with
the vehicle.
Steel wheel: 510 to 580 N
Aluminium wheel: 440 to 500 N)
Five wheel nuts For emergencies
6-19 6
OCRE12E1
Presented by http://mmc-manuals.ru/ \251
Page 289 of 369

Operation under adverse driving
conditions E00801702140
If your vehicle becomes stuck in sand,
mud or snow
If the vehicle becomes stuck
in snow, sand, or
mud, it can often be moved with a rocking motion.
Move the selector lever alternately between the
“L” (LOW) and “R” (REVERSE) position (with
manual transmission, between 1 st
and Reverse),
while applying slight pressure to the accelerator ped-
al.
Avoid racing the engine or spinning the wheels. Pro-
longed efforts to free a stuck vehicle may result in
overheating and transmission failure. Allow the en-
gine to idle for a few minutes to let the transmis-
sion cool between rocking attempts.
If the vehicle remains stuck after several rocking at-
tempts, seek other assistance. WARNING
l When attempting to rock your vehicle out
of a stuck position,
be
sure that the area
around the vehicle is clear of people and
physical objects. The rocking motion may
cause the vehicle to suddenly launch for-
ward or backward, causing injury or dam-
age to nearby people or objects.
On 2WD vehicles, it is recommended to start the ve-
hicle with parking
brake partially,
but not complete-
ly, applied by slightly pulling the parking brake lev-
er.
After the vehicle has become free, do not forget to
release the parking brake. NOTE
l Depress the accelerator pedal gradually when
starting the vehicle.
On a flooded road l Avoid
flooded roads.
Water could
enter the
brake discs, resulting in temporarily ineffec-
tive brakes. In such cases, lightly depress the
brake pedal to see if the brakes operate prop-
erly. If they do not, lightly depress the pedal
several times while driving in order to dry
the brake pads.
l When driving in rain or on a road with many
puddles a layer of water may form between
the tyres and the road surface.
This reduces a tyre’s frictional resistance on
the road, resulting in loss of steering stability
and braking capability.
To cope with this, observe the following items:
(a) Drive your vehicle at slow speed.
(b) Do not drive on worn tyres. Always maintain the specified tyre inflation
pressures.
On a snow-covered or frozen road l When
driving on a snow-covered
or frozen
road, it is recommended that you use snow
tyres or tyre chains.
Refer to the “Snow tyres” and “Tyre chains”
sections.
l Avoid high-speed operation, sudden acceler-
ation, abrupt brake application and sharp cor-
nering. l
Depressing the brake pedal
during
travel on
snowy or icy roads may cause tyre slippage
and skidding. When traction between the
tyres and the road is reduced the wheels may
skid and the vehicle cannot readily be
brought to a stop by conventional braking
techniques. Braking will differ, depending
upon whether you have anti-lock brake sys-
tem (ABS). If you do have ABS, brake by
pressing the brake system pedal hard, and
keeping it pressed. If you do not have ABS,
pump the brake pedal with short rapid jabs,
each time fully applying and fully releasing
for greatest effect.
l Allow extra distance between your vehicle
and the vehicle in front of you, and avoid sud-
den braking.
l Accumulation of ice on the braking system
can cause the wheels to lock. Pull away from
a standstill slowly after confirming safety
around the vehicle. CAUTION
l
Do not press the
accelerator
pedal rapid-
ly. If the wheels break free of the ice, the
vehicle could suddenly start moving and
possibly cause an accident.
On a bumpy or rutted road l Drive
as slow as possible
when driving on
bumpy or rutted roads. For emergencies
6-24
6
OCRE12E1
Presented by http://mmc-manuals.ru/ \251
Page 293 of 369

Vehicle care precautions
E00900100870
In order to maintain the
value of your vehicle, it is
necessary to perform regular maintenance using the
proper procedures. Always maintain your vehicle
in compliance with environmental pollution control
regulations. Carefully select the materials used for
washing, etc., to be sure that they do not contain cor-
rosives. If in doubt, we recommend you to consult
a specialist for selection of these materials. CAUTION
l
Cleaning products can be
dangerous.
Some
are poisonous. Others can burst in-
to flame if you strike a match or drop
them on a hot part of the vehicle. Some
are dangerous if you breathe their fumes
in a closed space. When you use anything
in a container to clean your vehicle, al-
ways follow the instructions and always
open your vehicle doors or windows when
you’re cleaning the inside. Never use the
following to clean your vehicle: • Petrol
• Paint Thinner
• Benzine
• Kerosene
• Turpentine
• Naphtha
• Lacquer Thinner
• Carbon Tetrachloride
• Nail Polish Remover
• Acetone
l These are all dangerous, and can damage
your vehicle. Cleaning the interior of your
vehicle E00900200288
After cleaning the interior of
your vehicle with wa-
ter, cleaner or similar, wipe and dry in a shady, well-
ventilated area. CAUTION
l
Do not use organic
substances
(solvents,
benzine, kerosene, alcohol, petrol, etc.) or
alkaline or acidic solutions.
These chemicals can cause discolouring,
staining or cracking of the surface.
If you use cleaners or polishing agents,
make sure their ingredients do not in-
clude the substances mentioned above.
NOTE l Always
read the instructions on
the cleaner la-
bel.
Plastic, vinyl leather, fabric and
flocked parts E00900300377
1. Gently wipe off with gauze or other soft
cloth soaked with a
3 % aqueous solution of
neutral detergent.
2. Dip cloth in fresh water and wring out well. Using this cloth, wipe off the detergent thor-
oughly. NOTE
l Do
not use cleaners, conditioners,
and protec-
tants containing silicons or wax.
Such products, when applied to the instru-
ment panels or other parts, may cause reflec-
tions on the windscreen and obscure vision.
Also, if such products get on the switches of
the electrical accessories, it may lead to fail-
ure of these accessories.
Upholstery E00900500018
1. To maintain the value of your new vehicle,
handle the upholstery carefully
and keep the
interior clean.
Use a vacuum cleaner and brush to clean the
seats. If stained, vinyl and synthetic leather
should be cleaned with an appropriate clean-
er, and cloth fabrics can be cleaned with ei-
ther upholstery cleaner or a 3 % solution of
neutral detergent in lukewarm water.
2. Clean the carpeting with a vacuum cleaner and remove any stains with carpet cleaner.
Oil and grease can be removed by lightly dab-
bing with a clean colourfast cloth and stain re-
mover.
Genuine leather* E00900600817
1. Gently wipe off with gauze or other soft
cloth soaked with a
5 % aqueous solution of
neutral detergent.
2. Dip cloth in fresh water and wring it out well. Using this cloth, wipe off the detergent
thoroughly.
3. Apply leather protecting agent to the genuine leather surface. Vehicle care
7-02
7
OCRE12E1
Presented by http://mmc-manuals.ru/ \251
Page 294 of 369

NOTE
l If
genuine leather is wet
with water or is wash-
ed in water, wipe off water as quickly as pos-
sible with a dry, soft cloth. If left damp, mil-
dew may grow.
l The genuine leather surface may be damaged
if a nylon brush or synthetic fibre is rubbed
hard against it.
l Organic solvents such as benzine, kerosene,
alcohol and petrol, acid or alkaline solvents
may discolour the genuine leather surface.
Be sure to use neutral detergents.
l Remove dirty patches or oil substances quick-
ly as they can stain genuine leather.
l The genuine leather surface may harden and
shrink if it is exposed to direct sun for long
hours. When your vehicle is parked, place it
in the shade as much as possible.
l When the temperature of the vehicle interior
rises in summer, vinyl products left on the
genuine leather seat may deteriorate and
stick to the seat. Cleaning the exterior of your
vehicle E00900700010
If the following is
left
on your vehicle, it may
cause corrosion, discolouration and stains, wash
the vehicle as soon as possible.
l Seawater, anti-freeze for road use.
l Soot and dust, iron powder from factories,
chemical substance (acids, alkalis, coal-tar,
etc.).
l Droppings from birds, carcasses of insects,
tree sap, etc.
Washing E00900902016
Chemicals contained in the dirt and dust picked up
from the road surface can
damage the paint coat
and body of your vehicle if left in prolonged contact.
Frequent washing and waxing is the best way to pro-
tect your vehicle from this damage. This will also
be effective in protecting it from environmental el-
ements such as rain, snow, salt air, etc.
Do not wash the vehicle in direct sunlight. Park the
vehicle in the shade and spray it with water to re-
move dust. Next, using an ample amount of clean
water and a car washing brush or sponge, wash the
vehicle from top to bottom.
Use a mild car washing soap if necessary. Rinse
thoroughly and wipe dry with a soft cloth. After
washing the vehicle, carefully clean the joints and
flanges of the doors, bonnet, etc., where dirt is like-
ly to remain. CAUTION
l
When washing the under side
of your ve-
hicle or wheel, be careful not to injure
your hands.
l Refrain from using a car wash as its brush-
es may scratch the paint surface, causing
it to lose its gloss.
Scratches will be especially visible on
darker coloured vehicles.
l Never spray or splash water on the electri-
cal components in the engine compart-
ment, as this may adversely affect engine
starting.
Exercise caution also when washing the
underbody; be careful not to spray water
into the engine compartment.
l Some types of hot water washing equip-
ment apply high pressure and heat to the
vehicle. They may cause heat distortion
and damage to the vehicle resin parts and
may result in flooding of the vehicle inte-
rior. Therefore; observe the following.
• Maintain a distance of approx. 50 cmor more between the vehicle body and
the washing nozzle.
• When washing around the door glass, hold the nozzle at a distance of more
than 50 cm and at right angles to the
glass surface. Vehicle care
7-03 7
OCRE12E1
Presented by http://mmc-manuals.ru/ \251