2011 MITSUBISHI PAJERO IV bulb
[x] Cancel search: bulbPage 89 of 377

Indication lamps
E00501600012Turn-signal indication lamps/
Hazard warning indication
lamps
E00501700068
These indication lamps
blink on and off
when a turn-signal lamp is operating.
NOTE
l If the blinking is too fast, the
cause may be a blown lamp bulb
or a faulty turn-signal connection.
When the hazard warning lamp switch is
pressed, all turn-signal lamps will flash
on and off continuously. High-beam indication lamp
E00501800072
This indication lamp
illuminates when
the high-beam is used. Front fog lamp indication
lamp*
E00501900132
This indication lamp
illuminates while
the front fog lamps are on. Rear fog lamp indication lamp
E00502000084
This lamp illuminates
while the rear fog
lamp is on. Position lamp indication lamp
E00508900102
This lamp illuminates
with the lamp
switch at “ ” or “ ” position
Diesel preheat indication lamp
(diesel-powered vehicles)
E00502300146
This indication lamp
illuminates when
the ignition switch is placed in the “ON”
position. As the glow plug becomes hot,
the lamp goes out and the engine can be
started. CAUTION
l
If the
diesel
preheat indication
lamp comes on after the engine
is started, the engine speed may
not rise above the idling speed
because of fuel freezing. In this
case, keep the engine idling for
about ten minutes, then turn
off the ignition switch and im-
mediately turn it on again to
confirm that the diesel preheat
indication lamp is off.
NOTE l If
the engine
is cold, the diesel pre-
heat indication lamp is on for a lon-
ger time. l
When the
engine
has not been star-
ted within about 5 seconds after
the diesel preheat indication lamp
went out, return the ignition
switch to the “LOCK” position.
Then, turn the switch to the “ON”
position to preheat the engine
again.
l When the engine is warm, the die-
sel preheat indication lamp does
not come on even if the ignition
switch is placed in the “ON” posi-
tion. Fuel filter indication lamp (die-
sel-powered vehicles)
E00509900239
This indication lamp
illuminates when
the ignition switch is turned to the “ON”
position and goes off after the engine
has started. If it lights up while the en-
gine is running, it indicates that water
has accumulated inside the fuel filter; if
this happens, remove the water from the
fuel filter. Refer to “Removal of water
from the fuel filter (diesel-powered vehi-
cles only)” on page 6-06.
When the lamp goes out, you can re-
sume driving. If it either does not go out
or comes on from time to time, we rec-
ommend you to have the vehicle inspec-
ted. Instruments and controls
3-08
3
OBKE12E1
Page 116 of 377

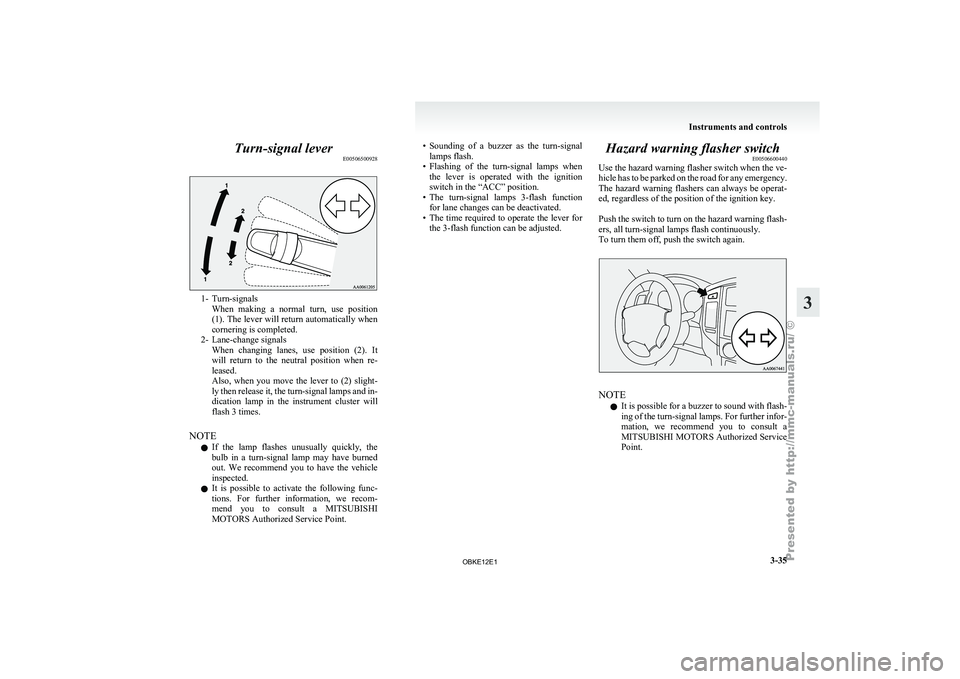
Turn-signal lever
E005065009281- Turn-signals
When making a
normal turn, use position
(1). The lever will return automatically when
cornering is completed.
2- Lane-change signals When changing lanes, use position (2). It
will return to the neutral position when re-
leased.
Also, when you move the lever to (2) slight-
ly then release it, the turn-signal lamps and in-
dication lamp in the instrument cluster will
flash 3 times.
NOTE l If the lamp flashes unusually quickly, the
bulb in a turn-signal lamp may have burned
out. We recommend you to have the vehicle
inspected.
l It is possible to activate the following func-
tions. For further information, we recom-
mend you to consult a MITSUBISHI
MOTORS Authorized Service Point. • Sounding
of a buzzer as the turn-signal
lamps flash.
• Flashing
of the turn-signal lamps when
the lever is operated with the ignition
switch in the “ACC” position.
• The turn-signal lamps 3-flash function for lane changes can be deactivated.
• The time required to operate the lever for the 3-flash function can be adjusted. Hazard warning flasher switch
E00506600440
Use the hazard
warning flasher switch when the ve-
hicle has to be parked on the road for any emergency.
The hazard warning flashers can always be operat-
ed, regardless of the position of the ignition key.
Push the switch to turn on the hazard warning flash-
ers, all turn-signal lamps flash continuously.
To turn them off, push the switch again. NOTE
l It
is possible
for a buzzer to sound with flash-
ing of the turn-signal lamps. For further infor-
mation, we recommend you to consult a
MITSUBISHI MOTORS Authorized Service
Point. Instruments and controls
3-35 3
OBKE12E1
Page 160 of 377

Inspection and maintenance
following rough road operation E00606700048
After operating the
vehicle in rough road condi-
tions, be sure to perform the following inspection
and maintenance procedures:
l Check that the vehicle has not been damaged
by rocks, gravel, etc.
l Carefully wash the vehicle with water.
After washing, drive the vehicle slowly
while lightly depressing the brake pedal in or-
der to dry out the brakes. If the brakes still
do not function properly, we recommend you
to have the brakes checked as soon as possible
l Remove the insects, dried grass, etc. clog-
ging the radiator core.
l After crossing a stream, be sure to have the
following items inspected at a MITSUBISHI
MOTORS Authorized Service Point and take
the necessary measures.
• Check the brake system and, if necessary,have it serviced.
• Check the engine, transmission, transfer, and differential oil or grease level and tur-
bidity. If the oil or grease is milky, it indi-
cates water contamination. Replace it
with new oil or grease.
• Grease the propeller shaft.
• Check the inside of the vehicle. If ingress of water is found, dry the carpet etc.
• Inspect the headlamps. If the headlamp bulb is flooded with water, we recom-
mend you to have it drained. Cautions on handling of 4-wheel
drive vehicles E00606800401
Tyres and wheels
Since the driving
torque can be applied to the 4
wheels, the performance of the vehicle when oper-
ating in 4-wheel drive is greatly affected by the con-
dition of the tyres.
Pay close attention to the tyres.
l Install specified tyres on all wheels. Refer to
“Tyres and wheels” on page 9-12.
l Be sure to fit all 4 tyres and wheels of the
same size and type.
When replacement of any of the tyres or
wheels is necessary, replace all of them.
l All tyres should be rotated whenever the
wear difference between the front and rear
tyres is recognizable.
Good vehicle performance cannot be expected if
there is a difference in wear between tyres. Refer to
“Tyre rotation” on page 8-14. l Check the tyre inflation pressure regularly.
l If the tyre inflation pressure is inappropriate,
the transfer gear may make some noise and
shock while changing the drive mode. CAUTION
l
Always use tyres
of the same size, same
type, and same brand, and which have no
wear differences. Using tyres which differ
in size, type, brand or the degree of wear
will cause excessive loading, resulting in
possible damage to the drive system.
Towing
If towing is
necessary, we recommend you to have
it done by your MITSUBISHI MOTORS Author-
ized Service Point or a commercial tow truck service.
In the following cases, transport the vehicle using a
tow truck.
l The engine runs but the vehicle does not
move or abnormal noise is produced.
l Inspection of the vehicle’s underside reveals
that oil or some other fluid is leaking.
Only when you cannot receive a towing service
from a MITSUBISHI MOTORS Authorized Serv-
ice Point or commercial tow truck service, tow
your vehicle carefully in accordance with the in-
structions given in “Towing” on page 6-15. Starting and driving
4-35 4
OBKE12E1
Page 308 of 377

Service precautions
....................................................................... 8-02
Catalytic converter ........................................................................ 8-02
Bonnet...........................................................................................8-03
Engine oil ......................................................................................8-04
Engine coolant .............................................................................. 8-06
Washer fluid ................................................................................. 8-07
Brake fluid .................................................................................... 8-08
Clutch fluid* ................................................................................. 8-09
Power steering fluid ...................................................................... 8-10
Battery .......................................................................................... 8-10
Tyres............................................................................................. 8-12
Parking brake break-in.................................................................. 8-16
Wiper blade rubber replacement ...................................................
8-17
General maintenance .................................................................... 8-18
For cold and snowy weather......................................................... 8-19
Fusible links.................................................................................. 8-19
Fuses............................................................................................. 8-19
Replacement of lamp bulbs .......................................................... 8-23Maintenance
8
OBKE12E1
Page 325 of 377

NOTE
l Do
not allow
the wiper arm to fall onto the
window glass; it could damage the glass.
4. Firmly insert the retainer (C) into the groove (D) in the wiper blade.
Refer to the illustration to ensure that the re-
tainers are correctly aligned as you insert
them into the groove. NOTE
l If
a retainer
is not supplied with the new wip-
er blade, use the retainer from the old blade. General maintenance
E01002700360
Fuel, engine coolant, oil and exhaust
gas leakage
Look under
the
body of your vehicle to check for
fuel, engine coolant, oil and exhaust gas leaks. WARNING
l If
you
see
a suspicious fuel leak or if you
smell fuel, do not operate the vehicle; we
recommend you to call for assistance.
Exterior and interior lamp operation
Operate the combination
lamp switch to check that
all lamps are functioning properly.
If the lamps do not illuminate, the probable cause
is a blown fuse or defective lamp bulb. Check the
fuses first. If there is no blown fuses, check the
lamp bulbs.
For information regarding the inspection and re-
placement of the fuses and the lamp bulbs, refer to
“Fuses” on page 8-19 and “Replacement of lamp
bulbs” on page 8-23.
If the fuses and bulbs are all OK, we recommend
you to have your vehicle checked and repaired.
Meter, gauge and indicator/warning
lamps operation
Run the engine to check the operation of all meters,
gauges, and indicator/warning lamps.
If there is anything wrong, we recommend you to
have your vehicle inspected. Hinges and latches lubrication
Check all
latches
and hinges, and, if necessary,
have them lubricated. Maintenance
8-18
8
OBKE12E1
Page 330 of 377

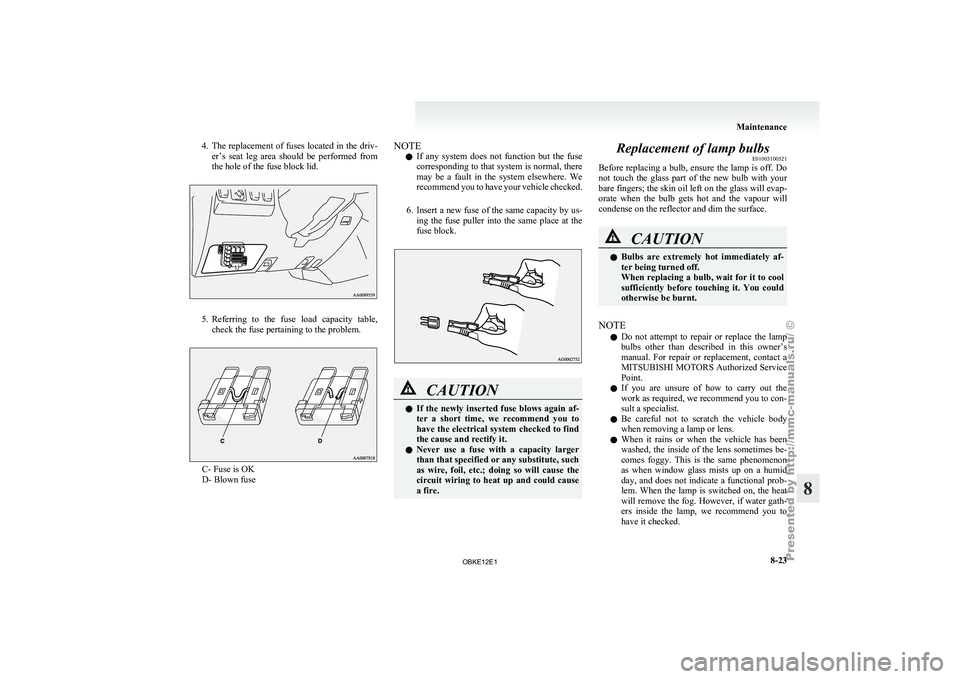
4. The replacement of fuses located in the driv-
er’s seat leg area should be performed from
the hole of the fuse block lid. 5. Referring to
the
fuse load capacity table,
check the fuse pertaining to the problem. C- Fuse is OK
D- Blown fuse NOTE
l If any
system
does not function but the fuse
corresponding to that system is normal, there
may be a fault in the system elsewhere. We
recommend you to have your vehicle checked.
6. Insert a new fuse of the same capacity by us- ing the fuse puller into the same place at the
fuse block. CAUTION
l
If the
newly
inserted fuse blows again af-
ter a short time, we recommend you to
have the electrical system checked to find
the cause and rectify it.
l Never use a fuse with a capacity larger
than that specified or any substitute, such
as wire, foil, etc.; doing so will cause the
circuit wiring to heat up and could cause
a fire. Replacement of lamp bulbs
E01003100521
Before replacing a
bulb, ensure the lamp is off. Do
not touch the glass part of the new bulb with your
bare fingers; the skin oil left on the glass will evap-
orate when the bulb gets hot and the vapour will
condense on the reflector and dim the surface. CAUTION
l
Bulbs are
extremely
hot immediately af-
ter being turned off.
When replacing a bulb, wait for it to cool
sufficiently before touching it. You could
otherwise be burnt.
NOTE l Do
not attempt
to repair or replace the lamp
bulbs other than described in this owner’s
manual. For repair or replacement, contact a
MITSUBISHI MOTORS Authorized Service
Point.
l If you are unsure of how to carry out the
work as required, we recommend you to con-
sult a specialist.
l Be careful not to scratch the vehicle body
when removing a lamp or lens.
l When it rains or when the vehicle has been
washed, the inside of the lens sometimes be-
comes foggy. This is the same phenomenon
as when window glass mists up on a humid
day, and does not indicate a functional prob-
lem. When the lamp is switched on, the heat
will remove the fog. However, if water gath-
ers inside the lamp, we recommend you to
have it checked. Maintenance
8-23 8
OBKE12E1
Page 331 of 377

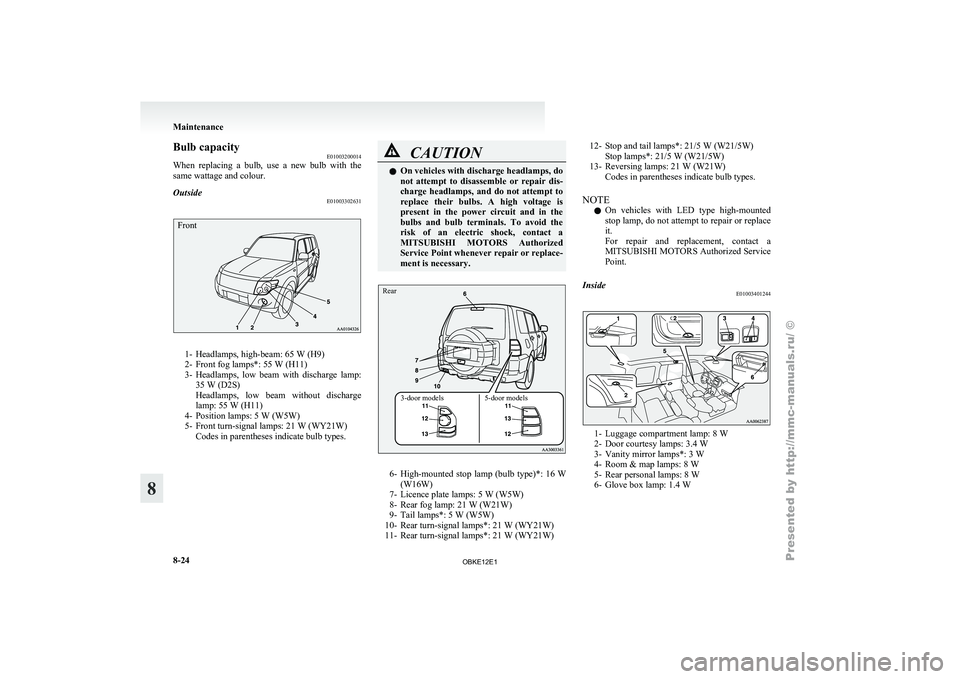
Bulb capacity
E01003200014
When replacing a
bulb, use a new bulb with the
same wattage and colour.
Outside E01003302631
Front1- Headlamps, high-beam: 65 W (H9)
2- Front fog lamps*: 55 W (H11)
3-
Headlamps,
low beam with discharge lamp:
35 W (D2S)
Headlamps, low beam without discharge
lamp: 55 W (H11)
4- Position lamps: 5 W (W5W)
5- Front turn-signal lamps: 21 W (WY21W) Codes in parentheses indicate bulb types. CAUTION
l
On vehicles with discharge headlamps, do
not attempt to
disassemble or repair dis-
charge headlamps, and do not attempt to
replace their bulbs. A high voltage is
present in the power circuit and in the
bulbs and bulb terminals. To avoid the
risk of an electric shock, contact a
MITSUBISHI MOTORS Authorized
Service Point whenever repair or replace-
ment is necessary.
3-door models 5-door models
Rear
6- High-mounted stop
lamp
(bulb type)*: 16 W
(W16W)
7- Licence plate lamps: 5 W (W5W)
8- Rear fog lamp: 21 W (W21W)
9- Tail lamps*: 5 W (W5W)
10- Rear turn-signal lamps*: 21 W (WY21W)
11- Rear turn-signal lamps*: 21 W (WY21W) 12- Stop and tail lamps*: 21/5 W (W21/5W)
Stop lamps*: 21/5 W (W21/5W)
13- Reversing lamps: 21 W (W21W) Codes in parentheses indicate bulb types.
NOTE l On
vehicles
with LED type high-mounted
stop lamp, do not attempt to repair or replace
it.
For repair and replacement, contact a
MITSUBISHI MOTORS Authorized Service
Point.
Inside E01003401244 1- Luggage compartment lamp: 8 W
2- Door courtesy lamps: 3.4 W
3-
Vanity mirror lamps*:
3 W
4- Room & map lamps: 8 W
5- Rear personal lamps: 8 W
6- Glove box lamp: 1.4 W Maintenance
8-24
8
OBKE12E1
Page 332 of 377

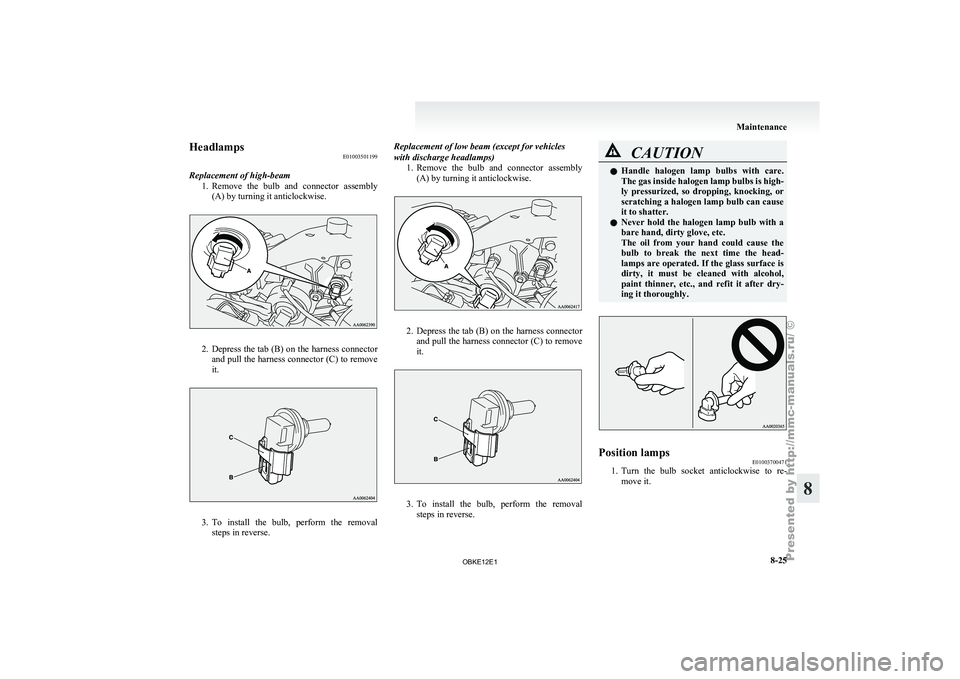
Headlamps
E01003501199
Replacement of high-beam 1. Remove the bulb
and connector assembly
(A) by turning it anticlockwise. 2. Depress the tab (B) on the harness connector
and pull
the harness connector (C) to remove
it. 3. To
install the bulb, perform the removal
steps in reverse. Replacement of low beam (except for vehicles
with discharge headlamps)
1.Remove the bulb
and connector assembly
(A) by turning it anticlockwise. 2. Depress the tab (B) on the harness connector
and pull
the harness connector (C) to remove
it. 3. To install the bulb, perform the removal
steps in reverse. CAUTION
l
Handle halogen lamp
bulbs with care.
The gas inside halogen lamp bulbs is high-
ly pressurized, so dropping, knocking, or
scratching a halogen lamp bulb can cause
it to shatter.
l Never hold the halogen lamp bulb with a
bare hand, dirty glove, etc.
The oil from your hand could cause the
bulb to break the next time the head-
lamps are operated. If the glass surface is
dirty, it must be cleaned with alcohol,
paint thinner, etc., and refit it after dry-
ing it thoroughly. Position lamps
E01003700471
1. Turn the bulb socket anticlockwise to re-
move it. Maintenance
8-25 8
OBKE12E1