2011 MITSUBISHI PAJERO IV racks
[x] Cancel search: racksPage 234 of 377
Press : The track number increases by
one.
Press : The track number decreases by
one.
Press for a
long period
(approx. 2 sec-
onds or more) : The track number increases
continuously while the button
is pressed.
Press for a
long period
(approx. 2 sec-
onds or more) : The track number decreases
continuouslywhile the button
is pressed.
If the side of the button is pressed once after a
few seconds, playback
returns to the start of that
track.
NOTE
l Every time the TRACK button (11) is press-
ed, the file number in the display changes.
To find a track E00758600223
You can select a folder to find a desired track.
1. Press the FOLDER button (12 or 13) to showthe desired folder in the display.
NOTE l If
no
operation is performed for 10 seconds
or more or other button is operated after the
FOLDER button has been pressed, the selec-
ted track becomes unselected and the display
returns to the playback display.
2. Press the MENU button (10) to select the fold- er. NOTE
l When
the DISC
button (15) is pressed, the
track find mode will be cancelled.
3. Press the FOLDER button (12 or 13) to show the desired track in the display.
NOTE l When the DISC button (15) is pressed, the se-
lection is cancelled and returned to the previ-
ous step.
l If no operation is performed for 5 seconds or
more after the FOLDER button (12 or 13) is
pressed, the displayed track is played.
4. Press the MENU button (10) to select the file.
To play the same file repeatedly E00758700022
Press the RPT button (5) to show “RPT” in the dis-
play. To cancel this mode, press the button again.
To play the files in the same folder repeatedly E00758800023
Press and hold the RPT button (5) until you hear a
beep to show “F-RPT” in the display.
All tracks
in
the current folder are played repeatedly.
To exit this mode, press the button again.
To play a folder in random order E00758900024
Press the RDM button (6) to show “RDM” in the
display.
The audio randomly
selects tracks from the current
folder and plays the selected tracks.
To exit this mode, press the button again. To play all folders in random order
E00759000022
Press and hold
the RDM button (6) until you hear a
beep to show “F-RDM” in the display.
The audio randomly selects tracks from all folders
and plays the selected tracks.
To exit this mode, press the button again.
To find the start of each track in a folder for play-
back (vehicles without Bluetooth ®
2.0 interface)
E00759100111
Press the SCAN button (14). “SCAN” is shown in
the display and
the tracks in the current folder are
played for several seconds from the beginning.
The file number will blink while the scan mode is
selected.
To exit this mode, press the button again.
NOTE
l Once all tracks in the folder have been cued
playback will restart from the beginning of
the track that was playing when cueing started.
To find the start of each track in all folders for
playback (vehicles with Bluetooth ®
2.0 interface)
E00765800038
Press the SCAN button (14). “SCAN” is shown in
the display and
all tracks in all folders are played
for several seconds from the beginning.
The file number will blink while the scan mode is
selected.
To exit this mode, press the button again.
To find the start of first tracks in all folders for
playback E00759200112
Press and hold the SCAN button (14) until you
hear a beep to show “F-SCAN” in the display.
The first tracks
in all folders are played for several
seconds from the beginning. For pleasant driving
5-51 5
OBKE12E1
Page 235 of 377
Playback starts from the folder next to the one cur-
rently playing.
The folder number
will blink while the scan mode
is selected.
To exit this mode, press the button again.
NOTE
l Once the cueing playback ends, playback
will start from the track at the beginning of
the folder next to the one that was playing
when the cueing started.
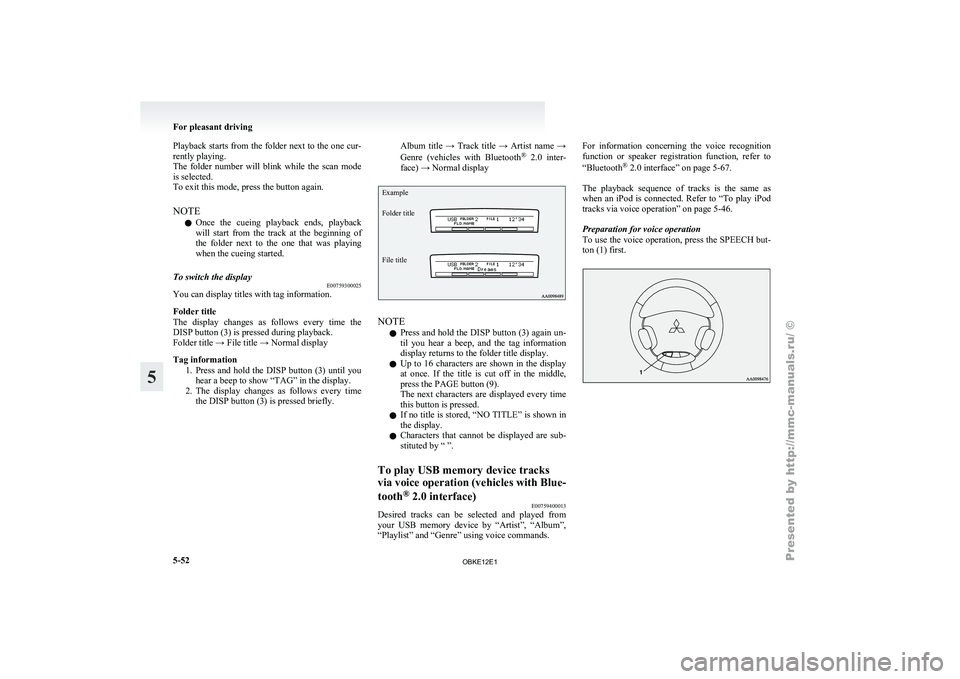
To switch the display E00759300025
You can display titles with tag information.
Folder title
The display changes
as follows every time the
DISP button (3) is pressed during playback.
Folder title → File title → Normal display
Tag information
1. Press and hold the DISP button (3) until youhear a beep to show “TAG” in the display.
2. The display changes as follows every time the DISP button (3) is pressed briefly. Album title → Track title → Artist name →
Genre
(vehicles with
Bluetooth®
2.0 inter-
face) → Normal display
Example
Folder title
File title NOTE
l Press
and hold
the DISP button (3) again un-
til you hear a beep, and the tag information
display returns to the folder title display.
l Up to 16 characters are shown in the display
at once. If the title is cut off in the middle,
press the PAGE button (9).
The next characters are displayed every time
this button is pressed.
l If no title is stored, “NO TITLE” is shown in
the display.
l Characters that cannot be displayed are sub-
stituted by “ ”.
To play USB memory device tracks
via voice operation
(vehicles with Blue-
tooth ®
2.0 interface)
E00759400013
Desired tracks can be selected and played from
your USB memory
device by “Artist”, “Album”,
“Playlist” and “Genre” using voice commands. For information concerning the voice recognition
function or
speaker
registration function, refer to
“Bluetooth ®
2.0 interface” on page 5-67.
The playback sequence of tracks is the same as
when an iPod is connected. Refer to “To play iPod
tracks via voice operation” on page 5-46.
Preparation for voice operation
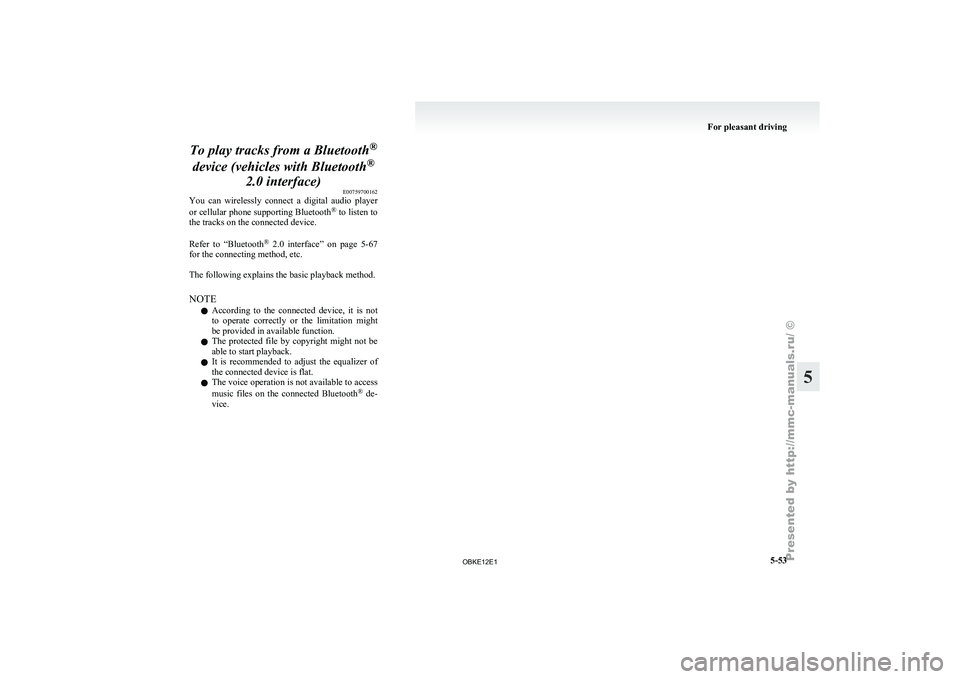
To use the voice operation, press the SPEECH but-
ton (1) first. For pleasant driving
5-52
5
OBKE12E1
Page 236 of 377
To play tracks from a Bluetooth
®
device (vehicles with Bluetooth ®
2.0 interface) E00759700162
You can wirelessly
connect a digital audio player
or cellular phone supporting Bluetooth ®
to listen to
the tracks on the connected device.
Refer to “Bluetooth ®
2.0 interface” on page 5-67
for the connecting method, etc.
The following explains the basic playback method.
NOTE
l According to the connected device, it is not
to operate correctly or the limitation might
be provided in available function.
l The protected file by copyright might not be
able to start playback.
l It is recommended to adjust the equalizer of
the connected device is flat.
l The voice operation is not available to access
music files on the connected Bluetooth ®
de-
vice. For pleasant driving
5-53 5
OBKE12E1
Page 238 of 377
To listen to tracks from a device con-
nected via Bluetooth
®
E00762700195
1. Press the PWR
button (1) to turn on the au-
dio system. The system turns on in the last
mode used.
2. Press the CD button (3) several times to
switch to the BT-A (Bluetooth ®
) mode. The
input mode changes as follows every time
the CD button is pressed.
CD mode → USB (iPod) mode → Blue-
tooth ®
mode → Rear-seat display mode*
NOTE l For vehicles equipped with audio/video input
RCA terminals, pressing and holding the CD
button for 2 seconds or more switches the sys-
tem to the AUX mode.
3. Connect your Bluetooth ®
device. Refer to
“Connecting the Bluetooth® 2.0 interface
and Bluetooth® device” on page 5-71.
4. Playback starts automatically.
NOTE l Depending on the connected device, the play-
back may not start automatically.
In this case, operate the connected device to
start the playback.
To stop the playback (if supported by the device) E00762800011
To stop the playback, press the Stop button (10).
To restart the playback, press the Play button (9).
To pause the playback (if supported by the device) E00762900038
To pause the playback, press the Pause button (10). To restart the playback, press the Play button (9).
To select a track (if supported by the device)
E00763000078
Press the TRACK button (7) to select the desired
track number.
Press : The track number increases by
one.
Press : The track number decreases by
one.
Press for a
long period
(approx. 2 sec-
onds or more) : The track number increases
continuously while the button
is pressed.
Press for a
long period
(approx. 2 sec-
onds or more) : The track number decreases
continuouslywhile the button
is pressed.
If the side of the button is pressed once while a
track is playing,
playback returns to the start of that
track.
NOTE
l Every time the track selection button is press-
ed, the track number in the display changes.
To play the same track repeatedly (if supported by
the device) E00763100011
Press the RPT button (4) during playback to show
“RPT” in the display.
To exit this mode, press the button again. To play tracks in random order (if supported by
the device)
E00763200012
Press the RDM
button (5) to show “RDM” in the
display.
The system randomly selects and plays tracks from
all tracks in the Bluetooth ®
device.
To exit this mode, press the button again.
To find the start of each track for playback (if sup-
ported by the device) E00763300084
Press the SCAN button (8). “SCAN” is shown in
the display and
all tracks in the Bluetooth ®
device
are played for several seconds from the beginning.
To exit this mode, press the button again.
To switch the display (if supported by the device) E00763400014
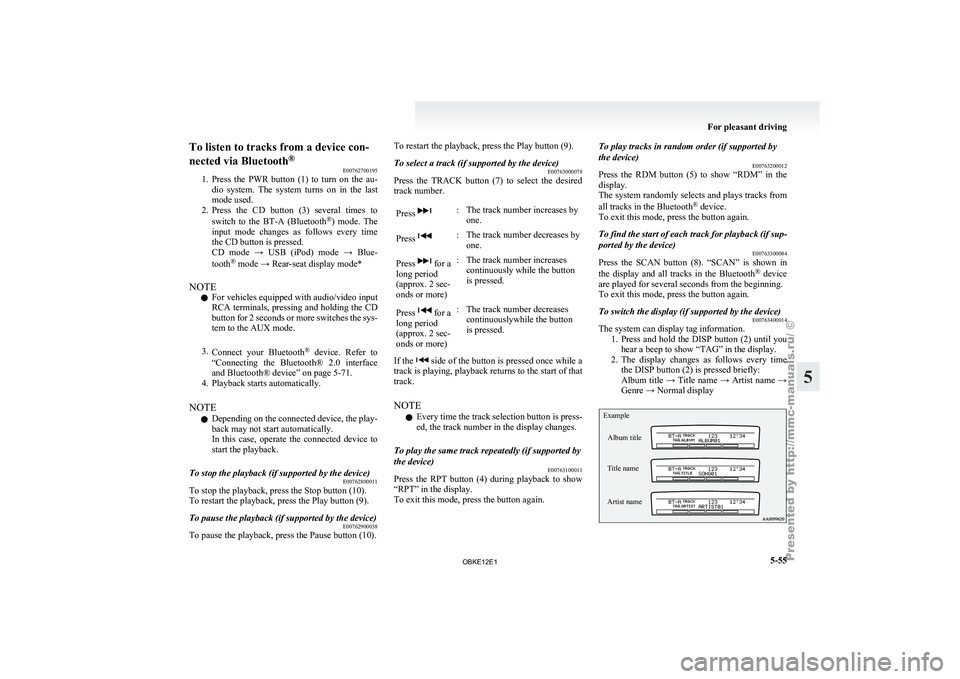
The system can display tag information.
1. Press and hold
the DISP button (2) until you
hear a beep to show “TAG” in the display.
2. The display changes as follows every time the DISP button (2) is pressed briefly:
Album title → Title name → Artist name →
Genre → Normal display
Example
Album title
Title name
Artist name For pleasant driving
5-55 5
OBKE12E1
Page 250 of 377

Link System*
E00764500012
The Link System
takes overall control of the devi-
ces connected via the USB input terminal or the
Bluetooth ®
2.0 interface allowing the connected de-
vices to be operated by using the switches in the ve-
hicle or voice commands.
See the following section for details on how to op-
erate.
Refer to “Bluetooth ®
2.0 interface” on page 5-67.
Refer to “USB input terminal” on page 5-82.
Refer to “To play tracks from USB device” on
page 5-43.
Refer to “To play tracks from a Bluetooth ®
device”
on page 5-53.
Refer to “To use the external audio input function”
on page 5-56.
Bluetooth ®
is a registered trademark of BLUE-
TOOTH SIG, INC.
Link System End User Licence Agree-
ment E00764600013
You have acquired a device that includes software
licensed by MITSUBISHI
MOTORS CORPORA-
TION from JOHNSON CONTROLS Inc (the auto-
motive experience business unit), and their subse-
quent 3 rd
party suppliers. For a complete list of
these 3 rd
party products and their end user licence
agreements, please go to the following website.
http://www.jciblueconnect.com/faq/fulldisclo-
sure.pdf Bluetooth
®
2.0 interface*
E00726000572
The Bluetooth ®
2.0 interface
allows for making/re-
ceiving hands-free calls in the vehicle using a Blue-
tooth ®
compatible cellular phone based on the wire-
less communication technology commonly known
as Bluetooth ®
. It also allows the user to play mu-
sic, saved in a Bluetooth ®
music player, from the
vehicle’s speakers.
The system is equipped with a voice recognition
function, which allows you to make hands-free
calls by simple switch operations and voice com-
mand operations using a defined voice tree.
The Bluetooth ®
2.0 interface can be used when the
ignition switch is in the “ON” or “ACC” position.
Before you can use the Bluetooth ®
2.0 interface,
you must pair the Bluetooth ®
device and Blue-
tooth ®
2.0 interface. Refer to “Connecting the Blue-
tooth® 2.0 interface and Bluetooth® device” on
page 5-71.
Bluetooth ®
is a registered trademark of BLUE-
TOOTH SIG, INC. WARNING
l Although the
Bluetooth®
2.0 interface al-
lows you to make hands-free calls, if you
choose to use the cellular phone while driv-
ing, you must not allow yourself to be dis-
tracted from the safe operation of your ve-
hicle. Anything, including cellular phone
usage, that distracts you from the safe op-
eration of your vehicle increases your
risk of an accident. WARNING
l Refer to and
comply with all state and lo-
cal laws in your area regarding cellular
phone usage while driving.
NOTE l The Bluetooth ®
2.0
interface cannot be used
if the Bluetooth ®
device has a flat battery or
the device power is turned off.
l Hands-free calls will not be possible if your
phone does not have service available.
l If you place the Bluetooth ®
device in the ve-
hicle’s third seat or luggage compartment,
you may not be able to use the Bluetooth ®
2.0 interface.
l Some Bluetooth ®
devices are not compatible
with the Bluetooth ®
2.0 interface.
l For details on the Bluetooth ®
2.0 interface,
you can see them by accessing the
MITSUBISHI MOTORS website.
Please read and agree on the “Warning about
Links to the Web Sites of Other Companies”
because it connects to other than
MITSUBISHI MOTORS website.
http://www.mitsubishi-motors.com/en/prod-
ucts/index.html
Steering control switch ® p. 5-68
Voice recognition function ® p. 5-68
Useful voice commands ® p. 5-69
Speaker enrollment function ® p. 5-70
Connecting the Bluetooth® 2.0 interface and Blue-
tooth® device ® p. 5-71
Operating a music player connected via Blue-
tooth® ® p. 5-74 For pleasant driving
5-67 5
OBKE12E1
Page 257 of 377
3. Say “Pairing Options.”
4. The voice guide
will say “Select one of the
following: pair, edit, delete, or list.” Say “Ed-
it.”
5. The voice guide will say “Please say,” and
read out the numbers of the Bluetooth ®
devi-
ces and device tags of corresponding devices
in order, starting with the Bluetooth ®
that
has been most recently connected.
After all paired device tags have been read,
the voice guide will say “Which device,
please?” Say the number of the device tag
you want to change.
NOTE l You can press and release the SPEECH but-
ton while the list is being read, and immedi-
ately say the number of the device tag you
want to change.
6. The voice guide will say “New name, please.” Say the name you want to register as
a new device tag.
When the confirmation function is on, the
voice guide will say “
this correct?” Answer “Yes.”
Answer “No,” you can say the new device
tag you want to register again.
7. The device tag is changed. When the change is complete, the voice
guide will say “New name saved” and then
the system will return to the main menu. Operating a music player connected
via Bluetooth
®
E00761000016
For the operation
of a music player connected via
Bluetooth ®
, refer to “To play tracks from a Blue-
tooth ®
device” on page 5-53.
How to make or receive hands-free calls E00761100020
You can make or receive hands-free calls using a
Bluetooth ®
compatible cellular
phone connected to
the Bluetooth ®
2.0 interface.
You can also use the phone books in the Blue-
tooth ®
2.0 interface to make calls without dialling
telephone numbers.
To make a call ® p. 5-74
SEND function ® p. 5-75
Receiving calls ® p. 5-75
MUTE function ® p. 5-76
Switching between hands-free mode and private
mode ® p. 5-76
NOTE
l The hands-free calls might not be operated
correctly when it makes calling or receiving
by operating the cellular phone directly.
To make a call E00761200122
You can make a call in the following 3 ways using
the Bluetooth ®
2.0 interface:
Making a call
by saying a telephone number, mak-
ing a call using the Bluetooth ®
2.0 interface’s
phone book, and making a call by redialing.
Making a call by using the telephone number
You can make a call by saying the telephone number. 1. Press the SPEECH button. 2. Say “Dial.”
3. After the
voice
guide says “Number please,”
say the telephone number.
4. The voice guide will say “Dialing
The Bluetooth ®
2.0 interface will then make
the call.
When the confirmation function is on, the sys-
tem will confirm again the telephone num-
ber. To continue with that number, answer
“Yes.”
To change the telephone number, answer
“No.” The system will say “Number please”
then say the telephone number again.
NOTE l In the case of English, the system will recog-
nise both “zero” and “oh” (Letter “o”) for the
number “0.”
l The Bluetooth ®
2.0 interface supports num-
bers (0 to 9) and characters (+, # and *).
l The maximum supported telephone number
length is as follows:
• International telephone number: + and tel-ephone numbers (to 18 digits).
• Except for international telephone num- ber: telephone numbers (to 19 digits).
Making a call using a phone book
You can make calls using the vehicle phone book
or mobile phone book of the Bluetooth ®
2.0 inter-
face.
For details on the phone books, refer to “Phone
book function” on page 5-76. 1. Press the SPEECH button.
2. Say “Call.” For pleasant driving
5-74
5
OBKE12E1
Page 265 of 377

USB input terminal*
E00761900015
You can connect
your USB memory device or
iPod* to play music files stored in the USB memo-
ry device or iPod.
The following explains how to connect and remove
a USB memory device or iPod.
Refer to the following sections for details on how
to play music files:
Refer to “To play tracks from USB device” on
page 5-43.
*: “iPod” is a registered trademark of Apple Inc. in
the United States and other countries.
How to connect a USB memory device E00762000273
1. Park your vehicle in a safe place and turn the
ignition switch to the “LOCK” position.
2. Open
the USB input terminal cover (A) in
the glove box. 3. Connect the connector cable (C) to the USB
memory device (B). 4. Connect the connector cable (C) to the USB
input terminal (D). CAUTION
l
Keep the lid
of the glove box closed while
driving the vehicle. A lid or the contents
of the glove box could otherwise cause in-
juries.
NOTE l Do
not connect
the USB memory device to
the USB input terminal directly.
The USB memory device may be damaged.
l When closing the glove box, be careful not
to trap the connector cable.
5. To remove the connector cable, turn the igni- tion switch to the “LOCK” position first and
perform the installation steps in reverse.
How to connect an iPod E00762100014
1. Park your vehicle in a safe place and turn the
ignition switch to the “LOCK” position.
2. Open
the USB input terminal cover (A) in
the glove box. For pleasant driving
5-82
5
OBKE12E1
Page 305 of 377

CAUTION
l
After washing the vehicle, drive the vehi-
cle slowly while lightly depressing the
brake pedal several times in order to dry
out the brakes.
Leaving the brakes wet could result in re-
duced braking performance. Also, there
is a possibility that they could freeze up
or become inoperative due to rust, render-
ing the vehicle unable to move.
l When using an automatic car wash, pay
attention to the following items, referring
to the operation manual or consulting a
car wash operator. If the following proce-
dure is not followed, it could result in dam-
age to your vehicle.
• The outside mirrors are retracted.
• The wiper arm assembly is taped.
• If your vehicle is equipped with a reardeflector or roof rails, consult a car
wash operator before using the car
wash.
• If your vehicle has rain sensor wipers, place the wiper switch lever in the
“OFF” position to deactivate the rain
sensor.
During cold weather
Salt and other
chemicals spread on the roads in
some areas in winter can have a harmful effect on
the vehicle body. You should therefore wash the ve-
hicle as often as possible in accordance with our
care-instructions. It is recommended to have a pres-
ervative applied and the underfloor protection
checked before and after the cold weather season. After washing your vehicle, wipe off all water-
drops from
the
rubber parts around the doors to pre-
vent the doors from freezing.
NOTE
l To prevent freezing of the weatherstripping
on the doors, bonnet, etc., they should be trea-
ted with silicone spray.
Waxing E00901000560
Waxing the vehicle will help prevent the adherence
of dust and
road chemicals to the paintwork. Apply
a wax solution after washing the vehicle, or at least
once every three months to assist displacing of water.
Do not wax your vehicle in direct sunlight. You
should wax after the surfaces have cooled. CAUTION
l
Waxes containing
high
abrasive com-
pounds should not be used. Such waxes re-
move rust and stains effectively from the
paintwork but they are harmful to the lus-
tre on the painted surface and the plated
surface.
Further, they are harmful to glossy surfa-
ces such as grille, garnish, mouldings, etc.
l Do not use petrol or paint thinners to re-
move road tar or other contamination to
the vehicle surface.
l Do not apply wax on the areas having
black mat coating as it can cause uneven
discolouration, patches, blurs, etc. If
stained with wax, immediately wipe off
with a piece of soft cloth and warm water. CAUTION
l
On vehicles with
a sunroof, be careful
when waxing the area around the sunroof
opening, not to put any wax on the weath-
erstrip (black rubber). If stained with
wax, the weatherstrip cannot maintain a
weatherproof seal with the sunroof.
Polishing E00901100024
The vehicle should only be polished if the paint-
work has become stained or lost its lustre. Matt-fin-
ish parts and
plastic bumpers must not be polished,
polishing these parts will stain them or damage
their finish.
Damaged paint E00901200155
Small cracks and scratches in the paint coat should
be touched up
as soon as possible with
MITSUBISHI touch-up paint to prevent corrosion.
Check body areas facing the road or the tyres care-
fully for damage to the paint coat caused by flying
stones, etc. The paint code number for your vehicle
can be found on the vehicle information code plate.
(Refer to “Vehicle information code plate” on page
9-02.)
Cleaning plastic parts E00901300619
Use a sponge or chamois leather.
If a car
wax adheres on a grey or black rough sur-
face of the bumper, moulding or lamps, the surface
becomes white. In such a case, wipe it off using
lukewarm water and soft cloth or chamois leather. Vehicle care
7-04
7
OBKE12E1