Page 255 of 714

N00518300515
Cruise control is an automatic speed control system that keeps
a set speed. It can be activated at s")
3-140 Features and controls
3
To w i n g
N00546300044
Cruise control
(if so equipped)
N00518300515
Cruise control is an automatic speed control system that keeps
a set speed. It can be activated at speeds from about 25 mph
(40 km/h). Cruise control does not work at speeds below about
25 mph (40 km/h).NOTE�Cruise control may not be able to keep your speed on
uphills or downhills.
�Your speed may decrease on a steep uphill. You may use
the accelerator pedal if you want to stay at your set speed.
�Your speed may increase to more than the set speed on a
steep downhill. You have to use the brake to control your
speed. As a result, the set speed driving is deactivated.
CAUTION
!�The system may be malfunctioning.
Park your vehicle in a safe place and stop the engine.
Restart the engine and check whether the dis-
play/indicator goes out. If they go out, there is no
abnormal condition. If they do not go out or if they
turn on frequently, it is not necessary to stop the
vehicle immediately, but you should have your vehi-
cle inspected by an authorized Mitsubishi Motors
dealer or a repair facility of your choice as soon as
possible.
CAUTION
!�When towing the vehicle with only the front wheels
or only the rear wheels raised off the ground, do not
place the ignition switch in the “ON” position or do
not put the operation mode in ON. Placing the igni-
tion switch in the “ON” position or putting the oper-
ation mode in ON could cause the ASC to operate,
resulting in an accident.
Note that the correct towing method depends on the
transmission type and the vehicle’s drive configura-
tion.
For details, refer to “Towing” on page 6-25.
CAUTION
!�When you do not wish to drive at a set speed, turn
off the cruise control for safety.�Do not use cruise control when driving conditions
will not allow you to stay at the same speed, such as
in heavy traffic or on roads that are winding, icy,
snow-covered, wet, slippery, on a steep downhill
slope.
BK0122500US.book 140 ページ 2010年5月12日 水曜日 午前11時11分
Page 332 of 714
. The lights will go back to normal when you let
go. While the high")
Features and controls
3-217
3
Headlight flasher
N00550000185
You can flash the high beams by pulling the lever gently
toward you (2). The lights will go back to normal when you let
go. While the high beam is on, you will see a blue light on the
instrument panel.NOTE�You can flash the high beams by pulling the lever toward
you, even if the light switch is off.
�If you turn the lights off with the head lights set to high-
beam illumination, the headlights are automatically
returned to their low-beam setting when the light switch is
next turned to the “ ” position.
Welcome light
N00563200077
This function turns on the front side-marker and parking lights
for about 30 seconds after the UNLOCK button (A) on the
remote control transmitter is pressed when the combination
headlights and dimmer switch is in the “OFF” or “AUTO”
position (for vehicles equipped with the automatic light con-
trol). On vehicles equipped with the automatic light control,
the welcome light function will operate only when it is dark
outside the vehicle.
BK0122500US.book 217 ページ 2010年5月12日 水曜日 午前11時11分
Page 333 of 714
 on the remote control tra")
3-218 Features and controls
3
NOTE�While the welcome light function is operating, perform
one of the following operations to cancel the function.
• Push the LOCK button (B) on the remote control trans-
mitter.
• Turn the combination headlights and dimmer switch to
the “ ” or “ ” position.
• Turn the ignition switch to the “ON” position.
�It is possible to modify functions as follows:
• The headlights can be set to come on in the low beam
setting.
• The welcome light function can be deactivated.
For details, consult a Mitsubishi Motors dealer.
On vehicles equipped with Mitsubishi Multi-Communica-
tion System, screen operations can be used to make the
adjustment.
Refer to separate owner’s manual for details.
Coming home light
N00547300070
This function turns on the headlights in the low beam setting
for about 30 seconds after the ignition switch is turned to the
“LOCK” position.
1. Turn the combination headlights and dimmer switch to the
“OFF” or “AUTO” position (for vehicles equipped with
the automatic light control).
2. Turn the ignition switch to the “LOCK” position. Also, if
a key was used to start the engine, remove the key from
the ignition switch.
3. Within 60 seconds of turning the ignition switch to the
“LOCK” position, pull the turn signal lever toward you.
BK0122500US.book 218 ページ 2010年5月12日 水曜日 午前11時11分
Page 334 of 714

Features and controls
3-219
3
4. The headlights will come on in the low beam setting for
about 30 seconds. After the headlights go off, the head-
lights can be turned on again in the low beam setting for
about 30 seconds by pulling the turn signal lever toward
you within 60 seconds of turning the ignition switch to the
“LOCK” position. To turn on the headlights again after 60
seconds of turning the ignition switch to the “LOCK”
position, repeat the process from step 1.NOTE�While the coming home light function is operating, per-
form one of the following operations to cancel the func-
tion.
• Pull the turn signal lever toward you.
• Turn the combination headlights and dimmer switch to
the “ ” or “ ” position.
• Turn the ignition switch to the “ON” position.
�It is possible to modify functions as follows:
• The time that the headlights remain on can be changed.
• The coming home light function can be deactivated.
For details, consult a Mitsubishi Motors dealer.
On vehicles equipped with Mitsubishi Multi-Communica-
tion System, screen operations can be used to make the
adjustment.
Refer to separate owner’s manual for details.
Headlight leveling switch
(if so equipped)
N00537100075
The direction of the headlight beam (the direction in which the
light shines) alters according to the number of people and the
load in the vehicle. Lower the headlight angle if it is too high
due to the number of people and/or the load in the vehicle so
that the headlights’ glare does not distract the drivers of
approaching vehicles. First set the light switch to the “ ”
position, then turn the headlight leveling switch knob to lower
the beam. The greater the number on the headlight leveling
switch knob, the lower the beam will point.
Set the switch to the appropriate position so that the headlight
beam is level with the road.
BK0122500US.book 219 ページ 2010年5月12日 水曜日 午前11時11分
Page 344 of 714

Features and controls
3-229
3
Windshield washer
N00504600230
The windshield washer can be operated with the ignition
switch in the “ON” or “ACC” position.
The washer fluid will be sprayed onto the windshield by pull-
ing the lever toward you.
When the wipers are not in operation or in intermittent opera-
tion, by pulling the lever toward you, the wipers will operate
several times while the washer fluid is being sprayed.
Also, by releasing the lever soon after pulling it toward you,
the washer fluid will be sprayed several times while the wipers
are operating several times. (Intelligent washer)
Intelligent washer will stop operating with any operation of the
lever.
NOTE�It is possible to modify functions as follows:
• Intelligent washer can be deactivated.
• The wipers can be set to operate again after about 6 sec-
onds.
For details, consult a Mitsubishi Motors dealer.
On vehicles equipped with Mitsubishi Multi-Communica-
tion System, screen operations can be used to make the
adjustment.
Refer to the separate owner’s manual for details.
BK0122500US.book 229 ページ 2010年5月12日 水曜日 午前11時11分
Page 390 of 714
Features and controls
3-275
3
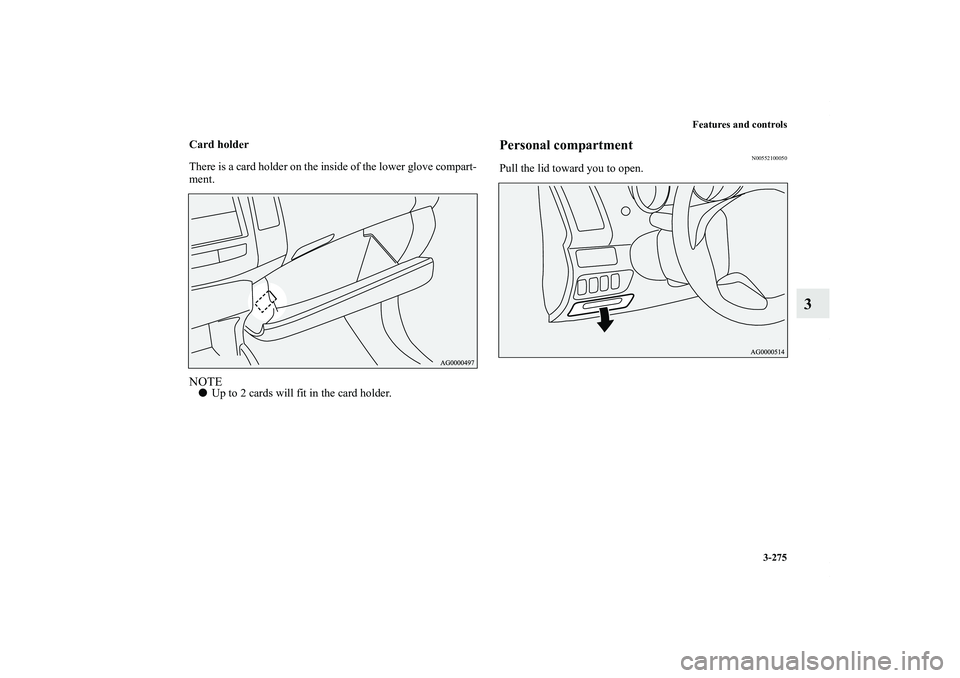
Card holder
There is a card holder on the inside of the lower glove compart-
ment.NOTE�Up to 2 cards will fit in the card holder.
Personal compartment
N00552100050
Pull the lid toward you to open.
BK0122500US.book 275 ページ 2010年5月12日 水曜日 午前11時11分
Page 399 of 714
3-284 Features and controls
3
To change positionThere are 2 installation holes (B) for the cargo area cover.1. Move one of the sliders (C) toward the inside of the vehi-
cle, and fit the protruding portion (D) into the installation
hole that is to be used. Move the opposite slider in the
same fashion.
2. After changing the position, gently shake the entire cargo
area cover to make sure it is securely retained.
NOTE�If the second row seat touches the cargo area cover, move
the cargo area cover rearward.
The cargo area cover could be damaged if it supports the
seatback of the second row seats.
BK0122500US.book 284 ページ 2010年5月12日 水曜日 午前11時11分
Page 400 of 714
Features and controls
3-285
3
To remove1. Roll back the cargo area cover.
2. Move one of the sliders (C) toward the inside of the vehi-
cle and lift it to remove the cargo area cover.
To fit the cargo area cover, follow the removal steps in reverse.
Gently shake the entire cargo area cover after fitting it to make
sure it is securely retained.
Assist grips
N00559000032
The assist grips (located above the doors on the headliner) are
not designed to support body weight. They are intended for use
only while seated in the vehicle.
CAUTION
!�Do not use the assist grips when getting into or out
of the vehicle. The assist grips could detach causing
you to fall.
BK0122500US.book 285 ページ 2010年5月12日 水曜日 午前11時11分
 for the cargo area cover.1. Move one of the sliders (C) toward the inside of the vehi-
cle, and fit the protruding po")
 toward the inside of the vehi-
cle and lift it to remove the cargo area cover.
To fit the cargo")