Page 473 of 602
5-104 Comfort controls
5
ReflectionThe reason why one can hear FM but not AM in parking
garages, under bridges etc., is that FM signals, unlike AM sig-
nals, are reflected by solid objects such as buildings, etc.
Because FM signals are easily reflected by buildings, this can
also cause reception disturbances.
The direct signal from the broadcast station reaches the antenna
slightly before the reflected signal. This time difference may
cause some reception disturbance or flutter.
This problem occurs primarily in urban areas.
Cross modulationIf one listens to a weak station and is in the vicinity of another
strong station, both stations might be received simultaneously.FM stereo receptionStereo reception requires a high quality broadcast signal. This
means that types of disturbances mentioned previously become
more marked and the reception range is somewhat diminished
during stereo reception.
BK0120400US.book 104 ページ 2010年5月12日 水曜日 午前10時50分
Page 476 of 602
6
For emergencies
If the vehicle breaks down . . . . . . . . . . . . . . . . . . .6- 2
Jump-starting the engine . . . . . . . . . . . . . . . . . . . .6- 2
Engine overheating . . . . . . . . . . . . . . . . . . . . . . . .6- 5
Jack and tools . . . . . . . . . . . . . . . . . . . . . . . . . . . . .6- 7
How to change a tire . . . . . . . . . . . . . . . . . . . . . . .6- 8
Towing . . . . . . . . . . . . . . . . . . . . . . . . . . . . . . . . . .6- 21
Operation under adverse driving conditions . . . . .6- 23
BK0120400US.book 1 ページ 2010年5月12日 水曜日 午前10時50分
Page 480 of 602

For emergencies
6-5
6
As your vehicle has anti-lock brakesIf you drive your vehicle with a low battery charge after the
engine has been started by using jumper cables, the engine may
misfire. This can cause the anti-lock braking system warning
light to blink on and off. This is only due to the low battery
voltage. It is not a problem with the brake system. If this hap-
pens, fully charge the battery and ensure the charging system is
operating properly.
Engine overheating
N00836500352
When the engine is overheating, the information screen in the
multi-information display will be interrupted and the engine
coolant temperature warning display will appear. Also “ ”
blink. If this happens:
1. Stop the vehicle in a safe place. Turn on the hazard warn-
ing flashers.
2. With the engine still running, carefully raise the engine
hood to vent the engine compartment.
3. Check that the cooling fan is running. If the fan is not
turning, stop the engine immediately and contact an
authorized Mitsubishi Motors dealer or a repair facility of
your choice for assistance.
4. If you see steam or spray coming from under the hood,
turn off the engine.
WA R N I N G
!�To avoid personal injury, keep hands, hair, jewelry
and clothes away from the cooling fan. The cooling
fan can start at any time.
BK0120400US.book 5 ページ 2010年5月12日 水曜日 午前10時50分
Page 481 of 602

6-6 For emergencies
6
5. If you do not see steam or spray coming from under the
hood, leave the engine on until the bar graph for the
engine coolant temperature warning display on the multi-
information display goes down. When it is in the middle
of the normal zone, you can start driving again. If the bar
graph stays in the red zone, turn off the engine.
6. When you do not see any more steam or spray, open the
hood. Look for obvious leaks, such as a split radiator
hose. Be careful as components will be hot. Any leak
source must be repaired.
7. If there is no obvious leak source, check the coolant level
in the engine coolant reserve tank. If there is none, or if it
is too low, slowly add coolant.8. If the engine coolant reserve tank needs coolant, you will
probably also need to add coolant to the radiator. Do not
loosen or remove the radiator cap until the engine has
cooled down.
9. Start the engine, and slowly add coolant, up to the bottom
of the filler neck. Use plain water if you have to (and
replace it with the right coolant as soon as possible).
10. Replace the radiator cap and tighten it fully. Check the
engine coolant temperature display on the multi-informa-
tion display. You can start driving again when the bar
graph for the engine coolant temperature display returns
to the normal zone.
11. Have the system inspected by your authorized Mitsubishi
Motors dealer or a repair facility of your choice.
WA R N I N G
!�Before raising the engine hood, check to see if there
is steam or spray coming from under the hood.
Steam or spray coming from an overheated engine
could seriously scald you.
Do not open the hood until there is no steam or
spray.
WA R N I N G
!�Removing the radiator cap could scald you with
escaping hot water or steam. When checking the
radiator level, cover the cap with a cloth before try-
ing to remove it. Turn it slowly counterclockwise,
without pressing down, to the first notch. The pres-
sure in the system will then be let out. When the
pressure is COMPLETELY LET OUT, press down
and keep turning the cap counterclockwise until it
comes off.
BK0120400US.book 6 ページ 2010年5月12日 水曜日 午前10時50分
Page 483 of 602
6-8 For emergencies
6
JackBefore removing the jack, lift up the luggage floor board.
How to change a tire
N00836900792
Before changing a tire, first stop your vehicle in a safe, flat
location.
1. Park the vehicle on level and stable ground.
2. Set the parking brake firmly.
3. On vehicles equipped with manual transaxle, stop the
engine and move the gearshift lever to the “R” (Reverse)
position.
On vehicles equipped with continuously variable trans-
mission (CVT), move the selector lever to the “P”
(PARK) position, and stop the engine.
4. Turn on the hazard flashers and set up a warning triangle,
flashing signal light, etc., at an adequate distance from the
vehicle, and have all your passengers leave the vehicle.
WA R N I N G
!�The jack should not be used for any purpose other
than to change a tire.�Never get under the vehicle or put any portion of
your body under the vehicle while it is supported by
the jack.
BK0120400US.book 8 ページ 2010年5月12日 水曜日 午前10時50分
Page 485 of 602

6-10 For emergencies
6
Spare tire information
N00849600331
Compact spare tireThe compact spare tire is stowed beneath the luggage floor
board of the luggage compartment. It is designed to save space
in the luggage compartment. Its lighter weight makes it easier
to use if a flat tire occurs.
WA R N I N G
!�Tires, including spare tire, degrade over time with
age even when they are not being used. It is recom-
mended that tires over 6 years generally be replaced
even if damage is not obvious.
CAUTION
!�While the compact spare tire is stowed, the inflation
pressure should be checked at least once a month to
assure that it remains at the recommended inflation
pressure. See the tire and loading information plac-
ard attached to the driver’s door sill. Refer to “Tire
and loading information placard” on page 9-4.�Driving with an improperly inflated tire can cause
an accident. If you have no choice but to drive with
an under-inflated tire, keep your speed down and
avoid sudden steering or braking, if possible. Inflate
the tire to the correct pressure as soon as possible.
Refer to “Tire inflation pressures” on page 7-27.
�The compact spare tire should be used only tempo-
rarily. While the compact spare tire is being used,
the tire pressure monitoring system will not function
properly. Have the tire replaced or repaired at an
authorized Mitsubishi Motors dealer or a repair
facility of your choice as soon as possible.�Do not go over 50 mph (80 km/h) when driving with
the compact spare tire.�Avoid sudden starting and braking when driving
with the compact spare tire.�Do not drive through automatic car washes and over
obstacles that could possibly damage the underside
of your vehicle. Because the compact spare tire is
smaller than the original tire, there is less clearance
between the ground and your vehicle.�Because the compact spare tire is designed only for
your vehicle, do not use it on any other vehicle.�Do not put the compact spare tire on a different
wheel, and do not put standard tires, snow tires,
wheel covers or trim rings on the compact spare
wheel. Otherwise, you could damage these parts or
other parts on your vehicle.�Do not use tire chains with your compact spare tire.
Using a chain could cause damage to your vehicle
and loss of the chains.
CAUTION
!
BK0120400US.book 10 ページ 2010年5月12日 水曜日 午前10時50分
Page 487 of 602
6-12 For emergencies
6
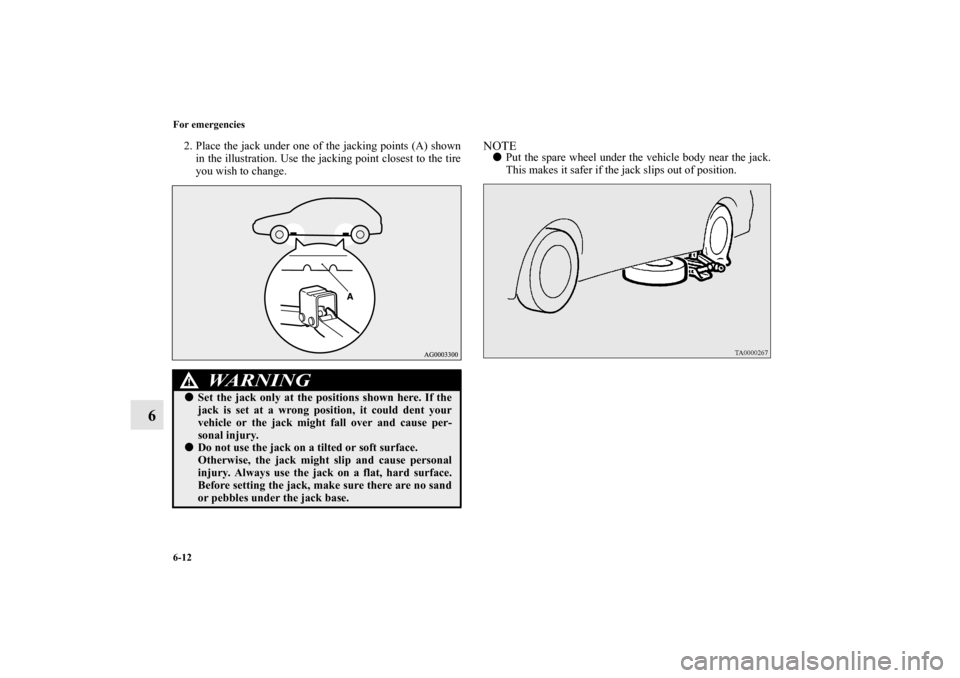
2. Place the jack under one of the jacking points (A) shown
in the illustration. Use the jacking point closest to the tire
you wish to change.
NOTE�Put the spare wheel under the vehicle body near the jack.
This makes it safer if the jack slips out of position.
WA R N I N G
!�Set the jack only at the positions shown here. If the
jack is set at a wrong position, it could dent your
vehicle or the jack might fall over and cause per-
sonal injury.�Do not use the jack on a tilted or soft surface.
Otherwise, the jack might slip and cause personal
injury. Always use the jack on a flat, hard surface.
Before setting the jack, make sure there are no sand
or pebbles under the jack base.
BK0120400US.book 12 ページ 2010年5月12日 水曜日 午前10時50分
Page 488 of 602
For emergencies
6-13
6
3. Rotate the jack by hand until the flange portion (B) fits in
the groove (C) at the top of the jack.4. Insert the bar (D) into the wheel nut wrench (E). Then put
the end of the bar into the shaft’s jack end, as shown in the
illustration.
Slowly rotate the wheel nut wrench until the tire is raised
slightly off the ground surface.
WA R N I N G
!�Stop jacking up the vehicle as soon as the tire is
raised off the ground. It is dangerous to raise the
vehicle any higher.�Do not get under your vehicle while using the jack.�Do not bump the raised vehicle or leave it sitting on
the jack for a long time. Both are very dangerous.�Do not use a jack except the one that came with your
vehicle.�The jack should not be used for any purpose other
than to change a tire.
BK0120400US.book 13 ページ 2010年5月12日 水曜日 午前10時50分