Page 368 of 700

Features and controls
3-273
3
5. To remove the Dock connector, turn the ignition switch to
the “LOCK” position first and perform the installation
steps in reverse.Types of connectable devices and supported file
specifications
N00567000028
Device types
N00567100032
Devices of the following types can be connected.
*: “iPod touch,” “iPod classic,” “iPod” and “iPod nano” are
registered trademarks of Apple Inc. in the Untied States and
other countries.
NOTE�Depending on the type of the USB memory device or
other device connected, the connected device may not
function properly or the available functions may be lim-
ited.
�Use the iPod whose firmware has been updated to the lat-
est version.
�You can charge your iPod by connecting it to the USB
input terminal when the ignition switch is in the “ACC” or
“ON” position.
�Do not keep your USB memory device or iPod in your
vehicle.
�It is recommended that you back up the files in case of
data damage.
�Do not connect to the USB input terminal any device
(hard disk, card reader, memory reader, etc.) other than
the connectable devices specified in the previous section.
The device and/or data may be damaged. If any of these
devices was connected by mistake, remove it after turning
the ignition switch to the “LOCK” position.
Model name
Condition
USB memory deviceStorage capacity of 256 Mbytes
or more
iPod touch* F/W Ver.1.1.1 or later
iPod classic* F/W Ver.1.0 or later
iPod (fifth generation)* F/W Ver.1.2.2 or later
iPod nano (fifth generation)* F/W Ver.1.2 or later
iPod nano (second generation)* F/W Ver.1.1.2 or later
Models other than USB mem-
ory devices and iPodsDigital audio player supporting
mass storage class
BK0119300US.book 273 ページ 2010年5月21日 金曜日 午前10時13分
Page 369 of 700
3-274 Features and controls
3
File specifications
N00567200017
You can play music files of the following specifications that
are saved in a USB memory device or other device supporting
mass storage class.
Sun visors
N00524600308
Fold the sun visor downward (1) to reduce front glare while
driving. To reduce side glare, turn the visor to the side (2).
Item
Condition
File format MP3, WMA, AAC, WAV
Maximum number of levels
(including the root)Level 8
Number of folders 700
Number of files 65,535BK0119300US.book 274 ページ 2010年5月21日 金曜日 午前10時13分
Page 380 of 700
Features and controls
3-285
3
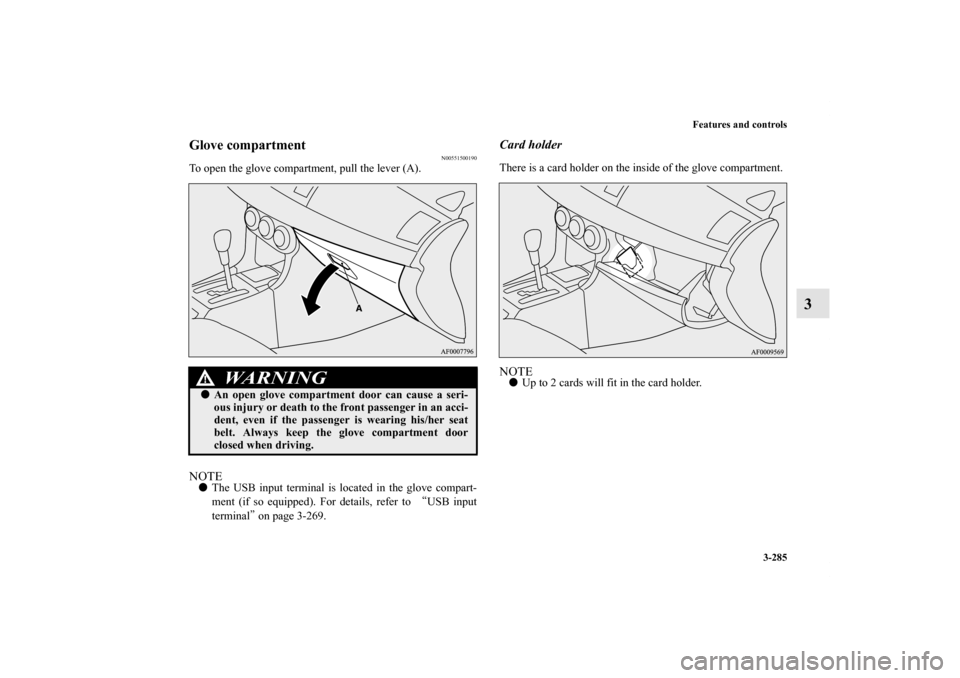
Glove compartment
N00551500190
To open the glove compartment, pull the lever (A).NOTE�The USB input terminal is located in the glove compart-
ment (if so equipped). For details, refer to “USB input
terminal” on page 3-269.
Card holderThere is a card holder on the inside of the glove compartment.NOTE�Up to 2 cards will fit in the card holder.
WA R N I N G
!�An open glove compartment door can cause a seri-
ous injury or death to the front passenger in an acci-
dent, even if the passenger is wearing his/her seat
belt. Always keep the glove compartment door
closed when driving.
BK0119300US.book 285 ページ 2010年5月21日 金曜日 午前10時13分
Page 400 of 700
 . . . . . . . . . . . . . . . . . . . . .")
5
Comfort controls
Vents. . . . . . . . . . . . . . . . . . . . . . . . . . . . . . . . . . . .5- 2
Heater without air conditioning function
(if so equipped) . . . . . . . . . . . . . . . . . . . . . . . . . .5- 6
Manual air conditioning with MAX A/C mode
(if so equipped) . . . . . . . . . . . . . . . . . . . . . . . . . .5- 12
Manual air conditioning without MAX A/C mode
(if so equipped) . . . . . . . . . . . . . . . . . . . . . . . . . .5- 22
Automatic air conditioning with Fahrenheit scale
(if so equipped) . . . . . . . . . . . . . . . . . . . . . . . . . .5- 31
Automatic air conditioning with Celsius scale
(if so equipped) . . . . . . . . . . . . . . . . . . . . . . . . . .5- 41
Important air conditioning operating tips . . . . . . .5- 51
Air purifier . . . . . . . . . . . . . . . . . . . . . . . . . . . . . . .5- 52
AM/FM electronically tuned radio with CD player
(RBDS and MP3 compatible)
(if so equipped) . . . . . . . . . . . . . . . . . . . . . . . . . .5- 52
AM/FM electronically tuned radio with 6 CD
autochanger (RBDS and MP3 compatible)
(if so equipped) . . . . . . . . . . . . . . . . . . . . . . . . . .5- 80
To play tracks from USB device
(if so equipped) . . . . . . . . . . . . . . . . . . . . . . . . . .5- 111To play tracks from a Bluetooth® device
(vehicles with Bluetooth® 2.0 interface) . . . . . . 5- 128
To use the external audio input function
(if so equipped) . . . . . . . . . . . . . . . . . . . . . . . . . 5- 132
Steering wheel audio remote control switch
(if so equipped) . . . . . . . . . . . . . . . . . . . . . . . . . 5- 134
Error codes . . . . . . . . . . . . . . . . . . . . . . . . . . . . . . 5- 137
Error codes (SIRIUS Satellite Radio)
(if so equipped) . . . . . . . . . . . . . . . . . . . . . . . . . 5- 139
Error codes (iPod) . . . . . . . . . . . . . . . . . . . . . . . . . 5- 141
Error codes (USB memory device) . . . . . . . . . . . . 5- 143
Handling of compact discs (CD) . . . . . . . . . . . . . . 5- 145
Antenna . . . . . . . . . . . . . . . . . . . . . . . . . . . . . . . . . 5- 148
Digital clock . . . . . . . . . . . . . . . . . . . . . . . . . . . . . 5- 149
General information about your radio . . . . . . . . . . 5- 150
BK0119300US.book 1 ページ 2010年5月21日 金曜日 午前10時13分
Page 510 of 700
Comfort controls
5-111
5 To play tracks from USB device (if so
equipped)
N00762200027
You can connect your iPod or USB memory device to the USB
input terminal and play music files stored in the iPod or USB
memory device.
See the following section for the types of connectable devices
and supported files.
Refer to “Types of connectable devices and supported file
specifications” on page 3-273.
See the following sections for the connecting methods, “How
to connect an iPod” on page 3-271 and “How to connect a USB
memory device” on page 3-269.
If your vehicle is equipped with a Bluetooth
® 2.0 interface,
you can play music files in your iPod or USB memory device
via voice operation.
Refer to “To play iPod tracks via voice operation” on page 5-
116 and “To play USB memory device tracks via voice opera-
tion” on page 5-127.
BK0119300US.book 111 ページ 2010年5月21日 金曜日 午前10時13分
Page 512 of 700
 to turn on the audio system. The
system turns on in the last mode used.
2. Connect your iPod to the USB input ter")
Comfort controls
5-113
5
To play from an iPod
N00762400032
1. Press the PWR button (3) to turn on the audio system. The
system turns on in the last mode used.
2. Connect your iPod to the USB input terminal.
Refer to “How to connect an iPod” on page 3-271.
3. Press the CD button (2) several times to switch to the iPod
mode. The input mode changes every time the CD button
is pressed.
CD mode → iPod mode → Bluetooth
® mode (if so
equipped)
NOTE�If your vehicle is equipped with audio/video input RCA
terminals, pressing and holding the CD button for 2 sec-
onds or more switches the system to the AUX mode.
4. Once the device is selected, playback starts and “i”
appears on the display.NOTE�Depending on the condition of your iPod, it may take a
longer time before the playback starts.5. To stop the playback, press the RADIO button (1) or CD
button (2) to switch to a different mode.
NOTE�Buttons on the iPod are disabled while the iPod is con-
nected to the audio system.
�To adjust the volume and tone, refer to “To adjust the vol-
ume” on page 5-55, 5-83 and “To adjust the tone” on page
5-55, 5-83.To fast-forward/reverse the track
N00762500017
To fast-forward/reverse the current track, press the button
(9) or button (8).
Fast-forward
To fast-forward the current track, press the button (9).
While the button is pressed, the track will be fast-forwarded.
Fast-reverse
To fast-reverse the current track, press the button (8). While
the button is pressed, the track will be fast-reversed.
BK0119300US.book 113 ページ 2010年5月21日 金曜日 午前10時13分
Page 520 of 700
Comfort controls
5-121
5
USB control panel and display
N00763900021
1- RADIO button
2- CD (Mode change) button
3- PWR (On-Off) button
4- PAGE (Title scroll) button
5- DISP (Title display) button
6- RPT (Repeat) button
7- RDM (Random) button
8- (Fast-reverse) button
9- (Fast-forward) button
10- DISC UP button
11- SCAN button
12- FOLDER switch
13- TRACK (Track up/down) button
14- U (USB) indicator
15- FOLDER indicator
16- TRACK indicator
17- RPT/D-RPT/RDM/D-RDM/SCAN/F-SCAN indicator
BK0119300US.book 121 ページ 2010年5月21日 金曜日 午前10時13分
Page 521 of 700
 to turn on the audio system. The
system turns on in the last mode used.
2. Connect your USB memory de")
5-122 Comfort controls
5
To play from a USB memory device
N00764000032
1. Press the PWR button (3) to turn on the audio system. The
system turns on in the last mode used.
2. Connect your USB memory device to the USB input ter-
minal.
Refer to “How to connect a USB memory device” on page
3-269.
3. Press the CD button (2) several times to switch to the USB
mode. The input mode changes as follows every time the
CD button is pressed.
CD mode → USB mode → Bluetooth
® mode (if so
equipped)
NOTE�If your vehicle is equipped with audio/video input RCA
terminals, pressing and holding the CD button for 2 sec-
onds or more switches the system to the AUX mode.
4. Once the device is selected, playback starts and “U”
appears on the display.NOTE�Depending on the condition of your USB device, it may
take a longer time before the playback starts.5. To stop the playback, press the RADIO button (1) or CD
button (2) to switch to a different mode.
NOTE�To adjust the volume and tone, refer to “To adjust the vol-
ume” on page 5-55, 5-83 and “To adjust the tone” on page
5-55, 5-83.Supported compressed music files
N00764100033
This audio can play MP3, WMA, AAC and WAV files
recorded in a USB memory device. This audio supports up to
65,535 files in 700 folders on 8 levels.
BK0119300US.book 122 ページ 2010年5月21日 金曜日 午前10時13分


N00762200027
You can connect your iPod or USB memory device to the USB
input terminal and play music files stored in the iPod")
 button
3- PWR (On-Off) button
4- PAGE (Title scroll) button
5- DISP (Title display) button
6- RP")