2011 MITSUBISHI L200 audio
[x] Cancel search: audioPage 32 of 330

KeysE00300101608
Two keys are provided. The key fits all locks.
Keep one in a safe place as a spare key.
Type 1Type 2
WARNINGl When taking a key on flights, do not
press any switches on the key while on
the plane. If a switch is pressed on the
plane, the key emits electromagnetic
waves, which could adversely affect the
plane’s flight operation.
When carrying a key in a bag, be careful
that no switches on the key can be easily
pressed by mistake.
NOTE
l The key number is stamped on the tag as in-
dicated in the illustration.
Make a record of the key number and store
the key and key number tag in separate pla-
ces, so that you can order a key in the event
the original keys are lost.
l The key is a precision electronic device with
a built-in signal transmitter. Please observe
the following in order to prevent a malfunc-
tion. •Do not leave in a place that is exposed to
direct sunlight, for example on the dash-
board.
• Do not disassemble or modify.
• Do not excessively bend the key or sub-
ject it to strong impacts.
• Do not expose to water.
• Keep away from magnetic key holders.
• Keep away from audio systems, personal
computers, TVs, and other equipment
that generates a magnetic field.
• Do not clean with ultrasonic cleaners or
similar equipment.
• Do not leave the key where it may be ex-
posed to high temperature or high humid-
ity.
l The engine is designed so that it will not
start if the ID code registered in the immobil-
izer computer and the key’s ID code do not
match. Refer to the “Electronic immobilizer”
section for details and key usage.
Locking and unlocking
1-02
1
Page 58 of 330

Seat belt pretensioner system andforce limiter system* E00405700283
The driver’s and front passenger’s seat equipped
with an airbag has a pretensioner seat belt.Pretensioner system E00405801089
The pretensioner system will retract their respec-
tive seat belts instantaneously, thus maximizing the
seat belt’s effectiveness, if there is a frontal impact
severe enough to injure the driver and/or front pas-
senger and the ignition switch is in the “ON” or
“START” position.
The seat belt pretensioner includes the following
components:
1- Front impact sensors
2- Seat belt pretensioners
3- Airbag control unit
WARNINGl To obtain the best results from your pre-
tensioner seat belt, make sure you have ad-
justed your seat correctly and wear your
seat belt properly.CAUTIONl Installation of audio equipment or re-
pairs in the vicinity of the pretensioner
seat belts or floor console must be per-
formed in line with MITSUBISHI
MOTORS guidelines. It is important to
do so because the work could affect the
pretensioner systems.
l If you need to scrap the vehicle, please con-
sult a MITSUBISHI MOTORS Author-
ized Service Point. It is important to do
so because unexpected activation of the
pretensioner seat belts could cause inju-
ries.
NOTE
l The pretensioner seat belts will be activated
if the vehicle suffers a severe frontal impact,
even if the seat belts are not worn.
l The pretensioner seat belts are designed to
work only once. After the pretensioner seat
belts have been activated, we recommend
you have them replaced by a MITSUBISHI
MOTORS Authorized Service Point.
SRS warning lamp E00405900126
This warning lamp is shared by the SRS airbags
and the pretensioner seat belts.
Refer to “SRS warning lamp” on page 2-38.Force limiter system E00406000078
In the event of a collision, each force limiter sys-
tem will effectively absorb the load applied to the
seat belt so as to minimize the impact to the passen-
ger.Seat and seat belts
2-12
2
Page 91 of 330

Water temperature gaugeE00500800479
The water temperature gauge indicates the engine
coolant temperature when the ignition switch is in
the “ON” position.CAUTIONl If the indication needle enters the H zone
while the engine is running, it indicates
that the engine is possibly overheating. Im-
mediately park your vehicle in a safe
place and make the necessary correc-
tions. (Refer to “Engine overheating” on
page 6-04.)
While driving, care should always be tak-
en to maintain the normal operating tem-
perature.Daytime dipper button (meter illumi-
nation control)* E00508800273
The rheostat can be adjusted while the headlamps
or tail lamps turn on.
Turn the dial to adjust the illumination (meter, mul-
ti centre display, audio system’s control panel, heat-
er control panel, etc.) to the desired brightness.
1- To reduce brightness
2- To increase brightness
Instruments and controls
3-05
3
Page 98 of 330

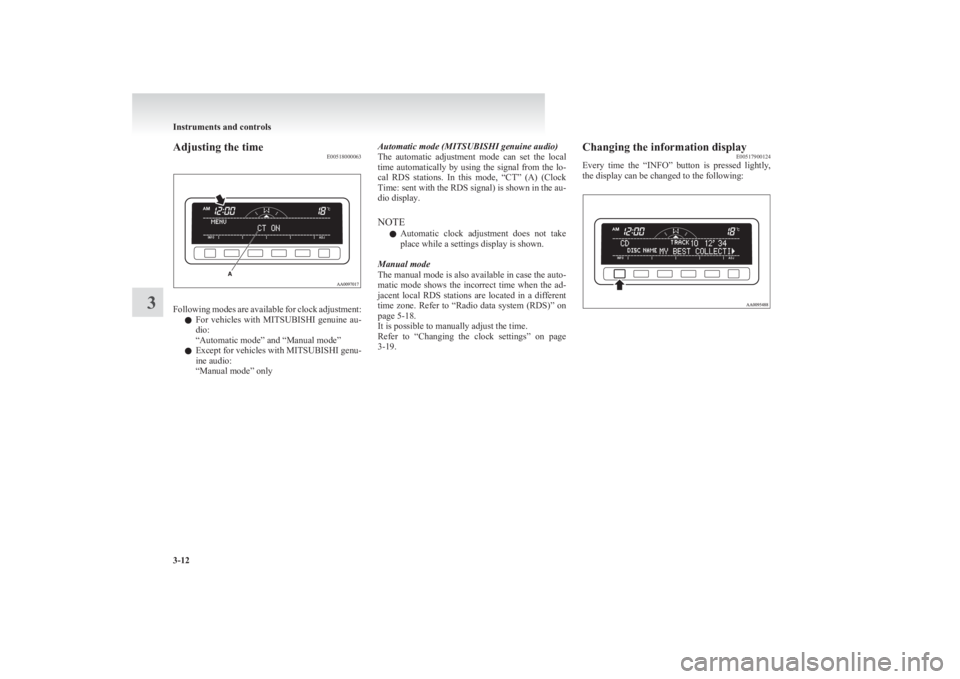
Adjusting the timeE00518000063
Following modes are available for clock adjustment:
l For vehicles with
MITSUBISHI genuine au-
dio:
“Automatic mode” and “Manual mode”
l Except for vehicles with
MITSUBISHI genu-
ine audio:
“Manual mode” only
Automatic mode (MITSUBISHI genuine audio)
The automatic adjustment mode can set the local
time automatically by using the signal from the lo-
cal RDS stations. In this mode, “CT” (A) (Clock
Time: sent with the RDS signal) is shown in the au-
dio display.
NOTE l Automatic clock adjustment does not take
place while a settings display is shown.
Manual mode
The manual mode is also available in case the auto-
matic mode shows the incorrect time when the ad-
jacent local RDS stations are located in a different
time zone. Refer to “Radio data system (RDS)” on
page 5-18.
It is possible to manually adjust the time.
Refer to “Changing the clock settings” on page
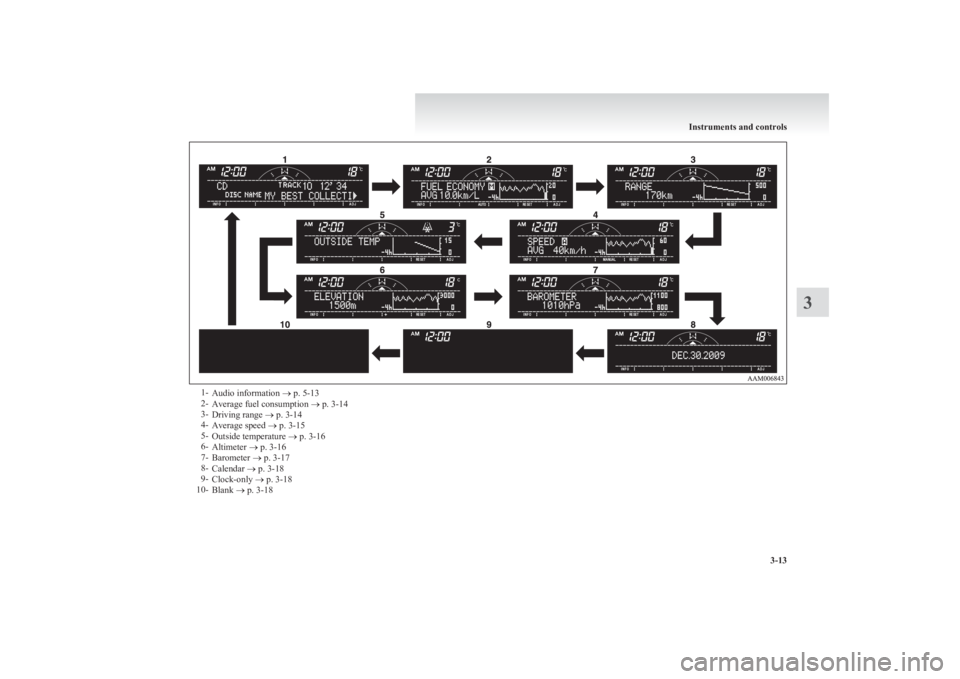
3-19.Changing the information display E00517900124
Every time the “INFO” button is pressed lightly,
the display can be changed to the following:
Instruments and controls
3-12
3
Page 99 of 330

1-Audio information ® p. 5-13
2- Average fuel consumption ® p. 3-14
3- Driving range ® p. 3-14
4- Average speed ® p. 3-15
5- Outside temperature ® p. 3-16
6- Altimeter ® p. 3-16
7- Barometer ® p. 3-17
8- Calendar ® p. 3-18
9- Clock-only ® p. 3-18
10- Blank ® p. 3-18
Instruments and controls
3-13
3
Page 104 of 330

NOTEl Pressing the “RESET” function button will
not reset the indication (C).
l It is possible to set the display unit to hPa,
mb, kPa, or inHg.
Refer to “User customization” on page 3-24.Calendar E00518800032
The date is shown. The calendar pattern can be
changed to your desired setting.
Refer to “Changing the calendar setting” on page
3-23.
Clock-only E00518900033
Only the clock is shown. The time notation can be
changed to your desired setting. (12 hour/24 hour)
Refer to “User customization” on page 3-24.Blank E00519000015
The whole display can be turned into blank. In this
case, buttons remain illuminated.
NOTE
l If you operate the audio system, the audio dis-
play pops up.
Selecting settings displays E00519100090
Every time the “ADJ” button is pressed lightly, the
display can be changed to the following:CAUTIONl The driver should not operate the display
while the vehicle is in motion.
l When operating the system, stop the vehi-
cle in a safe area.
1- Changing the clock settings ® p. 3-19
2- Adjusting the display brightness ® p. 3-20
3- Correcting the compass ® p. 3-21
4- Changing the calendar setting ® p. 3-23
5- User customization ® p. 3-24
6- Adjusting the barometer ® p. 3-28
Instruments and controls
3-18
3
Page 183 of 330

Ventilators.................................................................................... 5-02
Heater/Manual air conditioning* ..................................................5-03
Automatic air conditioning* ......................................................... 5-08
Important operation tips for the air conditioning..........................5-12
Air purifier* .................................................................................. 5-12
LW/MW/FM electronic tuning radio with CD player* ................5-13
To use the external audio input function* ....................................5-27
Steering wheel remote control switch* ........................................5-28
Error codes .................................................................................... 5-30
Audio system anti-theft feature .................................................... 5-32
Handling of compact discs ........................................................... 5-32
Antenna ......................................................................................... 5-34
Sun visors ..................................................................................... 5-35
Vanity mirror* .............................................................................. 5-36
Ashtray..........................................................................................5-36
Cigarette lighter ............................................................................ 5-37
Accessory socket* ........................................................................ 5-38
Digital clock* ............................................................................... 5-39
Interior lamps ................................................................................ 5-39
Storage spaces...............................................................................5-41
Cup holder* .................................................................................. 5-44
Bottle holder ................................................................................. 5-45
Convenient hook ........................................................................... 5-46
Coat hook* .................................................................................... 5-46
First-aid kit and warning triangle securing bands* ......................5-46For pleasant driving5
Page 195 of 330

LW/MW/FM electronic tuning radio with CD player*E00708501745
The audio system can be used when the ignition switch is in the “ON” or “ACC” position.A- Display windowB- Audio system
NOTE
l To listen to the audio system while the engine is stopped, turn the ignition key to the “ACC” position.
l If a cellular phone is used inside the vehicle, it may create noise from the audio equipment. This does not mean that anything is wrong with your audio
equipment. In such a case, use the cellular phone at a place as far away as possible from the audio equipment.
l If foreign objects or water get into the audio equipment, or if smoke or a strange odour comes from it, immediately turn off the audio system. We recom-
mend your to have it checked. Never try to repair it by yourself. Avoid continuous usage without inspection by a qualified person.
l The audio system’s control knob can be removed to deter thieves. For details, refer to “Audio system anti-theft feature” on page 5-32.
l The audio amplifier (if so equipped) is located under the front right seat.
Do not subject the amplifier to a strong impact.
It could damage the amplifier or malfunctioning could result.
For pleasant driving
5-13
5