2011 MITSUBISHI L200 length
[x] Cancel search: lengthPage 29 of 330

Genuine partsE00200500545
MITSUBISHI MOTORS has gone to great lengths
to bring you a superbly crafted automobile offering
the highest quality and dependability.
Use MITSUBISHI MOTORS Genuine Parts, de-
signed and manufactured to maintain your
MITSUBISHI MOTORS automobile at top per-
formance. MITSUBISHI MOTORS Genuine Parts
are identified by this mark and are available at all
MITSUBISHI MOTORS Authorized Service
Points.Used engine oils safety
instructions and disposal information E00200600025WARNINGlProlonged and repeated contact may
cause serious skin disorders, including
dermatitis and cancer.
l Avoid contact with the skin as far as pos-
sible and wash thoroughly after any con-
tact.
l Keep used engine oils out of reach of chil-
dren.
Protect the environment
It is illegal to pollute drains, water courses and soil.
Use authorized waste collection facilities, includ-
ing civic amenity sites and garages providing facili-
ties for disposal of used oil and used oil filters. If in
doubt, contact your local authority for advice on dis-
posal.
Disposal information for used
batteries E00201300029Your vehicle contains batteries
and/or accumulators.
Do not mix with general house-
hold waste.
For proper treatment, recovery
and recycling of used batteries,
please take them to applicable col-
lection points, in accordance
with your national legislation
and the Directives 2006/66/EC.
By disposing of these batteries
correctly, you will help to save
valuable resources and prevent
any potential negative effects on
human health and the environ-
ment which could otherwise
arise from inappropriate waste
handling.
General information
05
Page 55 of 330

CAUTIONlIf your vehicle is equipped with the rear
seat head restraint, the head restraints
for the front and rear seats differ in size.
When installing head restraints, make
sure the front and rear head restraints
are fitted in their respective seats.Seat belts E00404800825
To protect you and your passengers in the event of
an accident, it is most important that the seat belts
are worn correctly while driving.
A seat belt for a front seat equipped with an airbag
has a pretensioner system. These belts are used the
same way as a conventional seat belt.
Refer to “Seat belt pretensioner system and force
limiter system” on page 2-12 .WARNINGl Always place the shoulder belt over your
shoulder and across your chest. Never
put it behind you or under your arm.
l One seat belt should be used by only one
person. Doing otherwise can be dangerous.
l The seat belt will provide its wearer with
maximum protection if the recliner seat-
back is placed in fully upright position.
When the seatback is reclined, there is
greater risk that the passenger will slide
under the belt, especially in a forward im-
pact accident, and may be injured by the
belt or by striking the instrument panel
or seatbacks.
l Seat belts should always be worn by ev-
ery adult who drives or rides in this vehi-
cle, and by all children who are tall
enough to wear seat belts properly.
l Remove any twists when using the belt.
l No modifications or additions should be
made by the user which will either pre-
vent the seat belt adjusting devices from
operating to remove slack, or prevent the
seat belt assembly from being adjusted to
remove slack.WARNINGl To reduce risk of serious or fatal injury
in an accident, including the deploying
driver’s airbag, adjust the driver’s seat
as far back as possible while maintaining
a position that still allows good visibility
and good control of the steering wheel,
the brake and accelerator, and vehicle con-
trols.
l Never hold a child in your arms or on
your lap when riding in this vehicle, even
if you are wearing your seat belt. To do
so risks severe or fatal injury to the child
in a collision or sudden stop.
l Always adjust the seat belt to a snug fit.3-point type seat belt (with emergency
locking mechanism) E00404901126
This type of belt requires no length adjustment.
Once worn, the belt adjusts itself to the movement
of the wearer, but in the event of a sudden or strong
shock, the belt automatically locks to hold the wear-
er’s body.
Seat and seat belts
2-09
2
Page 143 of 330
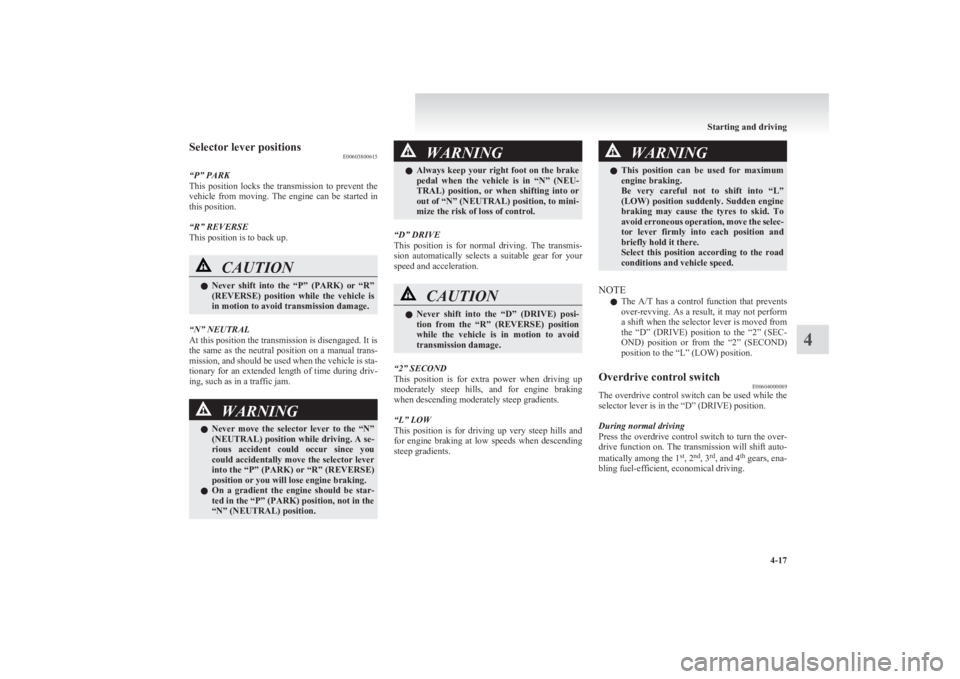
Selector lever positionsE00603800615
“P” PARK
This position locks the transmission to prevent the
vehicle from moving. The engine can be started in
this position.
“R” REVERSE
This position is to back up.CAUTIONl Never shift into the “P” (PARK) or “R”
(REVERSE) position while the vehicle is
in motion to avoid transmission damage.
“N” NEUTRAL
At this position the transmission is disengaged. It is
the same as the neutral position on a manual trans-
mission, and should be used when the vehicle is sta-
tionary for an extended length of time during driv-
ing, such as in a traffic jam.
WARNINGl Never move the selector lever to the “N”
(NEUTRAL) position while driving. A se-
rious accident could occur since you
could accidentally move the selector lever
into the “P” (PARK) or “R” (REVERSE)
position or you will lose engine braking.
l On a gradient the engine should be star-
ted in the “P” (PARK) position, not in the
“N” (NEUTRAL) position.WARNINGl Always keep your right foot on the brake
pedal when the vehicle is in “N” (NEU-
TRAL) position, or when shifting into or
out of “N” (NEUTRAL) position, to mini-
mize the risk of loss of control.
“D” DRIVE
This position is for normal driving. The transmis-
sion automatically selects a suitable gear for your
speed and acceleration.
CAUTIONl Never shift into the “D” (DRIVE) posi-
tion from the “R” (REVERSE) position
while the vehicle is in motion to avoid
transmission damage.
“2” SECOND
This position is for extra power when driving up
moderately steep hills, and for engine braking
when descending moderately steep gradients.
“L” LOW
This position is for driving up very steep hills and
for engine braking at low speeds when descending
steep gradients.
WARNINGl This position can be used for maximum
engine braking.
Be very careful not to shift into “L”
(LOW) position suddenly. Sudden engine
braking may cause the tyres to skid. To
avoid erroneous operation, move the selec-
tor lever firmly into each position and
briefly hold it there.
Select this position according to the road
conditions and vehicle speed.
NOTE
l The
A/T has a control function that prevents
over-revving. As a result, it may not perform
a shift when the selector lever is moved from
the “D” (DRIVE) position to the “2” (SEC-
OND) position or from the “2” (SECOND)
position to the “L” (LOW) position.
Overdrive control switch E00604000089
The overdrive control switch can be used while the
selector lever is in the “D” (DRIVE) position.
During normal driving
Press the overdrive control switch to turn the over-
drive function on. The transmission will shift auto-
matically among the 1 st
, 2 nd
, 3 rd
, and 4 th
gears, ena-
bling fuel-efficient, economical driving.
Starting and driving
4-17
4
Page 147 of 330
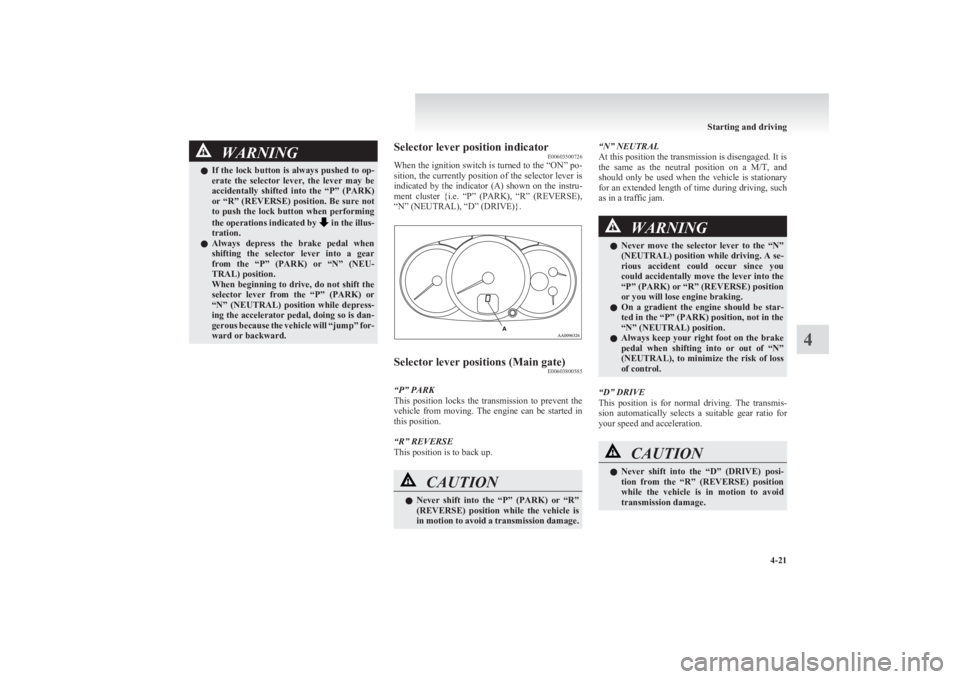
WARNINGlIf the lock button is always pushed to op-
erate the selector lever, the lever may be
accidentally shifted into the “P” (PARK)
or “R” (REVERSE) position. Be sure not
to push the lock button when performing
the operations indicated by
in the illus-
tration.
l Always depress the brake pedal when
shifting the selector lever into a gear
from the “P” (PARK) or “N” (NEU-
TRAL) position.
When beginning to drive, do not shift the
selector lever from the “P” (PARK) or
“N” (NEUTRAL) position while depress-
ing the accelerator pedal, doing so is dan-
gerous because the vehicle will “jump” for-
ward or backward.
Selector lever position indicator E00603500726
When the ignition switch is turned to the “ON” po-
sition, the currently position of the selector lever is
indicated by the indicator (A) shown on the instru-
ment cluster {i.e. “P” (PARK), “R” (REVERSE),
“N” (NEUTRAL), “D” (DRIVE)}.Selector lever positions (Main gate) E00603800585
“P” PARK
This position locks the transmission to prevent the
vehicle from moving. The engine can be started in
this position.
“R” REVERSE
This position is to back up.
CAUTIONl Never shift into the “P” (PARK) or “R”
(REVERSE) position while the vehicle is
in motion to avoid a transmission damage.“N” NEUTRAL
At this position the transmission is disengaged. It is
the same as the neutral position on a M/T, and
should only be used when the vehicle is stationary
for an extended length of time during driving, such
as in a traffic jam.WARNINGl Never move the selector lever to the “N”
(NEUTRAL) position while driving. A se-
rious accident could occur since you
could accidentally move the lever into the
“P” (PARK) or “R” (REVERSE) position
or you will lose engine braking.
l On a gradient the engine should be star-
ted in the “P” (PARK) position, not in the
“N” (NEUTRAL) position.
l Always keep your right foot on the brake
pedal when shifting into or out of “N”
(NEUTRAL), to minimize the risk of loss
of control.
“D” DRIVE
This position is for normal driving. The transmis-
sion automatically selects a suitable gear ratio for
your speed and acceleration.
CAUTIONl Never shift into the “D” (DRIVE) posi-
tion from the “R” (REVERSE) position
while the vehicle is in motion to avoid
transmission damage.
Starting and driving
4-21
4
Page 209 of 330
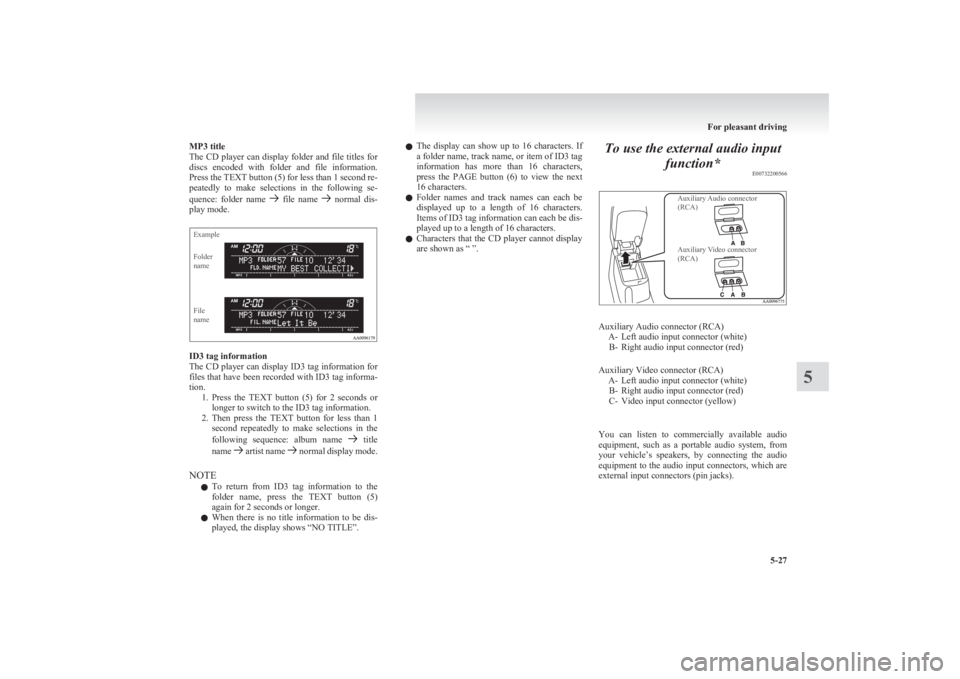
MP3 title
The CD player can display folder and file titles for
discs encoded with folder and file information.
Press the TEXT button (5) for less than 1 second re-
peatedly to make selections in the following se-
quence: folder name
file name normal dis-
play mode.
ExampleFolder
nameFile
name
ID3 tag information
The CD player can display ID3 tag information for
files that have been recorded with ID3 tag informa-
tion. 1.Press the TEXT button (5) for 2 seconds or
longer to switch to the ID3 tag information.
2. Then press the TEXT button for less than 1
second repeatedly to make selections in the
following sequence: album name
title
name artist name normal display mode.
NOTE l To return from ID3 tag information to the
folder name, press the TEXT button (5)
again for 2 seconds or longer.
l When there is no title information to be dis-
played, the display shows “NO TITLE”.
l The display can show up to 16 characters. If
a folder name, track name, or item of ID3 tag
information has more than 16 characters,
press the PAGE button (6) to view the next
16 characters.
l Folder names and track names can each be
displayed up to a length of 16 characters.
Items of ID3 tag information can each be dis-
played up to a length of 16 characters.
l Characters that the CD player cannot display
are shown as “ ”.To use the external audio input
function* E00732200566
Auxiliary Audio connector
(RCA)Auxiliary Video connector
(RCA)
Auxiliary Audio connector (RCA) A- Left audio input connector (white)B- Right audio input connector (red)
Auxiliary Video connector (RCA) A- Left audio input connector (white)B- Right audio input connector (red)
C- Video input connector (yellow)
You can listen to commercially available audio
equipment, such as a portable audio system, from
your vehicle’s speakers, by connecting the audio
equipment to the audio input connectors, which are
external input connectors (pin jacks).
For pleasant driving
5-27
5
Page 269 of 330

7.Remove dipstick and read the automatic trans-
mission fluid level.
The fluid level should always be between the
two marks on the dipstick.WARNINGl Do not spill the fluid onto a hot exhaust
manifold during topping up or inspec-
tion, or a fire may occur.
Fluid type
Use only “DIA QUEEN ATF SP III” transmission
fluid to ensure optimum transmission performance.
Washer fluid E01000700672
The windscreen washer fluid reservoir is in the en-
gine compartment.
Check the washer fluid level at regular intervals
and add washer fluid to reservoir if necessary.
NOTE
l The washer fluid container serves the wind-
screen and headlamps (if so equipped).
During cold weather
To ensure proper operation of the washers at low
temperatures, use a fluid containing an anti-freez-
ing agent.
Brake fluid E01000900687
To check the fluid level
Check the brake fluid level in the reservoir.
The brake fluid level must be between the “MAX”
and “MIN” marks on the reservoir.
The brake fluid level is monitored by a float. When
the brake fluid level falls below the “MIN” mark,
the brake fluid warning lamp lights up.
The fluid level falls slightly with wear of the brake
pads, but this does not indicate any abnormality.
If the brake fluid level falls markedly in a short
length of time, it indicates leaks from the brake sys-
tem.
If this occurs, we recommend you to have the vehi-
cle checked.
Fluid type
Use brake fluid conforming to DOT3 or DOT4.
The brake fluid is hygroscopic. Too much moisture
in the brake fluid will adversely affect the brake sys-
tem, reducing the brake performance.
Maintenance
8-07
8
Page 300 of 330
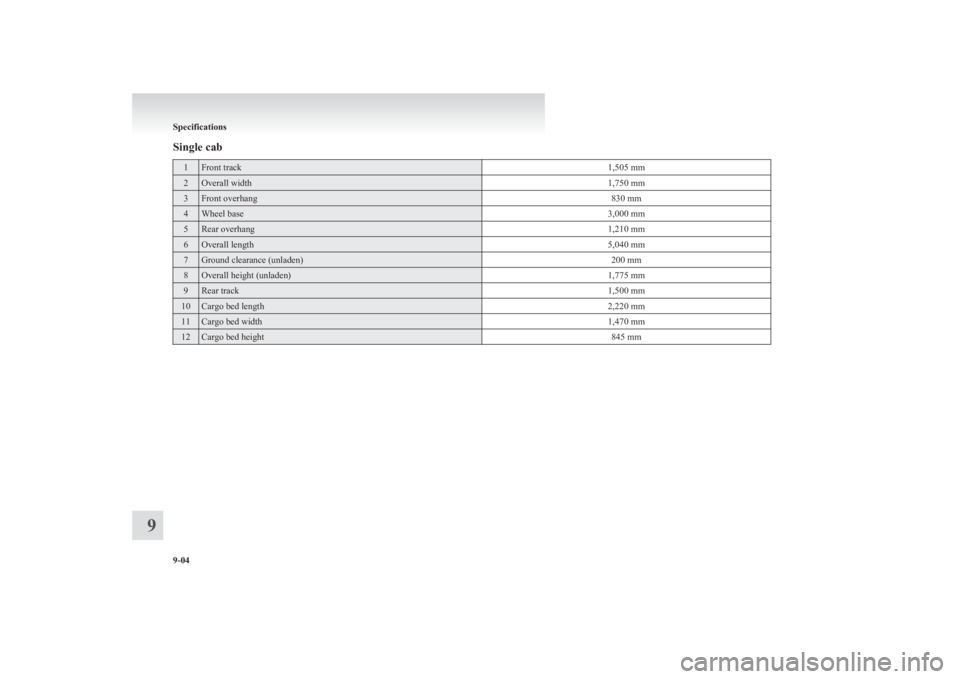
Single cab1Front track1,505 mm2Overall width1,750 mm3Front overhang830 mm4Wheel base3,000 mm5Rear overhang1,210 mm6Overall length5,040 mm7Ground clearance (unladen)200 mm8Overall height (unladen)1,775 mm9Rear track1,500 mm10Cargo bed length2,220 mm11Cargo bed width1,470 mm12Cargo bed height845 mm
Specifications
9-04
9
Page 302 of 330
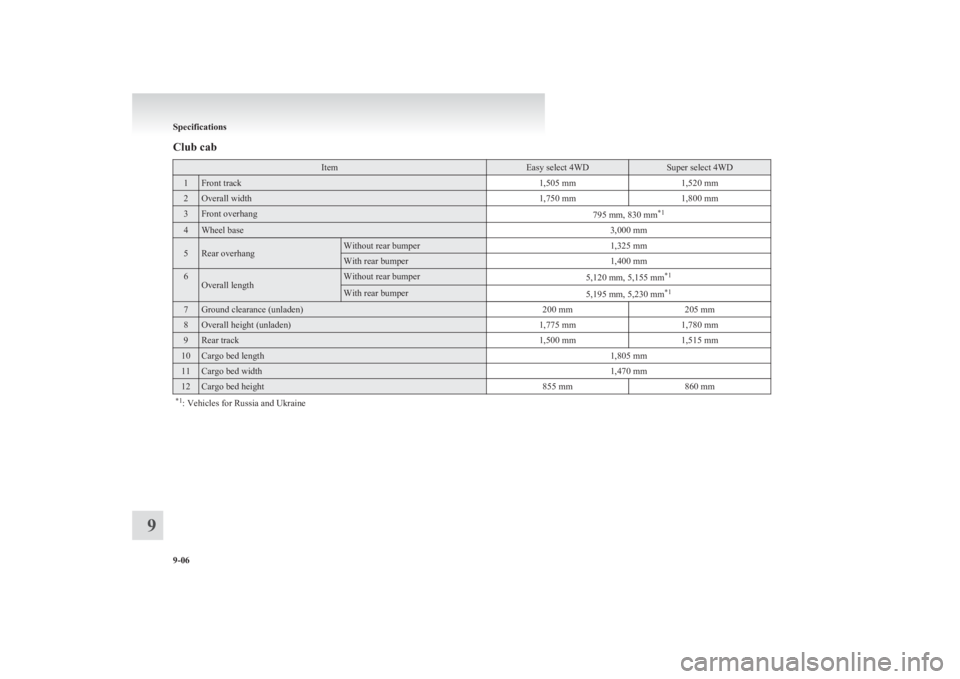
Club cabItemEasy select 4WDSuper select 4WD1Front track1,505 mm1,520 mm2Overall width1,750 mm1,800 mm3Front overhang795 mm, 830 mm*14Wheel base3,000 mm5Rear overhangWithout rear bumper1,325 mmWith rear bumper1,400 mm6Overall lengthWithout rear bumper5,120 mm, 5,155 mm *1With rear bumper5,195 mm, 5,230 mm*17Ground clearance (unladen)200 mm205 mm8Overall height (unladen)1,775 mm1,780 mm9Rear track1,500 mm1,515 mm10Cargo bed length1,805 mm11Cargo bed width1,470 mm12Cargo bed height855 mm860 mm*1
: Vehicles for Russia and Ukraine
Specifications
9-06
9