Page 407 of 514
6-8 For emergencies
6
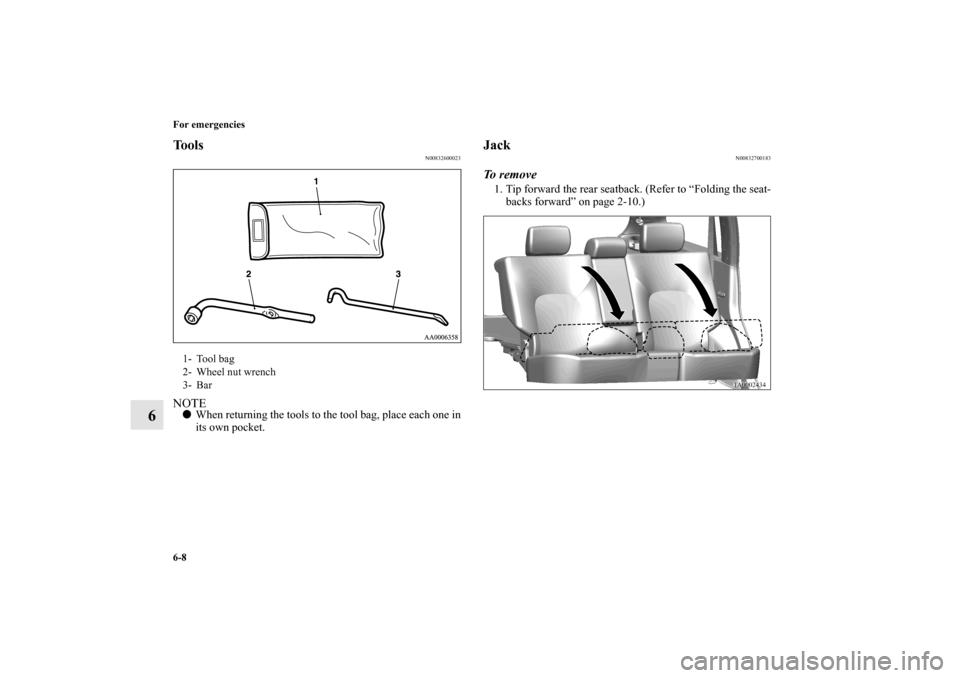
Tools
N00832600023
NOTE�When returning the tools to the tool bag, place each one in
its own pocket.
Jack
N00832700183
To r e m o v e1. Tip forward the rear seatback. (Refer to “Folding the seat-
backs forward” on page 2-10.)
1- Tool bag
2- Wheel nut wrench
3- Bar
BK0121600US.book 8 ページ 2010年4月12日 月曜日 午前10時39分
Page 412 of 514

For emergencies
6-13
6
NOTE�The chocks shown in the illustration do not come with
your vehicle. It is recommended that you purchase chocks
or blocks and keep them in the vehicle for use if needed.
�If chocks or blocks are not available, use stones or any
other objects that are large enough to hold the wheel in
position.
6. Get the jack, bar and wheel nut wrench ready.
Refer to “Tools and jack” on page 6-7.Spare tire information
N00849600269
Check the air pressure of the spare tire frequently and make
sure it is ready for emergency use at any time.
Maintaining the spare tire at the air pressure listed on the tire
and loading information placard will ensure that it can always
be used under any conditions (city/high-speed driving, varying
load weight, etc.).
The spare tire is stored beneath the luggage floor board of the
luggage compartment.
WA R N I N G
!�Tires, including spare tire, degrade over time with
age even when they are not being used.
It is recommended that tires over 6 years generally
be replaced even if damage is not obvious.
CAUTION
!�While the spare tire is stowed, the inflation pressure
should be checked at least once a month to assure
that it remains at the recommended inflation pres-
sure. See the tire and loading information placard
attached to the driver’s door sill. Refer to “Tire and
loading information placard” on page 9-3.�Driving with an improperly inflated tire can cause
an accident. If you have no choice but to drive with
an under-inflated tire, keep your speed down and
avoid sudden steering or braking, if possible. Inflate
the tire to the correct pressure as soon as possible.
Refer to “Tire inflation pressures” on page 7-24.�If your vehicle is equipped with the 17-inch-steel
spare tire or compact spare tire, it should only be
used temporarily. When the spare tire is used, the
tire pressure monitoring system will not work prop-
erly. See an authorized Mitsubishi Motors dealer as
soon as possible to replace or repair the original tire.�You can use the same wheel nuts on the spare tire
wheel.
BK0121600US.book 13 ページ 2010年4月12日 月曜日 午前10時39分
Page 413 of 514

The compact spare tire is designed to save space in the luggage
compartment. Its lighter weight makes it easier to use if a flat
tire occurs")
6-14 For emergencies
6
Compact spare tire
(if so equipped)
The compact spare tire is designed to save space in the luggage
compartment. Its lighter weight makes it easier to use if a flat
tire occurs.
To remove the spare tire
N00849700143
1. Lift up the luggage floor board.
2. To remove the spare tire, remove the installation clamp
(A) by turning it counterclockwise.
CAUTION
!�You can use the same wheel nuts on the compact
spare tire wheel.�Do not go over 50 mph (80 km/h) when driving with
the compact spare tire.�Avoid fast starting and braking when driving with
the compact spare tire. �Do not drive through automatic car washes and over
obstacles that could possibly damage the underside
of your vehicle. Because the compact spare tire is
smaller than the original tire, there is less clearance
between the ground and your vehicle. �Because the compact spare tire is designed only for
your vehicle, do not use it on any other vehicle. �Do not put the compact spare tire on a different
wheel, and do not put standard tires, snow tires,
wheel covers or trim rings on the compact spare
wheel. Otherwise, you could damage these parts or
other parts on your vehicle.
BK0121600US.book 14 ページ 2010年4月12日 月曜日 午前10時39分
Page 414 of 514
For emergencies
6-15
6
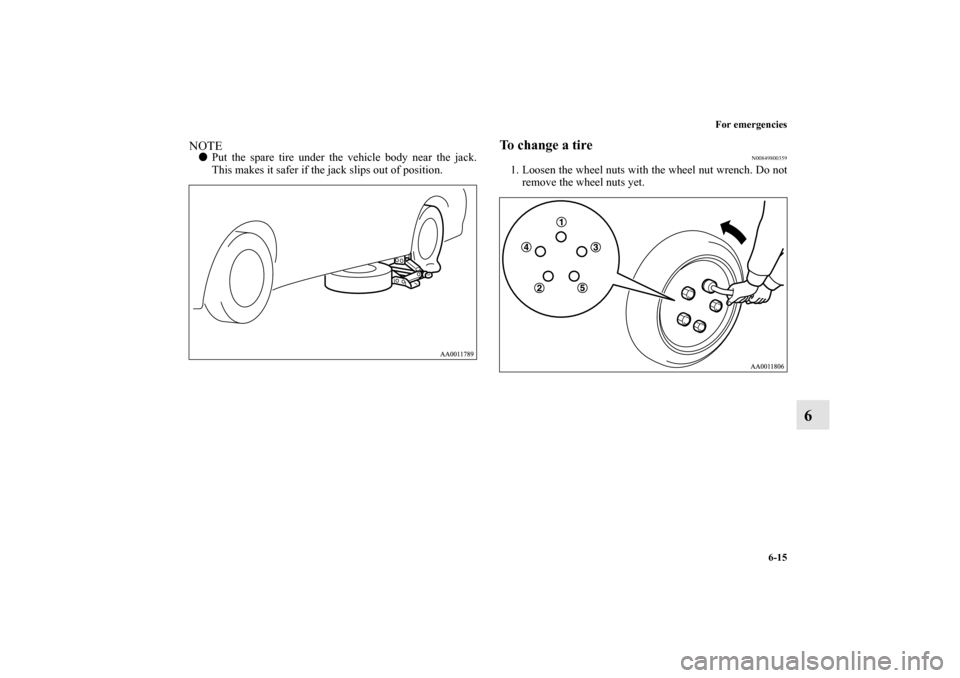
NOTE�Put the spare tire under the vehicle body near the jack.
This makes it safer if the jack slips out of position.
To change a tire
N00849800359
1. Loosen the wheel nuts with the wheel nut wrench. Do not
remove the wheel nuts yet.
BK0121600US.book 15 ページ 2010年4月12日 月曜日 午前10時39分
Page 416 of 514
 into the wheel nut wrench (E). Then put
the end of the bar into the shaft’s jack end, as shown in the
illustration.
Slowly rotate the wheel nut wrench un")
For emergencies
6-17
6
4. Insert the bar (D) into the wheel nut wrench (E). Then put
the end of the bar into the shaft’s jack end, as shown in the
illustration.
Slowly rotate the wheel nut wrench until the tire is raised
slightly off the ground surface.
5. Remove the wheel nuts with the wheel nut wrench, then
take the wheel off.
WA R N I N G
!�Stop jacking up the vehicle as soon as the tire is
raised off the ground. It is dangerous to raise the
vehicle any higher. �Do not get under your vehicle while using the jack. �Do not bump the raised vehicle or leave it sitting on
the jack for a long time. Both are very dangerous. �Do not use a jack except the one that came with your
vehicle. �The jack should not be used for any purpose other
than to change a tire.
�No one should be in your vehicle when using the
jack. �Do not start or run the engine while your vehicle is
on the jack.�Do not turn the raised wheel. The tires that are still
on the ground could turn and make your vehicle fall
off the jack.
CAUTION
!�Handle the wheel carefully when changing the tire,
to avoid scratching the wheel surface.
WA R N I N G
!
BK0121600US.book 17 ページ 2010年4月12日 月曜日 午前10時39分
Page 417 of 514
6-18 For emergencies
6
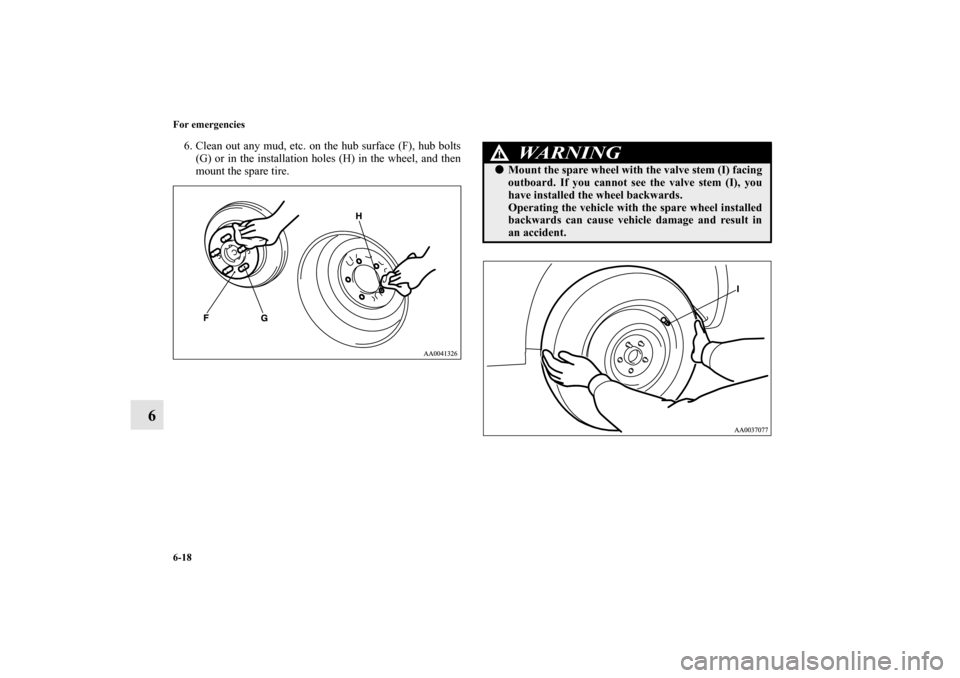
6. Clean out any mud, etc. on the hub surface (F), hub bolts
(G) or in the installation holes (H) in the wheel, and then
mount the spare tire.
WA R N I N G
!�Mount the spare wheel with the valve stem (I) facing
outboard. If you cannot see the valve stem (I), you
have installed the wheel backwards.
Operating the vehicle with the spare wheel installed
backwards can cause vehicle damage and result in
an accident.
BK0121600US.book 18 ページ 2010年4月12日 月曜日 午前10時39分
Page 418 of 514
For emergencies
6-19
6
7. On aluminum wheels, temporarily tighten the wheel nuts
(flange nuts) until their flange section comes in contact
with the wheel and it is no longer loose.On steel wheel (spare wheel), install the wheel nuts with
their tapered ends facing inward, then tighten by hand
until the wheel is no longer loose.
NOTE�Flange nuts can be temporarily used on the steel wheel
(spare wheel), but return them to the original wheel and
tire as soon as possible.
�If all four wheels are changed to steel wheels, use tapered
nuts.
Aluminum wheels
CAUTION
!�Never apply oil to either the wheel bolts or the nuts
or they will tighten too much.Steel wheel (spare wheel)
BK0121600US.book 19 ページ 2010年4月12日 月曜日 午前10時39分
Page 419 of 514
6-20 For emergencies
6
8. Lower the vehicle slowly by rotating the wheel nut
wrench counterclockwise until the tire touches the
ground.9. Tighten the nuts in the order shown in the illustration until
each nut has been tightened to the torque listed here.
88 to 108 N•m (65 to 80 ft-lb)
10. Lower the jack all the way and remove it.
CAUTION
!�Never use your foot or a pipe extension to apply
added force to the wheel nut wrench when tighten-
ing the wheel nuts. If you do so, you can over-tighten
the wheel nuts and damage the wheel, wheel nuts
and hub bolts.
BK0121600US.book 20 ページ 2010年4月12日 月曜日 午前10時39分
 until their flange section comes in contact
with the wheel and it is no longer loose.On steel wheel (spar")
