2011 MERCEDES-BENZ SLS trunk
[x] Cancel search: trunkPage 319 of 436

2. this device must accept any interference
received, including interference that may
cause undesired operation.
Any unauthorized modification to this
device could void the user’s authority to
operate the equipment.
iCanada only:
This device complies with RSS-210 of
Industry Canada. Operation is subject to
the following two conditions:
1. This device may not cause interference,
and
2. this device must accept any interference
received, including interference that may
cause undesired operation of the device.
Any unauthorized modification to this
device could void the user’s authority to
operate the equipment.
Trickle charge socket
The trickle charge socket is located on the
driver’s side of the trunk. The trickle charge
socket is suitable for connection of a trickle
charger only. A trickle charger can be
purchased at any authorized Mercedes-Benz
Center.
XSwitch off the ignition.XOpen the trunk (Y page 239).XConnect the trickle charger to trickle
charge socket :. Observe the instructions
of the trickle charger manufacturer.
iA trickle charger that is connected to
trickle charge socket : can only maintain
the charge of the vehicle battery. When the
vehicle battery is discharged, it must be
charged with a battery charge unit. For
more information on charging the battery,
see (Y page 412).
Floormat (driver’s side)
GWarning!
Whenever you are using a floormat, make sure
there is enough clearance and that the
floormat is securely fastened.
The floormat should always be securely
fastened using the fastening equipment.
Before driving off, check that the floormat is
securely in place and adjust it if necessary. A
loose floormat could slip and hinder proper
functioning of the pedals.
Do not place several floormats on top of each
other as this may impair pedal movement.
XMove the driver’s seat as far to the rear as
possible.
XRemoving: Pull floormat off of retainer
pins ;.
XInstalling: Press floormat eyelets : onto
retainer pins ;.
Useful features317Controls in detailBA 197 USA, CA Edition A 2011; 1; 27, en-UShereepeVersion: 3.0.3.52010-03-24T15:31:10+01:00 - Seite 317Z
Page 362 of 436

Leather upholstery
Please note that leather upholstery is a
natural product and is therefore subject to a
natural aging process. Leather upholstery
may also react to certain ambient influences
such as high humidity or high temperature by
showing wrinkles for example.
XWipe leather upholstery with a damp cloth
and dry thoroughly or clean with Mercedes-
Benz approved Leather Care.
! To avoid damage to leather upholstery:
RWipe with light pressure only.
RDo not clean with abrasive cleaning
agents such as scouring milk or powder.
RDo not soak the leather upholstery.
As leather is a natural product, it could
otherwise harden or become porous.
RExercise particular care when cleaning
perforated leather as its underside
should not become wet.
Chrome-plated exhaust tip
Regular cleaning and care of chrome-plated
exhaust tips will help to maintain their shine
and the classy appearance.
XUse Mercedes-Benz approved Chrome
Polishing Paste each time the vehicle has
been washed, especially during the winter.
! Do not use alkaline cleaners such as
wheel cleaners as they could cause
corrosion.
Trunk Wing
You can extend and retract the Trunk Wing
manually for cleaning.
GWarning!
Make sure that nobody can become trapped
when you retract the Trunk Wing manually. If
there is a risk of entrapment, release the
Trunk Wing switch to stop the retraction
process. The Trunk Wing will then extend
again.
Never leave children unattended in the
vehicle. They could inadvertently retract the
extended Trunk Wing. Somebody could
become trapped and be seriously injured.
! Do not enter an automatic car wash with
the Trunk Wing extended. Otherwise, the
Trunk Wing could be damaged.
Only extend the Trunk Wing in order to
clean it by hand. Retract it again after
cleaning.
XClose the trunk lid (Y page 240).XSwitch on the ignition.XTo extend: Press Trunk Wing switch :.
The Trunk Wing extends.
Trunk Wing switch : flashes for as long as
the Trunk Wing extends. It remains
illuminated in red when the Trunk Wing is
fully extended.
XTo retract: Press and hold Trunk Wing
switch : until the Trunk Wing has
retracted completely.
Trunk Wing switch : flashes for as long as
the Trunk Wing retracts. It goes out when
the Trunk Wing is fully retracted.
The message Rear Spoiler retracts
manually appears in the multifunction
display.
iWhen you release Trunk Wing switch :
during the retraction process, the Trunk
Wing extends again automatically.
360Vehicle careOperation
BA 197 USA, CA Edition A 2011; 1; 27, en-UShereepeVersion: 3.0.3.52010-03-24T15:31:10+01:00 - Seite 360
Page 364 of 436
Vehicle equipment
iThis Operator’s Manual describes all
features, standard or optional, potentially
available for your vehicle at the time of
purchase. Please be aware that your
vehicle might not be equipped with all
features described in this manual.
Where will I find...?
First aid kit
iCheck expiration dates and contents for
completeness at least once a year and
replace missing/expired items.
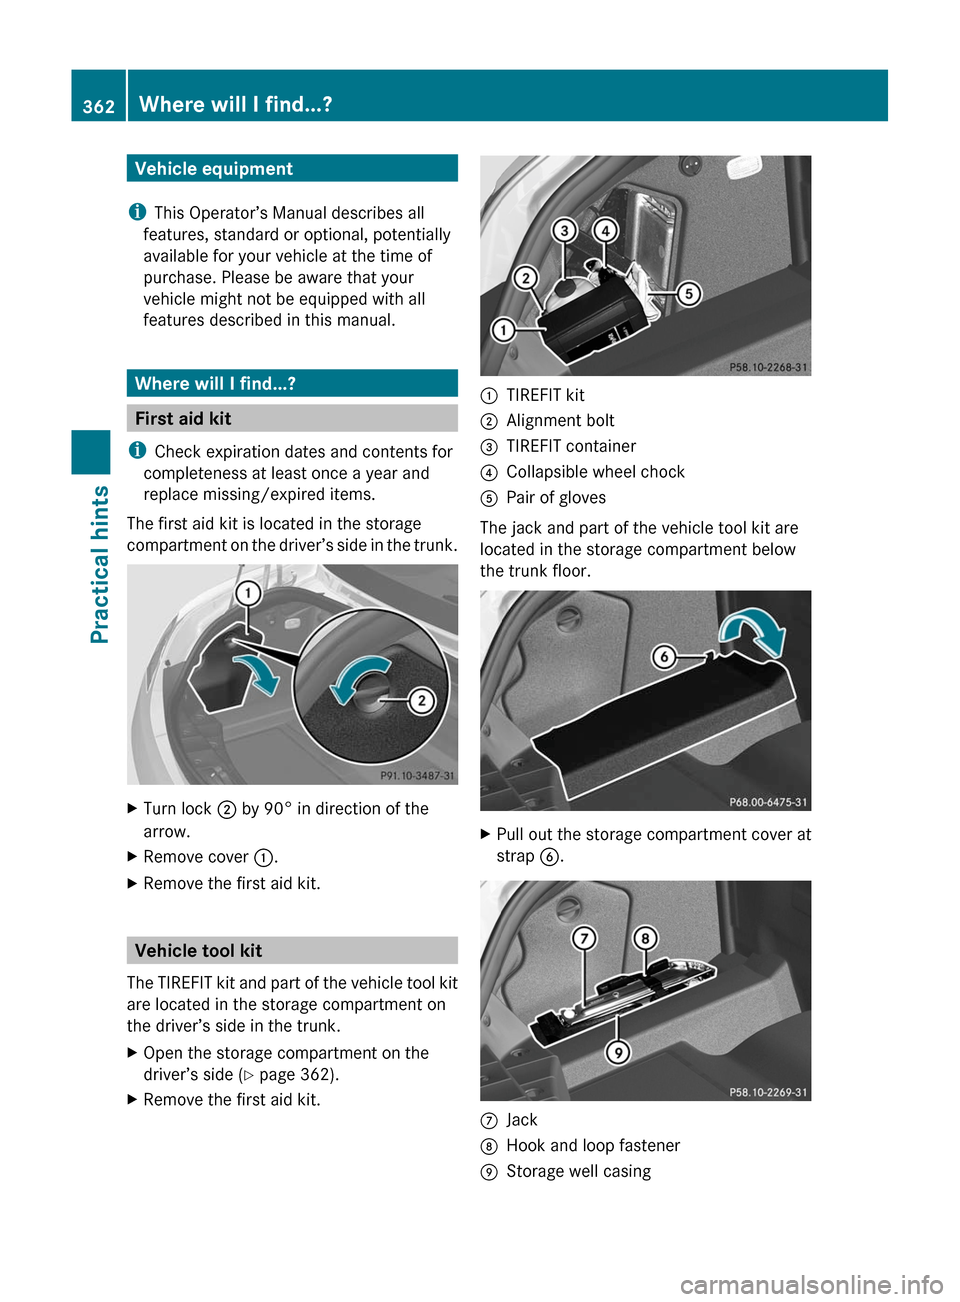
The first aid kit is located in the storage
compartment on the driver’s side in the trunk.
XTurn lock ; by 90° in direction of the
arrow.
XRemove cover :.XRemove the first aid kit.
Vehicle tool kit
The TIREFIT kit and part of the vehicle tool kit
are located in the storage compartment on
the driver’s side in the trunk.
XOpen the storage compartment on the
driver’s side (Y page 362).
XRemove the first aid kit.:TIREFIT kit;Alignment bolt=TIREFIT container?Collapsible wheel chockAPair of gloves
The jack and part of the vehicle tool kit are
located in the storage compartment below
the trunk floor.
XPull out the storage compartment cover at
strap B.CJackDHook and loop fastenerEStorage well casing362Where will I find...?Practical hints
BA 197 USA, CA Edition A 2011; 1; 27, en-UShereepeVersion: 3.0.3.52010-03-24T15:31:10+01:00 - Seite 362
Page 381 of 436
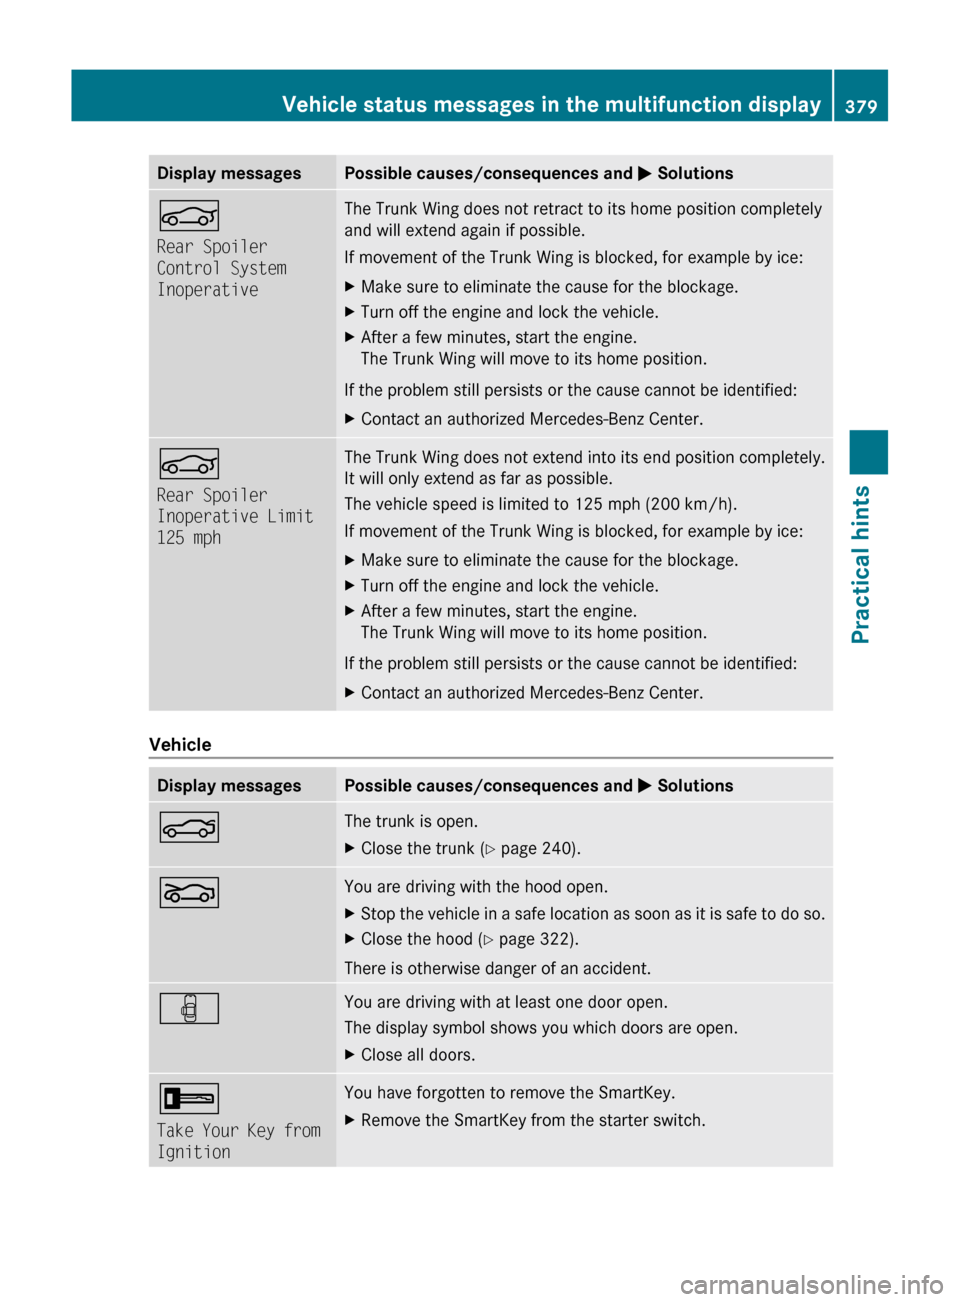
Display messagesPossible causes/consequences and M SolutionsÑ
Rear Spoiler
Control System
InoperativeThe Trunk Wing does not retract to its home position completely
and will extend again if possible.
If movement of the Trunk Wing is blocked, for example by ice:XMake sure to eliminate the cause for the blockage.XTurn off the engine and lock the vehicle.XAfter a few minutes, start the engine.
The Trunk Wing will move to its home position.
If the problem still persists or the cause cannot be identified:
XContact an authorized Mercedes-Benz Center.Ñ
Rear Spoiler
Inoperative Limit
125 mphThe Trunk Wing does not extend into its end position completely.
It will only extend as far as possible.
The vehicle speed is limited to 125 mph (200 km/h).
If movement of the Trunk Wing is blocked, for example by ice:XMake sure to eliminate the cause for the blockage.XTurn off the engine and lock the vehicle.XAfter a few minutes, start the engine.
The Trunk Wing will move to its home position.
If the problem still persists or the cause cannot be identified:
XContact an authorized Mercedes-Benz Center.
Vehicle
Display messagesPossible causes/consequences and M SolutionsNThe trunk is open. XClose the trunk ( Y page 240).LYou are driving with the hood open. XStop the vehicle in a safe location as soon as it is safe to do so.XClose the hood ( Y page 322).
There is otherwise danger of an accident.
´You are driving with at least one door open.
The display symbol shows you which doors are open.XClose all doors.+
Take Your Key from
IgnitionYou have forgotten to remove the SmartKey. XRemove the SmartKey from the starter switch.Vehicle status messages in the multifunction display379Practical hintsBA 197 USA, CA Edition A 2011; 1; 27, en-UShereepeVersion: 3.0.3.52010-03-24T15:31:10+01:00 - Seite 379Z
Page 400 of 436
Unlocking/locking the vehicle
If you cannot lock or unlock the vehicle
centrally with the SmartKey, use the
mechanical key.
The anti-theft alarm system will be triggered
when you
Runlock the driver’s door with the
mechanical key
and
Ropen the driver’s door
To cancel the alarm, see “Canceling the
alarm” (Y page 67).
XRemove the mechanical key from the
SmartKey (Y page 397).
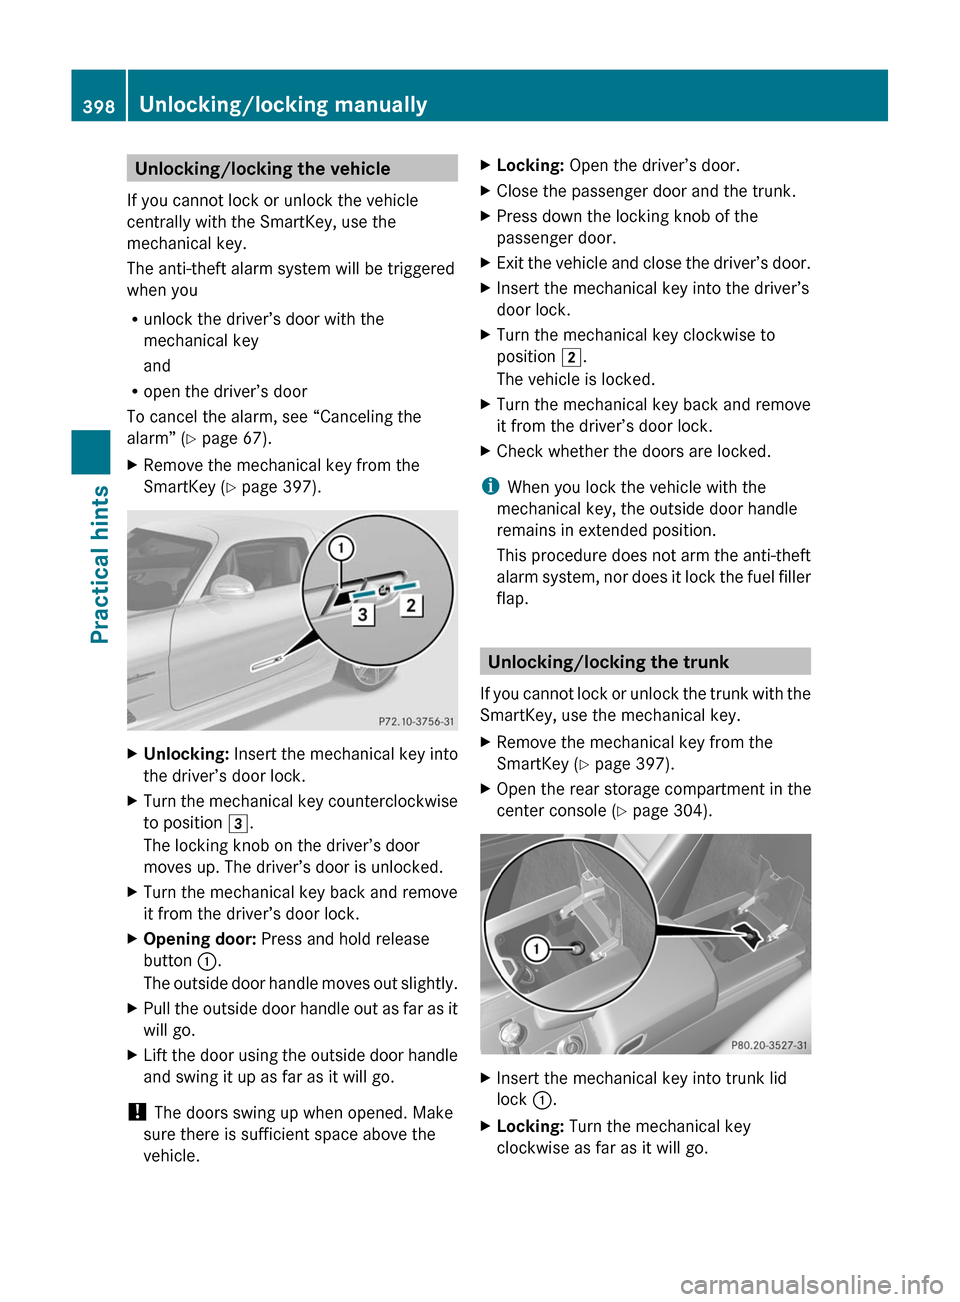
XUnlocking: Insert the mechanical key into
the driver’s door lock.
XTurn the mechanical key counterclockwise
to position 3.
The locking knob on the driver’s door
moves up. The driver’s door is unlocked.
XTurn the mechanical key back and remove
it from the driver’s door lock.
XOpening door: Press and hold release
button :.
The outside door handle moves out slightly.
XPull the outside door handle out as far as it
will go.
XLift the door using the outside door handle
and swing it up as far as it will go.
! The doors swing up when opened. Make
sure there is sufficient space above the
vehicle.
XLocking: Open the driver’s door.XClose the passenger door and the trunk.XPress down the locking knob of the
passenger door.
XExit the vehicle and close the driver’s door.XInsert the mechanical key into the driver’s
door lock.
XTurn the mechanical key clockwise to
position 2.
The vehicle is locked.
XTurn the mechanical key back and remove
it from the driver’s door lock.
XCheck whether the doors are locked.
iWhen you lock the vehicle with the
mechanical key, the outside door handle
remains in extended position.
This procedure does not arm the anti-theft
alarm system, nor does it lock the fuel filler
flap.
Unlocking/locking the trunk
If you cannot lock or unlock the trunk with the
SmartKey, use the mechanical key.
XRemove the mechanical key from the
SmartKey (Y page 397).
XOpen the rear storage compartment in the
center console (Y page 304).
XInsert the mechanical key into trunk lid
lock :.
XLocking: Turn the mechanical key
clockwise as far as it will go.
398Unlocking/locking manuallyPractical hints
BA 197 USA, CA Edition A 2011; 1; 27, en-UShereepeVersion: 3.0.3.52010-03-24T15:31:10+01:00 - Seite 398
Page 401 of 436
XRemove the SmartKey from the trunk lid
lock.XCheck whether the trunk is locked.XUnlocking: Insert the mechanical key into
trunk lid lock :.XTurn the mechanical key counterclockwise
as far as it will go.XRemove the SmartKey from the trunk lid
lock.
You can now open the trunk.
Replacing SmartKey battery
If the battery in the SmartKey is discharged,
the vehicle can no longer be locked or
unlocked. It is recommended to have the
battery replaced at an authorized Mercedes-
Benz Center.
GWarning!
Batteries contain poisonous and corrosive
substances. Therefore, keep the batteries out
of reach of children.
If a battery is swallowed, seek medical help
immediately.
GWarning!
SmartKey batteries contain perchlorate
material, which may require special handling
and regard for the environment. Check with
your local government’s disposal guidelines.
California residents, see http://
www.dtsc.ca.gov/HazardousWaste/
Perchlorate/index.cfm .
Batteries contain materials that can harm the
environment if disposed of improperly.
Recycling of batteries is the preferred method
of disposal. Many states (USA only) or
provinces (Canada only) require sellers of
batteries to accept old batteries for recycling.
When inserting the battery, make sure he is
clean and free of lint.
i The required replacement battery is
available at any authorized Mercedes-Benz
Center.
Replacement battery: Lithium, type CR 2025
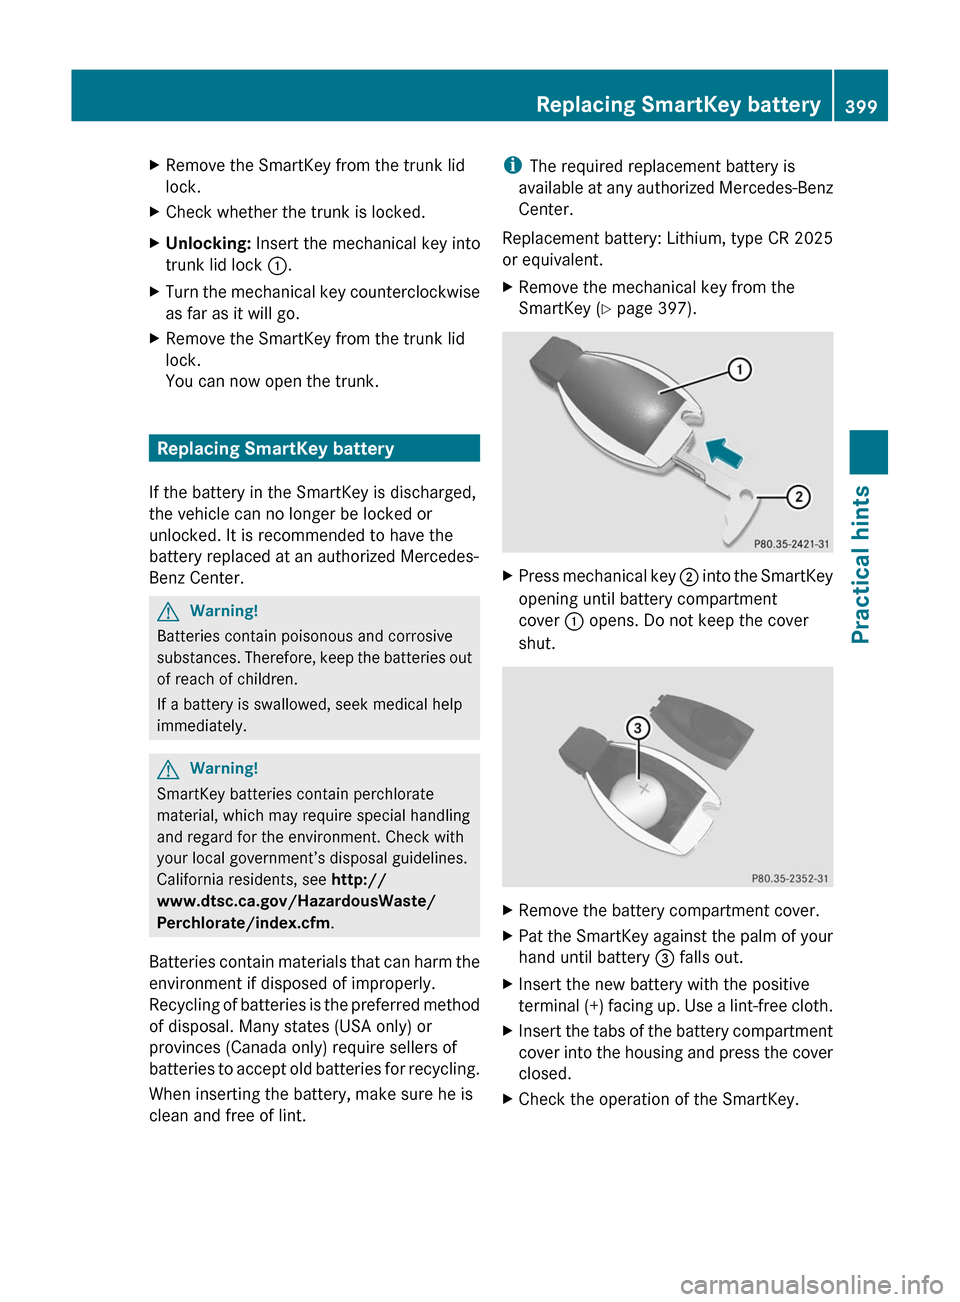
or equivalent.XRemove the mechanical key from the
SmartKey ( Y page 397).XPress mechanical key ; into the SmartKey
opening until battery compartment
cover : opens. Do not keep the cover
shut.XRemove the battery compartment cover.XPat the SmartKey against the palm of your
hand until battery = falls out.XInsert the new battery with the positive
terminal (+) facing up. Use a lint-free cloth.XInsert the tabs of the battery compartment
cover into the housing and press the cover
closed.XCheck the operation of the SmartKey.Replacing SmartKey battery399Practical hintsBA 197 USA, CA Edition A 2011; 1; 27, en-UShereepeVersion: 3.0.3.52010-03-24T15:31:10+01:00 - Seite 399Z
Page 404 of 436

Flat tire
Notes
Your vehicle is equipped with a TIREFIT kit
(Y page 362).
Preparing the vehicle
XWhenever possible, park the vehicle in a
safe distance from moving traffic on a hard,
flat surface.
XTurn on the hazard warning flasher.XTurn the steering wheel so that the front
wheels are in a straight-ahead position.
XEngage the electronic parking brake.XShift the transmission into park position P.XTurn off the engine.XKEYLESS-GO: Open the driver’s door (this
puts the starter switch in position 0, same
as with the SmartKey removed from the
starter switch). The driver’s door can then
be closed again. Open doors only when
conditions are safe to do so.
or
XRemove the SmartKey from the starter
switch.
XHave any passenger exit the vehicle at a
safe distance from the roadway. Open
doors only when conditions are safe to do
so.
Sealing tires with TIREFIT
Small tire punctures, particularly those in the
tread, can be sealed with TIREFIT.
TIREFIT can be used in ambient temperatures
down to -40‡ (-40†).
GWarning!
TIREFIT is a limited repair device. TIREFIT
cannot be used for cuts or punctures larger
than approximately 0.16 in (4 mm) and tire
damage caused by driving with extremely low
tire inflation pressure, or on a flat tire, or a
damaged wheel.
Do not drive the vehicle under such
circumstances.
Contact the nearest authorized Mercedes-
Benz Center for assistance or call Roadside
Assistance.
XForeign objects (e.g. screws or nails)
should not be removed from the tire.
XTake the TIREFIT kit, the sticker, and the
electric air pump out of the trunk
(Y page 362).
XOpen the TIREFIT kit.XAttach upper part of sticker D where it will
be easily seen by the driver on the
instrument cluster.
XAttach lower part of sticker D to the
damaged tire (close to the tire valve).
GWarning!
Take care not to allow the contents of TIREFIT
to come in contact with hair, eyes or clothing.
TIREFIT is harmful if inhaled, swallowed or
absorbed through the skin - causes skin, eye
and respiratory irritation.
Any contact with eyes or skin should be
flushed immediately with plenty of water.
If clothing comes in contact with TIREFIT,
change clothing as soon as possible.
In case of allergic reaction or rash, consult a
physician immediately.
402Flat tirePractical hints
BA 197 USA, CA Edition A 2011; 1; 27, en-UShereepeVersion: 3.0.3.52010-03-24T15:31:10+01:00 - Seite 402
Page 417 of 436
Towing the vehicle
Safety notes
Mercedes-Benz recommends that the vehicle
be transported with all wheels off the ground
using flatbed or appropriate wheel lift/dolly
equipment. This method is preferable to other
types of towing.
! To prevent damage during transport, do
not tie down vehicle by its chassis or
suspension parts.
If circumstances do not permit the
recommended towing methods, the vehicle
may be towed with all wheels on the ground
or rear axle raised only so far as necessary to
have the vehicle moved to a safe location
where the recommended towing methods
can be employed.
! Before towing the vehicle observe the
following instructions:
RDo not tow-start the vehicle. You could
otherwise seriously damage the
transmission which is not covered by the
Mercedes-Benz Limited Warranty.
RDo not tow with sling-type equipment.
Towing with sling-type equipment over
bumpy roads will damage radiator and
supports.
RTowing of the vehicle should only be
done using the properly installed towing
eye bolt. Never attach a tow cable, tow
rope or tow rod to the vehicle chassis,
frame or suspension parts.
GWarning!
With the engine not running, there is no power
assistance for the brake and steering
systems. In this case, it is important to keep
in mind that a considerably higher degree of
effort is necessary to brake and steer the
vehicle. Adapt your driving accordingly.
! Avoid pulling the vehicle abruptly or
diagonally, since it could result in damage
to the chassis alignment.
! Do not use the towing eye bolt for
recovery, as this could damage the vehicle.
If in doubt, recover the vehicle with a crane.
iIf the battery is disconnected or
discharged
Rthe transmission will remain in park
position P
Rthe SmartKey will not turn in the starter
switch
For more information see “Battery”
(Y page 410) or “Jump starting”
(Y page 413).
Installing towing eye bolt
The towing eye bolt is supplied with the
vehicle tool kit, located in the storage
compartment underneath the trunk floor
(Y page 362).
XTake the towing eye bolt and the wheel
wrench out of the trunk.
Your vehicle is equipped with a front towing
eye bolt only. You cannot tow other vehicles
with your vehicle.
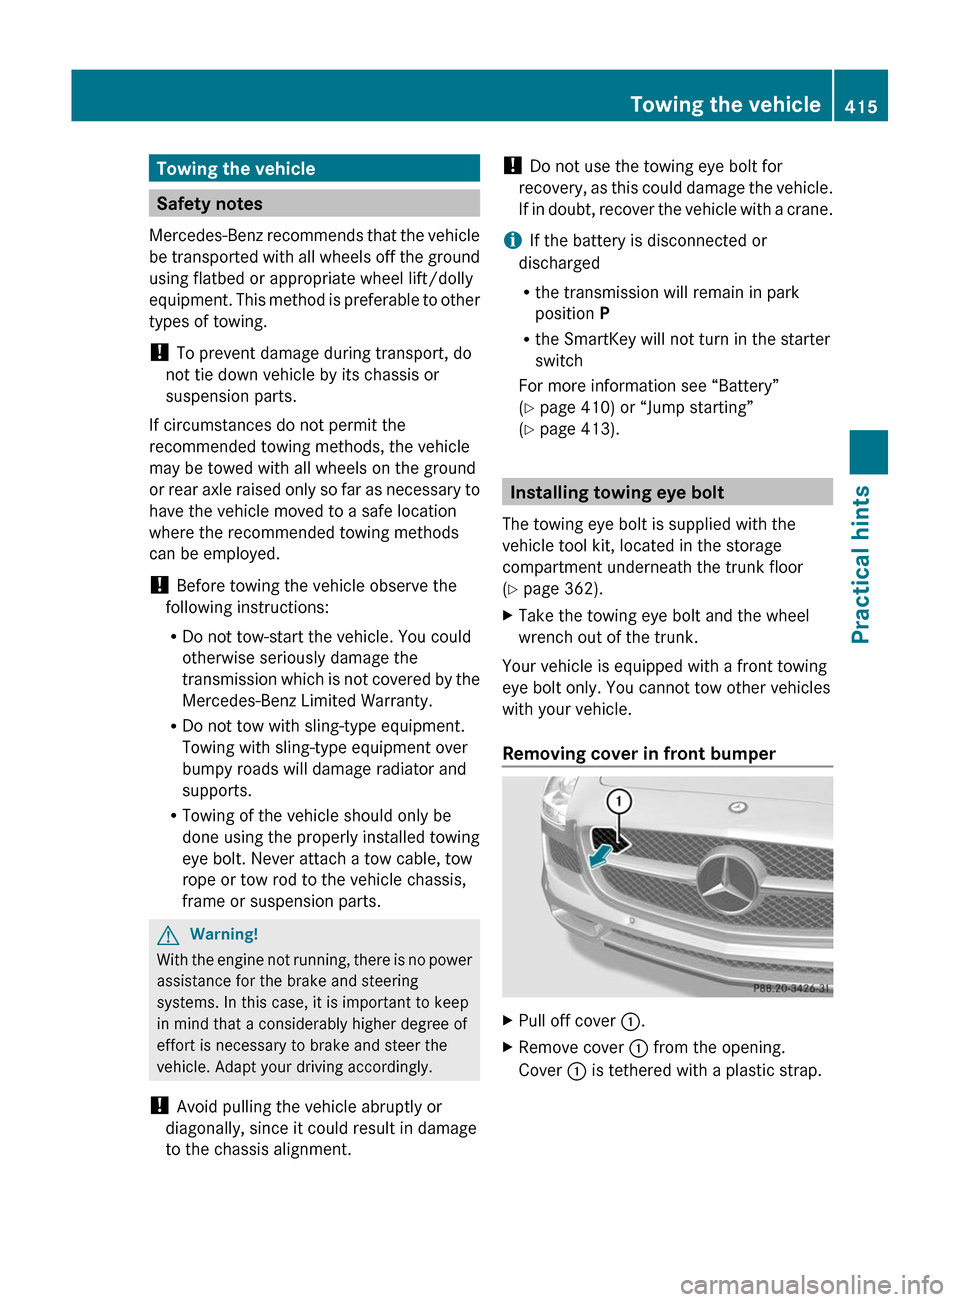
Removing cover in front bumper
XPull off cover :.XRemove cover : from the opening.
Cover : is tethered with a plastic strap.
Towing the vehicle415Practical hintsBA 197 USA, CA Edition A 2011; 1; 27, en-UShereepeVersion: 3.0.3.52010-03-24T15:31:10+01:00 - Seite 415Z