2011 MERCEDES-BENZ SLS trunk
[x] Cancel search: trunkPage 242 of 436
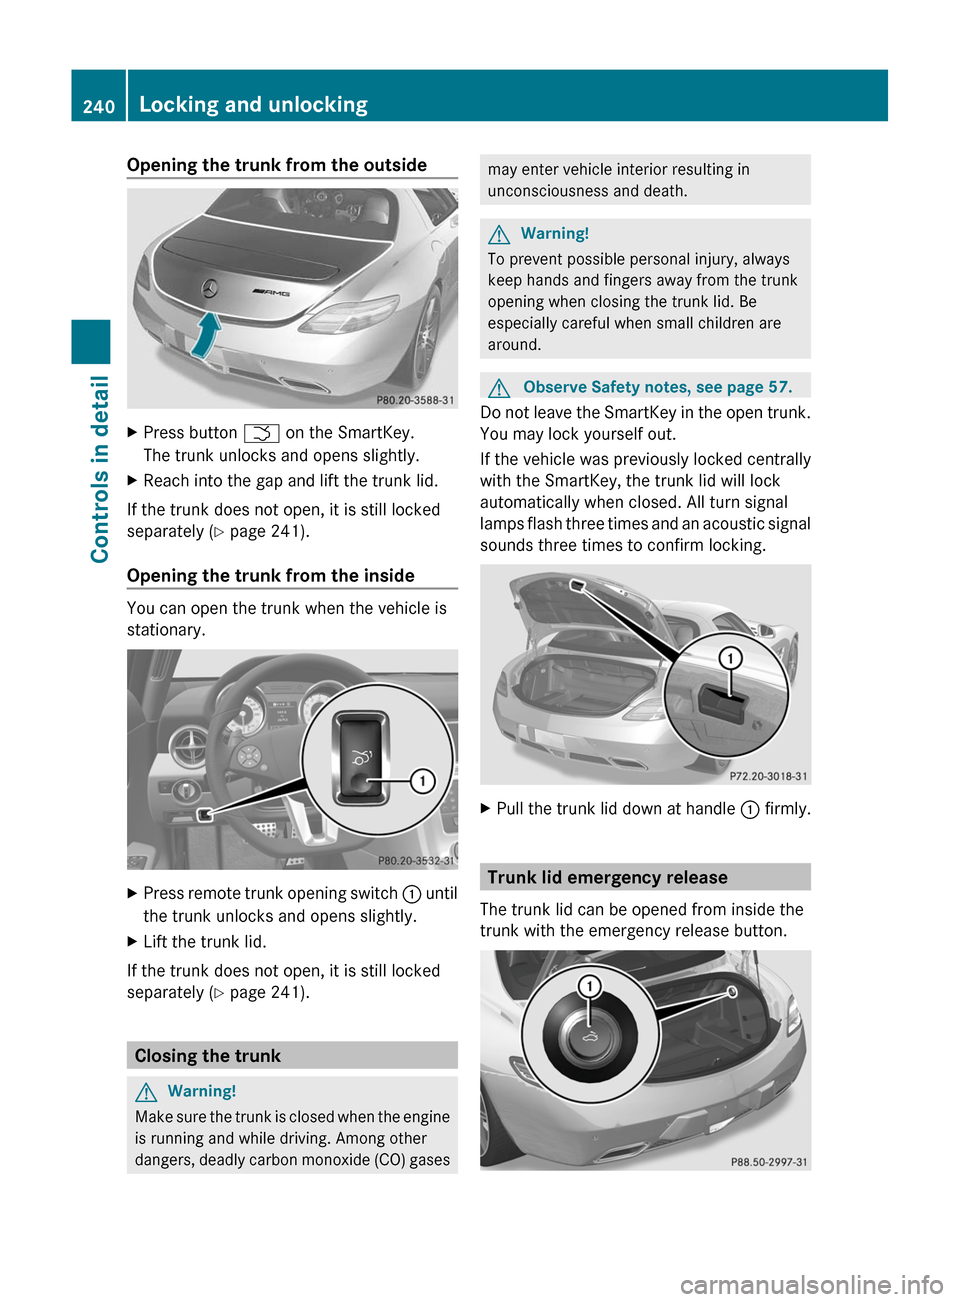
Opening the trunk from the outsideXPress button F on the SmartKey.
The trunk unlocks and opens slightly.
XReach into the gap and lift the trunk lid.
If the trunk does not open, it is still locked
separately (Y page 241).
Opening the trunk from the inside
You can open the trunk when the vehicle is
stationary.
XPress remote trunk opening switch : until
the trunk unlocks and opens slightly.
XLift the trunk lid.
If the trunk does not open, it is still locked
separately (Y page 241).
Closing the trunk
GWarning!
Make sure the trunk is closed when the engine
is running and while driving. Among other
dangers, deadly carbon monoxide (CO) gases
may enter vehicle interior resulting in
unconsciousness and death.
GWarning!
To prevent possible personal injury, always
keep hands and fingers away from the trunk
opening when closing the trunk lid. Be
especially careful when small children are
around.
GObserve Safety notes, see page 57.
Do not leave the SmartKey in the open trunk.
You may lock yourself out.
If the vehicle was previously locked centrally
with the SmartKey, the trunk lid will lock
automatically when closed. All turn signal
lamps flash three times and an acoustic signal
sounds three times to confirm locking.
XPull the trunk lid down at handle : firmly.
Trunk lid emergency release
The trunk lid can be opened from inside the
trunk with the emergency release button.
240Locking and unlockingControls in detail
BA 197 USA, CA Edition A 2011; 1; 27, en-UShereepeVersion: 3.0.3.52010-03-24T15:31:10+01:00 - Seite 240
Page 243 of 436

XBriefly press emergency release
button :.
The trunk lid unlocks and opens slightly.
XPush up the trunk lid to fully open.
The emergency release button unlocks the
trunk while the vehicle is standing still or in
motion.
Illumination of the emergency release button:
RThe button flashes for 30 minutes after
opening the trunk.
RThe button flashes for 60 minutes after
closing the trunk.
The emergency release button does not
unlock the trunk, if the vehicle battery is
discharged or disconnected.
If the vehicle has previously been locked
centrally with the SmartKey, opening the
trunk from the inside using the emergency
release button will trigger the anti-theft alarm
system.
To cancel the alarm, see (Y page 67).
Valet locking
You can lock the trunk separately with the
mechanical key. This denies unauthorized
access to the trunk, e.g. when you valet park
the vehicle.
XLeave only the SmartKey less its
mechanical key with the vehicle.
XValet locking: Close the trunk
(Y page 240).
XRemove the mechanical key from the
SmartKey (Y page 397).
XOpen the rear storage compartment in the
center console (Y page 304).
XInsert the mechanical key into trunk lid
lock :.
XTurn the mechanical key clockwise as far
as it will go.
XIn this position, pull out the mechanical
key.
XCheck whether the trunk is locked.
The trunk remains locked even when the
vehicle is centrally unlocked.
You can then only open the trunk with the
mechanical key.
XCanceling: Insert the mechanical into
trunk lid lock :.
XTurn the mechanical key counterclockwise
as far as it will go.
XIn this position, pull out the mechanical
key.
You can now open the trunk.
Starter switch positions
KEYLESS-GO
GObserve Safety notes, see page 57.
You can start the engine and turn it off again
using the KEYLESS-GO start/stop button.
The KEYLESS-GO start/stop button is located
in the center console. The KEYLESS-GO
start/stop button is illuminated when the
vehicle is unlocked.
The SmartKey must be located in the vehicle.
It will, however, not be detected in the trunk.
Pressing the KEYLESS-GO start/stop button
without depressing the brake pedal
Starter switch positions241Controls in detailBA 197 USA, CA Edition A 2011; 1; 27, en-UShereepeVersion: 3.0.3.52010-03-24T15:31:10+01:00 - Seite 241Z
Page 260 of 436
Starting the engineGWarning!
Inhalation of exhaust gas is hazardous to your
health. All exhaust gas contains carbon
monoxide (CO), and inhaling it can cause
unconsciousness and possible death.
Do not run the engine in confined areas (such
as a garage) which are not properly ventilated.
If you think that exhaust gas fumes are
entering the vehicle while driving, have the
cause determined and corrected
immediately. If you must drive under these
conditions, drive only with at least one
window fully open at all times.
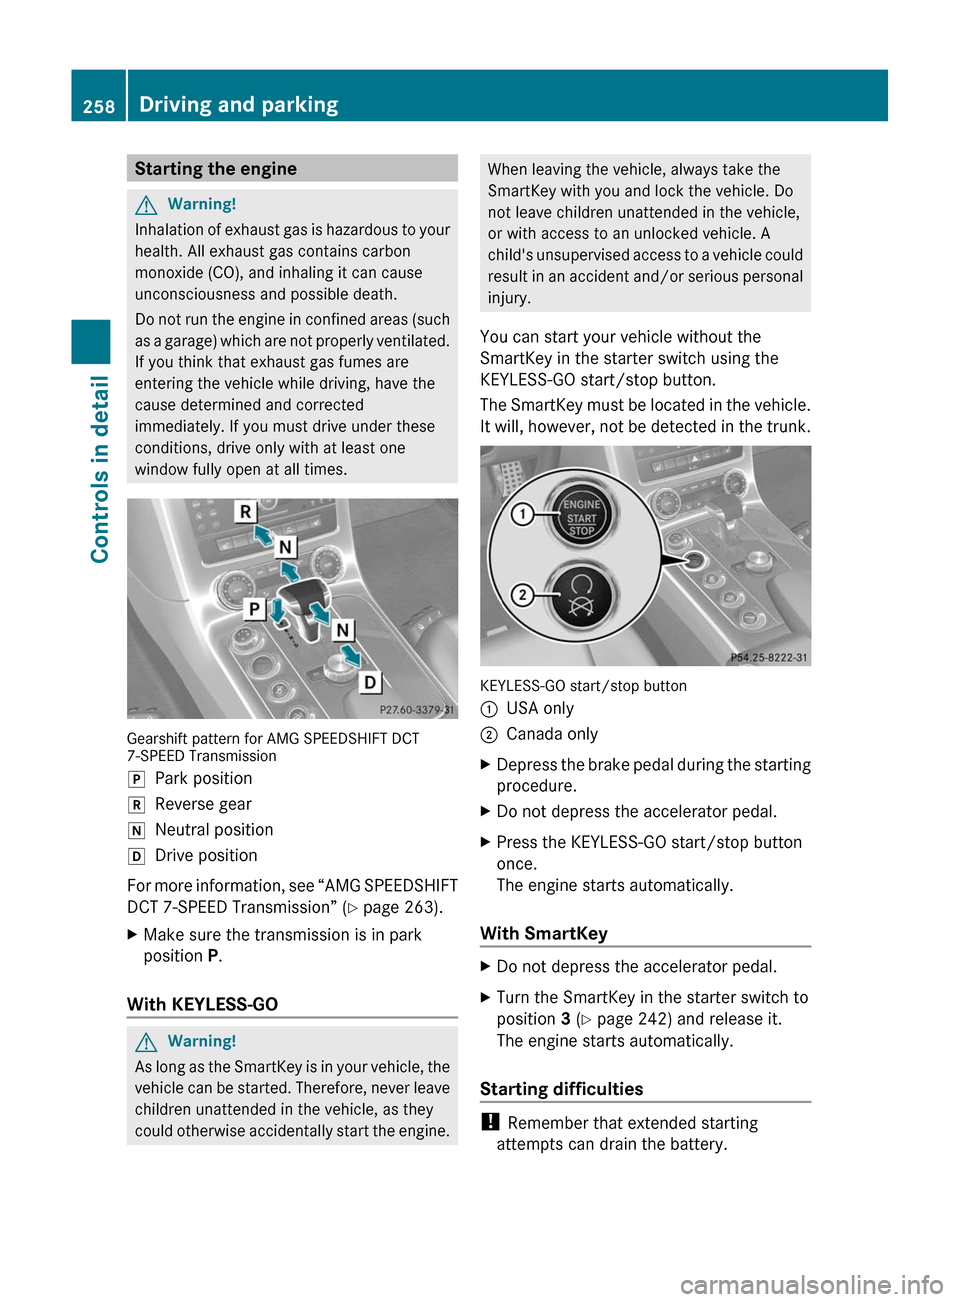
Gearshift pattern for AMG SPEEDSHIFT DCT7-SPEED Transmission
jPark positionkReverse geariNeutral positionhDrive position
For more information, see “AMG SPEEDSHIFT
DCT 7-SPEED Transmission” (Y page 263).
XMake sure the transmission is in park
position P.
With KEYLESS-GO
GWarning!
As long as the SmartKey is in your vehicle, the
vehicle can be started. Therefore, never leave
children unattended in the vehicle, as they
could otherwise accidentally start the engine.
When leaving the vehicle, always take the
SmartKey with you and lock the vehicle. Do
not leave children unattended in the vehicle,
or with access to an unlocked vehicle. A
child's unsupervised access to a vehicle could
result in an accident and/or serious personal
injury.
You can start your vehicle without the
SmartKey in the starter switch using the
KEYLESS-GO start/stop button.
The SmartKey must be located in the vehicle.
It will, however, not be detected in the trunk.
KEYLESS-GO start/stop button
:USA only;Canada onlyXDepress the brake pedal during the starting
procedure.
XDo not depress the accelerator pedal.XPress the KEYLESS-GO start/stop button
once.
The engine starts automatically.
With SmartKey
XDo not depress the accelerator pedal.XTurn the SmartKey in the starter switch to
position 3 (Y page 242) and release it.
The engine starts automatically.
Starting difficulties
! Remember that extended starting
attempts can drain the battery.
258Driving and parkingControls in detail
BA 197 USA, CA Edition A 2011; 1; 27, en-UShereepeVersion: 3.0.3.52010-03-24T15:31:10+01:00 - Seite 258
Page 263 of 436

If the extent of the damage cannot be
determined:
XContact an authorized Mercedes-Benz
Center or call Roadside Assistance.
If no damage on major assemblies, fuel
system, and engine mount can be
determined:
XStart the engine in the usual manner.
Parking
GWarning!
Do not park in areas where the hot exhaust
system could come into contact with
combustible materials. Combustible
materials such as grass, hay or leaves could
be ignited and cause a vehicle fire.
Unintended vehicle movement could cause
serious personal injury or damage to the
vehicle or the vehicle drivetrain. To reduce
such risks, always do the following before
turning off the engine and leaving the vehicle:
RKeep right foot on the brake pedal.
REngage the electronic parking brake.
RShift the transmission into park position P.
RSlowly release the brake pedal.
RWhen parked on an incline, always turn the
front wheels towards the road curb.
RPress the KEYLESS-GO start/stop button,
or turn the SmartKey in the starter switch
to position 0 and remove the SmartKey
from the starter switch.
RTake the SmartKey with you and lock the
vehicle when leaving.
Electronic parking brake
GWarning!
When leaving the vehicle, always remove the
SmartKey from the starter switch, take it with
you, and lock the vehicle. Do not leave
children unattended in the vehicle, or with
access to an unlocked vehicle. Children could
release the electronic parking brake and/or
shift the transmission out of park position P,
either of which could result in an accident
and/or serious personal injury.
Engaging electronic parking brake
XPress handle :.
The red indicator lamp F (USA only)
or ! (Canada only) in the instrument
cluster comes on.
iYou can engage the electronic parking
brake even when the SmartKey is removed
from the starter switch.
Releasing electronic parking brake
manually
XSwitch on the ignition.XPull handle :.
The red indicator lamp F (USA only)
or ! (Canada only) in the instrument
cluster goes out.
Releasing electronic parking brake
automatically
The electronic parking brake releases
automatically when all of the following
conditions are fulfilled:
RThe engine is running.
RThe transmission is in drive position D or
reverse gear R. With the transmission in
reverse gear R the trunk lid must be closed.
RThe hood is closed.
RYou have fastened your seat belt.
RYou depress on the accelerator pedal.
Driving and parking261Controls in detailBA 197 USA, CA Edition A 2011; 1; 27, en-UShereepeVersion: 3.0.3.52010-03-24T15:31:10+01:00 - Seite 261Z
Page 292 of 436
=Average speed during lap?Lap lengthAMaximum speed during lapXPress button : or 9 to see other lap
analyses.
Driving systems
Introduction
This section describes the following driving
systems of your vehicle:
R Cruise control
R RACE START
R Hill-start assist system
R Parktronic system
R Rear view camera
The driving safety systems ABS, Adaptive
Brake, BAS, EBP, ESC and Trunk Wing are
described in the “Safety and security” section
( Y page 61).
Cruise control
The cruise control maintains the speed you
set for your vehicle automatically.
The use of the cruise control is recommended
for driving at a constant speed for extended
periods of time.
The currently set speed or last set speed
(“Resume” function) appears in the
multifunction display for approximately
5 seconds.
GWarning!
The cruise control is a convenience system
designed to assist the driver during vehicle
operation. The driver is and must always
remain responsible for the vehicle’s speed
and for safe brake operation.
Only use the cruise control if the road, traffic,
and weather conditions make it advisable to
travel at a constant speed.
R The use of the cruise control can be
dangerous on winding roads or in heavy
traffic because conditions do not allow safe
driving at a constant speed.
R The use of the cruise control can be
dangerous on slippery roads. Rapid
changes in tire traction can result in wheel
spin and loss of control.
R Deactivate the cruise control when driving
in fog.
The “Resume” function should only be
operated if the driver is fully aware of the
previously set speed and wishes to resume
this particular preset speed.GWarning!
The cruise control brakes automatically so
that the set speed is not exceeded.
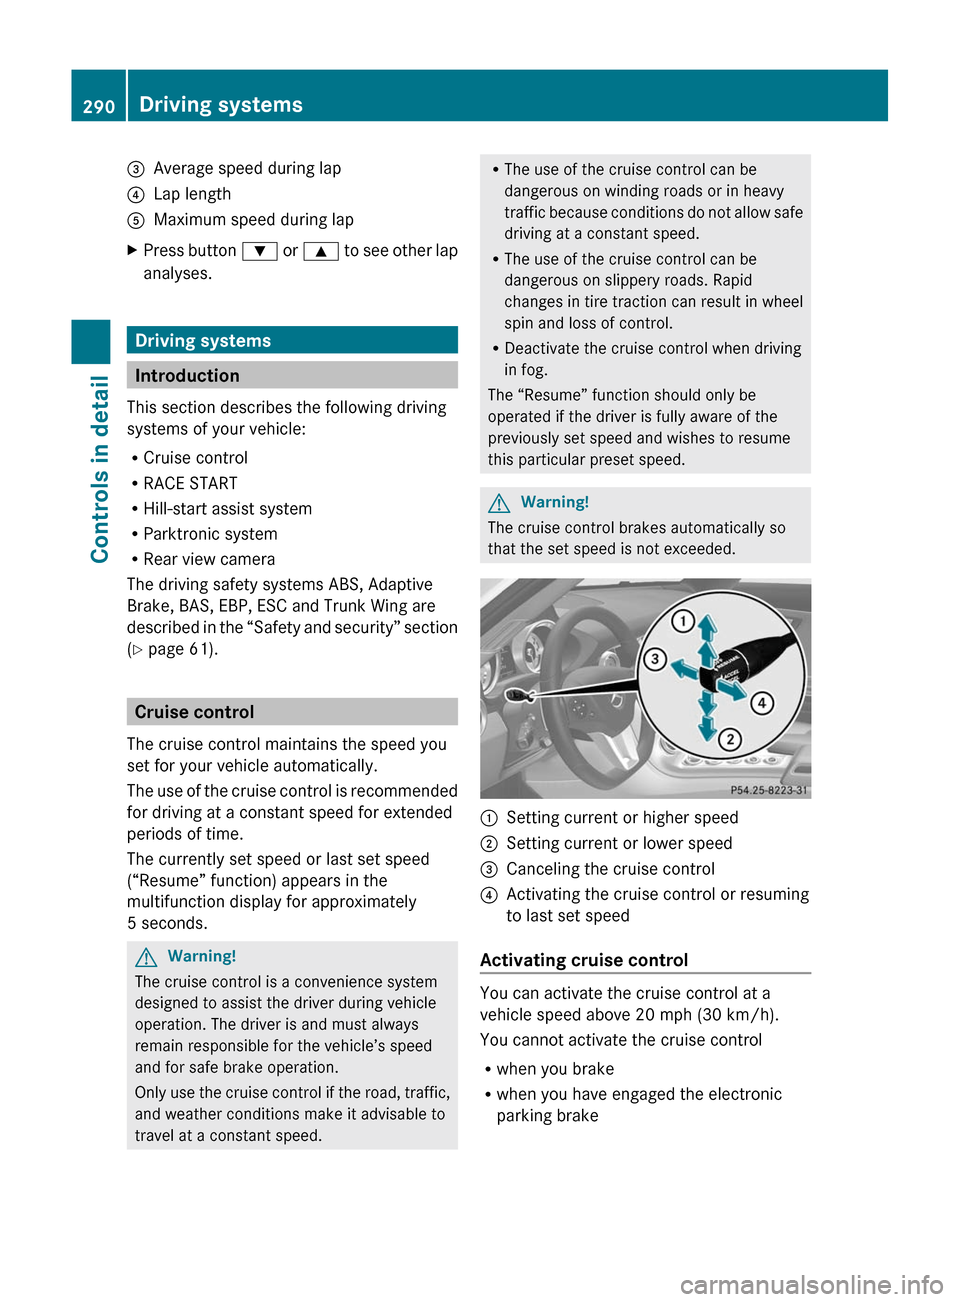
:Setting current or higher speed;Setting current or lower speed=Canceling the cruise control?Activating the cruise control or resuming
to last set speed
Activating cruise control
You can activate the cruise control at a
vehicle speed above 20 mph (30 km/h).
You cannot activate the cruise control
R when you brake
R when you have engaged the electronic
parking brake
290Driving systemsControls in detail
BA 197 USA, CA Edition A 2011; 1; 27, en-UShereepeVersion: 3.0.3.52010-03-24T15:31:10+01:00 - Seite 290
Page 294 of 436

increments each time you lift or press the
cruise control lever up or down to the
resistance point.XIncreasing: Briefly lift the cruise control
lever up to the resistance point in direction
of arrow :.XDecreasing: Briefly press the cruise
control lever down to the resistance point
in direction of arrow ;.XRelease the cruise control lever.
The new speed is set and the vehicle will
accelerate or decelerate.
Adjustment in 5 mph (Canada: 10 km/h)
increments
i The set speed value is increased or
decreased in 5 mph (Canada: 10 km/h)
increments each time you lift or press the
cruise control lever up or down past the
resistance point.
XIncreasing: Briefly lift the cruise control
lever up past the resistance point in
direction of arrow :.XDecreasing: Briefly press the cruise
control lever down past the resistance
point in direction of arrow ;.XRelease the cruise control lever.
The new speed is set and the vehicle will
accelerate or decelerate. Keep in mind that
it may take a brief moment until the vehicle
has reached the set speed.
Setting stored speed (Resume function)
GWarning!
The set speed stored in memory should only
be set again if prevailing road conditions and
legal speed limits permit. Possible
acceleration or deceleration differences
arising from returning to the preset speed
could cause an accident and/or serious injury
to you and others.
XBriefly pull the cruise control lever in
direction of arrow ?.
If no speed is stored, the current speed is
set and stored.XRemove your foot from the accelerator
pedal.
The last stored speed is deleted from memory
when the engine is turned off.
RACE START
RACE START enables optimum acceleration
from a standing start with suitable high-grip
road surface conditions.
GWarning!
RACE START is only available when ESC
SPORT is activated. ESC SPORT only
stabilizes the vehicle to a certain extent if it is
swerving or the wheels are spinning.
RACE START may only be used on closed
roads. Always adapt your speed and driving
style to suit the current road and weather
conditions.
Conditions for activation
RACE START can be activated when
R the doors are closed
R the trunk is closed
R the hood is closed
R the engine is running and the transmission
and the engine have reached their
operating temperature. The engine has
reached its operating temperature when
the engine oil temperature indicator in the
multifunction display stops flashing.
R ESC SPORT is switched on ( Y page 62)
R the multifunction steering wheel is in the
straight-ahead position
R the vehicle is standing still and the brake
pedal is depressed (left foot)
R the transmission is in drive position D
292Driving systemsControls in detail
BA 197 USA, CA Edition A 2011; 1; 27, en-UShereepeVersion: 3.0.3.52010-03-24T15:31:10+01:00 - Seite 292
Page 299 of 436
GWarning!
The rear view camera is only an aid and may
display obstacles
R from a distorted perspective
R inaccurately
R may not display obstacles at all
The rear view camera does not relieve you of
the responsibility to be cautious. Take care
and pay careful attention. The rear view
camera may not show objects which are
R very close to the rear bumper
R under the rear bumper
You are responsible for safety at all times and
must continue to pay attention to the
immediate surroundings when parking and
maneuvering. This includes the area behind,
in front of, and beside the vehicle. Otherwise
you could endanger yourself and/or others.
GWarning!
The rear view camera either will not function
or will not function to its full capability if
R the trunk lid is open
R it is raining very hard, snowing or foggy
R it is night or you are parking/maneuvering
your vehicle in an area where it is very dark
R the camera is exposed to a very bright white
light
R the immediate surroundings are
illuminated with fluorescent light (the
COMAND system display can flicker)
R there is a sudden change in temperature,
e.g. if you drive into a heated garage from
the cold (lens condensation)
R the camera lens is dirty or covered
R the rear of your vehicle is damaged
In this case, have the position and setting
of the camera checked by a qualified
specialist workshop. Mercedes-Benz
recommends that you contact a Mercedes-
Benz Center for this purpose.
Do not use the rear view camera in these
situations. Otherwise you could injure
yourself or others and/or damage property
including your vehicle while parking/
maneuvering.
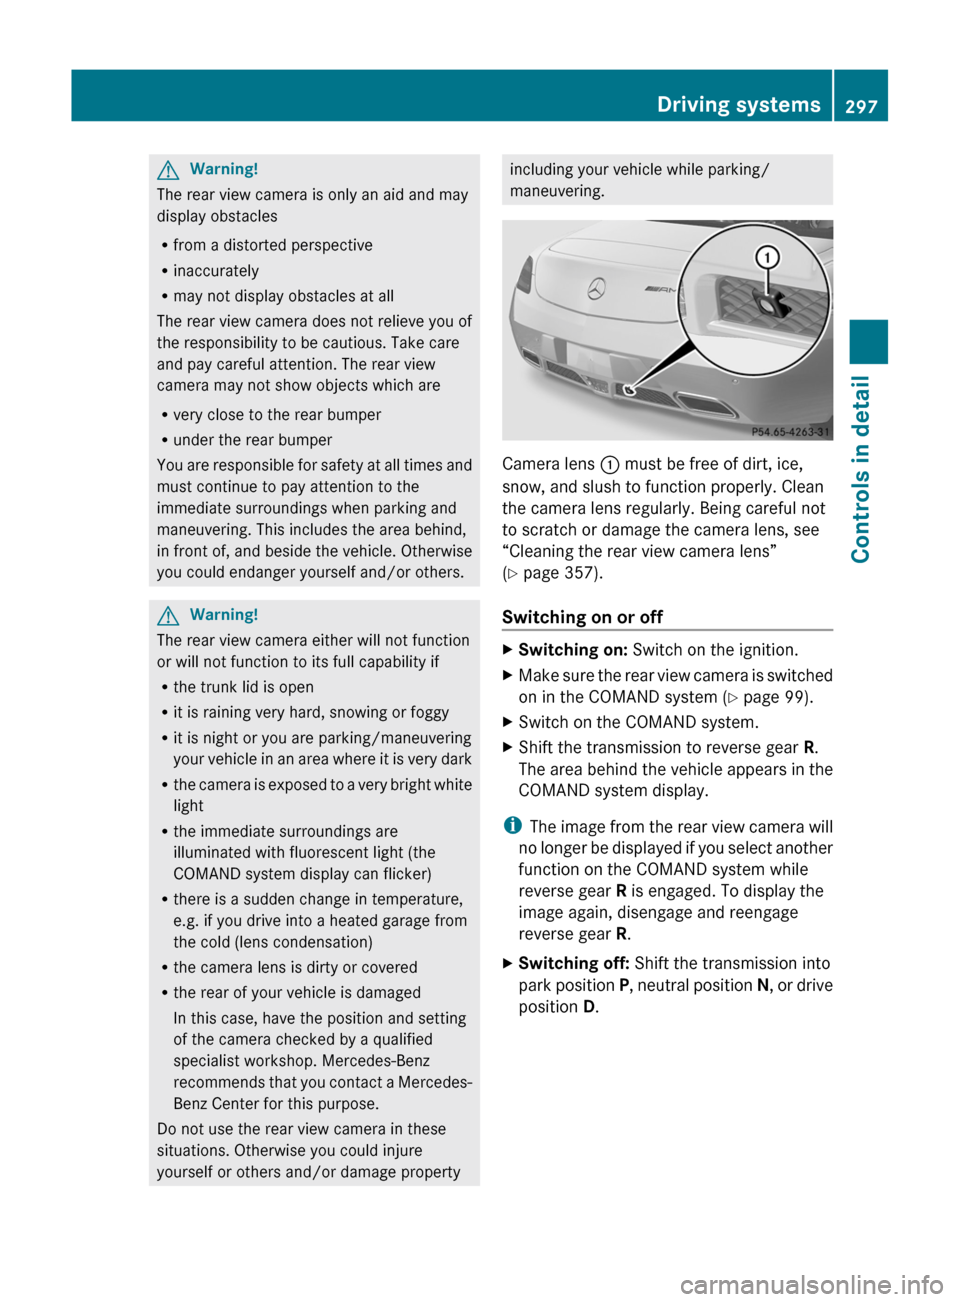
Camera lens : must be free of dirt, ice,
snow, and slush to function properly. Clean
the camera lens regularly. Being careful not
to scratch or damage the camera lens, see
“Cleaning the rear view camera lens”
( Y page 357).
Switching on or off
XSwitching on: Switch on the ignition.XMake sure the rear view camera is switched
on in the COMAND system ( Y page 99).XSwitch on the COMAND system.XShift the transmission to reverse gear R.
The area behind the vehicle appears in the
COMAND system display.
i The image from the rear view camera will
no longer be displayed if you select another
function on the COMAND system while
reverse gear R is engaged. To display the
image again, disengage and reengage
reverse gear R.
XSwitching off: Shift the transmission into
park position P, neutral position N, or drive
position D.Driving systems297Controls in detailBA 197 USA, CA Edition A 2011; 1; 27, en-UShereepeVersion: 3.0.3.52010-03-24T15:31:10+01:00 - Seite 297Z
Page 306 of 436
XActivating: Adjust the air temperature, air
volume and air distribution.
XPress button ¸.
The indicator lamp in the button comes on.
The driver-side settings are used for the
passenger side.
XDeactivating: Press button ¸ again.
The indicator lamp in the button goes out.
Rear window defroster
GWarning!
Any accumulation of snow and ice should be
removed from the rear window before driving.
Visibility could otherwise be impaired,
endangering you and others.
The rear window defroster uses a large
amount of power. To keep the battery drain
to a minimum, switch off the defroster as
soon as the rear window is clear. The
defroster is switched off automatically after
some time of operation depending on the
outside temperature.
XSwitch on the ignition.XSwitching on: Press button ¤.
The indicator lamp in the button comes on.
XSwitching off: Press button ¤ again.
The rear window defroster switches off when
the battery voltage is too low. Too many
electrical consumers may be operating
simultaneously.
XSwitch off consumers that are currently not
needed if required.
Loading and storing
Parcel net
GWarning!
The parcel net is intended for storing light-
weight items only, such as road maps, mail,
etc.
Heavy objects, objects with sharp edges, or
fragile objects may not be transported in the
parcel net. In an accident, during hard
braking, or sudden maneuvers, they could be
thrown around inside the vehicle and cause
injury to vehicle occupants.
The parcel net cannot protect transported
goods in the event of an accident.
A parcel net is located in the passenger
footwell.
Storage compartments
GWarning!
To help avoid personal injury during a collision
or sudden maneuver, exercise care when
storing objects in the vehicle. Put luggage or
cargo in the trunk if possible.
Keep compartment lids closed. This will help
to prevent stored objects from being thrown
about and injuring vehicle occupants during
Rbraking
Rvehicle maneuvers
Ran accident
Glove box
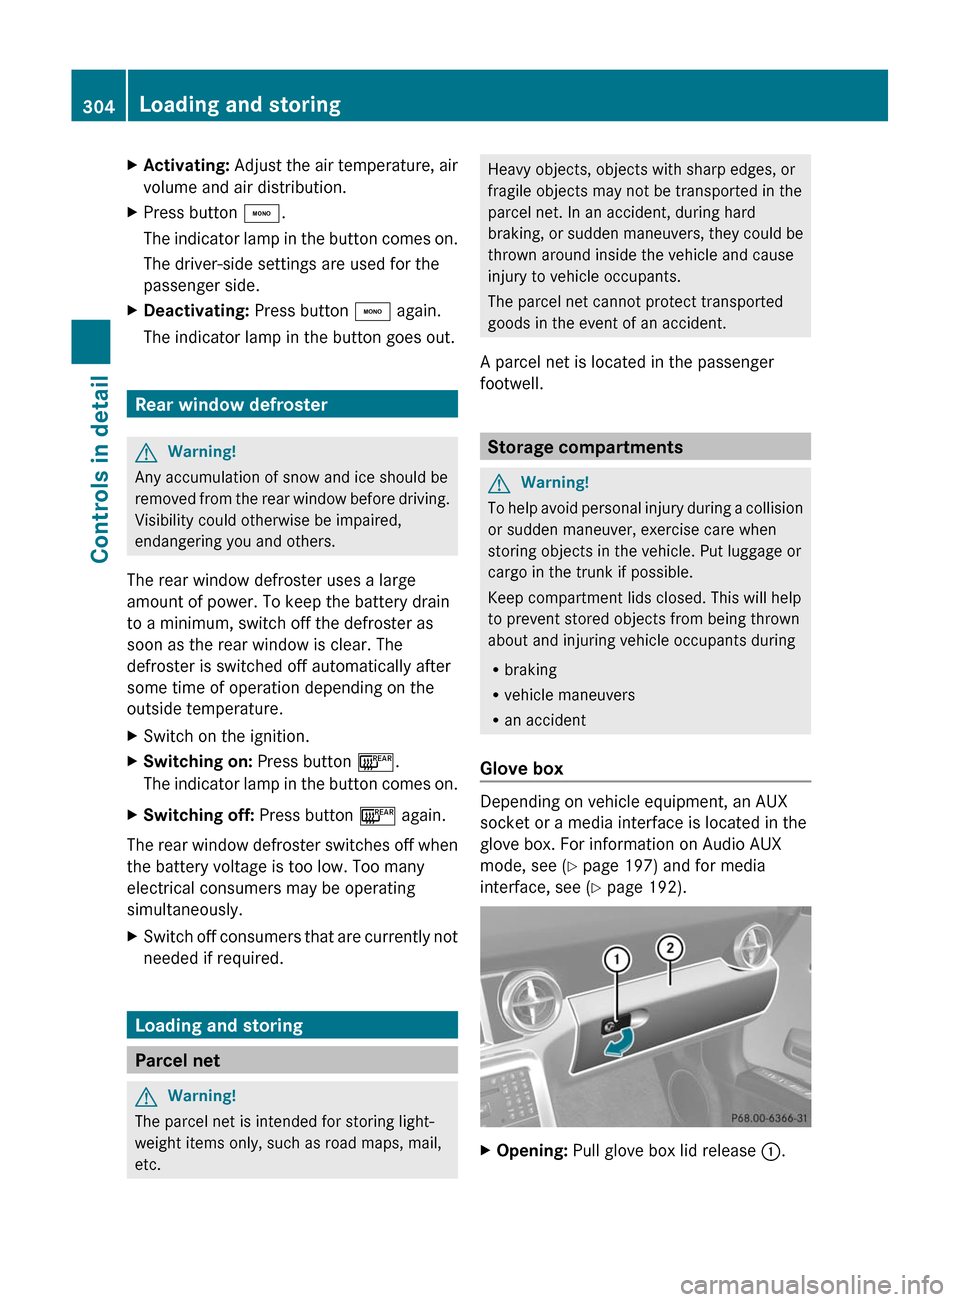
Depending on vehicle equipment, an AUX
socket or a media interface is located in the
glove box. For information on Audio AUX
mode, see (Y page 197) and for media
interface, see (Y page 192).
XOpening: Pull glove box lid release :.304Loading and storingControls in detail
BA 197 USA, CA Edition A 2011; 1; 27, en-UShereepeVersion: 3.0.3.52010-03-24T15:31:10+01:00 - Seite 304