2011 MERCEDES-BENZ SLS tow
[x] Cancel search: towPage 338 of 436
XStep 3: Subtract the combined weight of the driver and passengers from XXX kilograms or
XXX lbs.XStep 4: The resulting figure equals the available amount of cargo and luggage load capacity.
For example, if the “XXX” amount equals 1 400 lbs and there will be five 150 lbs passengers
in your vehicle, the amount of available cargo and luggage load capacity is 650 lbs
(1 400 - 750 (5 x 150) = 650 lbs).XStep 5: Determine the combined weight of luggage and cargo being loaded on the vehicle.
That weight may not safely exceed the available cargo and luggage load capacity calculated
in step 4.XStep 6 (if applicable): If your vehicle will be towing a trailer, load from your trailer will be
transferred to your vehicle. Consult this manual to determine how this reduces the available
cargo and luggage load capacity of your vehicle ( Y page 337).
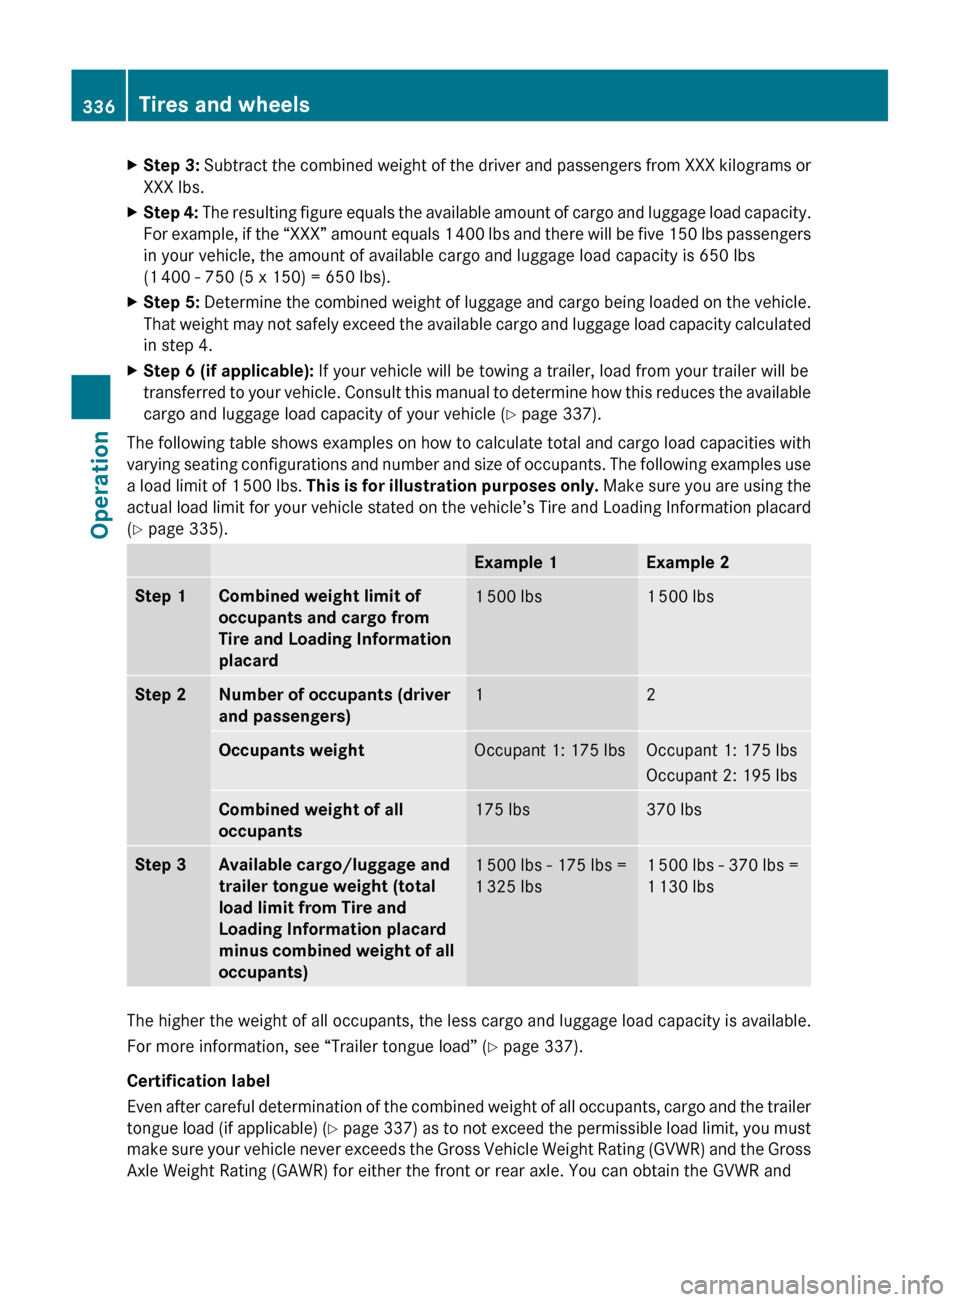
The following table shows examples on how to calculate total and cargo load capacities with
varying seating configurations and number and size of occupants. The following examples use
a load limit of 1 500 lbs. This is for illustration purposes only. Make sure you are using the
actual load limit for your vehicle stated on the vehicle’s Tire and Loading Information placard
( Y page 335).
Example 1Example 2Step 1Combined weight limit of
occupants and cargo from
Tire and Loading Information
placard1 500 lbs1 500 lbsStep 2Number of occupants (driver
and passengers)12Occupants weightOccupant 1: 175 lbsOccupant 1: 175 lbs
Occupant 2: 195 lbsCombined weight of all
occupants175 lbs370 lbsStep 3Available cargo/luggage and
trailer tongue weight (total
load limit from Tire and
Loading Information placard
minus combined weight of all
occupants)1 500 lbs - 175 lbs =
1 325 lbs1 500 lbs - 370 lbs =
1 130 lbs
The higher the weight of all occupants, the less cargo and luggage load capacity is available.
For more information, see “Trailer tongue load” ( Y page 337).
Certification label
Even after careful determination of the combined weight of all occupants, cargo and the trailer
tongue load (if applicable) (Y page 337) as to not exceed the permissible load limit, you must
make sure your vehicle never exceeds the Gross Vehicle Weight Rating (GVWR) and the Gross
Axle Weight Rating (GAWR) for either the front or rear axle. You can obtain the GVWR and
336Tires and wheelsOperation
BA 197 USA, CA Edition A 2011; 1; 27, en-UShereepeVersion: 3.0.3.52010-03-24T15:31:10+01:00 - Seite 336
Page 339 of 436
GAWR from the certification label. The certification label can be found on the driver’s door
B-pillar, see the “Technical data” section ( Y page 421).
Gross Vehicle Weight Rating (GVWR): The total weight of the vehicle, all occupants, all cargo,
and the trailer tongue load (if applicable) must never exceed the GVWR.
Gross Axle Weight Rating (GAWR): The total allowable weight that can be carried by a single
axle (front or rear).
To assure that your vehicle does not exceed the maximum permissible weight limits (GVWR
and GAWR for front and rear axle), have the loaded vehicle (including driver, passengers and
all cargo and, if applicable, trailer fully loaded) weighed on a suitable commercial scale.
Trailer tongue load
The tongue load of any trailer is an important weight to measure because it affects the load
you can carry in your vehicle. If a trailer is towed, the tongue load must be added to the weight
of all occupants riding and any cargo you are carrying in the vehicle. The tongue load typically
is 10% of the trailer weight and everything loaded in it.
Your Mercedes-Benz has been designed primarily to carry passengers and their cargo.
Mercedes-Benz does not recommend trailer towing with your vehicle.Maximum tire loadGWarning!
Do not overload the tires by exceeding the
specified load limit as indicated on the Tire
and Loading Information placard on the
driver’s door B-pillar. Overloading the tires
can overheat them, possibly causing a
blowout. Overloading the tires can also result
in handling or steering problems, or brake
failure.
i For illustration purposes only. Actual data
on tires are specific to each vehicle and
may vary from data shown in above
illustration.
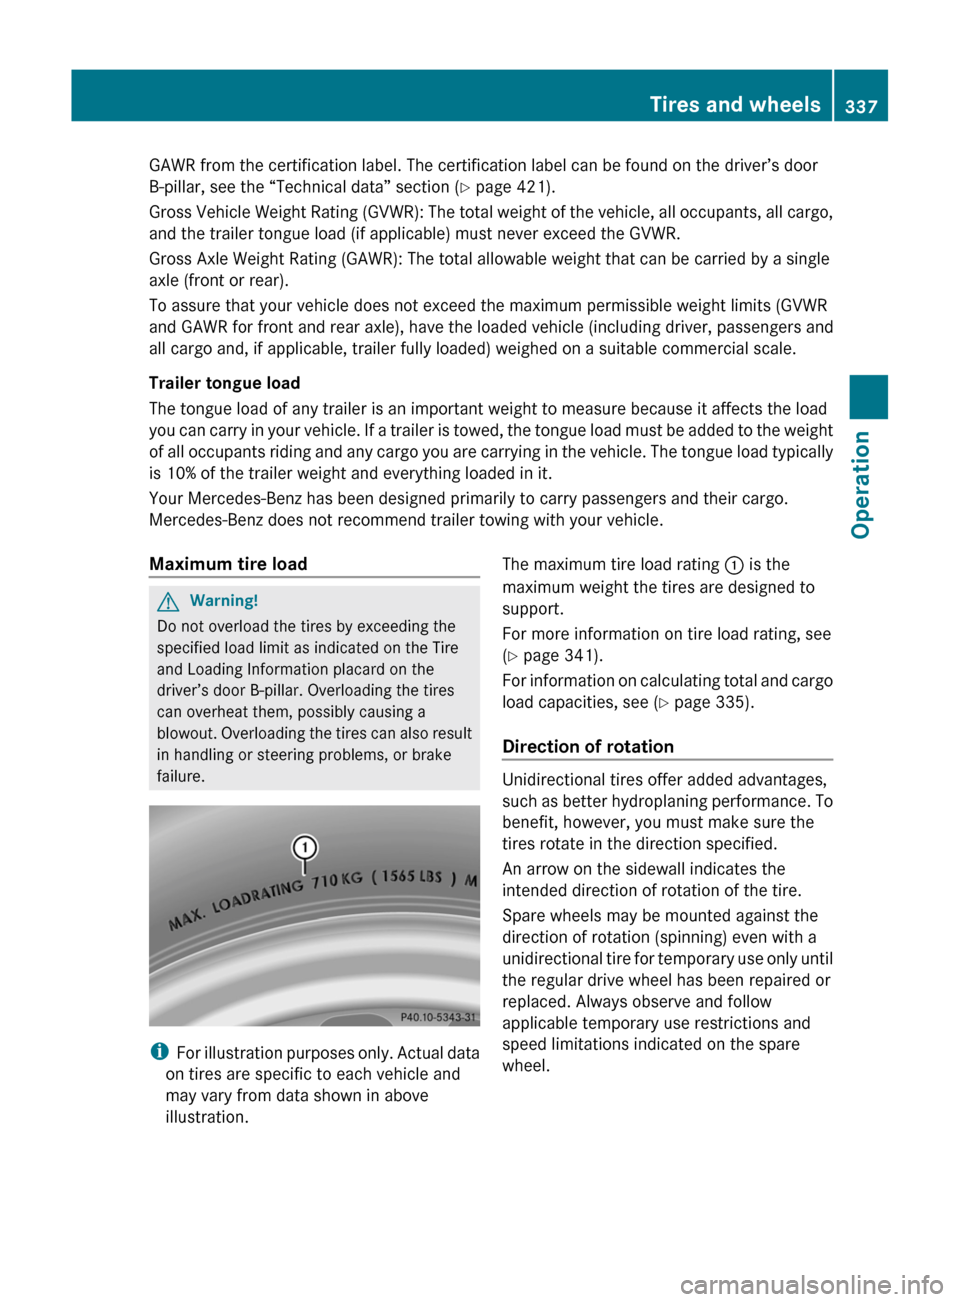
The maximum tire load rating : is the
maximum weight the tires are designed to
support.
For more information on tire load rating, see
( Y page 341).
For information on calculating total and cargo
load capacities, see ( Y page 335).
Direction of rotation
Unidirectional tires offer added advantages,
such as better hydroplaning performance. To
benefit, however, you must make sure the
tires rotate in the direction specified.
An arrow on the sidewall indicates the
intended direction of rotation of the tire.
Spare wheels may be mounted against the
direction of rotation (spinning) even with a
unidirectional tire for temporary use only until
the regular drive wheel has been repaired or
replaced. Always observe and follow
applicable temporary use restrictions and
speed limitations indicated on the spare
wheel.
Tires and wheels337OperationBA 197 USA, CA Edition A 2011; 1; 27, en-UShereepeVersion: 3.0.3.52010-03-24T15:31:10+01:00 - Seite 337Z
Page 352 of 436
advisable to brake the vehicle with
considerable force prior to parking. The heat
generated serves to dry the brakes.
Salt-covered roadsGWarning!
A layer of salt on the brake discs and the brake
linings may cause a delay in the braking
effect, resulting in a significantly increased
braking distance, which could lead to an
accident.
To avoid this danger, you should:
R occasionally brake carefully when you are
driving on salt-covered roads, so that any
layer of salt that may have built up on the
brake discs and the brake linings is
removed without putting other road users
at risk
R maintain a greater distance to the vehicle
ahead and drive with particular care
R carefully apply the brakes at the end of a
trip and immediately after commencing a
new trip, so that salt residues are removed
from the brake disc
Brake service
! The brake fluid level in the reservoir may
be too low if the red brake warning lamp in
the instrument cluster comes on while the
engine is running and an acoustic warning
sounds. Observe additional messages in
the multifunction display that may appear.
Brake pad wear or a leak in the system may
be the reason for low brake fluid in the
reservoir.
Have the brake system inspected
immediately. Contact an authorized
Mercedes-Benz Center.
All checks and service work on the brake
system should be carried out by qualified
technicians only. Contact an authorized
Mercedes-Benz Center.
Only install brake pads and use brake fluid
recommended by Mercedes-Benz.
GWarning!
If other than recommended brake pads are
installed, or other than recommended brake
fluid is used, the braking properties of the
vehicle can be degraded to an extent that safe
braking is substantially impaired. This could
result in an accident.
! Because the ESC operates automatically,
the engine and ignition must be shut off
(KEYLESS-GO start/stop button in position
0 or 1, or SmartKey in starter switch
position 0 or 1) when the electronic parking
brake is being tested on a brake test
dynamometer or when the vehicle is being
towed with the rear axle raised.
Active braking action through the ESC may
otherwise seriously damage the brake
system which is not covered by the
Mercedes-Benz Limited Warranty.
If your brake system is only subjected to
moderate loads, you should occasionally test
the effectiveness of the brakes by applying
above-normal braking pressure at higher
speeds. This will also enhance the grip of the
brake pads.
GWarning!
Make sure not to endanger any other road
users when carrying out these braking
maneuvers.
Refer to the description of the Brake Assist
System (BAS) ( Y page 62).
High-performance brake system and
ceramic brake system
GWarning!
New vehicle brake pads and disks, and
replacement brake pads and disks may take
several hundred miles of driving until they
provide optimum braking efficiency. Until that
time, you may need to use increased brake
pedal pressure while braking. Please be aware
of this and adjust your driving and braking
accordingly during this break-in period.
350Driving instructionsOperation
BA 197 USA, CA Edition A 2011; 1; 27, en-UShereepeVersion: 3.0.3.52010-03-24T15:31:10+01:00 - Seite 350
Page 358 of 436

Have paintwork repairs performed at an
authorized Mercedes-Benz Center.
Have stone chipping repairs as soon as
possible.
Remove the following immediately if possible.
Do not apply strong force.
R Soak insect remains with insect remover
and rinse them of with water afterwards.
Use a soft bristle toothbrush for remains
that have not come off.
R Soak bird droppings with water and rinse
them of with water afterwards. Use a soft
bristle toothbrush for remains that have not
come off.
R Remove tree resins, grease, oil, wax, and
gasoline with commercially available
benzine.
R Dab off tar splashes or tar stains with tar
remover.
Engine cleaning
Prior to cleaning the engine compartment,
make sure to protect electrical components
and connectors from contact with water and
cleaning agents.
Corrosion protection, such as MB
Anticorrosion Wax should be applied to the
engine compartment after every engine
cleaning. Before applying, all control linkage
bushings and joints should be lubricated. The
poly-V-belt and all pulleys should be
protected from any wax.
Vehicle washing
In the winter, thoroughly remove all traces of
road salt as soon as possible.
When washing the vehicle underbody, do not
forget to clean the inner sides of the wheels.
GWarning!
After washing the vehicle, braking efficiency
may be reduced. Reduced braking efficiency
could cause an accident.
Brake the vehicle significantly after washing
the vehicle. Observe the traffic situation when
doing so. The brake discs will warm up and
dry faster. Drive carefully after washing the
vehicle until the brakes have dried and you
can notice that brake efficiency has been
restored.
Hand-washXDo not use hot water or wash your vehicle
in direct sunlight.XOnly use a soft, wet cloth or sponge to
clean the vehicle.XOnly use a mild vehicle wash detergent,
such as Mercedes-Benz approved Car
Shampoo.XThoroughly spray the vehicle with a
diffused jet of water.XDo not spray directly towards the
ventilation intake.XUse plenty of water and rinse the sponge
and chamois frequently.XRinse with clean water and dry with a
chamois thoroughly.
Do not allow cleaning agents to dry on the
finish.
Automatic car wash
You can have your vehicle washed in an
automatic car wash from the start. Brushless
car washes are preferable.
XTo protect the filter system, activate the air
recirculation mode using button g on
the climate control panel.
! Do not clean your vehicle in an automatic
touchless car wash which uses caustic
spray. Caustic spray will damage the paint
or ornamental moldings.
If the vehicle is very dirty, prewash it before
running it through the automatic car wash.
! Make sure the combination switch is set
to wiper setting $. Otherwise, the rain
sensor could activate and cause the wipers
to move unintentionally. This may lead to
vehicle damage.
356Vehicle careOperation
BA 197 USA, CA Edition A 2011; 1; 27, en-UShereepeVersion: 3.0.3.52010-03-24T15:31:10+01:00 - Seite 356
Page 363 of 436
Vehicle equipment ............................362
Where will I find...? ...........................362
Vehicle status messages in the
multifunction display .......................364
What to do if... ................................... 388
Unlocking/locking manually ...........397
Replacing SmartKey battery ............399
Replacing bulbs ................................. 400
Replacing wiper blades ....................400
Flat tire .............................................. 402
Wheel change .................................... 405
Battery ............................................... 410
Jump starting .................................... 413
Towing the vehicle ............................415
Fuses .................................................. 417361Practical hintsBA 197 USA, CA Edition A 2011; 1; 27, en-UShereepeVersion: 3.0.3.52010-03-24T15:31:10+01:00 - Seite 361
Page 365 of 436

XTo remove jack C from storage well casing
E, loosen hook and loop fastener D.
XRemove jack C with storage well casing
E.
FFuse chartGWheel wrenchHTowing eye bolt
Collapsible wheel chock
The collapsible wheel chock serves to secure
the vehicle, e.g. while changing a wheel.
XTake the collapsible wheel chock from the
vehicle tool kit (Y page 362).
XSetting up: Tilt both plates upward :.XFold the lower plate outward ;.XGuide the tabs of the lower plate all the way
into the openings of base plate =.
For information on where to place wheel
chocks when changing a wheel, see
“Preparing the vehicle” (Y page 405).
Jack GWarning!
Only use the jack supplied with your vehicle
to lift the vehicle briefly for wheel changes. If
you use the jack for any other purpose, you or
others could be injured, as the jack is
designed only for the purpose of changing a
wheel.
When using the jack, observe the safety notes
in the “Removing the wheel” section and the
notes on the jack.
XTake the jack from the vehicle tool kit
(Y page 362).
Storage position
XTurn the crank handle in the direction of
arrow as far as it will go.
Operational position
XTurn the crank handle clockwise.Where will I find...?363Practical hintsBA 197 USA, CA Edition A 2011; 1; 27, en-UShereepeVersion: 3.0.3.52010-03-24T15:31:10+01:00 - Seite 363Z
Page 390 of 436
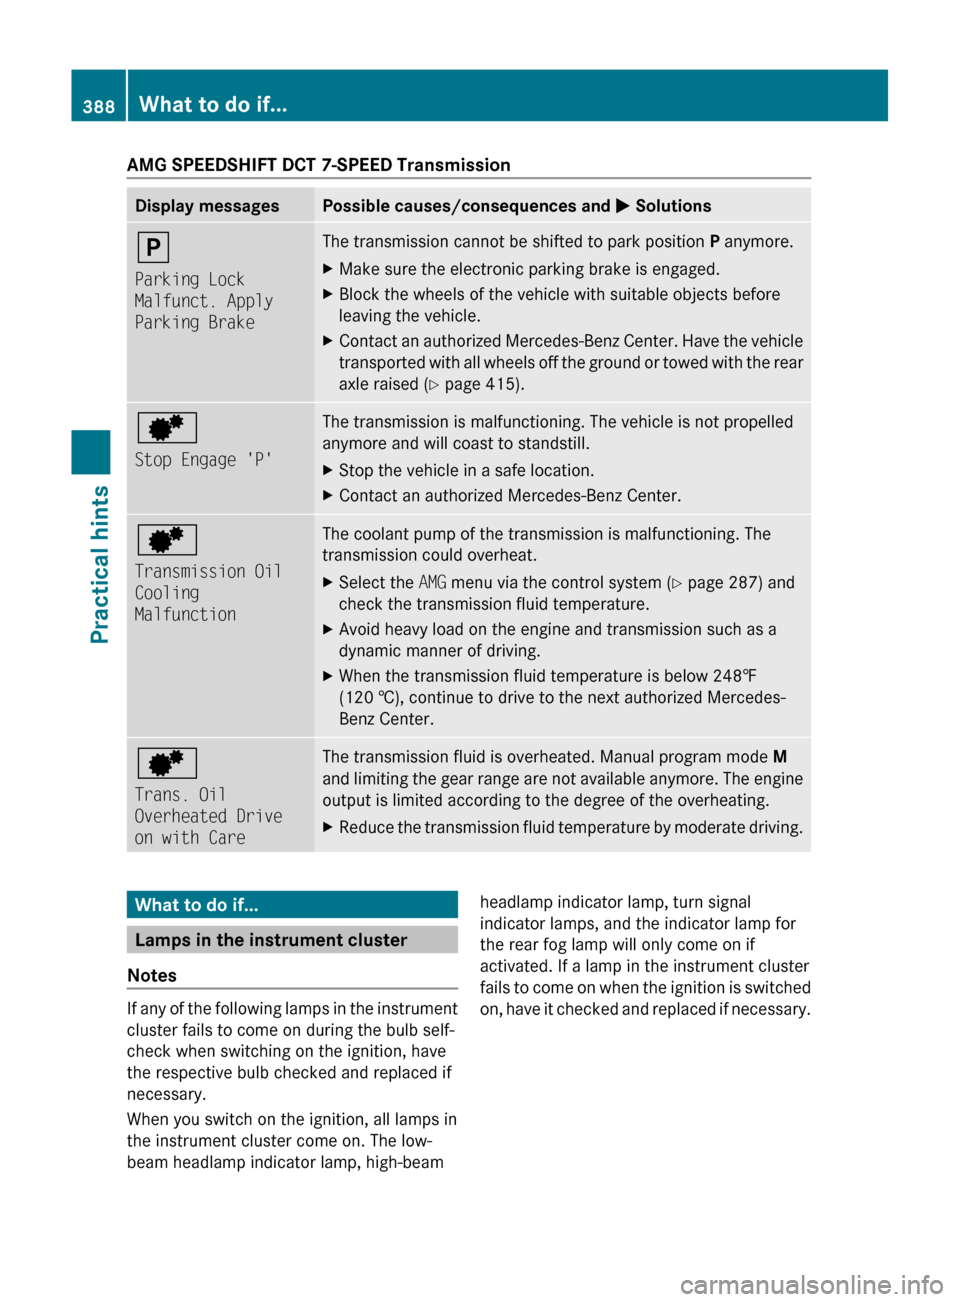
AMG SPEEDSHIFT DCT 7-SPEED TransmissionDisplay messagesPossible causes/consequences and M Solutionsj
Parking Lock
Malfunct. Apply
Parking BrakeThe transmission cannot be shifted to park position P anymore.XMake sure the electronic parking brake is engaged.XBlock the wheels of the vehicle with suitable objects before
leaving the vehicle.XContact an authorized Mercedes-Benz Center. Have the vehicle
transported with all wheels off the ground or towed with the rear
axle raised ( Y page 415).d
Stop Engage 'P'The transmission is malfunctioning. The vehicle is not propelled
anymore and will coast to standstill.XStop the vehicle in a safe location.XContact an authorized Mercedes-Benz Center.d
Transmission Oil
Cooling
MalfunctionThe coolant pump of the transmission is malfunctioning. The
transmission could overheat.XSelect the AMG menu via the control system ( Y page 287) and
check the transmission fluid temperature.XAvoid heavy load on the engine and transmission such as a
dynamic manner of driving.XWhen the transmission fluid temperature is below 248‡
(120 †), continue to drive to the next authorized Mercedes-
Benz Center.d
Trans. Oil
Overheated Drive
on with CareThe transmission fluid is overheated. Manual program mode M
and limiting the gear range are not available anymore. The engine
output is limited according to the degree of the overheating.XReduce the transmission fluid temperature by moderate driving.What to do if...
Lamps in the instrument cluster
Notes
If any of the following lamps in the instrument
cluster fails to come on during the bulb self-
check when switching on the ignition, have
the respective bulb checked and replaced if
necessary.
When you switch on the ignition, all lamps in
the instrument cluster come on. The low-
beam headlamp indicator lamp, high-beam
headlamp indicator lamp, turn signal
indicator lamps, and the indicator lamp for
the rear fog lamp will only come on if
activated. If a lamp in the instrument cluster
fails to come on when the ignition is switched
on, have it checked and replaced if necessary.388What to do if...Practical hints
BA 197 USA, CA Edition A 2011; 1; 27, en-UShereepeVersion: 3.0.3.52010-03-24T15:31:10+01:00 - Seite 388
Page 415 of 436
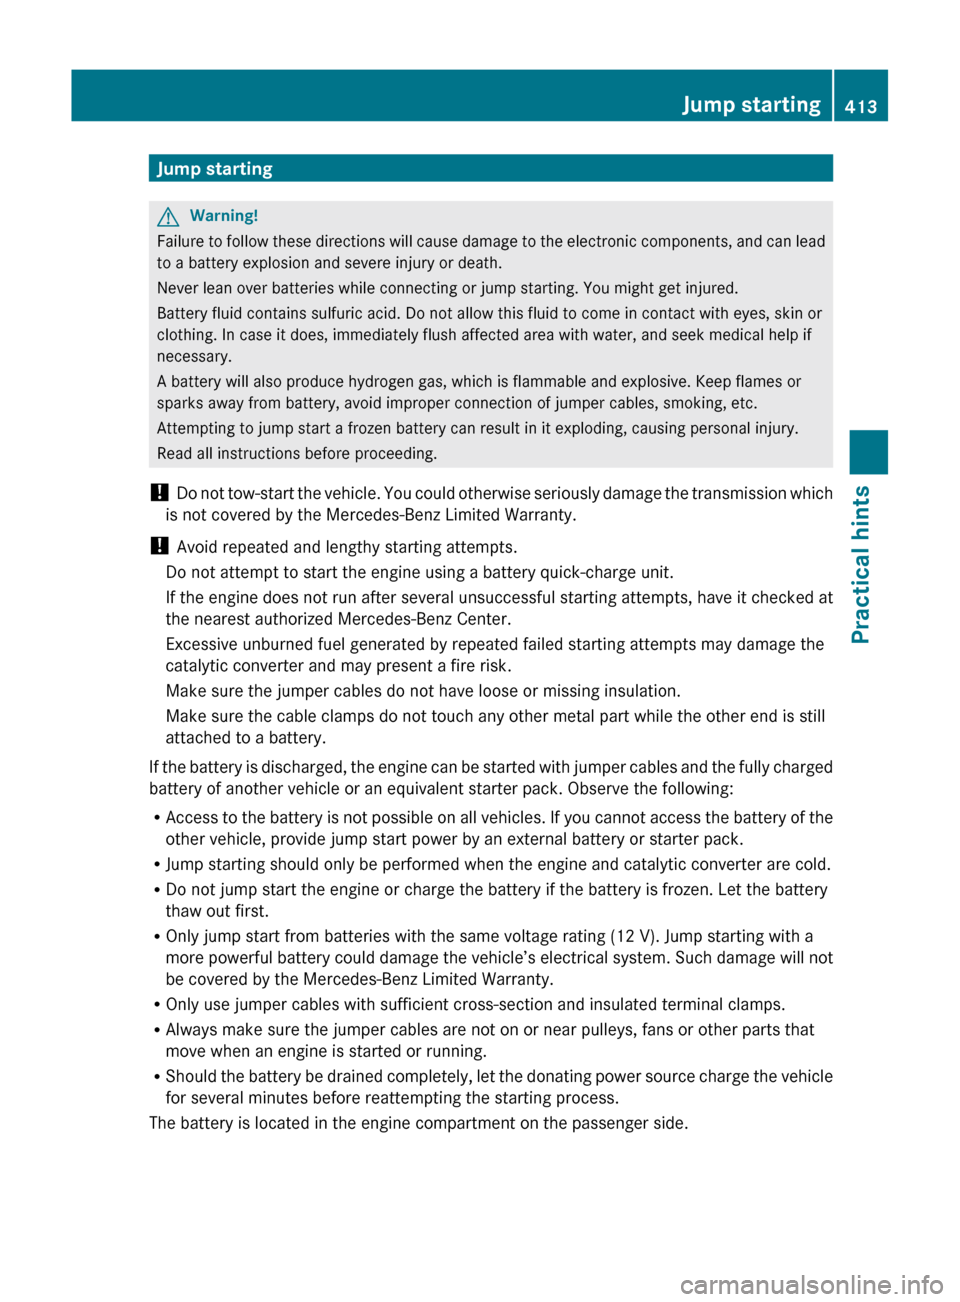
Jump startingGWarning!
Failure to follow these directions will cause damage to the electronic components, and can lead
to a battery explosion and severe injury or death.
Never lean over batteries while connecting or jump starting. You might get injured.
Battery fluid contains sulfuric acid. Do not allow this fluid to come in contact with eyes, skin or
clothing. In case it does, immediately flush affected area with water, and seek medical help if
necessary.
A battery will also produce hydrogen gas, which is flammable and explosive. Keep flames or
sparks away from battery, avoid improper connection of jumper cables, smoking, etc.
Attempting to jump start a frozen battery can result in it exploding, causing personal injury.
Read all instructions before proceeding.
! Do not tow-start the vehicle. You could otherwise seriously damage the transmission which
is not covered by the Mercedes-Benz Limited Warranty.
! Avoid repeated and lengthy starting attempts.
Do not attempt to start the engine using a battery quick-charge unit.
If the engine does not run after several unsuccessful starting attempts, have it checked at
the nearest authorized Mercedes-Benz Center.
Excessive unburned fuel generated by repeated failed starting attempts may damage the
catalytic converter and may present a fire risk.
Make sure the jumper cables do not have loose or missing insulation.
Make sure the cable clamps do not touch any other metal part while the other end is still
attached to a battery.
If the battery is discharged, the engine can be started with jumper cables and the fully charged
battery of another vehicle or an equivalent starter pack. Observe the following:
R Access to the battery is not possible on all vehicles. If you cannot access the battery of the
other vehicle, provide jump start power by an external battery or starter pack.
R Jump starting should only be performed when the engine and catalytic converter are cold.
R Do not jump start the engine or charge the battery if the battery is frozen. Let the battery
thaw out first.
R Only jump start from batteries with the same voltage rating (12 V). Jump starting with a
more powerful battery could damage the vehicle’s electrical system. Such damage will not
be covered by the Mercedes-Benz Limited Warranty.
R Only use jumper cables with sufficient cross-section and insulated terminal clamps.
R Always make sure the jumper cables are not on or near pulleys, fans or other parts that
move when an engine is started or running.
R Should the battery be drained completely, let the donating power source charge the vehicle
for several minutes before reattempting the starting process.
The battery is located in the engine compartment on the passenger side.
Jump starting413Practical hintsBA 197 USA, CA Edition A 2011; 1; 27, en-UShereepeVersion: 3.0.3.52010-03-24T15:31:10+01:00 - Seite 413Z